Solar battery on the balcony, use experience
Hi Geektimes. This article is a continuation of the previous part, about the travel charger " Anker Solar 21W ". The idea of using a solar battery for charging various gadgets seemed very promising to me, but of course, 21W as a universal charge is not enough - I want to be able to charge not only in sunny weather, and this requires a reserve of power. Therefore, full-fledged solar panels were purchased and experiments with them started.
What came out of it, the details under the cut.
1. Solar panel
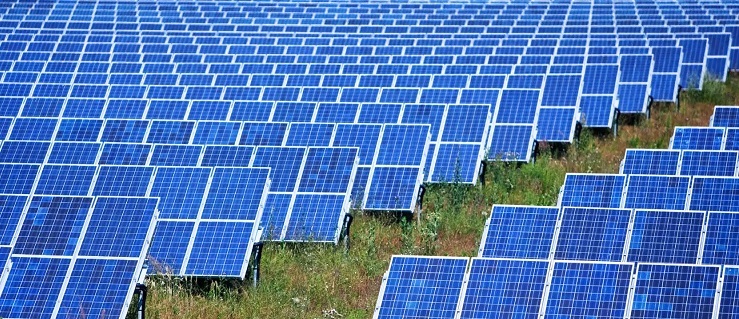
There are different options, but the main limitation on the balcony is the availability of free space. To understand the price order, a 50W battery costs about 5000 rubles and looks like this:
')

Panel dimensions in mm - 540x620x30, weight 4kg.
Balconies are different in size, based on the dimensions of the panels, it is quite possible to place 2 or 4 pieces without any problems, it will no longer fit. For the test, 2 panels of 50W each were purchased. Such a battery gives about 18V under load or 24V without it, so when using 2x batteries you need to rely on the total voltage up to 50V (for example, many dc-dc converters regularly work up to 30V). You can connect the batteries in parallel, but then the loss due to the length of the wires will be slightly higher.
2. Controller
There are 2 options here:
- Solar panels + controller + battery
This is a classic design: the controller charges the battery when there is sun, the user uses this energy when he needs it.

The advantages of this system are several:
- energy can be used anytime, not just when it’s light,
- the ability to connect an inverter and receive output 220V,
- As a bonus, a backup source in the house in case of a power outage.
There is one drawback: the use of a large-capacity battery kills the environmental friendliness of the idea of this event. The number of charge / discharge cycles of batteries is limited, they do not like overdischarge, and besides, batteries and controllers are quite expensive. The price of the controller ranges from 1000r for the cheapest PWM version, to 10,000-20000r for a more expensive (and efficient) version with MPPT support (what MPPT is, you can read here ). The price of the battery is from 5000r for a regular gel battery at 40-50A * h, some use LiFePo4 batteries, they are certainly more expensive.
- Grid-tie inverter
This technology is the most promising at the moment.

The bottom line is that the converter converts and sends energy immediately to the home power grid. At the same time, the energy consumed from the network is reduced, the house meter records lower readings.
Ideally, if the solar panels provide enough energy for all consumers, the value on the meter will not increase at all. And if the consumption of an apartment / house is less than the production of solar panels, then the meter will record the "export" of energy, which should be taken into account by the electricity supplier. In Russia, however, such a scheme does not work yet - moreover, most of the old electric meters consider energy “modulo”, i.e. for the energy you give away also have to pay. Like in 2017, microgeneration issues at the legal level promised to start solving. But by the way, for panels on the balcony, all this has only a theoretical interest - their output is too low.
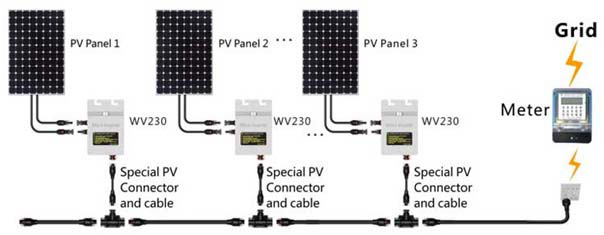
The price of grid-tie inverter is from $ 100, depending on the power. Separately, it is worth noting microenvectors - they are placed directly on the battery, and immediately give the mains voltage, but the recommended power of the panels is at least 200W. The inverter is mounted directly on the back of the solar panel, it allows you to connect them like this:
But for the balcony it is of course irrelevant.
First of all, it was interesting to find out what real power can be obtained from solar panels. For this, for $ 15, the ADS1115 ADC for Raspberry Pi was purchased:
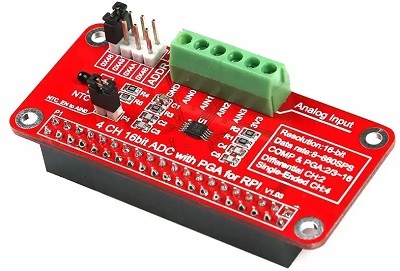
It is easy to use, the input voltage is divided by a divider and fed to an analog input, we have digital values at the output. Source codes for working with ADCs can be found here . The ACS712 current sensor was also purchased, the voltage sensor was made from a bunch of resistors (only one nominal was found at home). An ordinary 100W light bulb was installed as a load. Of course, from 48 volts it did not burn (the light is designed for 220V), but only barely glowed. The resistance of the coil is 42 Ohms, which gives an estimate of the power of the voltage (although the resistance of the incandescent lamp is nonlinear, but for rough estimation it will do).
The first test version looked like this:
The source code was added so that the data and the current time were saved in CSV, and a web server was launched on the Raspberry Pi to download files over the local network.
The results for the usual quite clear day with variable cloudiness look like this:

It can be seen that the peak of the voltage falls in the early morning, which is a consequence of improper installation of the panels - ideally, they should not stand upright.
And this is what a “failure” looks like on the day when clouds came running, and it started to rain:
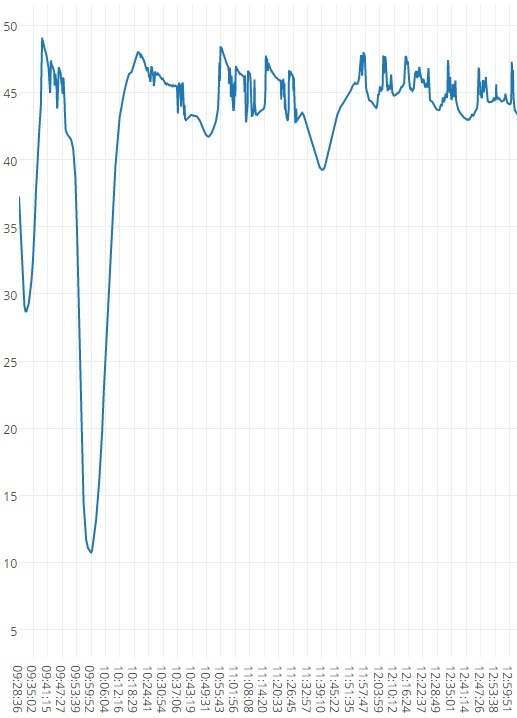
Considering the voltage of 44V and the resistance of the filament of the lamp to 42 ohms, we can roughly estimate (ignore the non-linearity of the resistance of the lamp), which in the best case is obtained power P = U * U / R = 46W. Alas, the efficiency of a 100-watt panel for vertical installation is not very good - the sun's rays do not fall on the panel at a right angle. In the worst case (overcast, rain) the power drops even to 10W. In winter and summer, the total energy received will also differ.
The experience with energy transfer directly to the network turned out to be unsuccessful: a 500-watt inverter of 45 watts simply did not work. In principle, this was expected, so the inverter was left for the futurebefore moving to a place with a bigger balcony .
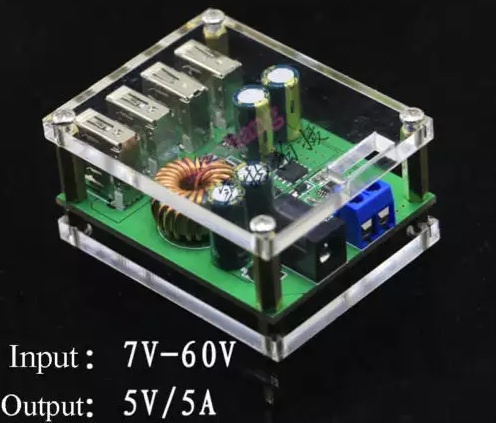
As a result, given the decision to abandon the buffer batteries, the only working option was to use dc-dc converters directly: for example, such a converter can charge any USB devices, there is already a USB connector on its output:

There are models a little more expensive, they have a higher maximum current and a greater number of USB connectors:
It is also thought to find a dc-dc converter for charging a laptop, their choice on eBay is quite large.
This system is experimental, but in general we can say that it works. As can be seen on the schedule, from 7 in the morning until 17 in the evening, the power delivered by the panels is more than 30W, which in principle is not so bad. In absolutely cloudy weather, the results are certainly worse.
Of course, there is no question of economic feasibility of speech - when generating 40W * h for 7 hours, 2KW * h will be generated in a week. Payback in the prices of their region, everyone can figure out on their own. The question is of course not in price, but in gaining experience, which is always interesting.
But where to put energy, the question is still open. Using 40W for charging USB devices is too redundant. On eBay there are grid tie inverters for 300W with an operating voltage of 10.5-28V, but there are few reviews on them, and I don’t want to spend $ 100 on the test. If there is no suitable solution, we can assume that one 50-watt panel is optimum for the balcony - it can charge different gadgets, redundancy in this case is minimal.
At least, now all home digital devices (phones, tablets) are transferred to “green energy” without much trouble. There is a thought to consider the use of a buffer LiFePo4 battery, but the question of choice and the battery and controller is still open.
In addition: as suggested in the comments, you can use a lead battery, such as a car battery. Yes, this is really a cheap and working option, with a 100-watt panel will be enough for about such a controller, priced at only $ 10-20 on eBay:
But this solution is not entirely environmentally friendly and not exactly interesting, so in terms of learning technologies, I do not consider it. And if someone needs, for example, to power the video camera at the dacha, then it’s probably quite an option.
Continued in the next part . A short video version can also be viewed in the video on youtube .
PS: The comments asked to post a photo, at the moment the batteries look like this:
This size of the panels does not interfere with the use of the balcony and, in principle, does not spoil the appearance. Also, as suggested in the comments, it is more profitable to buy panels of more power, the optimum price for the panels are 150-200W, but their placement is a bit more complicated, and we must already figure out the dimensions, fit the panel or not. Also there is a question of reliable fasteners.
What came out of it, the details under the cut.
Iron
1. Solar panel
There are different options, but the main limitation on the balcony is the availability of free space. To understand the price order, a 50W battery costs about 5000 rubles and looks like this:
')
Panel dimensions in mm - 540x620x30, weight 4kg.
Balconies are different in size, based on the dimensions of the panels, it is quite possible to place 2 or 4 pieces without any problems, it will no longer fit. For the test, 2 panels of 50W each were purchased. Such a battery gives about 18V under load or 24V without it, so when using 2x batteries you need to rely on the total voltage up to 50V (for example, many dc-dc converters regularly work up to 30V). You can connect the batteries in parallel, but then the loss due to the length of the wires will be slightly higher.
2. Controller
There are 2 options here:
- Solar panels + controller + battery
This is a classic design: the controller charges the battery when there is sun, the user uses this energy when he needs it.
The advantages of this system are several:
- energy can be used anytime, not just when it’s light,
- the ability to connect an inverter and receive output 220V,
- As a bonus, a backup source in the house in case of a power outage.
There is one drawback: the use of a large-capacity battery kills the environmental friendliness of the idea of this event. The number of charge / discharge cycles of batteries is limited, they do not like overdischarge, and besides, batteries and controllers are quite expensive. The price of the controller ranges from 1000r for the cheapest PWM version, to 10,000-20000r for a more expensive (and efficient) version with MPPT support (what MPPT is, you can read here ). The price of the battery is from 5000r for a regular gel battery at 40-50A * h, some use LiFePo4 batteries, they are certainly more expensive.
- Grid-tie inverter
This technology is the most promising at the moment.
The bottom line is that the converter converts and sends energy immediately to the home power grid. At the same time, the energy consumed from the network is reduced, the house meter records lower readings.
Ideally, if the solar panels provide enough energy for all consumers, the value on the meter will not increase at all. And if the consumption of an apartment / house is less than the production of solar panels, then the meter will record the "export" of energy, which should be taken into account by the electricity supplier. In Russia, however, such a scheme does not work yet - moreover, most of the old electric meters consider energy “modulo”, i.e. for the energy you give away also have to pay. Like in 2017, microgeneration issues at the legal level promised to start solving. But by the way, for panels on the balcony, all this has only a theoretical interest - their output is too low.
The price of grid-tie inverter is from $ 100, depending on the power. Separately, it is worth noting microenvectors - they are placed directly on the battery, and immediately give the mains voltage, but the recommended power of the panels is at least 200W. The inverter is mounted directly on the back of the solar panel, it allows you to connect them like this:
But for the balcony it is of course irrelevant.
Testing
First of all, it was interesting to find out what real power can be obtained from solar panels. For this, for $ 15, the ADS1115 ADC for Raspberry Pi was purchased:
It is easy to use, the input voltage is divided by a divider and fed to an analog input, we have digital values at the output. Source codes for working with ADCs can be found here . The ACS712 current sensor was also purchased, the voltage sensor was made from a bunch of resistors (only one nominal was found at home). An ordinary 100W light bulb was installed as a load. Of course, from 48 volts it did not burn (the light is designed for 220V), but only barely glowed. The resistance of the coil is 42 Ohms, which gives an estimate of the power of the voltage (although the resistance of the incandescent lamp is nonlinear, but for rough estimation it will do).
The first test version looked like this:
Techno-Fetishists do not watch!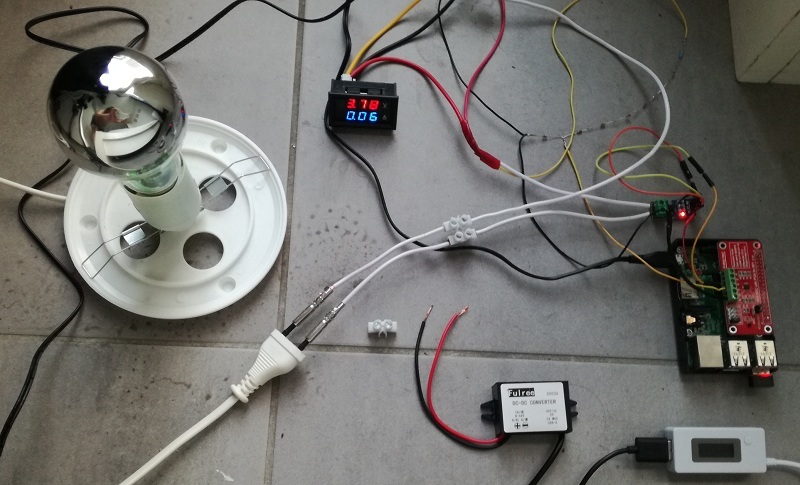
The source code was added so that the data and the current time were saved in CSV, and a web server was launched on the Raspberry Pi to download files over the local network.
The results for the usual quite clear day with variable cloudiness look like this:
It can be seen that the peak of the voltage falls in the early morning, which is a consequence of improper installation of the panels - ideally, they should not stand upright.
And this is what a “failure” looks like on the day when clouds came running, and it started to rain:
Considering the voltage of 44V and the resistance of the filament of the lamp to 42 ohms, we can roughly estimate (ignore the non-linearity of the resistance of the lamp), which in the best case is obtained power P = U * U / R = 46W. Alas, the efficiency of a 100-watt panel for vertical installation is not very good - the sun's rays do not fall on the panel at a right angle. In the worst case (overcast, rain) the power drops even to 10W. In winter and summer, the total energy received will also differ.
The experience with energy transfer directly to the network turned out to be unsuccessful: a 500-watt inverter of 45 watts simply did not work. In principle, this was expected, so the inverter was left for the future
As a result, given the decision to abandon the buffer batteries, the only working option was to use dc-dc converters directly: for example, such a converter can charge any USB devices, there is already a USB connector on its output:
There are models a little more expensive, they have a higher maximum current and a greater number of USB connectors:
It is also thought to find a dc-dc converter for charging a laptop, their choice on eBay is quite large.
Conclusion
This system is experimental, but in general we can say that it works. As can be seen on the schedule, from 7 in the morning until 17 in the evening, the power delivered by the panels is more than 30W, which in principle is not so bad. In absolutely cloudy weather, the results are certainly worse.
Of course, there is no question of economic feasibility of speech - when generating 40W * h for 7 hours, 2KW * h will be generated in a week. Payback in the prices of their region, everyone can figure out on their own. The question is of course not in price, but in gaining experience, which is always interesting.
But where to put energy, the question is still open. Using 40W for charging USB devices is too redundant. On eBay there are grid tie inverters for 300W with an operating voltage of 10.5-28V, but there are few reviews on them, and I don’t want to spend $ 100 on the test. If there is no suitable solution, we can assume that one 50-watt panel is optimum for the balcony - it can charge different gadgets, redundancy in this case is minimal.
At least, now all home digital devices (phones, tablets) are transferred to “green energy” without much trouble. There is a thought to consider the use of a buffer LiFePo4 battery, but the question of choice and the battery and controller is still open.
In addition: as suggested in the comments, you can use a lead battery, such as a car battery. Yes, this is really a cheap and working option, with a 100-watt panel will be enough for about such a controller, priced at only $ 10-20 on eBay:
A photo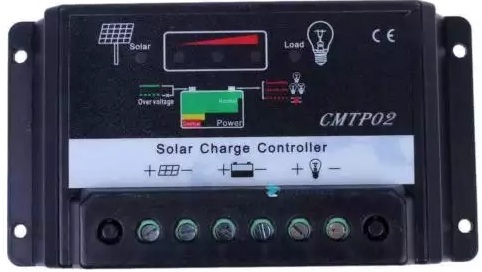
Google according to the PWM Solar Charger.
Google according to the PWM Solar Charger.
But this solution is not entirely environmentally friendly and not exactly interesting, so in terms of learning technologies, I do not consider it. And if someone needs, for example, to power the video camera at the dacha, then it’s probably quite an option.
Continued in the next part . A short video version can also be viewed in the video on youtube .
PS: The comments asked to post a photo, at the moment the batteries look like this:
A photo
This size of the panels does not interfere with the use of the balcony and, in principle, does not spoil the appearance. Also, as suggested in the comments, it is more profitable to buy panels of more power, the optimum price for the panels are 150-200W, but their placement is a bit more complicated, and we must already figure out the dimensions, fit the panel or not. Also there is a question of reliable fasteners.
Source: https://habr.com/ru/post/403523/
All Articles