Electron microscope in the garage. We accelerate electrons
There is a vacuum, the cathode is inserted, the column is cleaned, high voltage is applied, and even computer control is done. It remains only to see the electron beam and try the work of magnetic lenses.
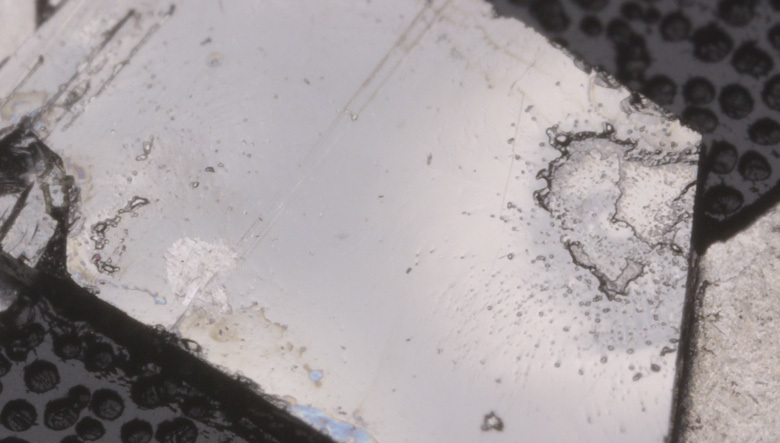
But first I will tell about the plate from an unknown material: when I cleaned the column, I found incomprehensible plates from a shiny, very fragile substance in a lock chamber, in a secluded place. Where was this microscope before getting to me, and what was looked at on it is unknown.
')
It has been suggested that it is silicon. What it turned out in the end and what progress was achieved in an electron microscope in three weeks - under the cut.
When I went to VacuumTechExpo last year, I was surprised by the booth of the Czech manufacturer of electronic microscopes Tescan . There was a modern scanning microscope with field emission in working condition and anyone could register and see their sample (necessary experts were present).
The second working microscope presented at the exhibition (generally speaking, AnalyticExpo, but they usually go together) is the desktop Phenom .
What is most interesting, both presented microscopes are equipped with an analyzer, which allows not only to see the surface structure by secondary electrons and to evaluate the material comparatively (by reflected electrons, clearly shown in the video), but also to find out the elemental composition of the sample surface.
The method is called:
Any substance will glow under the electron beam. It's all about the energy of the beam, and the wavelength of the induced radiation. But the most interesting thing is that each element has its own radiation spectrum, which often goes into the X-ray range (the so-called characteristic radiation). But, for example, the phosphor of the DRL 250 lamp, which I used as a sensitive screen for tuning, also glows in the optical range in red. This phenomenon is called cathode luminescence.
Analyzing the characteristic radiation and it is possible to determine the elemental composition of the sample at any chosen point.
There is another method called wave dispersion X-ray spectroscopy (WDS). It has a higher spectral resolution, but at a time detects only a certain wavelength, which is pre-configured.
This allows you to get an image of the content of only a certain element in the sample, while the EDS, although having a lower resolution, allows you to get information about all the elements. For example, we tune the WDS detector to a calcium wavelength, and get a black and white picture: black where there is no calcium, and white where it is.
I put my sample in the bag and went to VacuumTechExpo a couple of hours before closing. What was there - I suggest to look at the video. We filmed the whole process: we looked at the sample under a microscope, carried out its elemental analysis, and found out what it consists of. And at the same time we went through the exhibition and looked at various exhibits.
Go back to our microscope. Last time, we tested all the necessary components and conditions in order to ensure thermionic emission from the cathode and obtain a beam of free electrons at different accelerating voltages.
But you need to somehow “see” him, at least approximately. To immediately scan and detect is unwise. Because I don’t have a clue if magnetic lenses work, and the optical axis of the microscope is exposed by eye. By the way, this is already a sufficient success, since the condenser lens was strongly shifted to the side and not fixed with adjustable stops as needed (i.e., if I had not gone over the column, then nothing would have happened).
The obvious way to carry out a rough adjustment of the device is to put a substance on the stage that will glow in the optical range when it is bombarded with electrons. And try to steer lenses, high voltage, the cathode glow, displacement of the Venelt cylinder. And, of course, make a window so that you can watch.
I began to look for a suitable phosphor in advance. He asked all the people helping the project, as a result he received two whole subjects.
The first is a small CRT tube with a rectangular screen without an electron gun and without vacuum. I wanted to saw off the screen from it, but my friend asked me to leave it as a rare collection item (put it on the shelf behind the glass). Once asked, it means valuable.
The second is a full-fledged tube from an old oscilloscope, which has long been broken.

We nearly sawed it with a Dremel immediately after opening the oscilloscope, but decided to wait and do it in more comfortable conditions. The idea was simple - to make a small hole through which the tube would be filled with air without general destruction, and then cut the front screen with abrasive, and put it inside the microscope.
Another thought came, even easier. I have previously had to experiment with removing the outer bulb from the DRL 250 lamp in order to get a source of UV light with a wavelength of 250nm. It is clear that the phosphor is excited by UV radiation, and not by electrons, and the big question is whether it will glow from electrons. I looked for the composition, I did not find an unambiguous answer (different phosphors are used, but I still have a Soviet-made lamp). But, I wrote in the beginning of the article, that everything is glowing under the electron beam. Therefore, the chances of success are great.
Sawed, put inside the microscope.
He closed the large ports of the column back, only a small improvised window on top remained for observation. This window is made of "plexiglass" of approximately 5 mm thickness. Unfortunately, when I was looking for leaking with acetone before, I accidentally splashed onto it, and the optical transparency of the outer surface immediately deteriorated. Also, it was necessary to lubricate it with a thin layer of high-vacuum oil so that it was less breathable.
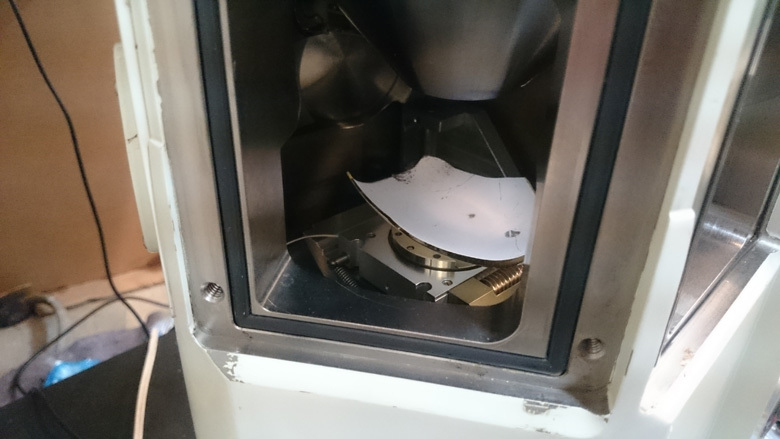
Through the window it all looks like this:
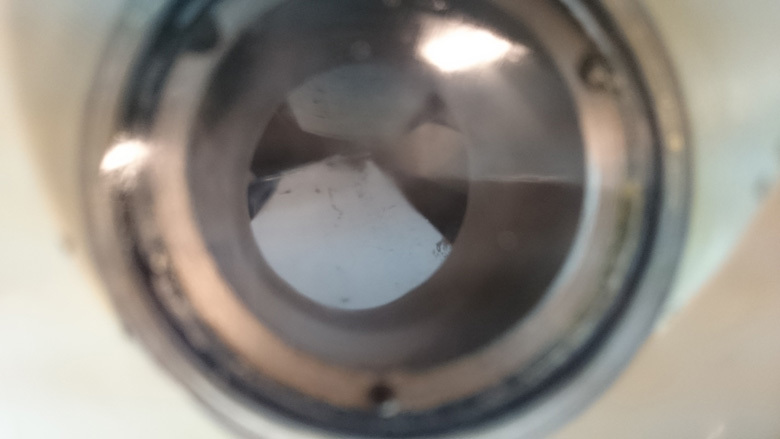
Even so it can be seen - and that is good. Luminescence accurately can be seen.
ATTENTION! Do not panic. When any material is irradiated with electrons, continuous X-ray radiation with an energy not exceeding the accelerating voltage multiplied by the electron charge arises (for example, for 30kV the maximum possible radiation energy is 30 keV). The column of the microscope is made at the factory so as to completely shield all radiation that occurs inside. The microscope is certified as a radiation safe device.
The modification of the column I made above (acrylic window) theoretically presents some danger in case of violation of the operating conditions and being in the immediate vicinity of this window.
I found this page (having experienced nostalgia for the late 1990s, when such pages were the height of perfection), which allows us to calculate the penetration of X-rays of various energies through various materials.
So, choose the material - PMMA , thickness 5 mm, and we consider the percentage of absorption for different energies.
Radiation with energies up to 8 keV is completely (99.9%) absorbed by acrylic, but radiation with higher energy can overcome this barrier. For example, 70% of the radiation with an energy of 30 keV will pass through the window.
It is clear that when the phosphor is irradiated with even 10 kV, we are unlikely to get X-ray radiation with an energy of 10 keV at the output; to do this, we need to put a massive copper anode there. But, nevertheless, for safety reasons, I calibrated the voltage source, and did not even turn on for an short period of time the accelerating voltage above 5 kV.
Everything is included - nothing happens. The block beeps, the heat is on, there is no emission. And so I tried, and commercials, well, nothing. He added the current filament yet. Doubts began to creep in, and suddenly the luminophor does not glow? The camcorder looked, in case it glows in the invisible range of the eye. Nothing.
He let the air out, took the holder of the final diaphragm, and twisted out a plate with apertures. He left only the holder with holes a few millimeters in diameter.
He opened the electron gun, picked up a small red laser, and began simply to shine “through the gap” through the entire column in order to find out if it was the same or not.
If the light beam does not pass, then the electronic one will get lost. Fortunately, having accurately compared the direction, I saw a red dot below. So you can try again!
But in vain I increased the current filament last time. At some point, the cathode could not stand it and quietly stopped working.
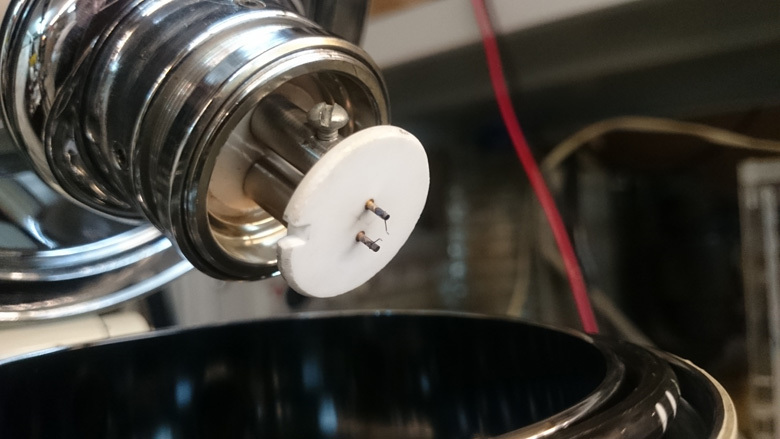
After that, I modified the cathode assembly for JEOL K-type cathodes, which are used in modern JEOL microscopes. The previous one was from an unknown microscope, and I didn’t come across any more. I have about two more in reserve, but they are very poorly suited to this microscope.
I assembled everything again, made a high-quality, reliable electrical connection of all parts of the column (the outer opening of the cathode cannon part, the main part of the column, the spring-loaded metal plate on which the column is installed and the entire high vacuum part with valves, the bollard - all this had to be electrically interconnected and also connect the ground of the high-voltage power supply unit, the aquarium body and the metal braid of the high-voltage cable from the microscope to this all.
What happened after switching on, look at the video:
Future Work Plan:
Many thanks to everyone who helps with the project. In the next series, I will tell you in detail about what I managed to get for the project.
Basically, the work will focus on electronics and detectors. But in the near future I will also need to re-apply the skills of metalworking.
If you have unnecessary blanks from metals (stainless steel, duralumin and steel) and plastics (plexiglas, etc.) that can be taken - I will be grateful. And everything related to metalworking is also useful.
It is also always useful to have Viton seals. There are several sizes of rings that I can not find.
Thank you for your time! Share your impressions and questions, I enjoy reading all the comments. If something is not clearly stated - ask, I will try to add. I write articles with a larger break than upload videos, so the progress with the microscope in real time can be found on the video on my channel .
In the next series - electronics, image capture device and a little bit of programming.
But first I will tell about the plate from an unknown material: when I cleaned the column, I found incomprehensible plates from a shiny, very fragile substance in a lock chamber, in a secluded place. Where was this microscope before getting to me, and what was looked at on it is unknown.
')
It has been suggested that it is silicon. What it turned out in the end and what progress was achieved in an electron microscope in three weeks - under the cut.
When I went to VacuumTechExpo last year, I was surprised by the booth of the Czech manufacturer of electronic microscopes Tescan . There was a modern scanning microscope with field emission in working condition and anyone could register and see their sample (necessary experts were present).
The second working microscope presented at the exhibition (generally speaking, AnalyticExpo, but they usually go together) is the desktop Phenom .
What is most interesting, both presented microscopes are equipped with an analyzer, which allows not only to see the surface structure by secondary electrons and to evaluate the material comparatively (by reflected electrons, clearly shown in the video), but also to find out the elemental composition of the sample surface.
The method is called:
Energy Dispersive X-ray Spectroscopy (EDS or EDX)
Any substance will glow under the electron beam. It's all about the energy of the beam, and the wavelength of the induced radiation. But the most interesting thing is that each element has its own radiation spectrum, which often goes into the X-ray range (the so-called characteristic radiation). But, for example, the phosphor of the DRL 250 lamp, which I used as a sensitive screen for tuning, also glows in the optical range in red. This phenomenon is called cathode luminescence.
Analyzing the characteristic radiation and it is possible to determine the elemental composition of the sample at any chosen point.
There is another method called wave dispersion X-ray spectroscopy (WDS). It has a higher spectral resolution, but at a time detects only a certain wavelength, which is pre-configured.
This allows you to get an image of the content of only a certain element in the sample, while the EDS, although having a lower resolution, allows you to get information about all the elements. For example, we tune the WDS detector to a calcium wavelength, and get a black and white picture: black where there is no calcium, and white where it is.
I put my sample in the bag and went to VacuumTechExpo a couple of hours before closing. What was there - I suggest to look at the video. We filmed the whole process: we looked at the sample under a microscope, carried out its elemental analysis, and found out what it consists of. And at the same time we went through the exhibition and looked at various exhibits.
Free electrons
Go back to our microscope. Last time, we tested all the necessary components and conditions in order to ensure thermionic emission from the cathode and obtain a beam of free electrons at different accelerating voltages.
But you need to somehow “see” him, at least approximately. To immediately scan and detect is unwise. Because I don’t have a clue if magnetic lenses work, and the optical axis of the microscope is exposed by eye. By the way, this is already a sufficient success, since the condenser lens was strongly shifted to the side and not fixed with adjustable stops as needed (i.e., if I had not gone over the column, then nothing would have happened).
The obvious way to carry out a rough adjustment of the device is to put a substance on the stage that will glow in the optical range when it is bombarded with electrons. And try to steer lenses, high voltage, the cathode glow, displacement of the Venelt cylinder. And, of course, make a window so that you can watch.
Phosphor
I began to look for a suitable phosphor in advance. He asked all the people helping the project, as a result he received two whole subjects.
The first is a small CRT tube with a rectangular screen without an electron gun and without vacuum. I wanted to saw off the screen from it, but my friend asked me to leave it as a rare collection item (put it on the shelf behind the glass). Once asked, it means valuable.
The second is a full-fledged tube from an old oscilloscope, which has long been broken.
We nearly sawed it with a Dremel immediately after opening the oscilloscope, but decided to wait and do it in more comfortable conditions. The idea was simple - to make a small hole through which the tube would be filled with air without general destruction, and then cut the front screen with abrasive, and put it inside the microscope.
Another thought came, even easier. I have previously had to experiment with removing the outer bulb from the DRL 250 lamp in order to get a source of UV light with a wavelength of 250nm. It is clear that the phosphor is excited by UV radiation, and not by electrons, and the big question is whether it will glow from electrons. I looked for the composition, I did not find an unambiguous answer (different phosphors are used, but I still have a Soviet-made lamp). But, I wrote in the beginning of the article, that everything is glowing under the electron beam. Therefore, the chances of success are great.
Sawed, put inside the microscope.
He closed the large ports of the column back, only a small improvised window on top remained for observation. This window is made of "plexiglass" of approximately 5 mm thickness. Unfortunately, when I was looking for leaking with acetone before, I accidentally splashed onto it, and the optical transparency of the outer surface immediately deteriorated. Also, it was necessary to lubricate it with a thin layer of high-vacuum oil so that it was less breathable.
Through the window it all looks like this:
Even so it can be seen - and that is good. Luminescence accurately can be seen.
About security
ATTENTION! Do not panic. When any material is irradiated with electrons, continuous X-ray radiation with an energy not exceeding the accelerating voltage multiplied by the electron charge arises (for example, for 30kV the maximum possible radiation energy is 30 keV). The column of the microscope is made at the factory so as to completely shield all radiation that occurs inside. The microscope is certified as a radiation safe device.
The modification of the column I made above (acrylic window) theoretically presents some danger in case of violation of the operating conditions and being in the immediate vicinity of this window.
I found this page (having experienced nostalgia for the late 1990s, when such pages were the height of perfection), which allows us to calculate the penetration of X-rays of various energies through various materials.
So, choose the material - PMMA , thickness 5 mm, and we consider the percentage of absorption for different energies.
Radiation with energies up to 8 keV is completely (99.9%) absorbed by acrylic, but radiation with higher energy can overcome this barrier. For example, 70% of the radiation with an energy of 30 keV will pass through the window.
It is clear that when the phosphor is irradiated with even 10 kV, we are unlikely to get X-ray radiation with an energy of 10 keV at the output; to do this, we need to put a massive copper anode there. But, nevertheless, for safety reasons, I calibrated the voltage source, and did not even turn on for an short period of time the accelerating voltage above 5 kV.
Attempt No. 1. Unsuccessful
Everything is included - nothing happens. The block beeps, the heat is on, there is no emission. And so I tried, and commercials, well, nothing. He added the current filament yet. Doubts began to creep in, and suddenly the luminophor does not glow? The camcorder looked, in case it glows in the invisible range of the eye. Nothing.
Attempt number 2. Still unsuccessful
He let the air out, took the holder of the final diaphragm, and twisted out a plate with apertures. He left only the holder with holes a few millimeters in diameter.
He opened the electron gun, picked up a small red laser, and began simply to shine “through the gap” through the entire column in order to find out if it was the same or not.
If the light beam does not pass, then the electronic one will get lost. Fortunately, having accurately compared the direction, I saw a red dot below. So you can try again!
But in vain I increased the current filament last time. At some point, the cathode could not stand it and quietly stopped working.
After that, I modified the cathode assembly for JEOL K-type cathodes, which are used in modern JEOL microscopes. The previous one was from an unknown microscope, and I didn’t come across any more. I have about two more in reserve, but they are very poorly suited to this microscope.
Attempt number 3. Success
I assembled everything again, made a high-quality, reliable electrical connection of all parts of the column (the outer opening of the cathode cannon part, the main part of the column, the spring-loaded metal plate on which the column is installed and the entire high vacuum part with valves, the bollard - all this had to be electrically interconnected and also connect the ground of the high-voltage power supply unit, the aquarium body and the metal braid of the high-voltage cable from the microscope to this all.
What happened after switching on, look at the video:
Future Work Plan:
- make magnetic lens control circuits
- try deflecting system
- make an induced current amplifier
- get the first picture from the microscope in the induced current mode :)
- restore and connect the secondary electron detectors and get the picture in the secondary electron mode :)
How can I help
Many thanks to everyone who helps with the project. In the next series, I will tell you in detail about what I managed to get for the project.
Basically, the work will focus on electronics and detectors. But in the near future I will also need to re-apply the skills of metalworking.
If you have unnecessary blanks from metals (stainless steel, duralumin and steel) and plastics (plexiglas, etc.) that can be taken - I will be grateful. And everything related to metalworking is also useful.
It is also always useful to have Viton seals. There are several sizes of rings that I can not find.
Thank you for your time! Share your impressions and questions, I enjoy reading all the comments. If something is not clearly stated - ask, I will try to add. I write articles with a larger break than upload videos, so the progress with the microscope in real time can be found on the video on my channel .
In the next series - electronics, image capture device and a little bit of programming.
Source: https://habr.com/ru/post/403447/
All Articles