Thermal imager in the DI HALT workshop
▌Intro
So, this marvelous device, the Seek Thermal thermal imager from Dadjet, fell into my hands. And, frankly, absolutely no desire to write a review on it. Well, in fact, who needs another unpacking, inspection of the package, pictures of the battery, pipe, cat, traces and wiring in the wall? This is all already been. If you still became curious, then right there, on the GT, there are some excellent and very detailed reviews of this device. I will highlight a few characteristic:
And I will not even tell you anything about the characteristics, why should I repeat? :) Since I have a “type of hackspace” here and, in fact, an experimental laboratory for suffering different funny nonsense, this device will serve as another tool capable of answering sometimes emerging questions. But first things first.
▌ Problems
I was offered a choice of iOS or Android solution. Since I'm already full of apple axes and I'm going to get rid of the iPhone and take the next device on the android, then the thermal imager took on the android . Fortunately, I still have an old Xperia Z smartphone and I planned to use it for the first time. OTG support in it is there, mouse-keyboard-flash drives work in it, they receive power. There should be no problems ... Naive, I forgot, that simple solutions do not work for me. At one time, I even had a branded arduin; then there simply wasn’t another one, I couldn’t flash it. Did not want to work out of the box, even burst! I had to solder the programmer and then, in the old fashion, sawed in assembler. And I wanted so much ... Therefore, I don’t like them - a child injury.
')
In short, it did not take off. Soft got up, and the imager does not see the phone. Does not see at all. No, he does not even see that something is connected to the port. Usually he still undermines me to inform. And here it is not. Without thinking twice, I exploded into the local radio parts store, where the director also has some kind of Xperia just my new one, the seller also has some kind of androidphone. In general, their people will not give the abyss.
We put Slava, the seller, the software on his Chinese OUKITEL 6000 Pro - stick a thermal imager. Works. It works great. I ran to the director. Vasily, what kind of a toy I have, but I need your phone! We put the software on the Xperia Z1C - everything works fine too.
But with the software, what the hell is going on. The fact is that Sony phones traditionally have a USB socket on the side.

And the picture is at an angle, but the camera’s software is not only unaware of turning it, but it’s impossible to adjust, it is also attached to the phone’s accelerometer tightly. You can disable the screen rotation in the phone itself, but it will not work. The interface of the program and the picture will also rotate. To solve the problem for programmers of this software for fifteen minutes with smoke breaks, but they don’t even try to solve the problem. For the past year and a half, the people have been cursing for this, but things are still there.
Okay, screen orientation is fixable. It is only necessary to solder the wiring for convenient connection, but to fence off the equipment. Is that not the question? Why the hell did it not work for me? I stuck in my Xperia Z Oban - it started. Works O_o. Well, it's clear - probably there is not enough power at the port. SchA, we will understand! I immediately buy USB sockets, plugs and run to my workshop.
Further dancing around the Xperia Z did not lead to anything. So she no longer wanted to run. In no way. And it was not about nutrition. Then I looked at the oscillograms of inclusion - well, yes, there is a failure in charging the tanks, but not great. No more than connecting a flash drive.

And if you distort the wire, then the capacity will already be charged and would have to start. Voltage does not subside. There should be no problems. Connecting external power, in the cut, did not give effect. Those. The thing here seems to be all the same in the software, and not in the hardware.
I did not understand, there was no time for that, I took the tablet SGS Note 10.1. And he gadsky wide connector. I bought an OTG cable.
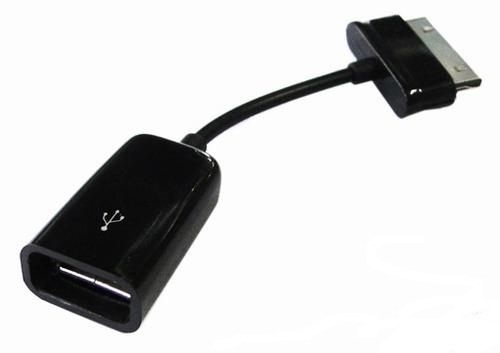
It is OTG that is needed, a simple one, a charger, lacks the necessary contacts in the connector and does not see its tablet. Gutted the lace, cut out the handkerchief, soldered it all.
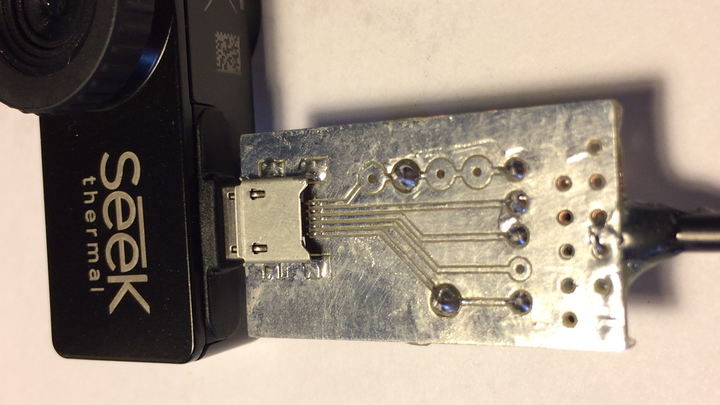
And so that the whole structure does not wobble and does not try to break the connector, I modeled it in Fusion360 and printed the mosquito snap-in:


→ Archive with a model of a thermal imager, as well as all parts of this pribluda in stl . You never know who will come in handy.
He hoisted it all on the tablet and now it has gone.
▌Work
As soon as everything worked, I immediately wanted to get answers to long-standing questions regarding the desk of my printer. First, how evenly the table heats up. The size of the table was 300x300mm and the edges were noticeably cooler than the center. At least according to the sensations. Now I could see it and take measures to solve the problem.
I also saw how much the external environment influences the temperature of the table. I think it’s no secret that drafts spoil the situation, uneven cooling of the table and the printed part leads to detaching it from the table, as well as rupture in layers - delamination. Even with the windows closed and no drafts in the workshop, there was a sharp failure along one edge. I thought it was the problem of the table, that it simply does not warm in that place. It turned out no. It’s just that we walked back and forth past the printer in this place and with our massive carcasses forced cold air. In great detail led to detachment from the table.
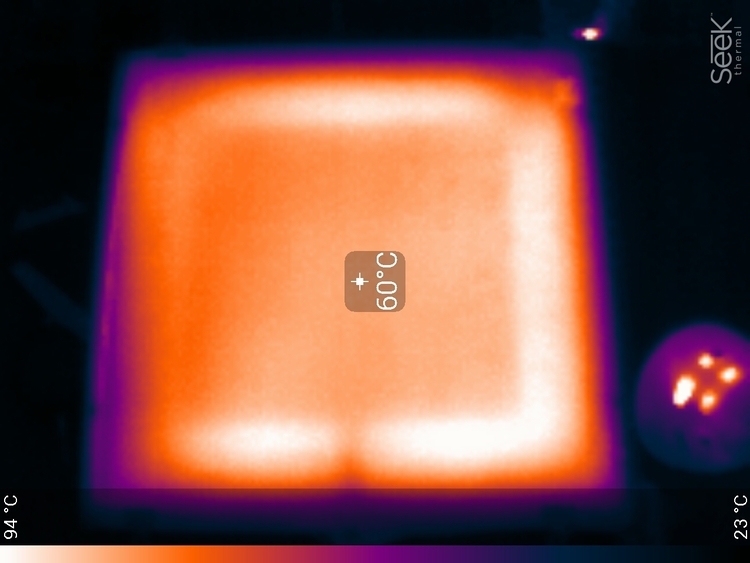
Installing simple cardboard walls has improved the picture with the uniform heating of the table and details. Better, of course, a fully enclosed camera. But here it is difficult to implement because of the design with a movable table.

At the same time they checked how much the native thermistor is lying. The fact that he is lying is undoubtedly that he is standing under the table, in the very center. Up to the details still air gap and glass. Although here the imager is not so hot which device. His accuracy is very conditional. Very much depends not on the real temperature of the object, but on how it radiates.
The second issue was the blower parts system. When printing overhanging elements, if they are not rapidly cooled, then cooling down naturally, they strive to bend up and hook onto the nozzle. Therefore, put a powerful airflow. But there are problems. The design of the extruder does not give much maneuver to make a full blown from all sides. Too thin air channel is obtained. I printed a system with two tubes blowing on both sides. But did it make sense at all? Check the direction of flow is quite difficult. I tried to put alcohol on the table and watch it evaporate, but it was still not obvious.
And then I just heated the table and slightly blew out of the cooler, turning on 10%, looked at the imager and it all became clear at once. It turned out that it was blowing in the wrong direction. Apparently the air flies by inertia. As a result, at low speeds, nothing gets under the nozzle.

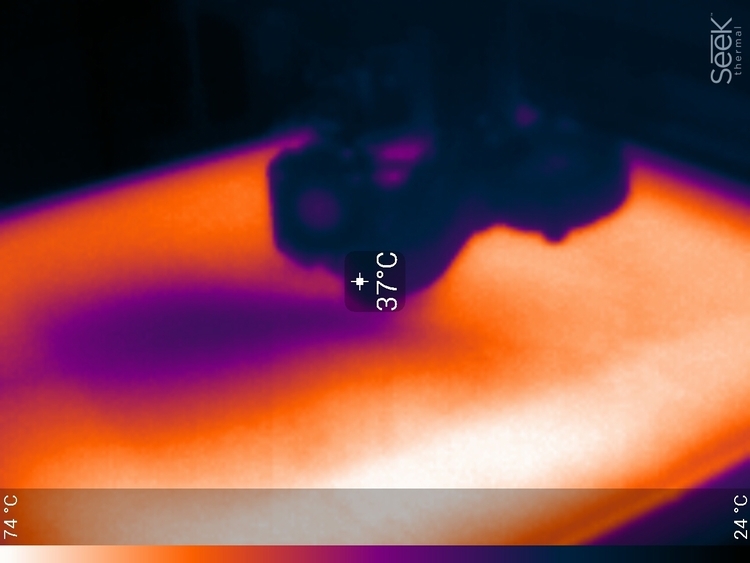

Moreover, it blows only from one nostril, in fact. Here apparently affects the way the thread is wrapped after the snail. The tube is short there. And only at high speed begins to blow properly and covers the entire printing area. But hellishly heals the table:

Therefore, I have some high-temperature plastics bouncing off the table starting at a certain printing height — the fan was turned on, plus he needed time to get the surface and the part to tear off.
In general, I will think over the alteration. Fortunately now I will not do it blindly.
Appreciated the work of cooling the thermal barrier. The essence of a thermal barrier is that plastic from a solid to a liquid jerk, the narrower the transition zone the better. Since a viscous, but not yet liquid plastic dramatically increases the coefficient of friction against the walls and the extruder may not have enough effort to push the plastic. There is a traffic jam. Especially such a cork likes to form on plastics with a low softening temperature, such as PLA. Especially with the retract, when the hot rod on the retract returns for a thermal barrier, taking with it heat.

He looked at the problem area with a thermal imager to make sure that this trouble did not concern me. Anything above the thermal transition is well cooled. Yes, actually, we had no problems with that. But once again look nice.
At the same time, I looked at the drivers of the step-drivers, that they were standing on the RAMPS - the radiators are cold, and the boards are warming a little. Looks like a thin track. The left driver rotates the extruder. The most loaded engine with me. Therefore, it is clearly hot.
Yes, someone in the comments asked if it could be used to see a separately heated resistor on the board or a tiny SOT23 transistor? See the dark spots? These are the ends of the PLS pins of the connector with a pitch of 2mm and a diameter of about 0.5mm. They are clearly visible. The heating resistor or transistor on the board will also be clearly visible. The resolution of the thermal imager's matrix and the possibility of focusing on it are more than enough.
And since the printer is on rails with wheels, the carriages roll easily and the engines do not heat up at all. Right now, here the engine is threshing back and forth, chasing the head while drawing the fill, but the engine is dark even on a thermal imager. And it touches the grave chill at all.

So, from one armed glance one can already see where it is in order, and where one can try to improve the situation.
Go ahead.
Soldering dryer It is always interesting which circuit is more efficient. Compressor or turbine. The essence of the compressor scheme is that the air is driven by a frog sitting on a vibrator (here everyone represents the extent of his depravity). In turbine the small impeller is built in the handle.
Turbine is quieter, cheaper. And received a truly massive distribution. Especially in a cheap station like lukey and other clones. Compressor is more expensive and less common. And noisy. But he has an important property - he can push more air through narrow nozzles. And the air is the main coolant in the hair dryer and no matter how much the heater warms there and to what temperature. The main thing is how much heat was able to deliver to the board.
Therefore, we take two hair dryers, put the same temperature on them, use an external thermocouple, set them approximately the same (according to the sensations, otherwise not to check, I watched the deviation of the piece of paper) flow, put on a narrow nozzle and start to heat ... Just along the table. Rate jet run. Without nozzles.

Both hair dryers are included in the maximum flow While parity. The picture is the same. Dress nozzle 5mm.

Here the compressor immediately begins to produce more performance, despite the fact that we have reduced the flow rate to 40% of the maximum at the compressor dryer (as instructed by the operating manual). Turbine is blowing as before to its fullest.
Dress the nozzle 3mm. This is usually drunk completely small things. Compressor power remains the same: 40%. The flow from the compressor is much stronger. This can be seen even by the fact that at the exit from the nozzle the jet does not fly by inertia, but expands sharply. This is felt in practice. From the turbine there is a feeling that the air does not come out at all. While the compressor gives a noticeable elastic flow.

In general, the situation is unambiguous. Although if you worked with a compressor and a turbine dryer, you yourself probably noticed the difference that the compressor dryer blows off in a flash, then you get to warm up with the turbine.
▌Longness
Even in the previous reviews in the comments were questions about the range of the thermal imager. I conducted an experiment, went to the shore of the lake, where the fishermen sit on the ice, about 400 meters from the shore, and I looked:

The photo was taken a few minutes later, during which time the first fisherman managed to cover a significant distance. Snapped to the camera of the tablet.

Consider also the fact that fishermen with an eye on a long motionless sitting on the ice dress VERY warm. So they shine in the IR range is very weak. Compare with the sunlit forest on the other side of the lake (about 3 km). How does clothing affect the image of a thermal imager in general can be compared with the example of my two cats? One of them is red, the second is bald. Their body temperature is about the same, about 39 degrees. But Bald is clearly glowing, while Red, much warmer, looks less noticeable.
▌ Impressions
Priborchik is extremely entertaining and in some cases allows you to calculate what is extremely difficult to do without him. The same airflow on the printer or how and in what sequence the printed circuit board is heated during operation. Sometimes it helps to figure out a problem before something burns out. Will be actively used now with or without :)
Unfortunately, the situation is greatly overshadowed by the curvature of the native software, at least in the android version. And the device clearly lacks its own camera. With exactly the same angles and synchronized focus. Then it would be possible to paint a high-quality picture with a conventional camera with an image from the IR matrix and get a picture that is simply chic in its information content. Yes, he certainly has the mode of displaying images from the camera of a smartphone and a thermal imager at the same time, but they do not often have the same optics parameters.
Information for bloggers and authors:
The company "Dadzhet" is interested in publishing independent objective reviews of dadzhetov in various kinds of media. The company “Djadzhet” will gladly provide dadzhetov bloggers and authors who want to test them and write a review.
The device after writing a review remains with the author. The company is not trying to tell the author what to write about our product, but asks to show the article before publication. In this case, it is possible to clarify information and prevent errors. Whether to consider company comments or not is always up to the discretion of the author. Read more ...
With a 10% discount, you can purchase a Seek Thermal thermal imager by specifying the promotional code GT-ST. The promotional code is valid 14 days.
So, this marvelous device, the Seek Thermal thermal imager from Dadjet, fell into my hands. And, frankly, absolutely no desire to write a review on it. Well, in fact, who needs another unpacking, inspection of the package, pictures of the battery, pipe, cat, traces and wiring in the wall? This is all already been. If you still became curious, then right there, on the GT, there are some excellent and very detailed reviews of this device. I will highlight a few characteristic:
- Thermal cameras for smartphone Seek Thermal - General overview with analysis of the interface and features.
- To see the invisible, connect not connected or squeeze all the juice from Seek Thermal - connection to the computer.
- Connecting the thermal imager Seek Thermal to the STM32 is a particularly interesting article.
And I will not even tell you anything about the characteristics, why should I repeat? :) Since I have a “type of hackspace” here and, in fact, an experimental laboratory for suffering different funny nonsense, this device will serve as another tool capable of answering sometimes emerging questions. But first things first.
▌ Problems
I was offered a choice of iOS or Android solution. Since I'm already full of apple axes and I'm going to get rid of the iPhone and take the next device on the android, then the thermal imager took on the android . Fortunately, I still have an old Xperia Z smartphone and I planned to use it for the first time. OTG support in it is there, mouse-keyboard-flash drives work in it, they receive power. There should be no problems ... Naive, I forgot, that simple solutions do not work for me. At one time, I even had a branded arduin; then there simply wasn’t another one, I couldn’t flash it. Did not want to work out of the box, even burst! I had to solder the programmer and then, in the old fashion, sawed in assembler. And I wanted so much ... Therefore, I don’t like them - a child injury.
')
In short, it did not take off. Soft got up, and the imager does not see the phone. Does not see at all. No, he does not even see that something is connected to the port. Usually he still undermines me to inform. And here it is not. Without thinking twice, I exploded into the local radio parts store, where the director also has some kind of Xperia just my new one, the seller also has some kind of androidphone. In general, their people will not give the abyss.
We put Slava, the seller, the software on his Chinese OUKITEL 6000 Pro - stick a thermal imager. Works. It works great. I ran to the director. Vasily, what kind of a toy I have, but I need your phone! We put the software on the Xperia Z1C - everything works fine too.
But with the software, what the hell is going on. The fact is that Sony phones traditionally have a USB socket on the side.
And the picture is at an angle, but the camera’s software is not only unaware of turning it, but it’s impossible to adjust, it is also attached to the phone’s accelerometer tightly. You can disable the screen rotation in the phone itself, but it will not work. The interface of the program and the picture will also rotate. To solve the problem for programmers of this software for fifteen minutes with smoke breaks, but they don’t even try to solve the problem. For the past year and a half, the people have been cursing for this, but things are still there.
Okay, screen orientation is fixable. It is only necessary to solder the wiring for convenient connection, but to fence off the equipment. Is that not the question? Why the hell did it not work for me? I stuck in my Xperia Z Oban - it started. Works O_o. Well, it's clear - probably there is not enough power at the port. SchA, we will understand! I immediately buy USB sockets, plugs and run to my workshop.
Further dancing around the Xperia Z did not lead to anything. So she no longer wanted to run. In no way. And it was not about nutrition. Then I looked at the oscillograms of inclusion - well, yes, there is a failure in charging the tanks, but not great. No more than connecting a flash drive.
And if you distort the wire, then the capacity will already be charged and would have to start. Voltage does not subside. There should be no problems. Connecting external power, in the cut, did not give effect. Those. The thing here seems to be all the same in the software, and not in the hardware.
I did not understand, there was no time for that, I took the tablet SGS Note 10.1. And he gadsky wide connector. I bought an OTG cable.
It is OTG that is needed, a simple one, a charger, lacks the necessary contacts in the connector and does not see its tablet. Gutted the lace, cut out the handkerchief, soldered it all.
And so that the whole structure does not wobble and does not try to break the connector, I modeled it in Fusion360 and printed the mosquito snap-in:
→ Archive with a model of a thermal imager, as well as all parts of this pribluda in stl . You never know who will come in handy.
He hoisted it all on the tablet and now it has gone.
▌Work
As soon as everything worked, I immediately wanted to get answers to long-standing questions regarding the desk of my printer. First, how evenly the table heats up. The size of the table was 300x300mm and the edges were noticeably cooler than the center. At least according to the sensations. Now I could see it and take measures to solve the problem.
I also saw how much the external environment influences the temperature of the table. I think it’s no secret that drafts spoil the situation, uneven cooling of the table and the printed part leads to detaching it from the table, as well as rupture in layers - delamination. Even with the windows closed and no drafts in the workshop, there was a sharp failure along one edge. I thought it was the problem of the table, that it simply does not warm in that place. It turned out no. It’s just that we walked back and forth past the printer in this place and with our massive carcasses forced cold air. In great detail led to detachment from the table.
Installing simple cardboard walls has improved the picture with the uniform heating of the table and details. Better, of course, a fully enclosed camera. But here it is difficult to implement because of the design with a movable table.
At the same time they checked how much the native thermistor is lying. The fact that he is lying is undoubtedly that he is standing under the table, in the very center. Up to the details still air gap and glass. Although here the imager is not so hot which device. His accuracy is very conditional. Very much depends not on the real temperature of the object, but on how it radiates.
The second issue was the blower parts system. When printing overhanging elements, if they are not rapidly cooled, then cooling down naturally, they strive to bend up and hook onto the nozzle. Therefore, put a powerful airflow. But there are problems. The design of the extruder does not give much maneuver to make a full blown from all sides. Too thin air channel is obtained. I printed a system with two tubes blowing on both sides. But did it make sense at all? Check the direction of flow is quite difficult. I tried to put alcohol on the table and watch it evaporate, but it was still not obvious.
And then I just heated the table and slightly blew out of the cooler, turning on 10%, looked at the imager and it all became clear at once. It turned out that it was blowing in the wrong direction. Apparently the air flies by inertia. As a result, at low speeds, nothing gets under the nozzle.
Moreover, it blows only from one nostril, in fact. Here apparently affects the way the thread is wrapped after the snail. The tube is short there. And only at high speed begins to blow properly and covers the entire printing area. But hellishly heals the table:
Therefore, I have some high-temperature plastics bouncing off the table starting at a certain printing height — the fan was turned on, plus he needed time to get the surface and the part to tear off.
In general, I will think over the alteration. Fortunately now I will not do it blindly.
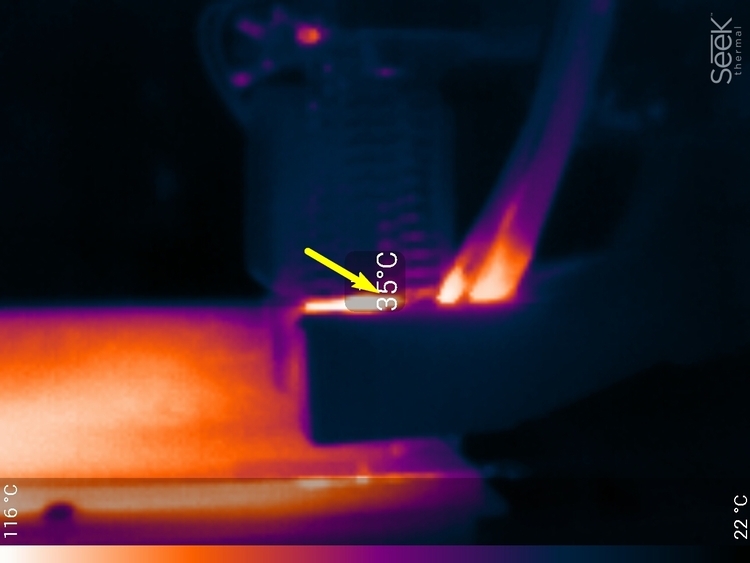
Appreciated the work of cooling the thermal barrier. The essence of a thermal barrier is that plastic from a solid to a liquid jerk, the narrower the transition zone the better. Since a viscous, but not yet liquid plastic dramatically increases the coefficient of friction against the walls and the extruder may not have enough effort to push the plastic. There is a traffic jam. Especially such a cork likes to form on plastics with a low softening temperature, such as PLA. Especially with the retract, when the hot rod on the retract returns for a thermal barrier, taking with it heat.
He looked at the problem area with a thermal imager to make sure that this trouble did not concern me. Anything above the thermal transition is well cooled. Yes, actually, we had no problems with that. But once again look nice.
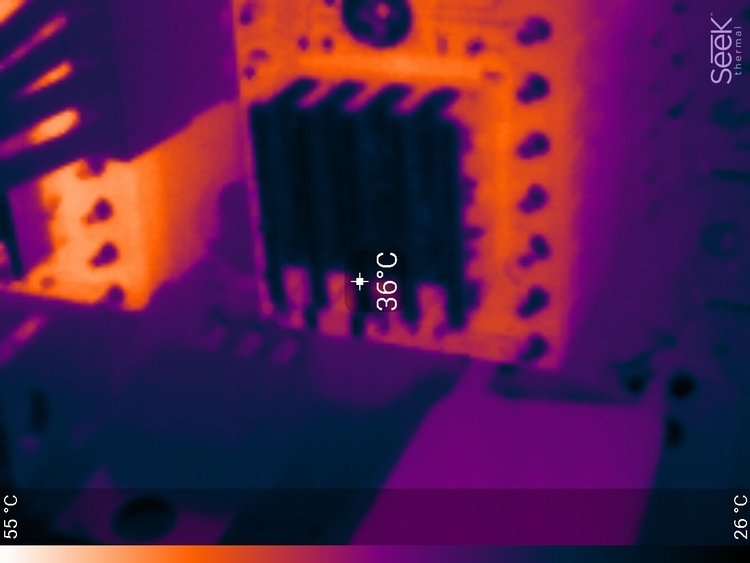
At the same time, I looked at the drivers of the step-drivers, that they were standing on the RAMPS - the radiators are cold, and the boards are warming a little. Looks like a thin track. The left driver rotates the extruder. The most loaded engine with me. Therefore, it is clearly hot.
Yes, someone in the comments asked if it could be used to see a separately heated resistor on the board or a tiny SOT23 transistor? See the dark spots? These are the ends of the PLS pins of the connector with a pitch of 2mm and a diameter of about 0.5mm. They are clearly visible. The heating resistor or transistor on the board will also be clearly visible. The resolution of the thermal imager's matrix and the possibility of focusing on it are more than enough.
And since the printer is on rails with wheels, the carriages roll easily and the engines do not heat up at all. Right now, here the engine is threshing back and forth, chasing the head while drawing the fill, but the engine is dark even on a thermal imager. And it touches the grave chill at all.
So, from one armed glance one can already see where it is in order, and where one can try to improve the situation.
Go ahead.
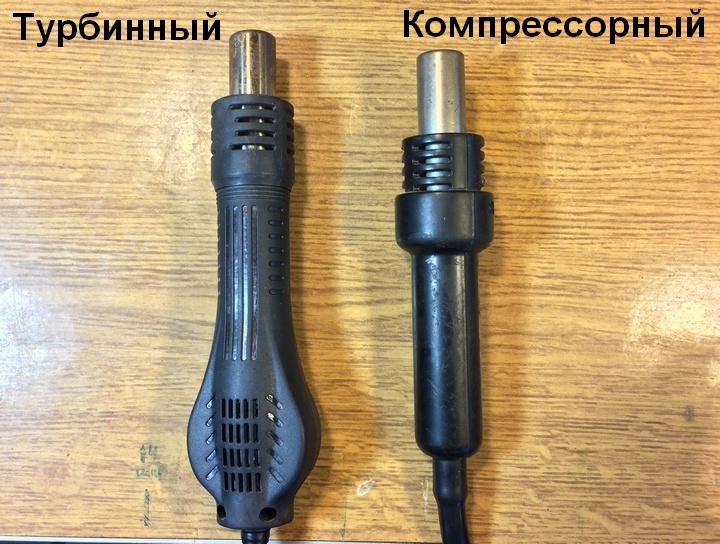
Soldering dryer It is always interesting which circuit is more efficient. Compressor or turbine. The essence of the compressor scheme is that the air is driven by a frog sitting on a vibrator (here everyone represents the extent of his depravity). In turbine the small impeller is built in the handle.
Turbine is quieter, cheaper. And received a truly massive distribution. Especially in a cheap station like lukey and other clones. Compressor is more expensive and less common. And noisy. But he has an important property - he can push more air through narrow nozzles. And the air is the main coolant in the hair dryer and no matter how much the heater warms there and to what temperature. The main thing is how much heat was able to deliver to the board.
Therefore, we take two hair dryers, put the same temperature on them, use an external thermocouple, set them approximately the same (according to the sensations, otherwise not to check, I watched the deviation of the piece of paper) flow, put on a narrow nozzle and start to heat ... Just along the table. Rate jet run. Without nozzles.
Both hair dryers are included in the maximum flow While parity. The picture is the same. Dress nozzle 5mm.
Here the compressor immediately begins to produce more performance, despite the fact that we have reduced the flow rate to 40% of the maximum at the compressor dryer (as instructed by the operating manual). Turbine is blowing as before to its fullest.
Dress the nozzle 3mm. This is usually drunk completely small things. Compressor power remains the same: 40%. The flow from the compressor is much stronger. This can be seen even by the fact that at the exit from the nozzle the jet does not fly by inertia, but expands sharply. This is felt in practice. From the turbine there is a feeling that the air does not come out at all. While the compressor gives a noticeable elastic flow.
In general, the situation is unambiguous. Although if you worked with a compressor and a turbine dryer, you yourself probably noticed the difference that the compressor dryer blows off in a flash, then you get to warm up with the turbine.
▌Longness
Even in the previous reviews in the comments were questions about the range of the thermal imager. I conducted an experiment, went to the shore of the lake, where the fishermen sit on the ice, about 400 meters from the shore, and I looked:
The photo was taken a few minutes later, during which time the first fisherman managed to cover a significant distance. Snapped to the camera of the tablet.
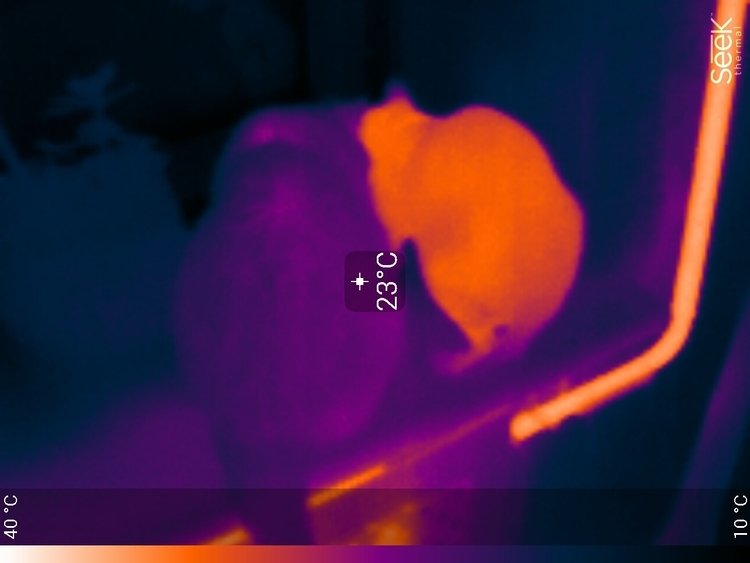
Consider also the fact that fishermen with an eye on a long motionless sitting on the ice dress VERY warm. So they shine in the IR range is very weak. Compare with the sunlit forest on the other side of the lake (about 3 km). How does clothing affect the image of a thermal imager in general can be compared with the example of my two cats? One of them is red, the second is bald. Their body temperature is about the same, about 39 degrees. But Bald is clearly glowing, while Red, much warmer, looks less noticeable.
▌ Impressions
Priborchik is extremely entertaining and in some cases allows you to calculate what is extremely difficult to do without him. The same airflow on the printer or how and in what sequence the printed circuit board is heated during operation. Sometimes it helps to figure out a problem before something burns out. Will be actively used now with or without :)
Unfortunately, the situation is greatly overshadowed by the curvature of the native software, at least in the android version. And the device clearly lacks its own camera. With exactly the same angles and synchronized focus. Then it would be possible to paint a high-quality picture with a conventional camera with an image from the IR matrix and get a picture that is simply chic in its information content. Yes, he certainly has the mode of displaying images from the camera of a smartphone and a thermal imager at the same time, but they do not often have the same optics parameters.
Information for bloggers and authors:
The company "Dadzhet" is interested in publishing independent objective reviews of dadzhetov in various kinds of media. The company “Djadzhet” will gladly provide dadzhetov bloggers and authors who want to test them and write a review.
The device after writing a review remains with the author. The company is not trying to tell the author what to write about our product, but asks to show the article before publication. In this case, it is possible to clarify information and prevent errors. Whether to consider company comments or not is always up to the discretion of the author. Read more ...
With a 10% discount, you can purchase a Seek Thermal thermal imager by specifying the promotional code GT-ST. The promotional code is valid 14 days.
Source: https://habr.com/ru/post/403075/
All Articles