How to turn a 3D model into a 800-pound robot
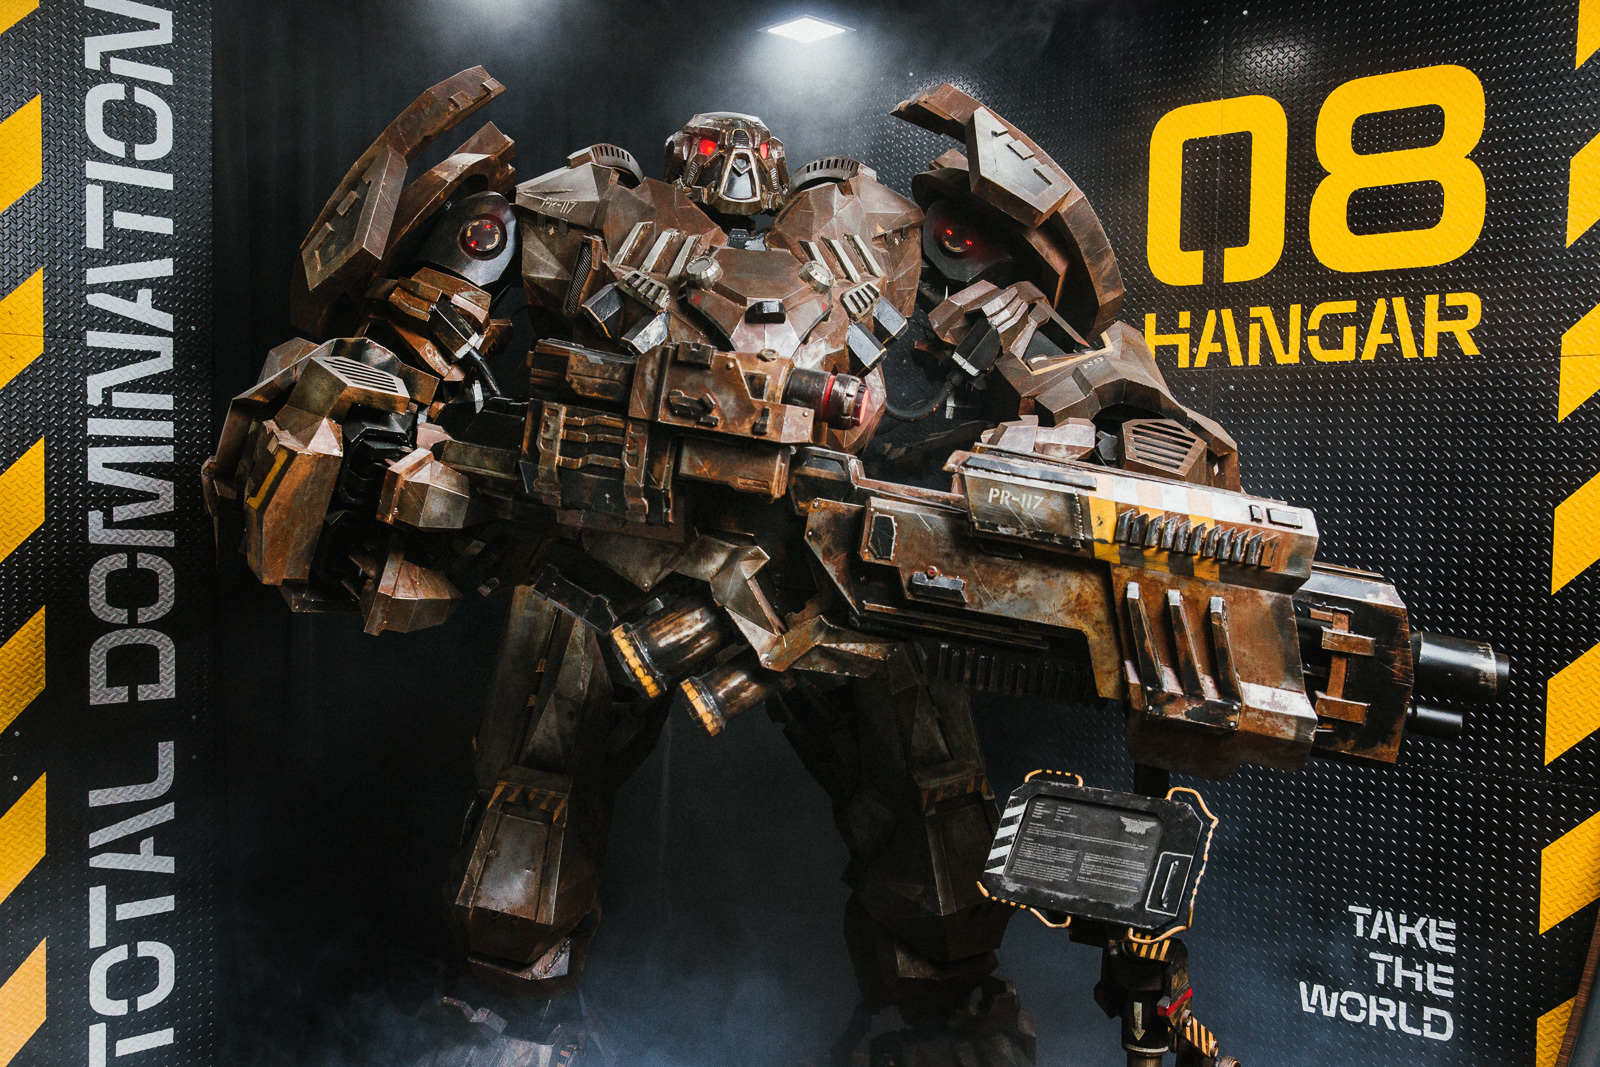
Meet this "Hammer" - a strategic unit from the game "Rules of War".

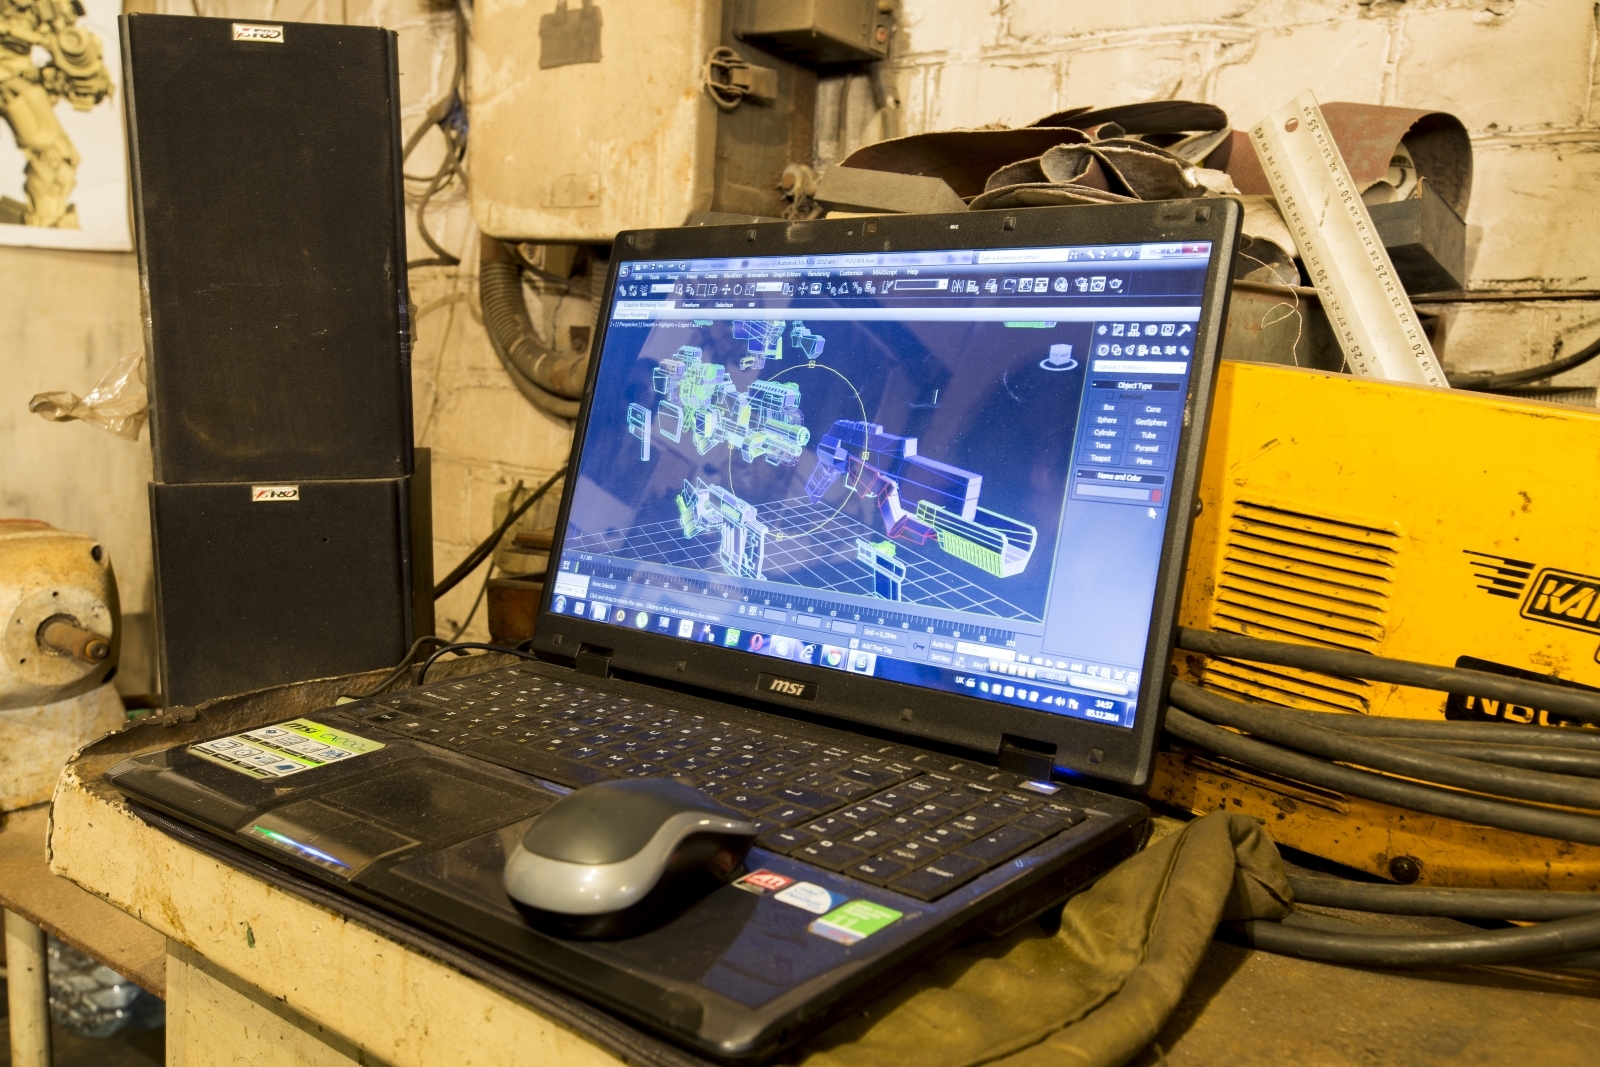
The 3D model of the robot was created 5 years ago. There are 180 thousand polygons, 440 elements and 5 basic texture sheets of 4K each. But now in front of you is not a 3D model, but a real 3-meter 800-kilogram giant of flesh and blood. More precisely, from metal and metal.
"Hammer" made Sasha, Andrew and Sergey - blacksmiths with experience. They say that their forge has become something of an art studio. We publish the story of the guys about how the robot "Hammer" was born.
')
We mainly work on exclusive orders - we take on what we are interested in and constantly raise the bar for complexity.
We find what no one else has done. Then we find out what the main problem is and get to work. Sergey created the most sophisticated gothic armor. And for Euro 2012 on one of the Kharkov avenues our 4-meter sculpture of a woman was installed. Once we made a figure of a horse, half of which was forged in a realistic manner, and the other half - in the style of steampunk. Most often it turns out that the difficulties over which others have retreated can be overcome - there would be a desire.
We started cooperation with Plarium with a small test task - first-aid kits from Half-Life. Now she hangs in the parking lot Plarium Kharkiv . And then the guys sent a 3D model, screenshots and a video with a robot.
We did not have the necessary experience, but we knew that we would get it in the process. In total, we worked on Hammer for 2 years, but now we would have done a similar project in 6 months.
First, we used the old approach - we printed the pictures, transferred the sizes to sheets of paper and began to cut the metal with a grinder. It took several weeks to create one foot and a lot more materials than we expected. It was necessary to look for alternatives.
We remembered that there are programs that decompose the model into a scan, from which papercraft is then created. We decided to try the same with metal.
In 3ds Max disassembled the robot on the details, and in Pepacura did a scan 3D model. Then they began to prepare materials for laser cutting and learn SolidWorks. To create the required number of parts, it was necessary to make 1.5 kilometers of cuts on 26 mm-steel sheets 1x2 meters in size.
In a company that deals with laser cutting and usually makes bodies for welding machines, they were very surprised at our order. Especially the number of parts - more than 3000.
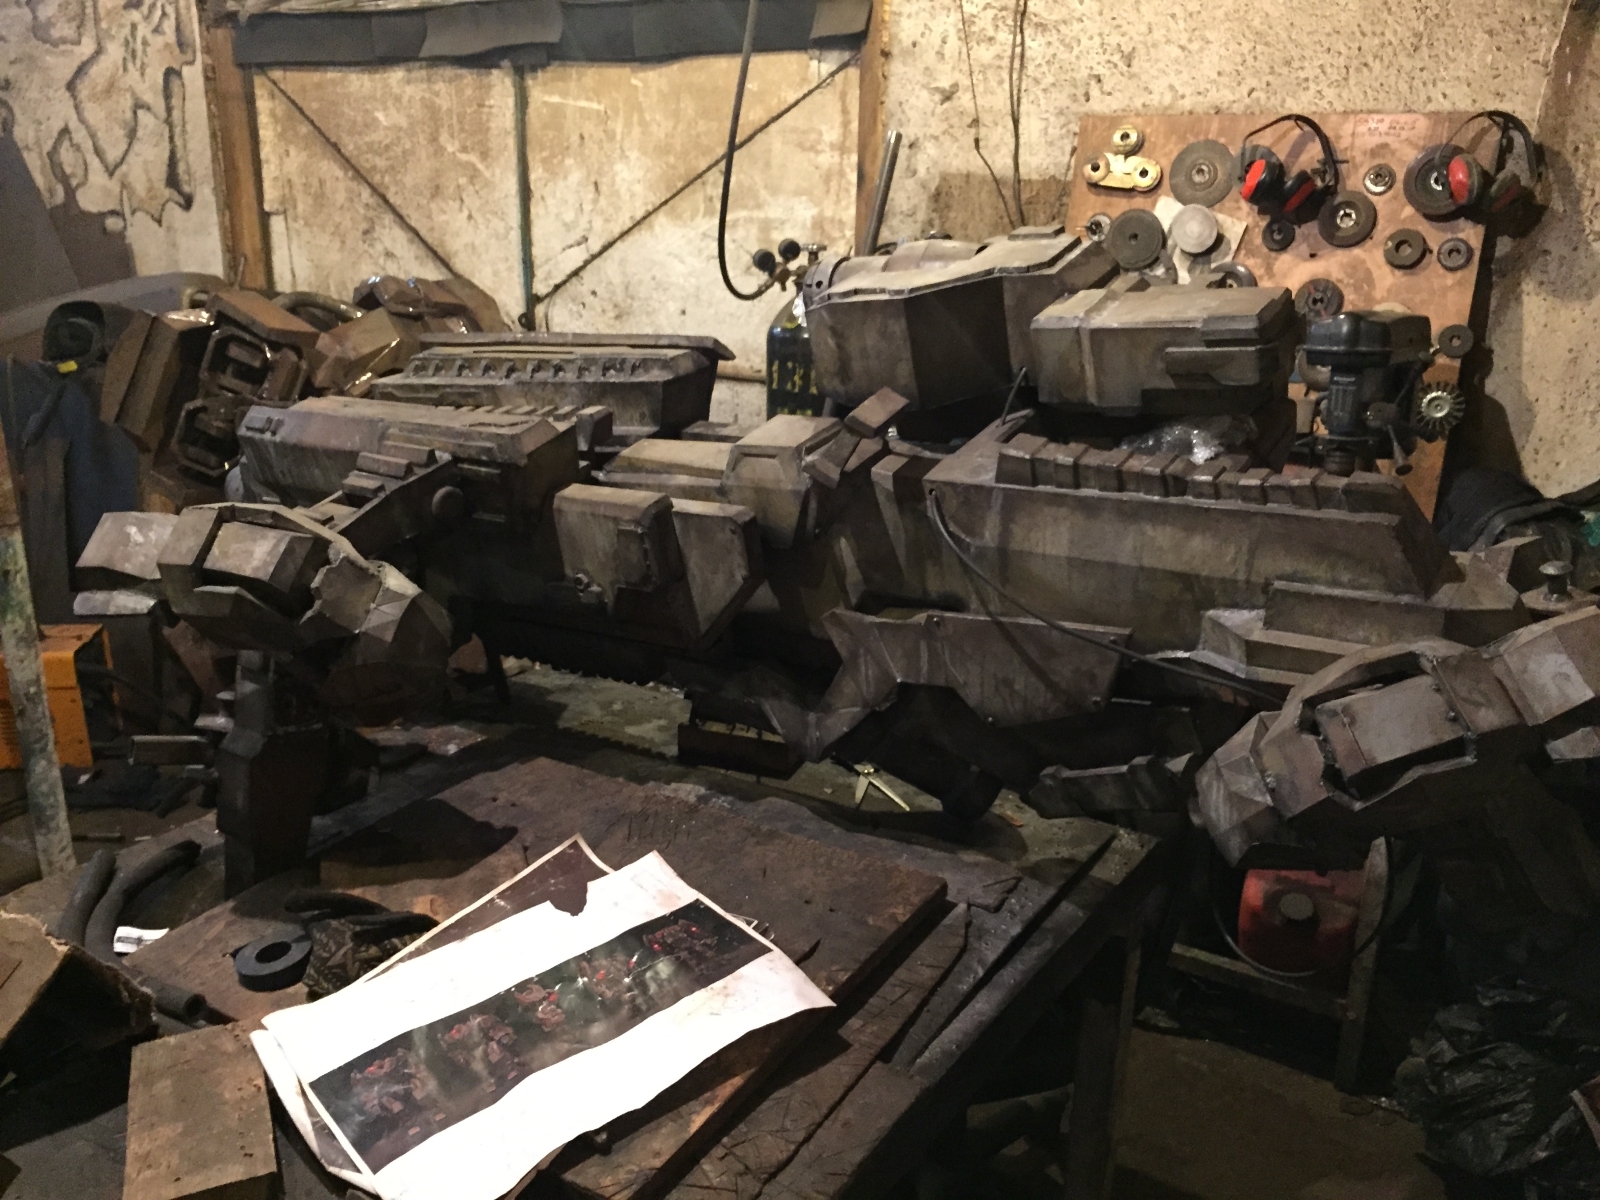
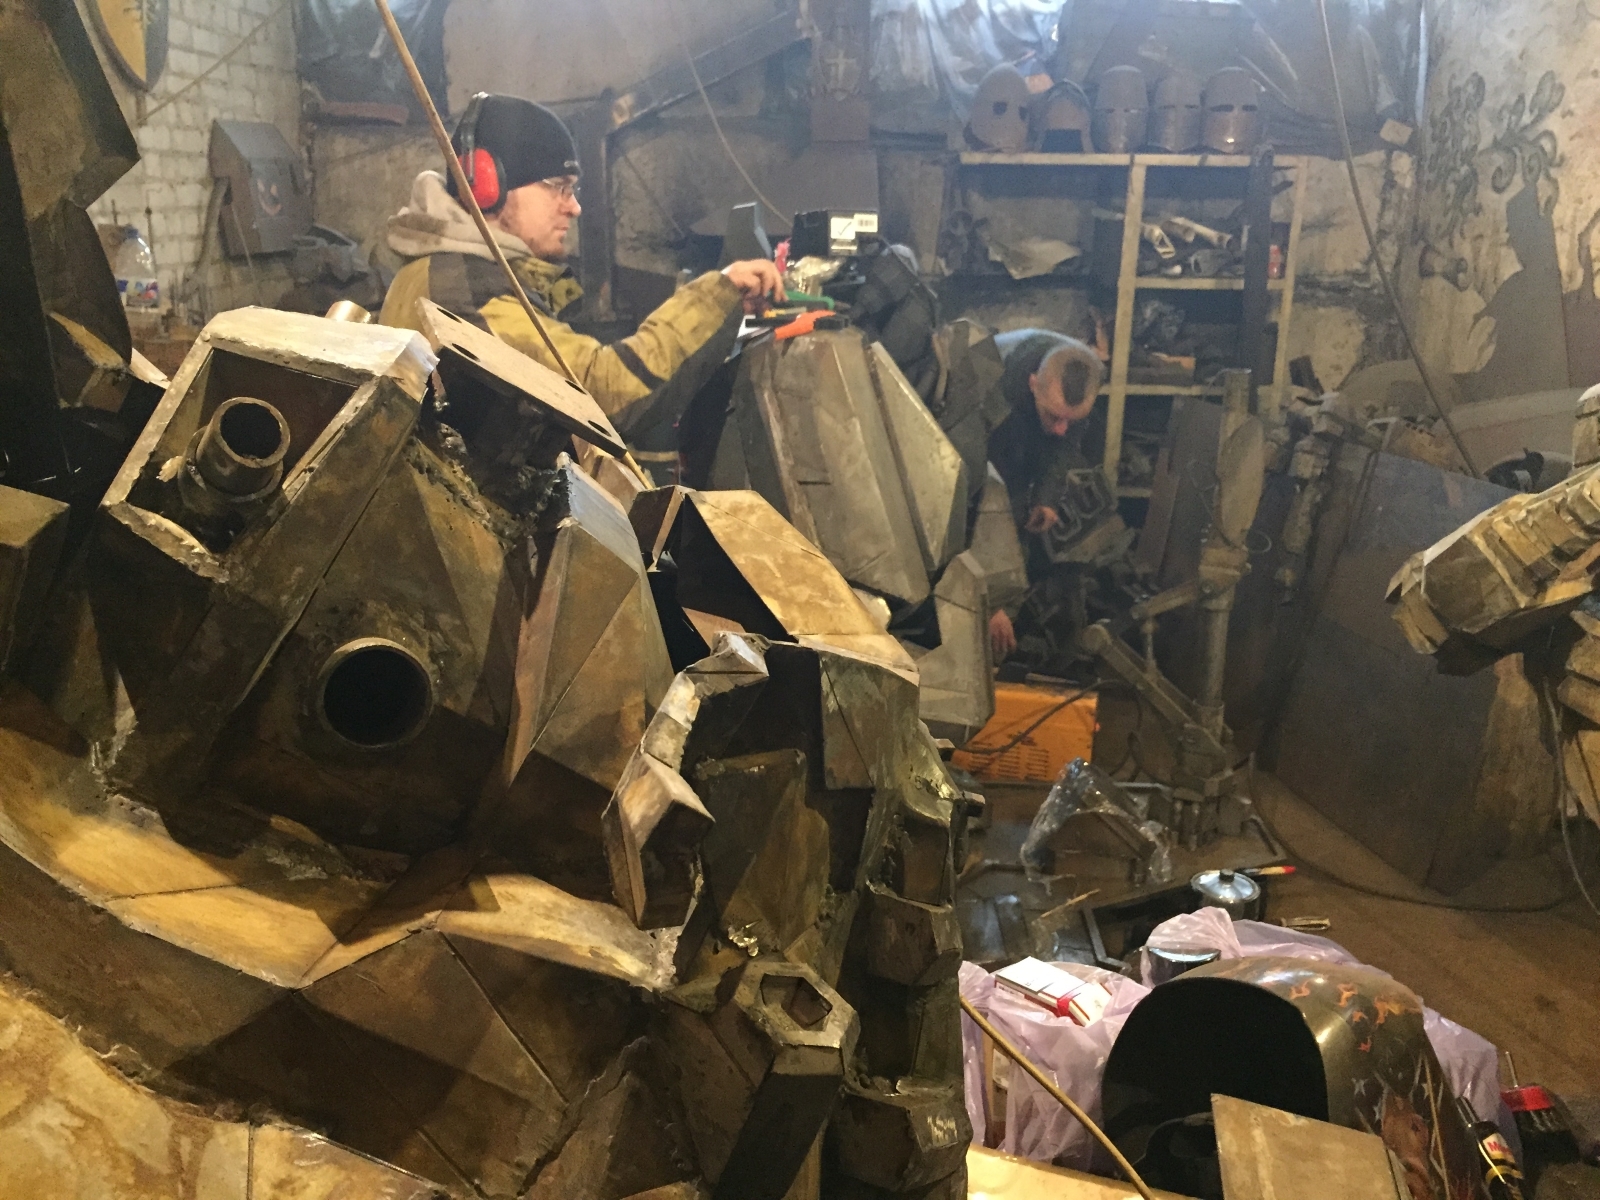
Soon the cut elements were taken to the workshop. At this moment we really realized the scale of the work: the details are piled up in heaps, it is impossible to pass in the workshop. The week went away only for sorting and labeling, it was scary to imagine how long it would take to assemble.

We divided the assembly work into blocks: each part of the robot was assembled separately. In this case, one part could consist of 20–30 parts joined together.
The basic element, on which everything is kept, was modeled in 3ds Max, and then assembled from pipes. The construction had to be made collapsible, so we bought strong pipes for the frame, and the rest of the blocks were mounted.
The laser cut out only the contours of the parts, so that all the folds and the volume needed to be created manually. We transferred the dotted fold lines from Peparura to the iron parts, and then walked along these marks with a grinder to make the metal more malleable. The markup was a very laborious process, it took a third of the time.
At the assembly stage, we burned 2 laptops and 2 phones. The equipment could not cope with the abundance of metal dust in the air, and it was impossible to work without visualization.
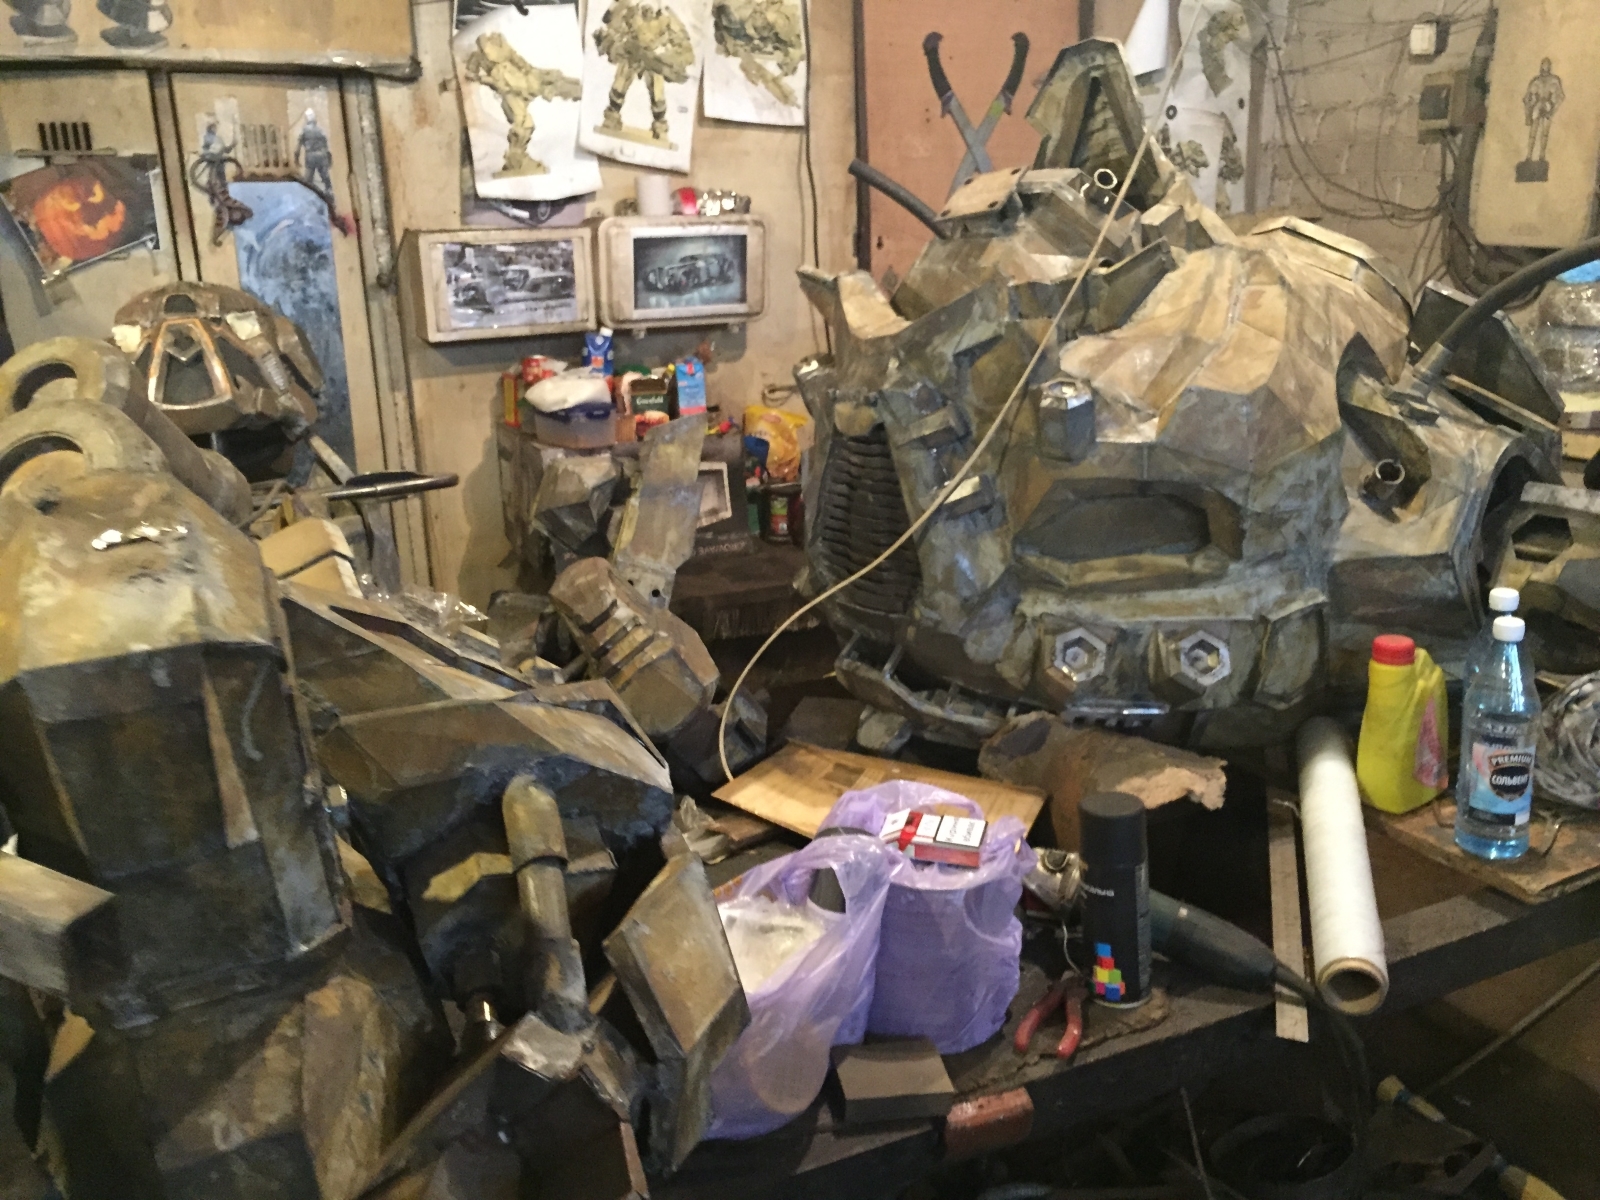
We separately collected the platform of the robot, its legs, body, arms and gun. Each of these elements also understands - for example, you can separate the head from the torso, and disassemble hands into several parts. This allows, if necessary, to get to the electronics in any module.


For each block, we defined the frame part and first of all curved it, and then joined others, which helped set the shape. All the blocks were first assembled on the welding tack, then boiled thoroughly, sent for stripping and put aside.
We started at the head of the robot and immediately realized that we were doing everything correctly: the head looked exactly like a 3D model.

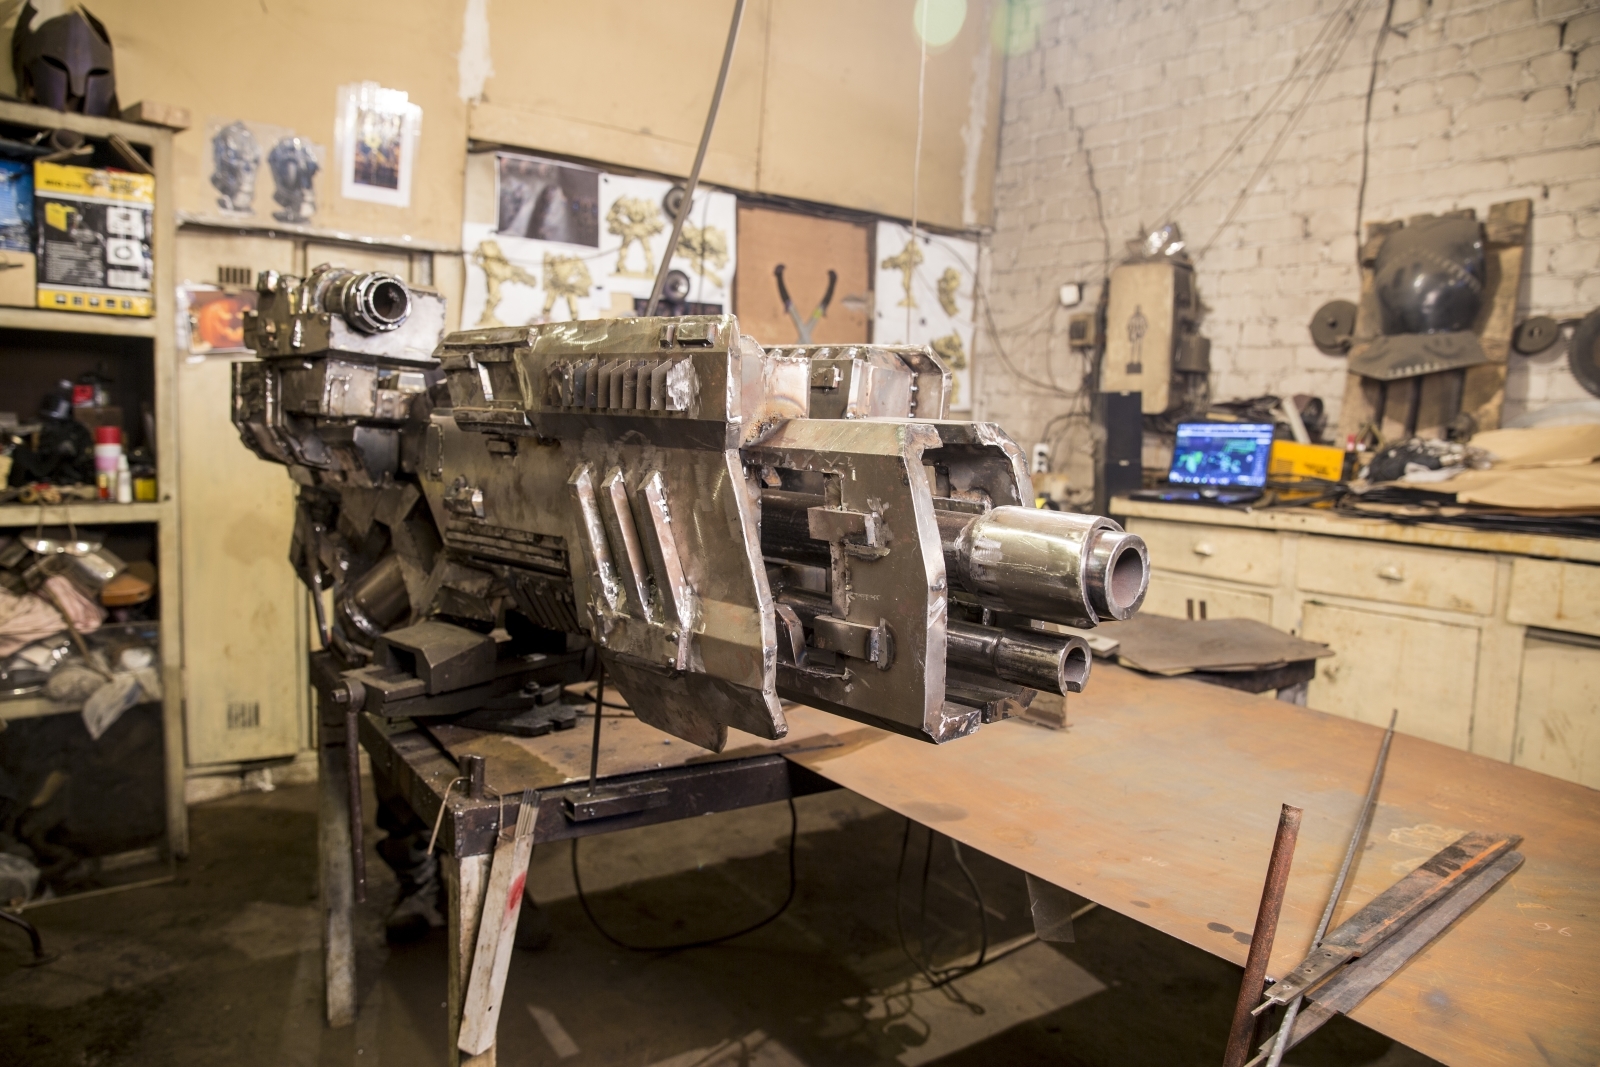
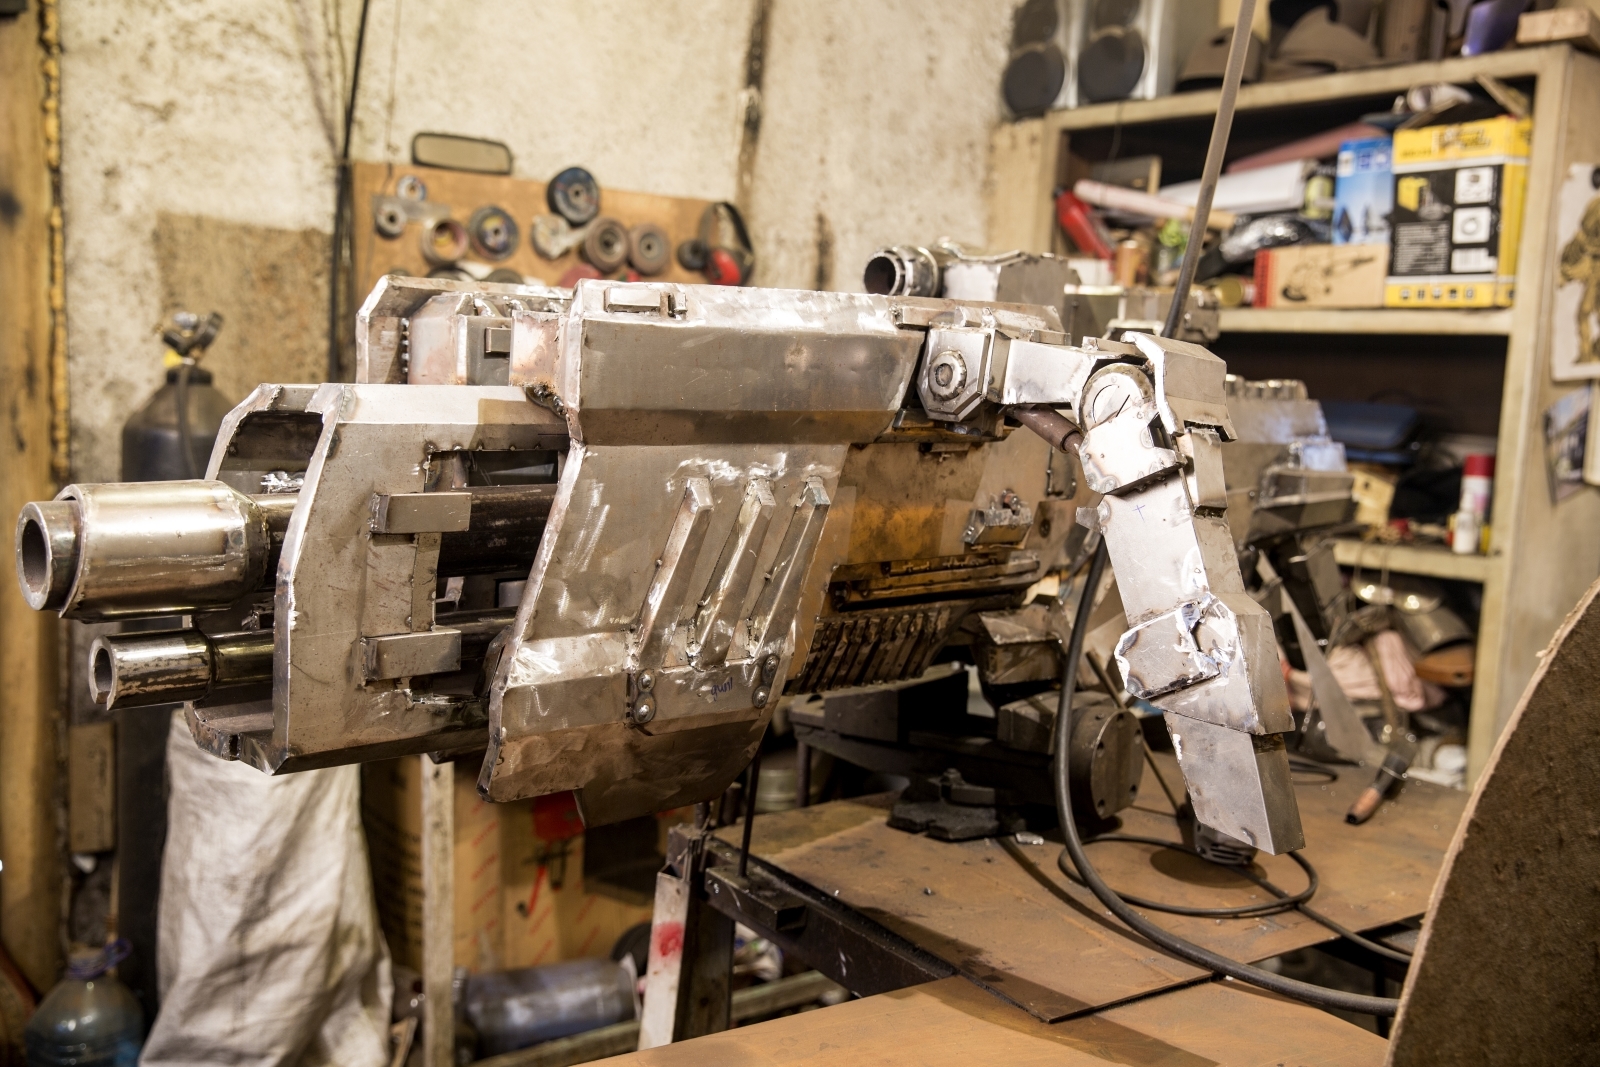
After the head and frame legs made a gun and began to create a collapsible structure for the body. When the body and arms were finished, the electricians went in for moving and luminous elements in the helmet, on the elbows and shoulders.
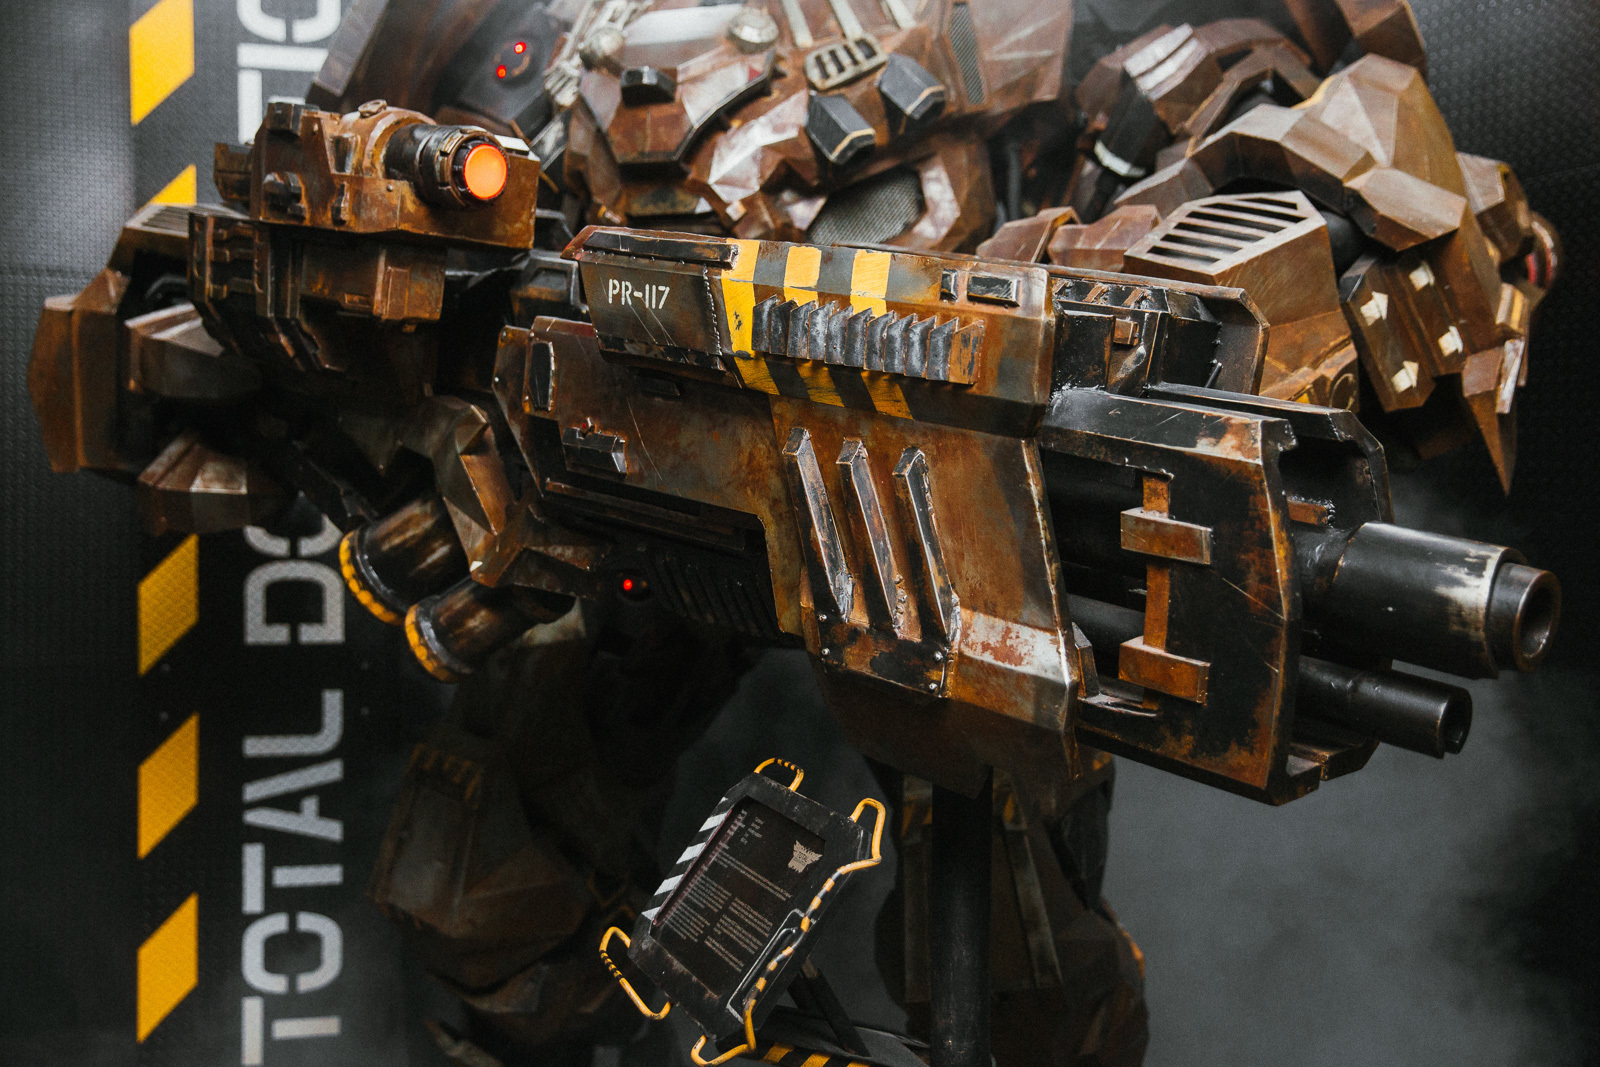
Suddenly, with a gun having difficulty. Virtual robot kept it without difficulty, but the real proportions were not allowed to take up arms. Therefore, we made an additional support and disguised it under the tablet.

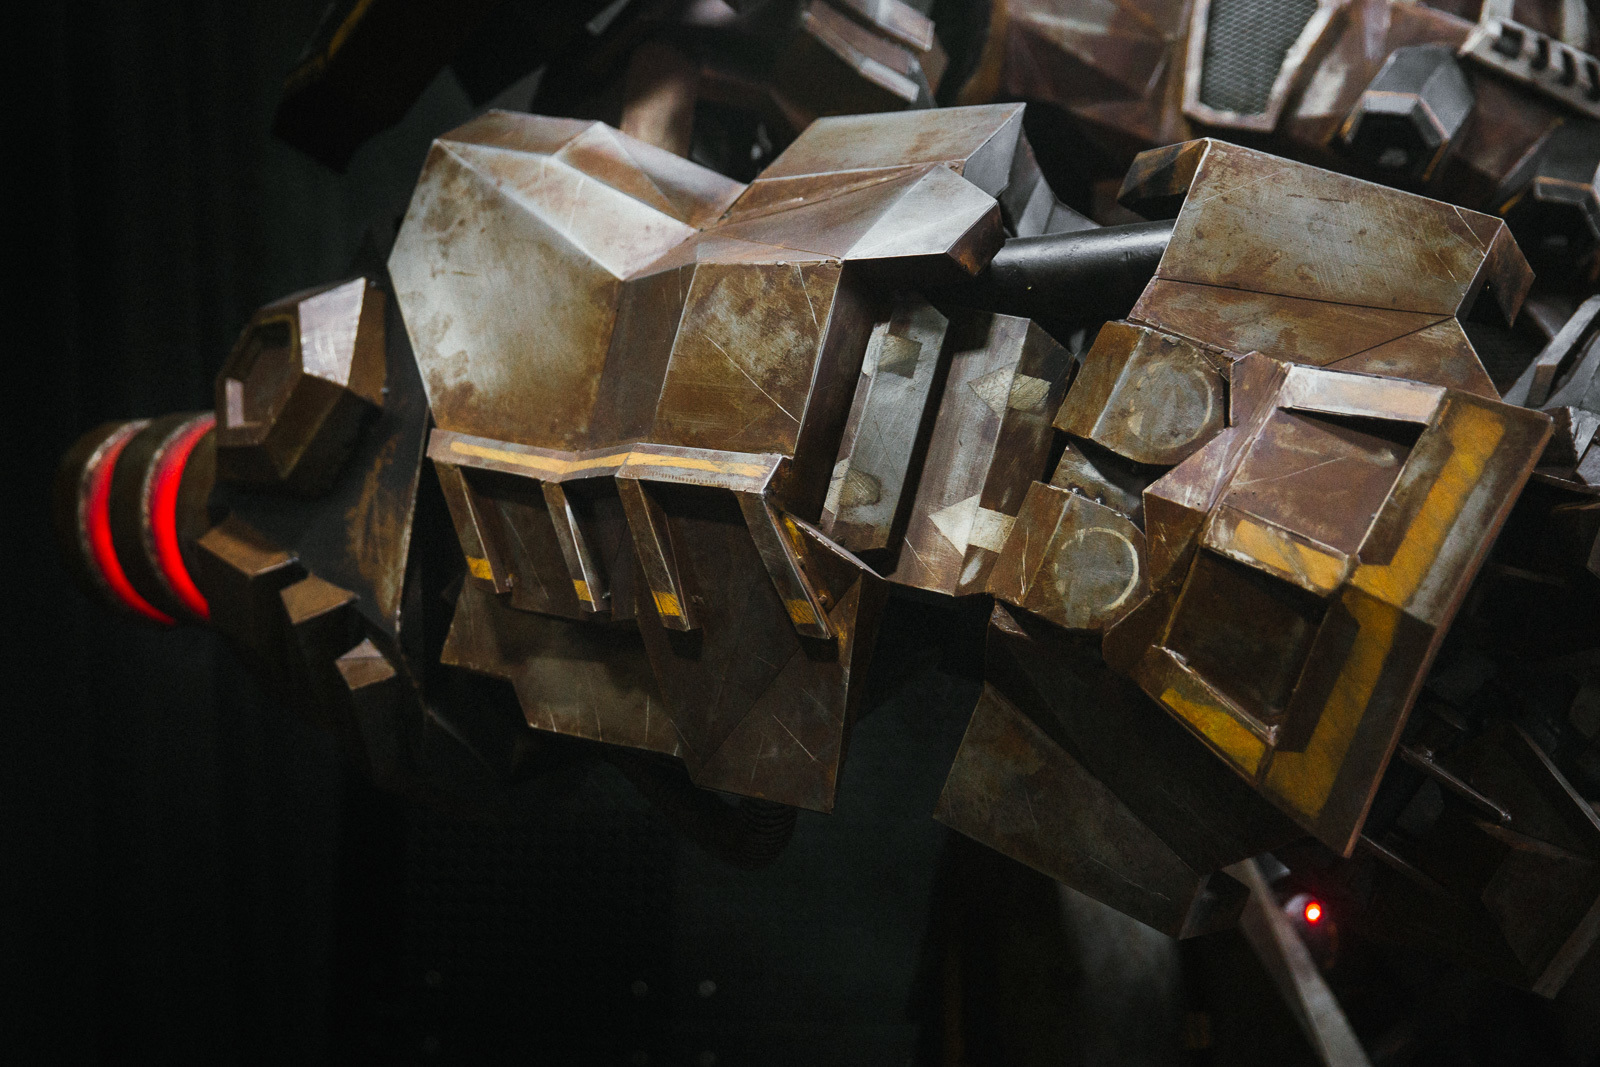
The robot can turn its head. An ordinary motor could not cope with such a weight, so we used one of the most powerful servo drives for robotics, designed for a force of 35 kilograms.
Of course, it was possible to take a simple microcontroller and stitch a usual program into it that would turn its head left and right. But we wanted more realism in the movements, so we implemented the rotation mechanism with the help of the Arduino. The program incorporates a non-linear algorithm and various settings, as well as the ability to control the movement of the head and the color of the backlight of the eyes, hands and sight from the smartphone.
The robot has waterproof Mystery speakers (the same is used on boats and yachts) and an amplifier with a karaoke system - you can connect 2 microphones or an electric guitar to the Hammer.
The sight and elbows were filled with hot melt, which scatters the light and hides its source. Previously, we have already experimented with the illumination of the Half-Life first-aid kit and found that the material is ideal for such purposes.
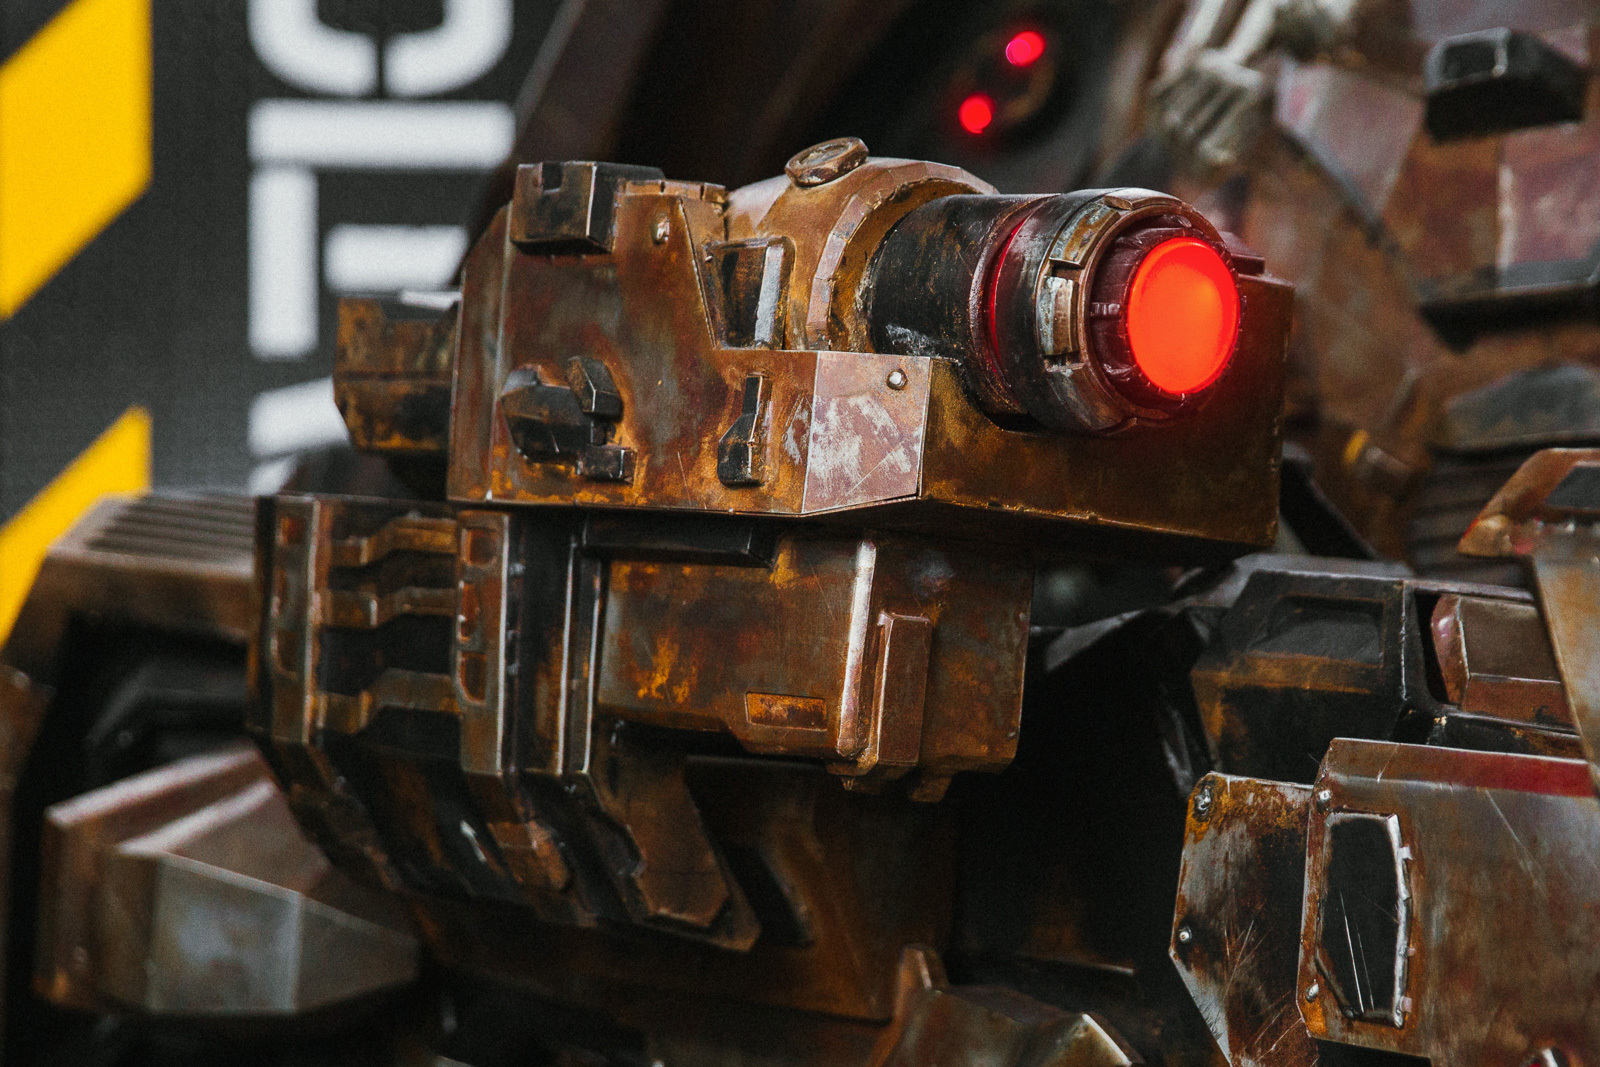
The LED ribbon runs along the contour of the modules. In the blue-eyed we saw that the robot uses the backlight on the shoulders to blind the enemy, so we left a gap through which a beam of light penetrates.

And in the eyes of the "Hammer" LED-tape is closed with a Plexiglas filter, wiped closer to the edges. This is what creates the effect of glowing pupils.

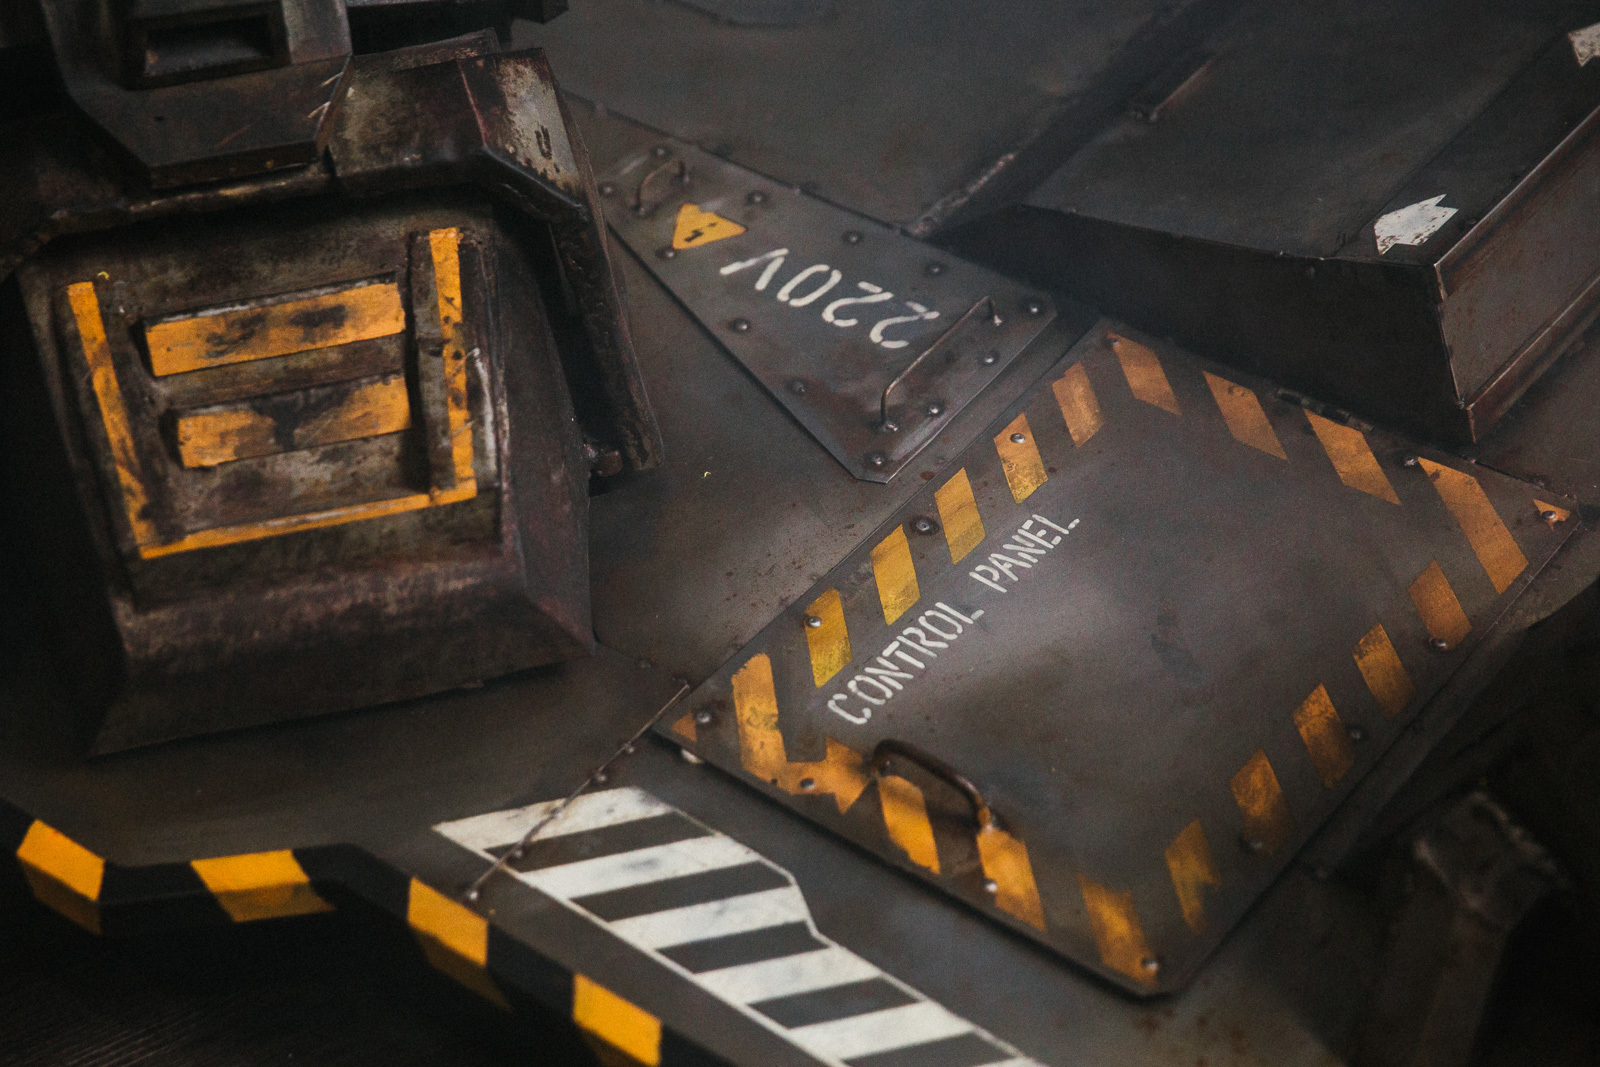
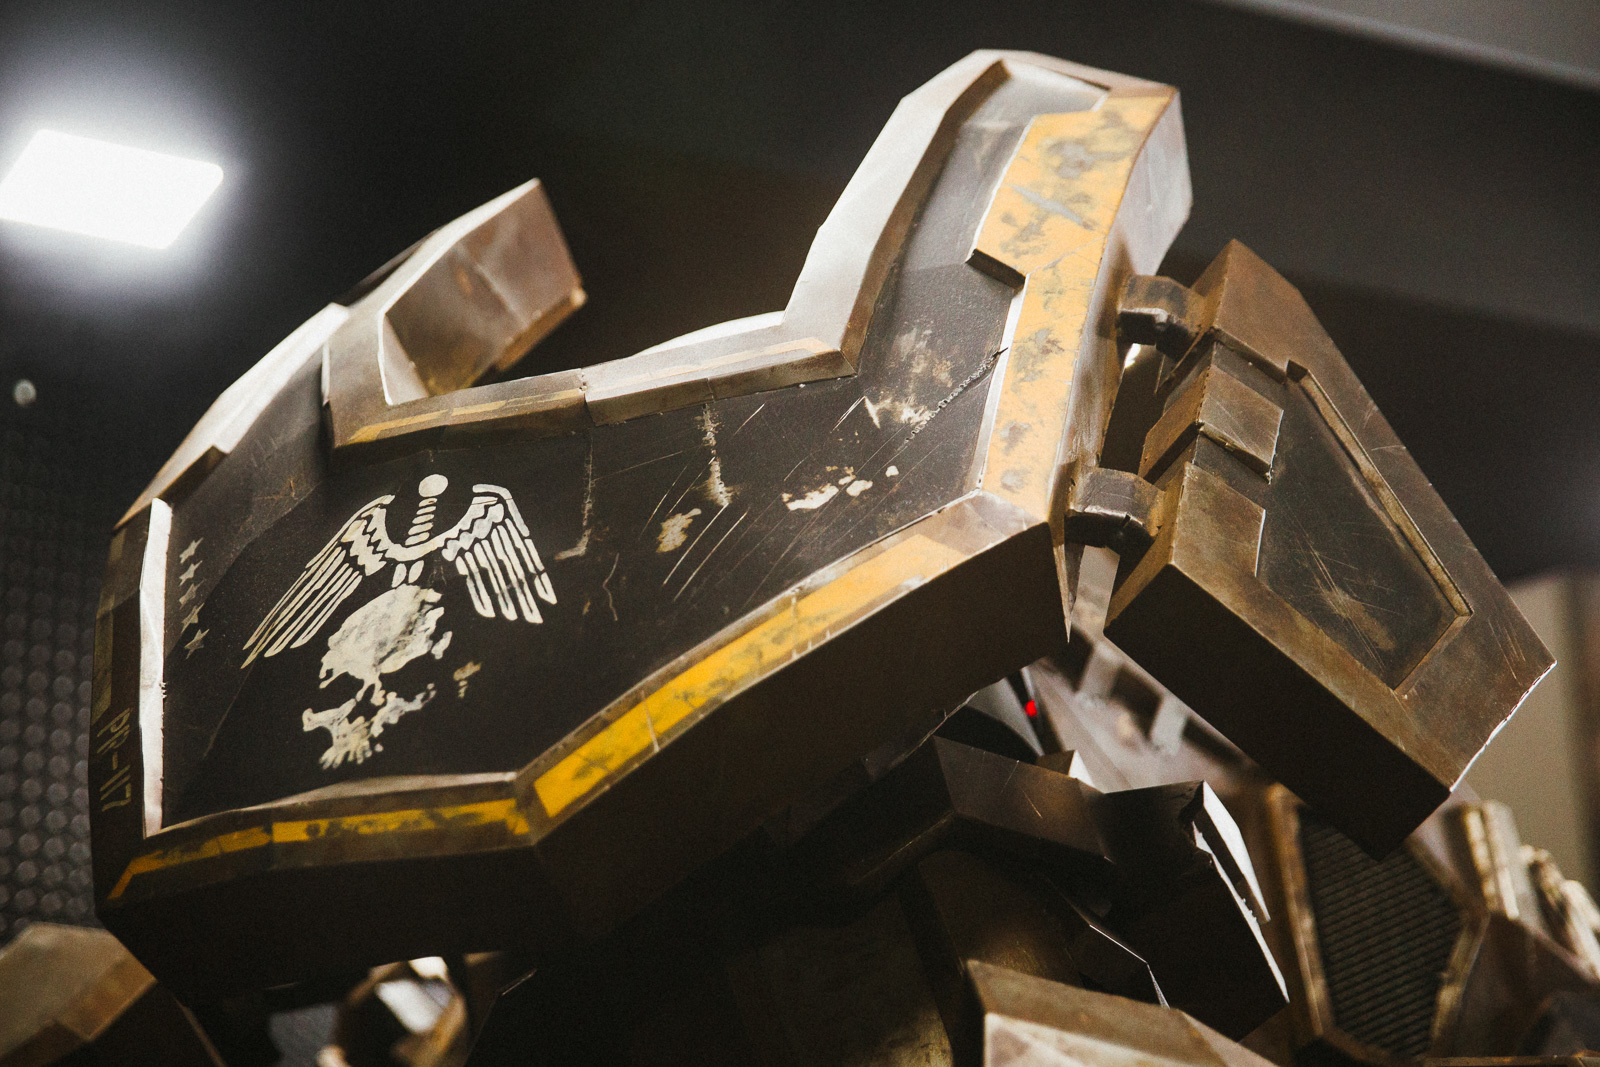
The easiest thing was to clean the robot, open it with primer and paint it. But we wanted the robot to look as if it had just come from the thick of the battle. For this it was necessary that the metal rusted evenly and the rust did not become corrosive. Therefore, we spent a huge amount of sandpaper, brushes and nozzles for the drill, manually cleaning every centimeter of metal.


The final stage, the assembly, took three days - without sleep and rest. It was the hardest part of the project. What it cost to insert a gun, which weighs more than 200 kilograms, in his hands!

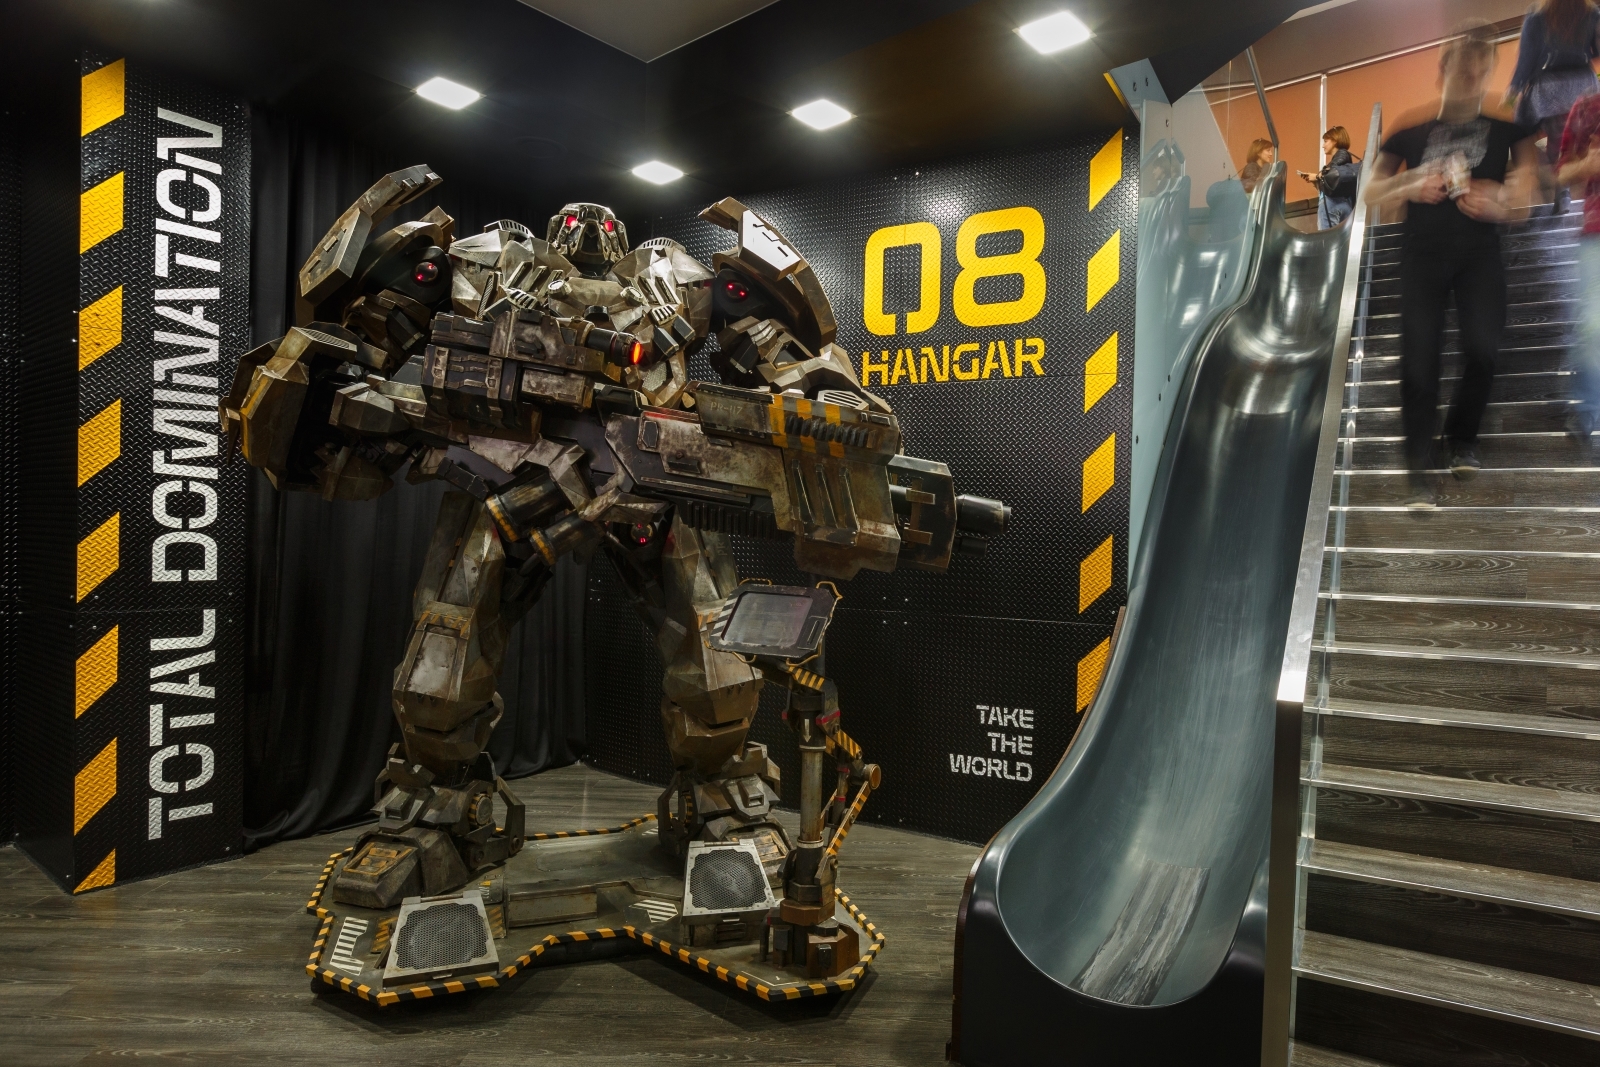
Now the robot "Hammer" meets employees and visitors of Plarium Kharkiv at the 8th floor reception.
PS Later, Plarium developers, localizers and sound designers taught the robot to speak in three languages, but this will be a separate article.
The 3D model of the robot was created 5 years ago. There are 180 thousand polygons, 440 elements and 5 basic texture sheets of 4K each. But now in front of you is not a 3D model, but a real 3-meter 800-kilogram giant of flesh and blood. More precisely, from metal and metal.
"Hammer" made Sasha, Andrew and Sergey - blacksmiths with experience. They say that their forge has become something of an art studio. We publish the story of the guys about how the robot "Hammer" was born.
')
How to start creating a robot
We mainly work on exclusive orders - we take on what we are interested in and constantly raise the bar for complexity.
We find what no one else has done. Then we find out what the main problem is and get to work. Sergey created the most sophisticated gothic armor. And for Euro 2012 on one of the Kharkov avenues our 4-meter sculpture of a woman was installed. Once we made a figure of a horse, half of which was forged in a realistic manner, and the other half - in the style of steampunk. Most often it turns out that the difficulties over which others have retreated can be overcome - there would be a desire.
We started cooperation with Plarium with a small test task - first-aid kits from Half-Life. Now she hangs in the parking lot Plarium Kharkiv . And then the guys sent a 3D model, screenshots and a video with a robot.
We did not have the necessary experience, but we knew that we would get it in the process. In total, we worked on Hammer for 2 years, but now we would have done a similar project in 6 months.
How we prepared the materials
First, we used the old approach - we printed the pictures, transferred the sizes to sheets of paper and began to cut the metal with a grinder. It took several weeks to create one foot and a lot more materials than we expected. It was necessary to look for alternatives.
We remembered that there are programs that decompose the model into a scan, from which papercraft is then created. We decided to try the same with metal.
In 3ds Max disassembled the robot on the details, and in Pepacura did a scan 3D model. Then they began to prepare materials for laser cutting and learn SolidWorks. To create the required number of parts, it was necessary to make 1.5 kilometers of cuts on 26 mm-steel sheets 1x2 meters in size.
In a company that deals with laser cutting and usually makes bodies for welding machines, they were very surprised at our order. Especially the number of parts - more than 3000.
Soon the cut elements were taken to the workshop. At this moment we really realized the scale of the work: the details are piled up in heaps, it is impossible to pass in the workshop. The week went away only for sorting and labeling, it was scary to imagine how long it would take to assemble.
How we collected the robot
We divided the assembly work into blocks: each part of the robot was assembled separately. In this case, one part could consist of 20–30 parts joined together.
The basic element, on which everything is kept, was modeled in 3ds Max, and then assembled from pipes. The construction had to be made collapsible, so we bought strong pipes for the frame, and the rest of the blocks were mounted.
The laser cut out only the contours of the parts, so that all the folds and the volume needed to be created manually. We transferred the dotted fold lines from Peparura to the iron parts, and then walked along these marks with a grinder to make the metal more malleable. The markup was a very laborious process, it took a third of the time.
At the assembly stage, we burned 2 laptops and 2 phones. The equipment could not cope with the abundance of metal dust in the air, and it was impossible to work without visualization.
We separately collected the platform of the robot, its legs, body, arms and gun. Each of these elements also understands - for example, you can separate the head from the torso, and disassemble hands into several parts. This allows, if necessary, to get to the electronics in any module.
For each block, we defined the frame part and first of all curved it, and then joined others, which helped set the shape. All the blocks were first assembled on the welding tack, then boiled thoroughly, sent for stripping and put aside.
We started at the head of the robot and immediately realized that we were doing everything correctly: the head looked exactly like a 3D model.
After the head and frame legs made a gun and began to create a collapsible structure for the body. When the body and arms were finished, the electricians went in for moving and luminous elements in the helmet, on the elbows and shoulders.
Suddenly, with a gun having difficulty. Virtual robot kept it without difficulty, but the real proportions were not allowed to take up arms. Therefore, we made an additional support and disguised it under the tablet.
How we revived the robot
The robot can turn its head. An ordinary motor could not cope with such a weight, so we used one of the most powerful servo drives for robotics, designed for a force of 35 kilograms.
Of course, it was possible to take a simple microcontroller and stitch a usual program into it that would turn its head left and right. But we wanted more realism in the movements, so we implemented the rotation mechanism with the help of the Arduino. The program incorporates a non-linear algorithm and various settings, as well as the ability to control the movement of the head and the color of the backlight of the eyes, hands and sight from the smartphone.
The robot has waterproof Mystery speakers (the same is used on boats and yachts) and an amplifier with a karaoke system - you can connect 2 microphones or an electric guitar to the Hammer.
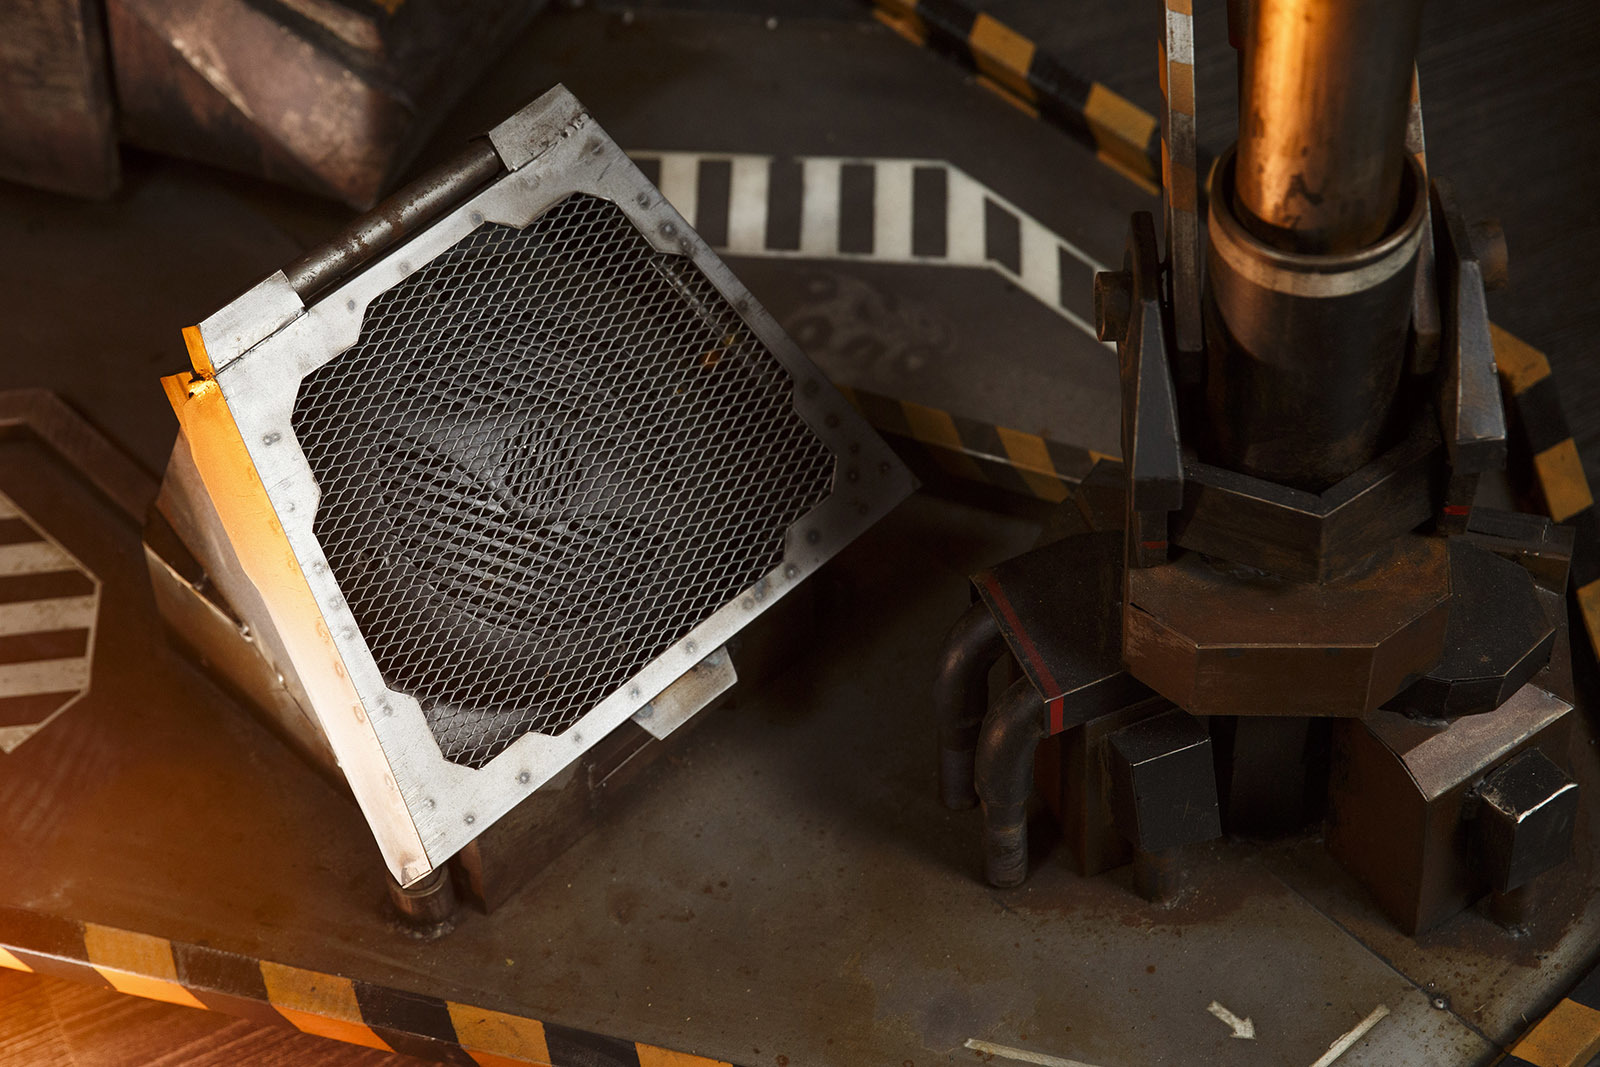
The sight and elbows were filled with hot melt, which scatters the light and hides its source. Previously, we have already experimented with the illumination of the Half-Life first-aid kit and found that the material is ideal for such purposes.
The LED ribbon runs along the contour of the modules. In the blue-eyed we saw that the robot uses the backlight on the shoulders to blind the enemy, so we left a gap through which a beam of light penetrates.
And in the eyes of the "Hammer" LED-tape is closed with a Plexiglas filter, wiped closer to the edges. This is what creates the effect of glowing pupils.
How to make beauty
The easiest thing was to clean the robot, open it with primer and paint it. But we wanted the robot to look as if it had just come from the thick of the battle. For this it was necessary that the metal rusted evenly and the rust did not become corrosive. Therefore, we spent a huge amount of sandpaper, brushes and nozzles for the drill, manually cleaning every centimeter of metal.
The final stage, the assembly, took three days - without sleep and rest. It was the hardest part of the project. What it cost to insert a gun, which weighs more than 200 kilograms, in his hands!
Now the robot "Hammer" meets employees and visitors of Plarium Kharkiv at the 8th floor reception.
PS Later, Plarium developers, localizers and sound designers taught the robot to speak in three languages, but this will be a separate article.
Source: https://habr.com/ru/post/402971/
All Articles