Noolite MTRF-32 + Arduino + Domoticz
In this article, I describe the connection of the Noolite MTRF-32 module to my Domoticz-based smart home control system.
My house is private. It has already introduced some of the rudiments of a smart home based on Domoticz and wireless actuators on MySensors.
At the moment, sensors for opening doors, switching on house lighting, temperature and humidity sensors at home and on the street, voice information about events and weather forecasts are implemented.
The house is wooden, so I did not really want to control the lighting by closing the relyushki from China. Pull the wires anywhere, too, is not an option. After much deliberation, the light control was done on noolite power units and consoles and it remained to somehow make friends with Domoticz.
')
At that moment, an article about the Noolite MTRF-32 module came across. Domoticz supports sending HTTP GET requests. The prospect of using modules with feedback is also beckoning, so the module was ordered.
As it turned out, I bought is not exactly what you need. At the time of purchase was available one module MTRF-32. And reading the article, I did not see information about the varieties of these modules. In general, I needed a USB version of the MTRF-32-USB.
What is done is done. The shawl was postponed untilsomeone laid out a ready-made library of better times.
For some reason, the best times have not come. Although I thought that the system is popular.
After walking around the site Noolite found NooliteOne software to work with the MTRF-64-USB. It turned out that it works through the com-port and I realized that the MTRF-64 is different from the MTRF-64-USB by the built-in USB-COM adapter. Included with the software were the drivers from the FTDI chip, and on my board was a contact suitable contact pad.
I did not solder the chip. But I made a Chinese Arduino Nano with an FTDI USB-COM adapter and connected it to the board.
Did not take off. For some reason, NooliteOne did not find my adapter. I already started looking towards decompilation when I discovered the library for the MT1132 module.
I compared the description of the modules and realized that in terms of data transfer, they almost do not differ. The functionality implemented in the library for MT1132 was sufficient for me (I don’t need feedback yet - there are no suitable power units).
Having corrected the code in the library, I began to receive answers from the MTRF-32. Oddly enough, it all worked the first time. And that's what happened:
Implemented commands to turn off, turn on, switch, turn on everything, turn off everything.
Things are easy, you need to give the command port to com. Since it is problematic from Domoticz to Windows, I decided to write a console application that will broadcast commands from the lua script. Commands are passed to the application as launch parameters.
noo.exe com5 n4 - turn on the light on channel 4, transmitted to the Arduino board on the COM5 port. Possible values for the second launch parameter:
Short video
A little about the house itself
My house is private. It has already introduced some of the rudiments of a smart home based on Domoticz and wireless actuators on MySensors.
At the moment, sensors for opening doors, switching on house lighting, temperature and humidity sensors at home and on the street, voice information about events and weather forecasts are implemented.
The house is wooden, so I did not really want to control the lighting by closing the relyushki from China. Pull the wires anywhere, too, is not an option. After much deliberation, the light control was done on noolite power units and consoles and it remained to somehow make friends with Domoticz.
')
At that moment, an article about the Noolite MTRF-32 module came across. Domoticz supports sending HTTP GET requests. The prospect of using modules with feedback is also beckoning, so the module was ordered.
The fact that you need to measure 7 times before cutting
As it turned out, I bought is not exactly what you need. At the time of purchase was available one module MTRF-32. And reading the article, I did not see information about the varieties of these modules. In general, I needed a USB version of the MTRF-32-USB.
Should clarify
32 means control over 32 channels. To date, a module with 64 channels is available on the noolite website, both options with or without USB. Question to the readers of the MTRF-32 somehow you can upgrade to the MTRF-64?
What is done is done. The shawl was postponed until
For some reason, the best times have not come. Although I thought that the system is popular.
First try
After walking around the site Noolite found NooliteOne software to work with the MTRF-64-USB. It turned out that it works through the com-port and I realized that the MTRF-64 is different from the MTRF-64-USB by the built-in USB-COM adapter. Included with the software were the drivers from the FTDI chip, and on my board was a contact suitable contact pad.
I did not solder the chip. But I made a Chinese Arduino Nano with an FTDI USB-COM adapter and connected it to the board.
Did not take off. For some reason, NooliteOne did not find my adapter. I already started looking towards decompilation when I discovered the library for the MT1132 module.
Second try
I compared the description of the modules and realized that in terms of data transfer, they almost do not differ. The functionality implemented in the library for MT1132 was sufficient for me (I don’t need feedback yet - there are no suitable power units).
Having corrected the code in the library, I began to receive answers from the MTRF-32. Oddly enough, it all worked the first time. And that's what happened:
Ardunoo.H
#ifndef ARDUNOO_H
#define ARDUNOO_H
#if defined (ARDUINO) && ARDUINO> = 100
#include "Arduino.h"
#else
#include "WProgram.h"
#endif
#include <SoftwareSerial.h>
class ArduNoo {
byte chnl;
SoftwareSerial ns;
public:
ArduNoo (byte rx, byte tx, byte ch = 0);
void on (byte ch = -1);
void off (byte ch = -1);
void onoff (byte ch = -1);
void bind (byte ch = -1);
void unbind (byte ch = -1);
bool command (byte channel, byte command);
};
#endif
Ardunoo.cpp
#include <ardunoo.h>
ArduNoo :: ArduNoo (byte rx, byte tx, byte ch): ns (rx, tx) {
chnl = ch;
ns.begin (9600);
}
void ArduNoo :: off (byte ch) {
command (ch, 0);
}
void ArduNoo :: on (byte ch) {
command (ch, 2);
}
void ArduNoo :: onoff (byte ch) {
command (ch, 4);
}
void ArduNoo :: unbind (byte ch) {
command (ch, 9);
}
void ArduNoo :: bind (byte ch) {
command (ch, 15);
}
bool ArduNoo :: command (byte chnl, byte command) {
static byte i, r, buf [17] = {171,0,0,0,0,0,0,0,0,0,0,0,0,0,0,0,0,0,172};
int sum = 0;
memset (buf + 2.0,14); / * clear message body * /
buf [4] = chnl;
buf [5] = command;
for (i = 0; i <15; ++ i) {// 10
sum + = buf [i];
}
buf [15] = lowByte (sum); // 10
buf [16] = 172; // 11
for (i = 0; i <17; ++ i) {
ns.write (buf [i]);
}
// debug code
for (i = 0; i <17; ++ i) {
while (! ns.available ()) delay (10);
r = ns.read ();
Serial.print®;
}
Serial.println ();
return true;
}
Ardunoo.ino
#include <SoftwareSerial.h>
#include <ardunoo.h>
#define RXpin 10
#define TXpin 11
ArduNoo noo (RXpin, TXpin);
String readString, chString;
void setup () {
Serial.begin (9600);
}
void loop () {
readString = "";
chString = "";
while (Serial.available ()) {
delay (3); // delay
if (Serial.available ()> 0) {
char c = Serial.read (); // gets one byte from serial buffer
readString + = c; // makes the string readString
}
}
if (readString.length ()> 1 && readString.length () <4) {// we expect 1 letter and 1 or 2 digits (ch = 0-31)
for (int i = 1; i <readString.length (); i ++) {
if (isDigit (readString [i])) {
chString.concat (readString [i]);
}
}
//Serial.println(readString[0]);
int ch = chString.toInt ();
switch (readString [0]) {
case 'n': // on
noo.on (ch);
break;
case 'f': // off
noo.off (ch);
break;
case 'x': // toggle
noo.onoff (ch);
break;
case 'b': // bind
noo.bind (ch);
break;
case 'u': // unbind
noo.unbind (ch);
break;
case 'y': // on all channels
for (int i = 0; i <32; i ++) {
noo.on (i);
delay (100);
}
break;
case 'z': // off all channels
for (int i = 0; i <32; i ++) {
noo.off (i);
delay (100);
}
break;
}
}
}
Library license from Zhumatiy Sergey
The MIT License (MIT)
Copyright © 2014 Zhumatiy Sergey
Permission is hereby granted
associated software files (the “Software”), to deal
in the Software without restriction, including without limitation the rights
to use, copy, modify, merge, publish, distribute, sublicense, and / or sell
Software is copyrighted
furnished to do so, subject to the following conditions:
This is a copyright notice.
copies or substantial portions of the Software.
THE SOFTWARE IS PROVIDED "AS IS", WITHOUT WARRANTY OF ANY KIND, EXPRESS OR
IMPLIED, INCLUDING BUT NOT LIMITED TO THE WARRANTIES OF MERCHANTABILITY,
FITNESS FOR A PARTICULAR PURPOSE AND NONINFRINGEMENT. IN NO EVENT SHALL THE
AUTHORS OR COPYRIGHT HOLDERS BE LIABLE FOR ANY CLAIM, DAMAGES OR OTHER
LIABILITY, WHETHER IN AN ACTION OF CONTRACT, TORT OR OTHERWISE, ARISING FROM,
OUT OF OR IN CONNECTION WITH THE SOFTWARE OR THE USE OR OTHER DEALINGS IN THE
SOFTWARE.
Implemented commands to turn off, turn on, switch, turn on everything, turn off everything.
Things are easy, you need to give the command port to com. Since it is problematic from Domoticz to Windows, I decided to write a console application that will broadcast commands from the lua script. Commands are passed to the application as launch parameters.
noo.cs
using System;
using System.Collections.Generic;
using System.Linq;
using System.Text;
using System.IO.Ports;
namespace noo
{
class program
{
static void Main (string [] args)
{
if (args.Length == 2)
{
SerialPort COM = new SerialPort (args [0]);
COM.Open ();
COM.WriteLine (args [1]);
COM.Close ();
}
}
}
}
using System.Collections.Generic;
using System.Linq;
using System.Text;
using System.IO.Ports;
namespace noo
{
class program
{
static void Main (string [] args)
{
if (args.Length == 2)
{
SerialPort COM = new SerialPort (args [0]);
COM.Open ();
COM.WriteLine (args [1]);
COM.Close ();
}
}
}
}
Command example:
noo.exe com5 n4 - turn on the light on channel 4, transmitted to the Arduino board on the COM5 port. Possible values for the second launch parameter:
- nX - enable channel X
- fX - turn off channel X
- xX - switch channel X
- bX - tie power block to channel X
- uX - untie the power unit from channel X
- yX - enable all channels, X any value
- zX - turn off all channels, X any value
lua script
local sensor1 = 'SWHallWay'
local sensor2 = 'SWHall'
local sensor3 = 'SWKitchen'
local sensor4 = 'SWBedroom'
local sensor5 = 'BTNLiteOff'
commandArray = {}
if (devicechanged [sensor1] == 'On') then
os.execute ("c: \\ PROGRA ~ 1 \\ Domoticz \\ scripts \\ noo.exe com4 n3")
end
if (devicechanged [sensor1] == 'Off') then
os.execute ("c: \\ PROGRA ~ 1 \\ Domoticz \\ scripts \\ noo.exe com4 f3")
end
if (devicechanged [sensor2] == 'On') then
os.execute ("c: \\ PROGRA ~ 1 \ Domoticz \\ scripts \\ noo.exe com4 n0")
end
if (devicechanged [sensor2] == 'Off') then
os.execute ("c: \\ PROGRA ~ 1 \ Domoticz \\ scripts \\ noo.exe com4 f0")
end
if (devicechanged [sensor3] == 'On') then
os.execute ("c: \\ PROGRA ~ 1 \\ Domoticz \\ scripts \\ noo.exe com4 n1")
end
if (devicechanged [sensor3] == 'Off') then
os.execute ("c: \\ PROGRA ~ 1 \\ Domoticz \\ scripts \\ noo.exe com4 f1")
end
if (devicechanged [sensor4] == 'On') then
os.execute ("c: \\ PROGRA ~ 1 \ Domoticz \\ scripts \\ noo.exe com4 n2")
end
if (devicechanged [sensor4] == 'Off') then
os.execute ("c: \\ PROGRA ~ 1 \\ Domoticz \\ scripts \\ noo.exe com4 f2")
end
if (devicechanged [sensor5] == 'Off') then
os.execute ("c: \\ PROGRA ~ 1 \\ Domoticz \\ scripts \\ noo.exe com4 z9")
end
return commandArray
Ground floor plan in Domoticz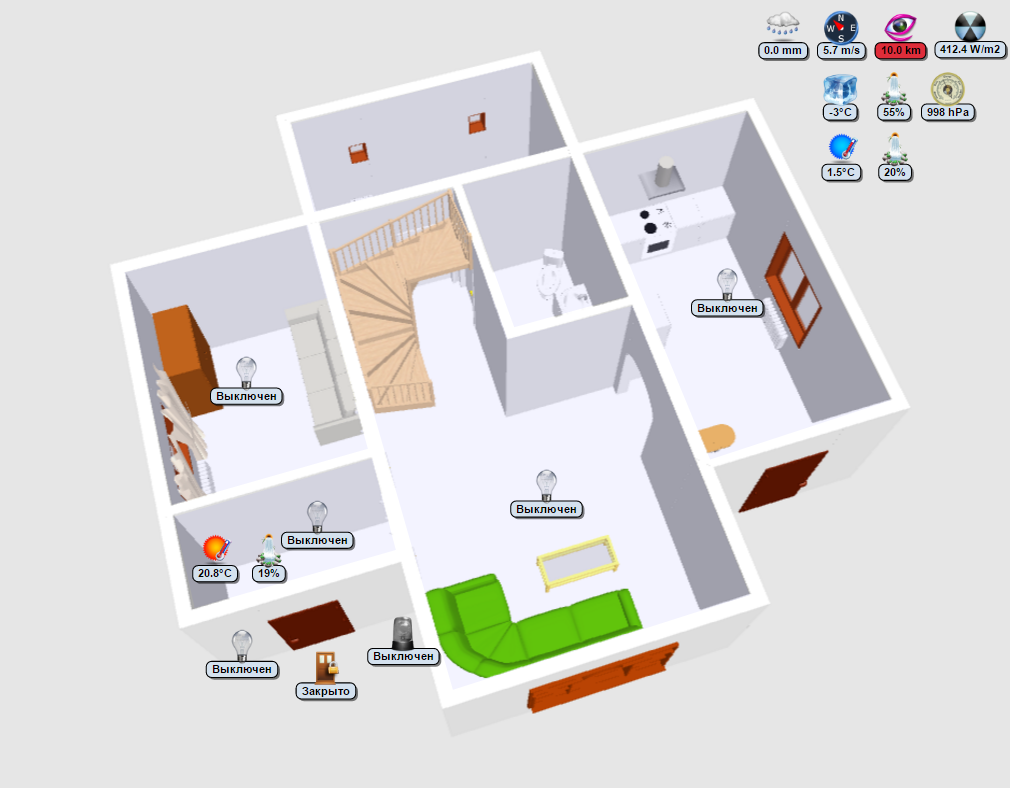
Short video
Source: https://habr.com/ru/post/402799/
All Articles