DIY: Lightsaber with sound
Hello! I like the Star Wars universe since childhood. When I was 7 years old I reviewed episodes 4-6 so many times that I could retell their contents in the smallest details.
Undoubtedly the most vivid impressions of the film - the battle of light swords. Two years ago I came across a brief article on the Internet about choosing a lightsaber as a gift, I became interested and studied this topic in detail.
At the end of the year, episode 8 comes out, on May 4, not far off, and on the threshold of the international day of Star Wars, I decided to write this article.
')
Under the cut, I will share information about the manufacturers of light swords and talk about creating a budget sword with sound based on Arduino.
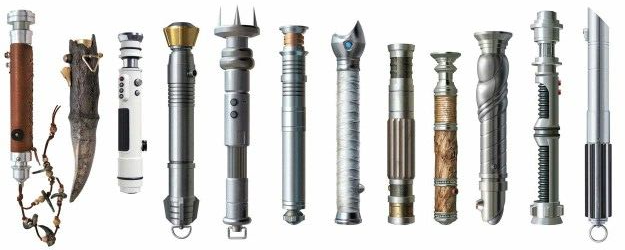
Now on the Internet there are many commercial manufacturers of light swords, the most noteworthy in my opinion:
● ● ● Genesis Custom Sabers - Very high-quality handles to order, the price for an elite custom sword with sound varies in the region of 1500-3000 USD.
● ● ● Saber Forge is a great choice, prices are more affordable, but swords are not as authentic as in Genesis CS. The price of a sword with a sound of about 300 USD.
● ● ● Ultrasabers is one of the most humane stores in terms of prices. A sword with a basic sound costs about 160 USD. You can order individual components for your project.
● ● ● The Custom Saber Shop - a site with a shop and a designer to build your sword.
There are other manufacturers of lightsabers, for example ● ● ● Makoto Tsai , which makes the brightest swords based on homemade LED strips.
But what to do if you do not want to spend a lot of money, and the lightsaber really wants? Only one way out - save up 5,000 rubles and make the sword yourself.
At the time of the beginning of my project, I practically had no programming experience, knowledge in electronics was completely absent. Maybe I did something not the best way, but I continue to learn and I will be glad to your advice.
In the description of the process of creating a sword, I will try to describe all the main difficulties.
So let's get started. Here is a list of all that I used:
- Arduino Pro micro 5v ~ 250 rubles for Ali
- Sound module WT588D-U ~ 250 rubles for Ali
- Step-up 3-5V ~ 100 rubles for Ali
- Speaker Ø28mm, 8 Ohm, 2W ~ 40 rubles for Ali
- ADXL335 Accelerometer ~ 200 rubles for Ali
- N-MOSFET IRF530N x2 ~ 40 rubles per amperka
- LED Luxeon rebel 3W ~ 70 rubles for Ali
- Lens for LED 8 ° ~ 50 rubles for Ali
- Battery CR123A x2 3.7V ~ 400 rubles for Ali
- Battery Krone 9v for Arduino power
- Battery holder ~ 15 rubles for Ali
- Anti-vandal button ~ 100 rubles for Ali
- Tumbler ~ 50 rubles for Ali
- White polycarbonate tube 1 ”~ 800 rubles in Moscow (there are many shops, they are in Google)
- PVC pipe for the manufacture of the handle
You will also need wires, a screw to fix the polycarbonate tube in the handle and a cap for the polycarbonate tube with a reflector.
I ordered a cap with a reflector in the Custom saber shop from $ 7 there, delivery for small goods costs $ 14.
You will also need to get somewhere sounds for the sword, usually a set of on / off sounds, work noise (hum), sounds of swing (swing), sounds of collisions (clash).
I bought a set of sounds on Saberfont for $ 7, but I'm sure you can find free sounds.
The total for the components is about 5,000 rubles. If you buy sounds, if not, then around 4,000.
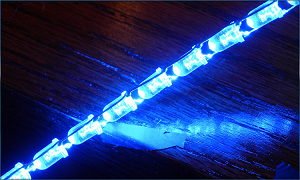
There are two main types of illumination "blades" - one powerful LED at the base of the polycarbonate tube, the light of which is reflected by the cap at the end of the tube and the second type is a homemade segmented LED strip. Segments are needed for the smooth inclusion of the sword, as in the movies.
For example, Makoto uses several segmented ribbons in its brightest swords.
I recommend using one powerful LED for the first build, it is much simpler and quite bright.
I want to immediately say that the swords in the video look brighter than in life, because the matrix of the camera accumulates light in contrast to our eyes. Do not expect your sword to shine like in movies.
I propose to start assembling a prototype with sound settings.
The most difficult thing in the project was to deal with the sound, the WT588D module in my case turned out to be an ideal option, since It provides continuous playback of audio files, it does not require a flash drive.
Before uploading files to WT, I had to edit them a little, for this you can use the free Audacity program.
It is necessary to open each file in turn, select the area with sound (I had several seconds of silence at the end of each file), in the lower left corner of the screen you need to set the frequency from 16000 to 22000 Khz. If the frequency is more than 22000, WT will not allow to download the file. Next Export selected - 16 bit.
To download files to the WT588D, you need a program to download sounds from the module manufacturer - Waytronic (it works only under Windows, I launched on MAC through BootCamp).
You need to run the software and select English in the settings. In WT588D there are several modes of operation, I chose One-line mode, because it requires a minimum of soldering, the module communicates with the Arduino through one pin.
The working field is divided into 3 parts, on the left - the list of files uploaded to the module, in the middle - the list of playlists, on the right - the list of files in the playlist.
To download files, right-click on the list of downloaded files and select Load - find and select the audio file processed in Audacity. Repeat for all files.
Next, you need to create playlists, adding a lot of recurring sounds of work noise after the sound of inclusion and the sounds of strokes / collisions. This is necessary in order not to write code to switch to noise after switching on / waving.
The playlist numbers will be called further in our sketch. After downloading the sounds and preparing playlists, you need to connect power to the WT, connect the speaker, and connect the Data pin to the WT with the Arduino. Just connect to the Arduino button to turn on / off the light / sound and the LED through the MOSFET.
Here is my connection diagram:
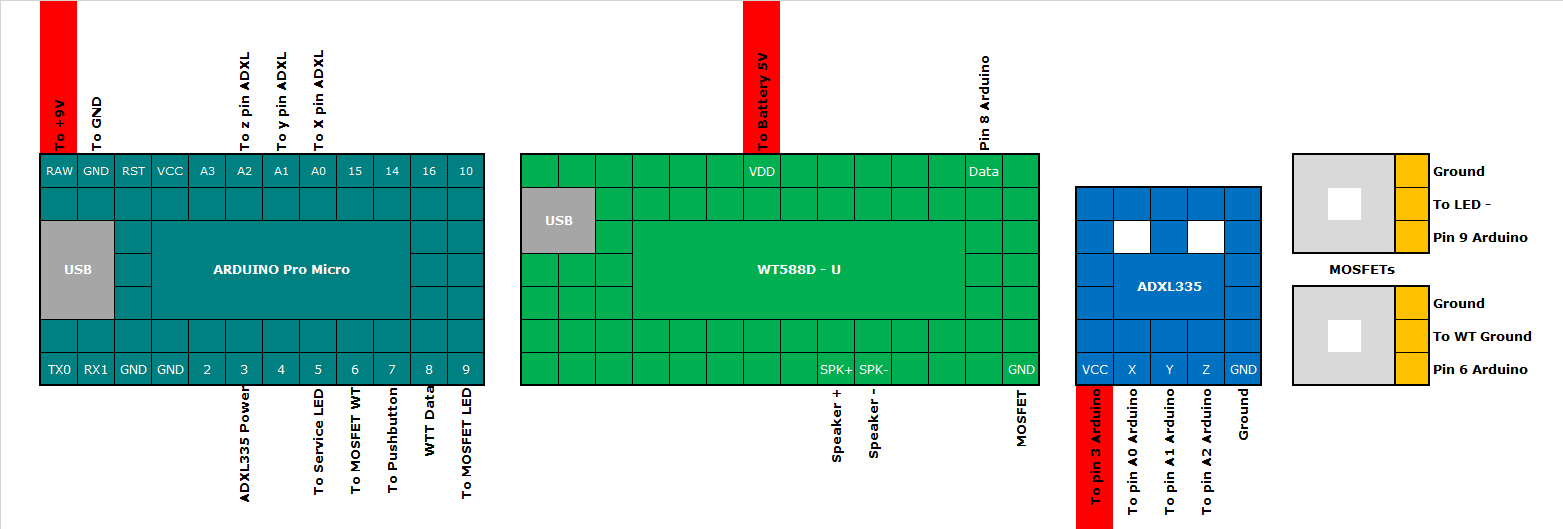
I power the WT from a separate 3.7V battery through the MOSFET using step-up to 5v, in which case I get the maximum output volume.
First you need to register everything that will be used in the sketch:
#define WT588D_SDA 8 // WT588D // const int xpin = A0; const int ypin = A1; const int zpin = A2; int oldtime; int newtime; int ADXL = 3; int BUTTON_PIN = 7; // int LED_PIN = 9; //MOSFET int WT_MOSFET = 6; //MOSFET WT588D int i = 0; byte file_count = 1; bool saberon; bool swingsound; void setup() { Serial.begin(9600); pinMode(BUTTON_PIN, INPUT_PULLUP); pinMode(LED_PIN, OUTPUT); pinMode(ADXL, OUTPUT); pinMode(WT_MOSFET, OUTPUT); pinMode(WT588D_SDA, OUTPUT); digitalWrite(ADXL, LOW); digitalWrite(LED_PIN, LOW); digitalWrite(WT588D_SDA, HIGH); digitalWrite(WT_MOSFET, LOW); saberon = false; swingsound = false; oldtime = analogRead(xpin) + analogRead(ypin) + analogRead(zpin); // } To use WT, in the sketch you need to declare the WT_Send_Command (*) command, to do this, add the following code to the end of the sketch:
void WT588D_Send_Command(byte addr) { digitalWrite(WT588D_SDA, LOW); delay(100); for (int i = 0; i < 9; i++) { digitalWrite(WT588D_SDA, HIGH); if (bitRead(addr, i)) { delayMicroseconds(600); digitalWrite(WT588D_SDA, LOW); delayMicroseconds(200); } else { delayMicroseconds(200); digitalWrite(WT588D_SDA, LOW); delayMicroseconds(600); } } digitalWrite(WT588D_SDA, HIGH); delay(50); } The next step is to write the code so that when the button is pressed, the LED turns on and the playlist plays with the start-up sound. When you press the button again, the LED turns off and plays the shutdown playlist.
If you have no programming experience, for a better understanding of the code, I recommend reading the following materials:
• Arduino If tutorial
• Arduino Boolean tutorial
• Arduino Button tutorial
Here is my code for recognizing the state of a button and turning effects on / off:
if (digitalRead(BUTTON_PIN) == LOW) { if (saberon) { WT588D_Send_Command(* ); delay(700); saberon = false; { analogWrite(LED_PIN, LOW); digitalWrite(WT_MOSFET, LOW); delay(1); } } else { digitalWrite(WT_MOSFET, HIGH); delay(100); WT588D_Send_Command(* ); { analogWrite(LED_PIN, HIGH); delay(1); } saberon = true; } } If everything is done correctly, you should hear the switch on sound and noise when the button is pressed, the LED should turn on. When pressed again, the sound is turned off and the LED should go out.
The main part of the sketch is ready, now we will connect the accelerometer and make WT reproduce the sounds of strokes.
The ADXL335 is fairly easy to use, it does not need to include any libraries. Here is the connection diagram:
For the operation of the accelerometer, we will take two measurements and, based on a comparison of readings, play the sound of a swing.
I recommend placing the accelerometer as close as possible to one of the ends of the handle.
newtime = analogRead(xpin) + analogRead(ypin) + analogRead(zpin); delay (100); if (newtime - oldtime >= 75 || newtime - oldtime <= -75) { if (swingsound) { swingsound = false; delay (50); } else { swingsound = true; WT588D_Send_Command(* ); delay (150); } } Serial.print(oldtime); Serial.print("\t"); Serial.print(newtime); Serial.print("\t"); Serial.print(newtime - oldtime); Serial.println(); oldtime = newtime; That's it, the prototype is ready. It's time to create a handle and put all the stuffing in it.
I made the handle of PVC pipe, insert for the blade diameter: 28mm.
I had problems with the handle, as a result, the first version was too small, now I'm doing a new one.
In the manufacture of PVC handles, you are limited only by your imagination, I can only give one piece of advice - before painting, treat the surface of the pipe with fine sandpaper, otherwise the paint will not hold well.
Here is the first version of my handle, I drilled holes in the lid and placed the speaker, and the blade is fixed in the pipe with four screws:


I didn’t include a clash effect in my sword, I’ll probably catch up next. But if you want to turn on the clash, you need a vibration sensor or an accelerometer setting for detecting short accelerations. If someone succeeds in setting up an accelerometer, do not be lazy to share the code, I will include it in an article mentioning you as the author.
Here is a small sword test at night outside:
update:
I completed the handle and worked on the synchronization of sounds, added the sound of the clash to the updated video:
I am sure that Geektimes reads a large number of very talented and skillful people, I ask you, share your opinion, give advice. It is possible that thanks to the collaboration we will be able to further simplify / optimize the process.
Be sure to share your results, it is very interesting to see what happens with you!
Thank you all for your attention! And may the force be with you!
Source: https://habr.com/ru/post/402681/
All Articles