How to stop paying for roaming, or With one number around the world
The idea of this material came to me last year, when, having made a big circle around our vast range, I received bills for roaming at the end of the month. Despite assurances from cellular companies about free roaming within the country, SMS or Internet traffic can be charged separately. And the minutes included in the tariff are valid only in the “home region”. Well, since this year's plans envisage traveling not only in his native country, I began to realize my idea - my own stationary PBX at home, which will be able to contact me anywhere in the world.
Along the way, I solved the problem of telephone communication between apartments and relatives' houses, since the time of internal negotiations was calculated not just for hours, but for dozens of hours.
A small spoiler: as a result, Asterisk was installed on the NAS and the router
So I came to the conclusion that you need your own telephony. It would be possible to choose any of the SIP-telephony services that are present in large numbers on the market. But I had a list of requirements that none of the operators satisfied:
Many operators provide a virtual PBX and even a voice menu. But this service is already paid. Some operators allow you to call within your network for free, but the problem of dialing long numbers arises. And certainly no one allows you to use the SIM card of the selected operator with the minimum cost of calls or prepaid minutes. So I decided to become my own telecom operator myself.
Step one. Platform Choice: Virtualization
')
Since I already dealt with IP-telephony, it was decided to raise my PBX based on Asterisk - it is free, there are a lot of forums, manuals and ... why not? I got several radio tubes with SIP support and started thinking about the platform for Asterisk work. To take out to the clouds or to a virtual server, this would mean that sooner or later you have to pay, but then the idea of making telephony for free falls. Therefore, I decided to use the virtualization function on my NAS QNAP TS-451. I have already written about this network drive chip, so you can read more . The performance of the system with the head was enough not only for the Asterisk itself, but also for the web interface, so I decided to use the Elastix distribution. I must say that the latest distribution kit number 5 on the official Elastix.org website is already conditionally free, so I recommend looking for a version 4 distribution kit on torrents - it was free and distributed freely, but now it is not available on the site.
Creating users in Elastix is described many times, but the rest is not covered in the network in such detail. Therefore, I will describe the connection of the SIP-provider "Multifon" from Megaphone and the creation of a voice menu with redirection.
Create a trunk with the parameters of your account in Multiphone. You can connect this option to any Megafon operator number. The withdrawal of funds does not depend on the chosen tariff plan and is made for each minute of an outgoing call. Inbox free. Two lines of conversation are supported at once. In addition, you can configure that incoming calls go only to the phone, telephone + multi-phone, only to the multi-phone.

Text settings for those who want to add a Multiphone trunk to themselves:
So, we have connected to the SIP-provider and now we can forward the incoming call to any of the internal numbers. But what to do if you want the caller to choose which extension number to dial? You can create a voice menu with the choice of destination. I will make a step by step description.
Create a voice menu in Elastix
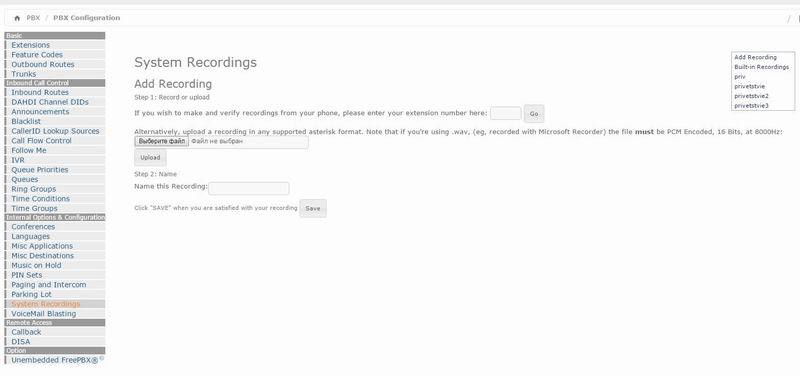
Go to the item System Recordings. Here you have already written the parameters of the voice recording you need to make: PCM, 16 bit, 8000 Hz. This can be done both in a standard recording utility and in third-party programs like SoundForge.
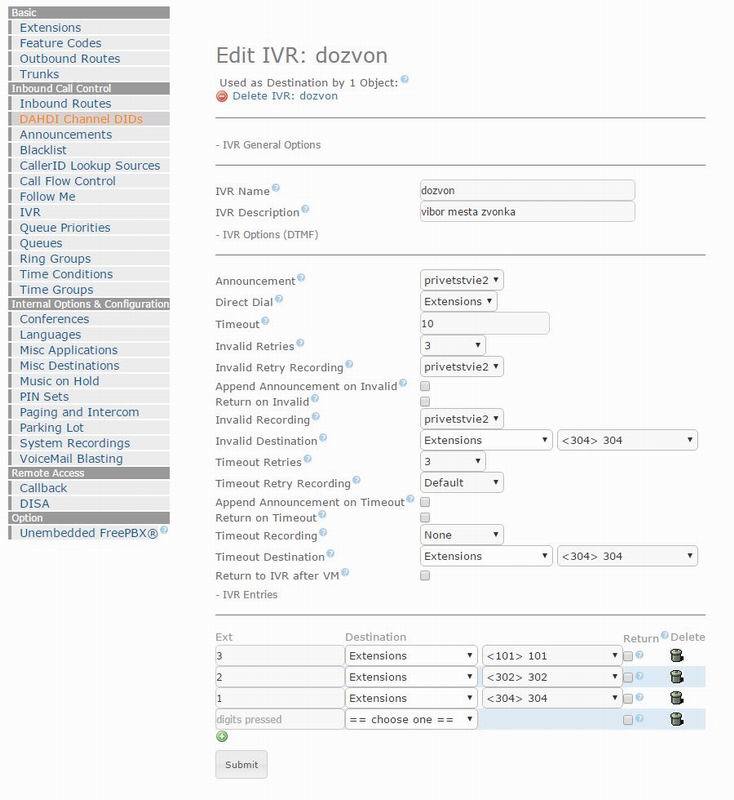
After the voice greeting is created and uploaded to the server, go to the IVR menu item. Create a new voice menu and select the greeting file, as well as the response to pressing the buttons. In my case, I chose that by pressing the number "3" will be called the number "101" and so on. If the wrong button is selected or the caller does not press any button, then the redirection goes to the internal number 304.
Now we need to make the incoming call get to our voice menu. Go to the point Inbound Routes and create a new rule. In the last paragraph, “Set Destination”, select the IVR and the previously created queue, which I called the “dozvon”.

We save and use. All this worked for about a month without failures, but it seemed to me a little. After all, not every home has a NAS with a virtual machine or a server on which you can pick up Asterisk, but almost every home has a router!
Possible problems and their solutions with the virtual server
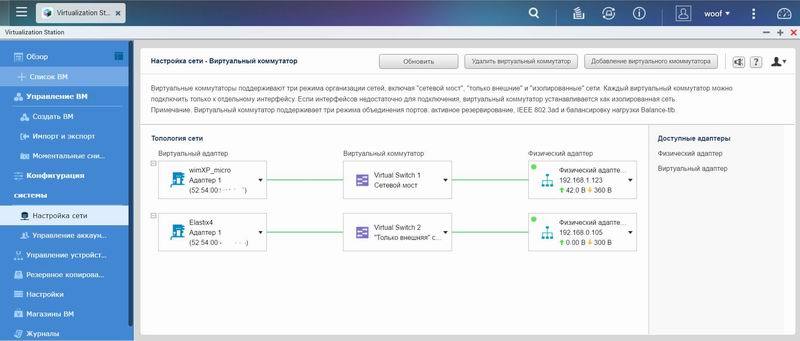
In the process of creating a server and port forwarding, it turned out that the work of two virtual machines and one physical server on the same network port is not very efficient. The simplest solution was to take advantage of the virtualization system and select a separate network interface for the virtual machine. This turned out to be very simple with the QNAP built-in tools. After that, the NAS + 1st virtual machine itself remained to work on the first network interface, and the second virtual machine - on the second network interface.
Step two: raise Asterisk on the router
It so happened that I use the Yota provider, but I do not use their original routers. For a long time, I had a great Zyxel router - Keenetic LTE. A couple of years ago, I already experienced it in the most severe conditions of the outback and was completely satisfied - there is a separate material about this on Habré.
In the latest NDMS firmware, and to be more precise, starting with firmware 2.08.B, support for OPKG packages has been enabled for the Zyxel Keenetic family of routers. This means that you can put the most diverse software. (There is a mass of software adapted for Zyxel routers) So why not put Asterisk there? It is important that the router has at least 128 MB of RAM. No sooner said than done!
More pleasantly, Zyxel even prepared a manual for deploying Asterisk for their routers. In principle, to deploy telephony on a router, it is enough to follow the step by step instructions. And I will tell you how I improved and brought the functioning of this system to the one that spun on a separate virtual server.
The first thing I encountered was an unclear problem with starting the router after a software reboot. It turned out that my flash drive connected to the USB port of the router consumes up to 0.16A current. This turned out to be enough so that the LTE modem in the Zyxel Keenetic LTE router periodically could not start. Everything was cured by connecting the flash drive through an external USB hub with additional power. Took time-tested and many people D-Link DUB-H7 . This ended the problems. I believe that routers with a pair of USB ports will work without such crutches.
Now proceed to the settings of Asterisk. Here you need to edit all the handles. There are two ways: go through SSH and edit there (MC is present) or go to the IP address of the router via a ball and edit files with Notepad ++. I was satisfied with both options and I got down to business. I added my users, I registered the multifon trunk in the sip.conf file. It remains only to make a voice queue. I put the voice greeting file in \\ 192.168.1.1 \ Asterisk-blue \ var \ lib \ asterisk \ sounds \ ru , and made the following changes to the extensions.conf file.
So it all worked. Outgoing calls go through Multiphone, internal calls between subscribers are free, and incoming calls through Multiphone can be addressed to any of the three subscribers. But I thought this was not enough. And it is a pity that only Megaphone provides an alternative cellular SIP line connection. What if you want to use another cellular provider? There is a solution!
Step three: we bind any mobile operator to our Asterisk
The final step was to connect any mobile operator to our telephony server. The most logical solution would be to connect a GSM-SIP gateway, which at the output gives a SIP trunk. But the cost of such devices for 1 sim-card starts from 9 thousand rubles, so it was decided to go the other way. We find a modem with voice support. In our case, it turned out to be Huawei E3131. How to unlock it and turn on voice functions is repeatedly told on the network, so I will not be distracted by this. We insert the sim card we need into the port of the USB hub and first of all disable its operation as a 3G modem in the menu.
After that, we begin to configure the Asterisk files. First, install the Dongle package with the command in the opkg install asterisk11-chan-dongle console. After installation, open the dongle.conf file and edit to get the following:
Save the file and go to the file extensions.conf. A multi-phone can be commented out, and added to work with a modem.
Now it all started and worked as it should. Incoming calls to the number are received by Asterisk and the user selects the number to determine where to call. An outgoing call goes through any mobile operator, wherever you are. That is, you can insert your SIM card into a USB modem and go to any part of the planet. There, it is enough to have access to the network, and on a smartphone / laptop to have a SIP client that connects to your Asterisk server. Solution run-in and running. The resulting glitches were treated by adding a USB hub with external power and replacing the flash drive, as some drives were malfunctioning. All the work on putting telephony into the work will take one evening.
To prevent this work from happening, you can create a backup of the entire Asterisk on a flash drive with one command:
Bonus for Zyxel Keenetic LTE owners
It should be noted that this router is also equipped with two SIP clients with physical FXS ports to which any analog telephone can be connected. And this client easily connects to the Asterisk server, which revolves on it.
Bonus for Zyxel Keenetic * owners
If you do not want to spend money on the purchase of SIP-phones, then the routers of the Keenetic line support the DECT-adapter from Zyxel, which adds the SIP-telephony function with the ability to connect any DECT cordless handset.
Conclusion
The task of free communication between separated subscribers with frequent and lengthy negotiations has been solved. The task of "presence" of the subscriber in the city and free communication with the owner of the number, wherever the owner is located, is also solved. The solution with virtualization on a QNAP TS-451 network drive benefits from the ability to configure Asterisk via a web interface. But the solution with the router does not require virtually any costs. Asterisk is easy! Why pay for roaming when the connection can be free?
I would like to separately thank the Zyxel team for their responsiveness, help in experiments and increasing the functionality of their devices.
PS As correctly commented below, almost all mobile operators prohibit the use of a SIM card to create a GSM gate. In fact, no one will block you until you start commercial exploitation of your gate. The author is not responsible for your actions.
Nevertheless, I know cases when companies used dozens of SIM cards in GSM gateways for cheap calls to cellular numbers.
Along the way, I solved the problem of telephone communication between apartments and relatives' houses, since the time of internal negotiations was calculated not just for hours, but for dozens of hours.
A small spoiler: as a result, Asterisk was installed on the NAS and the router
So I came to the conclusion that you need your own telephony. It would be possible to choose any of the SIP-telephony services that are present in large numbers on the market. But I had a list of requirements that none of the operators satisfied:
- Independent choice of internal numbers
- Access to external lines of communication with the possibility of calls to landline and mobile numbers
- The possibility of choosing an operator providing IP-telephony
- The ability to use the SIM-card of the selected operator with the usual "telephone" tariff
- Availability of voice menu for forwarding an incoming call to the desired subscriber
- Minimum or zero cost of servicing / maintaining intercom
Many operators provide a virtual PBX and even a voice menu. But this service is already paid. Some operators allow you to call within your network for free, but the problem of dialing long numbers arises. And certainly no one allows you to use the SIM card of the selected operator with the minimum cost of calls or prepaid minutes. So I decided to become my own telecom operator myself.
Step one. Platform Choice: Virtualization
')
Since I already dealt with IP-telephony, it was decided to raise my PBX based on Asterisk - it is free, there are a lot of forums, manuals and ... why not? I got several radio tubes with SIP support and started thinking about the platform for Asterisk work. To take out to the clouds or to a virtual server, this would mean that sooner or later you have to pay, but then the idea of making telephony for free falls. Therefore, I decided to use the virtualization function on my NAS QNAP TS-451. I have already written about this network drive chip, so you can read more . The performance of the system with the head was enough not only for the Asterisk itself, but also for the web interface, so I decided to use the Elastix distribution. I must say that the latest distribution kit number 5 on the official Elastix.org website is already conditionally free, so I recommend looking for a version 4 distribution kit on torrents - it was free and distributed freely, but now it is not available on the site.
Creating users in Elastix is described many times, but the rest is not covered in the network in such detail. Therefore, I will describe the connection of the SIP-provider "Multifon" from Megaphone and the creation of a voice menu with redirection.
Create a trunk with the parameters of your account in Multiphone. You can connect this option to any Megafon operator number. The withdrawal of funds does not depend on the chosen tariff plan and is made for each minute of an outgoing call. Inbox free. Two lines of conversation are supported at once. In addition, you can configure that incoming calls go only to the phone, telephone + multi-phone, only to the multi-phone.
Text settings for those who want to add a Multiphone trunk to themselves:
Trunk Multiphone
Peer Details:
username = phone_number
type = peer
secret = password
port = 5060
nat = yes
insecure = port, invite
host = sbc.megafon.ru
fromuser = telephone_number
fromdomain = multifon.ru
dtmfmode = inband
context = from-trunk
Register String:
telephone_number: password@multifon.ru/phone_number
username = phone_number
type = peer
secret = password
port = 5060
nat = yes
insecure = port, invite
host = sbc.megafon.ru
fromuser = telephone_number
fromdomain = multifon.ru
dtmfmode = inband
context = from-trunk
Register String:
telephone_number: password@multifon.ru/phone_number
So, we have connected to the SIP-provider and now we can forward the incoming call to any of the internal numbers. But what to do if you want the caller to choose which extension number to dial? You can create a voice menu with the choice of destination. I will make a step by step description.
Create a voice menu in Elastix
Go to the item System Recordings. Here you have already written the parameters of the voice recording you need to make: PCM, 16 bit, 8000 Hz. This can be done both in a standard recording utility and in third-party programs like SoundForge.
After the voice greeting is created and uploaded to the server, go to the IVR menu item. Create a new voice menu and select the greeting file, as well as the response to pressing the buttons. In my case, I chose that by pressing the number "3" will be called the number "101" and so on. If the wrong button is selected or the caller does not press any button, then the redirection goes to the internal number 304.
Now we need to make the incoming call get to our voice menu. Go to the point Inbound Routes and create a new rule. In the last paragraph, “Set Destination”, select the IVR and the previously created queue, which I called the “dozvon”.
We save and use. All this worked for about a month without failures, but it seemed to me a little. After all, not every home has a NAS with a virtual machine or a server on which you can pick up Asterisk, but almost every home has a router!
Possible problems and their solutions with the virtual server
In the process of creating a server and port forwarding, it turned out that the work of two virtual machines and one physical server on the same network port is not very efficient. The simplest solution was to take advantage of the virtualization system and select a separate network interface for the virtual machine. This turned out to be very simple with the QNAP built-in tools. After that, the NAS + 1st virtual machine itself remained to work on the first network interface, and the second virtual machine - on the second network interface.
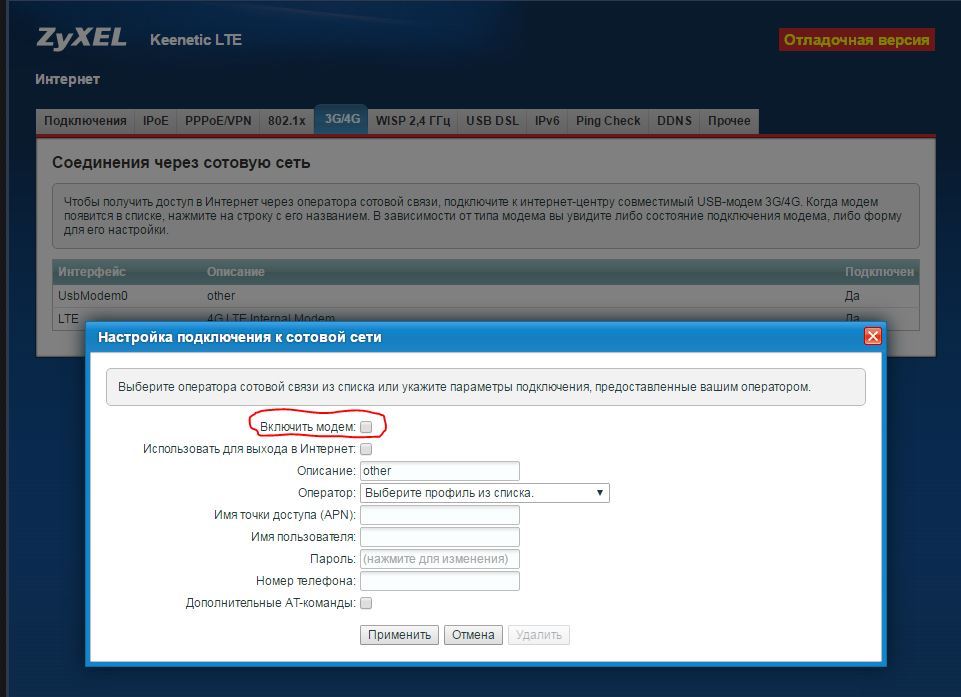
Step two: raise Asterisk on the router
It so happened that I use the Yota provider, but I do not use their original routers. For a long time, I had a great Zyxel router - Keenetic LTE. A couple of years ago, I already experienced it in the most severe conditions of the outback and was completely satisfied - there is a separate material about this on Habré.
In the latest NDMS firmware, and to be more precise, starting with firmware 2.08.B, support for OPKG packages has been enabled for the Zyxel Keenetic family of routers. This means that you can put the most diverse software. (There is a mass of software adapted for Zyxel routers) So why not put Asterisk there? It is important that the router has at least 128 MB of RAM. No sooner said than done!
More pleasantly, Zyxel even prepared a manual for deploying Asterisk for their routers. In principle, to deploy telephony on a router, it is enough to follow the step by step instructions. And I will tell you how I improved and brought the functioning of this system to the one that spun on a separate virtual server.
The first thing I encountered was an unclear problem with starting the router after a software reboot. It turned out that my flash drive connected to the USB port of the router consumes up to 0.16A current. This turned out to be enough so that the LTE modem in the Zyxel Keenetic LTE router periodically could not start. Everything was cured by connecting the flash drive through an external USB hub with additional power. Took time-tested and many people D-Link DUB-H7 . This ended the problems. I believe that routers with a pair of USB ports will work without such crutches.
Now proceed to the settings of Asterisk. Here you need to edit all the handles. There are two ways: go through SSH and edit there (MC is present) or go to the IP address of the router via a ball and edit files with Notepad ++. I was satisfied with both options and I got down to business. I added my users, I registered the multifon trunk in the sip.conf file. It remains only to make a voice queue. I put the voice greeting file in \\ 192.168.1.1 \ Asterisk-blue \ var \ lib \ asterisk \ sounds \ ru , and made the following changes to the extensions.conf file.
Making a voice menu in Asterisk
[external-outgoing]
; ------------------ Multifon - exten => _8 .........., 1, NoOp ()
exten => _8 .........., n, Set (__ SIP_CODEC_OUTBOUND = ulaw)
exten => _8 .........., n, Set (__ SIP_CODEC_INBOUND = ulaw)
exten => _8 .........., n, Answer ()
exten => _8 .........., n, Wait (2)
exten => _8 .........., n, Playback (/ opt / var / lib / asterisk / sounds / itsp_names / multifon)
exten => _8 .........., n, Dial (SIP / Multifon / 7 $ {EXTEN: 1} ,, T)
exten => _8 .........., n, Hangup ()
[multifon-incoming]; ===== Incoming call from Multifon =====
exten => _........, 1, NoOp ()
exten => _........, n, Wait (4)
exten => _........, n, Answer ()
exten => _........, n (play), NoOp ()
exten => _........, n, Wait (1)
exten => _........, n, Playback (hello)
exten => _........, n, Wait (0,5)
exten => _........, n, Playback (priv)
exten => _........, n, Set (TIMEOUT (digit) = 1)
exten => _........, n, NoOp ()
exten => _........, n, WaitExten (7)
exten => _1,1, NoOp ()
exten => _1, n, Set (__ SIP_CODEC_OUTBOUND = ulaw)
exten => _1, n, Set (__ SIP_CODEC_INBOUND = ulaw)
exten => _1, n, Set (CALLERID (num) = 8 $ {CALLERID (num): 1})
exten => _1, n (dial_ext), Dial (SIP / 101.60, mt)
exten => _2,1, NoOp ()
exten => _2, n, Set (__ SIP_CODEC_OUTBOUND = ulaw)
exten => _2, n, Set (__ SIP_CODEC_INBOUND = ulaw)
exten => _2, n, Set (CALLERID (num) = 8 $ {CALLERID (num): 1})
exten => _2, n (dial_ext), Dial (SIP / 302,60, mt)
exten => _3,1, NoOp ()
exten => _3, n, Set (__ SIP_CODEC_OUTBOUND = ulaw)
exten => _3, n, Set (__ SIP_CODEC_INBOUND = ulaw)
exten => _3, n, Set (CALLERID (num) = 8 $ {CALLERID (num): 1})
exten => _3, n (dial_ext), Dial (SIP / 304.60, mt)
So it all worked. Outgoing calls go through Multiphone, internal calls between subscribers are free, and incoming calls through Multiphone can be addressed to any of the three subscribers. But I thought this was not enough. And it is a pity that only Megaphone provides an alternative cellular SIP line connection. What if you want to use another cellular provider? There is a solution!
Step three: we bind any mobile operator to our Asterisk
The final step was to connect any mobile operator to our telephony server. The most logical solution would be to connect a GSM-SIP gateway, which at the output gives a SIP trunk. But the cost of such devices for 1 sim-card starts from 9 thousand rubles, so it was decided to go the other way. We find a modem with voice support. In our case, it turned out to be Huawei E3131. How to unlock it and turn on voice functions is repeatedly told on the network, so I will not be distracted by this. We insert the sim card we need into the port of the USB hub and first of all disable its operation as a 3G modem in the menu.
After that, we begin to configure the Asterisk files. First, install the Dongle package with the command in the opkg install asterisk11-chan-dongle console. After installation, open the dongle.conf file and edit to get the following:
Dongle.conf work file
[dongle]
interval = 15
[defaults]
context = dongle-incoming
rxgain = 0
txgain = 0
usecallingpres = yes
callwaiting = no
dtmf = inband
mindtmfgap = 45; minimal interval from end of previews DTMF from begining of next in ms
mindtmfduration = 80; minimal DTMF tone duration in ms
mindtmfinterval = 200; minimal interval between ends of DTMF of same digits in ms
[GSM1]
audio = / dev / ttyUSB1
data = / dev / ttyUSB2
imei = *****************; E3131 - enter IMEI modem
Save the file and go to the file extensions.conf. A multi-phone can be commented out, and added to work with a modem.
Register for operation of calls via USB-modem in the extensions.conf file
[dongle-outgoing]; for outgoing calls:
; ------------------ GSM1 Donle - exten => _8 .........., 1, NoOp ()
exten => _8 .........., n, Set (__ SIP_CODEC_OUTBOUND = ulaw)
exten => _8 .........., n, Set (__ SIP_CODEC_INBOUND = ulaw)
exten => _8 .........., n, Answer ()
exten => _8 .........., n, Wait (2)
exten => _8 .........., n, Playback (/ opt / var / lib / asterisk / sounds / itsp_names / beeline-gsm)
exten => _8 .........., n, Dial (DONGLE / GSM1 / 8 $ {EXTEN: 1} ,, T)
exten => _8 .........., n, Hangup ()
[dongle-incoming]; for incoming calls:
exten => s, 1, NoOp ()
exten => s, n, Wait (4)
exten => s, n, Answer ()
exten => s, n (play), NoOp ()
exten => s, n, Wait (1)
exten => s, n, Playback (hello)
exten => s, n, Wait (0,5)
exten => s, n, Playback (priv)
exten => s, n, Set (TIMEOUT (digit) = 1)
exten => s, n, NoOp ()
exten => s, n, WaitExten (7)
exten => _1,1, NoOp ()
exten => _1, n, Set (__ SIP_CODEC_OUTBOUND = ulaw)
exten => _1, n, Set (__ SIP_CODEC_INBOUND = ulaw)
exten => _1, n, Set (CALLERID (num) = 8 $ {CALLERID (num): 1})
exten => _1, n (dial_ext), Dial (SIP / 101.60, mt)
exten => _2,1, NoOp ()
exten => _2, n, Set (__ SIP_CODEC_OUTBOUND = ulaw)
exten => _2, n, Set (__ SIP_CODEC_INBOUND = ulaw)
exten => _2, n, Set (CALLERID (num) = 8 $ {CALLERID (num): 1})
exten => _2, n (dial_ext), Dial (SIP / 302,60, mt)
exten => _3,1, NoOp ()
exten => _3, n, Set (__ SIP_CODEC_OUTBOUND = ulaw)
exten => _3, n, Set (__ SIP_CODEC_INBOUND = ulaw)
exten => _3, n, Set (CALLERID (num) = 8 $ {CALLERID (num): 1})
exten => _3, n (dial_ext), Dial (SIP / 304.60, mt)
Now it all started and worked as it should. Incoming calls to the number are received by Asterisk and the user selects the number to determine where to call. An outgoing call goes through any mobile operator, wherever you are. That is, you can insert your SIM card into a USB modem and go to any part of the planet. There, it is enough to have access to the network, and on a smartphone / laptop to have a SIP client that connects to your Asterisk server. Solution run-in and running. The resulting glitches were treated by adding a USB hub with external power and replacing the flash drive, as some drives were malfunctioning. All the work on putting telephony into the work will take one evening.
To prevent this work from happening, you can create a backup of the entire Asterisk on a flash drive with one command:
We make a backup of Asterisk on a flash drive
tar cvzf / opt / backup-`date "+% Y-% m-% d_% H-% M" `.tar.gz -C / opt / bin etc home lib lost + found root sbin share tmp usr var
Bonus for Zyxel Keenetic LTE owners
It should be noted that this router is also equipped with two SIP clients with physical FXS ports to which any analog telephone can be connected. And this client easily connects to the Asterisk server, which revolves on it.
Bonus for Zyxel Keenetic * owners
If you do not want to spend money on the purchase of SIP-phones, then the routers of the Keenetic line support the DECT-adapter from Zyxel, which adds the SIP-telephony function with the ability to connect any DECT cordless handset.
Conclusion
The task of free communication between separated subscribers with frequent and lengthy negotiations has been solved. The task of "presence" of the subscriber in the city and free communication with the owner of the number, wherever the owner is located, is also solved. The solution with virtualization on a QNAP TS-451 network drive benefits from the ability to configure Asterisk via a web interface. But the solution with the router does not require virtually any costs. Asterisk is easy! Why pay for roaming when the connection can be free?
I would like to separately thank the Zyxel team for their responsiveness, help in experiments and increasing the functionality of their devices.
PS As correctly commented below, almost all mobile operators prohibit the use of a SIM card to create a GSM gate. In fact, no one will block you until you start commercial exploitation of your gate. The author is not responsible for your actions.
Nevertheless, I know cases when companies used dozens of SIM cards in GSM gateways for cheap calls to cellular numbers.
Source: https://habr.com/ru/post/402367/
All Articles