Homemade security system based on products for smart home from Nootehnika
Good day, dear community. I want to share with you an experiment in the implementation of a security system for a home based on devices for a smart home from the company Nootehnika. Immediately I want to make a reservation that this is one of the first experiments, and I set myself the goal of not "building an impregnable bastion", but a demonstration of the possibilities of using the devices I have chosen, experiment and learning lessons, as well as receiving feedback from you.
In short, the system I designed should, in arming mode, photograph each person approaching the front door and send a photo to an e-mail address, as well as send an e-mail message in the case of movement registration in the hallway (i.e., there is movement inside the apartment) . So, to the formulation of the problem.
The system I design should:
')
By various arming interfaces, I mean:
To solve this problem, I used the following hardware:
I have already cited a brief description of the devices for building the smart home of the company Notechnika in the “Introduction” section of the article , so I will not focus on this issue here. In addition, in all details about the devices can be found on the off.site website.
So, to the description of the system. Debian Linux 7, Simple Event Correlation (SEC) software and a linux toolkit for controlling Nootech devices from Oleg Artamonov are installed on the 3VI nettop.
Motion sensors (PM112) are installed in the vestibule in front of the entrance door and in the corridor (inside the apartment). A RX2164 USB receiver is connected to the nettop. The receiver receives signals from the sensors and switches, and the utilities for controlling the devices of the Technician (hereinafter referred to as the Noolite utilities) installed on the nettop, transmit the received signals to the syslog. SEC reads the file to which it writes syslog data and processes it according to the configured rules. As a result of processing, actions such as receiving photos from an IP camera and sending emails are performed.
Enabling (and disabling) of the security mode is carried out in two ways:
A block diagram illustrating the operation of the system is shown in Figure 1.
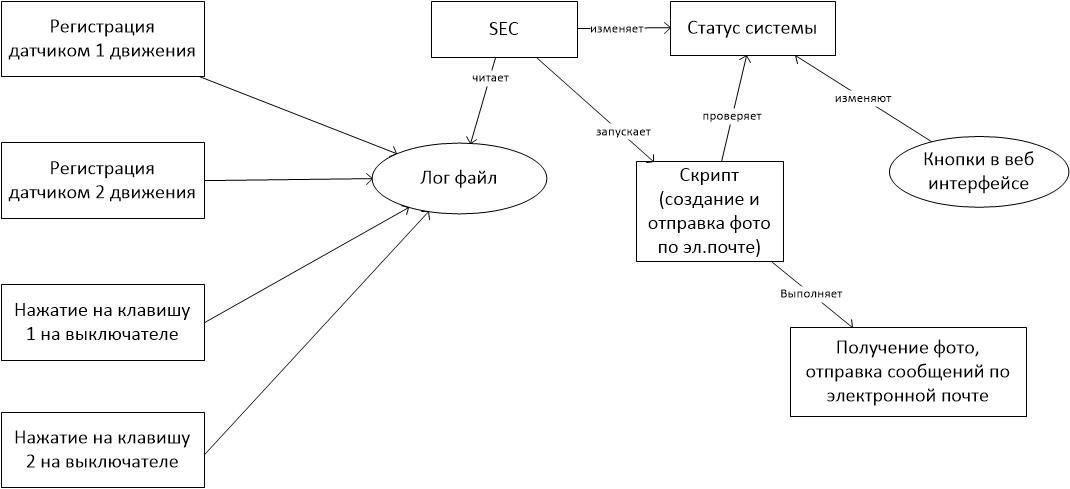
Figure 1 - Block diagram illustrating the operation of the system
For this system I use the same 2 motion sensors, the installation of which I described in section 4 of the article .
In short, one of the sensors is installed near the entrance door in the vestibule (outside the apartment). The sensitivity of this sensor is set at such a level as to record movement in the immediate vicinity of the door. The second sensor is installed immediately near the entrance door, but already inside the apartment. Sensitivity is adjusted in such a way as to fix the movement in the immediate vicinity of the door.
The IP camera is installed outside the apartment in the vestibule under the ceiling. An entrance door and about 1.5 meters of space in front of her fall into her field of view.
The PU311-2 switch is installed inside the cabinet so as not to catch the eye and not be accidentally pressed.
The 3VI nettop with the RX2164 signal receiver is located nearby on the mezzanine to ensure stable reception of signals from sensors and switches.
The equipment installation diagram is shown in Figure 2.
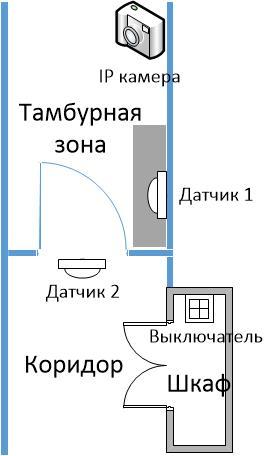
Figure 2 - Equipment installation diagram
Software setup includes:
In order for the RX2164 receiver to start receiving signals from a sensor or a switch, it is necessary to “bind” it. To do this, press the “bind” button on the sensor itself (on the back side), and execute the command on the computer to which the receiver is connected: nooliterxcfg –bind <channel number from 1 to 64>. Similarly, the binding of the switch to the receiver.
In my case, the sensor in the vestibule was connected to channel 3, the sensor in the apartment was connected to channel 2 and the two switch buttons to channels 1 and 4, respectively.
To receive signals from sensors in real time, you need to run the nooliterx utility in daemon mode. The installation process of utilities and their settings are described by the developer himself (Oleg Artamonov in the documentation for the utilities) and also by me in section 4 of the article (LINK). As a result, we obtain the recording of signals from sensors and switches in the syslog. It remains only to configure the recording of these messages to a file in the syslog itself and the output is the following (samples of messages from the sensors):
Sample messages from the switches (when you press the buttons on them) look a little different:
SEC is a utility for handling event logs. In short, at the input it receives a stream of events, each of which checks for compliance with the templates of customized rules. If a match is found, it launches the action specified in the corresponding rule. The thing is amazingly flexible to use. There is a detailed man page on the web.
SEC is used in my system in order to find messages from sensors and switches in the event flow in order to launch a script that takes a photo and sends emails, or simply translate the system on and off.
In the SEC, I set up 4 rules. 2 - for processing events from motion sensors and two - for processing signals from two buttons on the switch. The rules are in the /etc/sec.conf file.
Rule 1: Processing of the signal from the motion sensor in the vestibule (the sensor associated with channel 3)
The type of this rule - “SingleWithSurpress” - is intended to respond only to the first registered event during the time interval specified by the “window” parameter in seconds. Those. this setting says that the rule will not work more than once per minute and the action specified in the “action” parameter will be launched no more than once per minute. This is done to ensure that in the event that someone tinkers around the door for a few minutes not to spam their mail with tons of letters. The “pattern” parameter contains a regular expression, according to which events are searched from the sensor tied to channel 3. The “action” parameter contains two actions - the shellcmd, which executes the script and passes the parameter selected from the regular expression (in this case of representing the number “3”), and the second action “event% s” is used to transfer the expression written in the “desc” parameter to other rules that are not necessary for the operation of this system and can be omitted. The “desc” parameter contains additional service information that is used by other rules. For this system, it is not necessary and arbitrary data can be entered there.
Rule 2: Processing the signal from the movement sensor in the corridor (sensor linked to channel 2)
Here, everything is similar to rule 1. It is worth noting that the script is passed the number "2", obtained from the regular expression.
Rule 3: Processing the signal from the switch button tied to channel 1
This rule is still simpler - it works on every event that matches the regular expression specified in the parameter “pattern”. As an action, it records in the system status file. This file is analyzed by a script run by rules 1 and 2. In the case of the status “online”, the script is triggered, in the case of the value “offline” - the script does not trigger. More on this a little further.
Rule 4: Processing the signal from a switch button tied to channel 4
Everything is similar to rule 3, only the status is set to “offline”.
The script run by rules 1 and 2 checks the status of the system in the status file and, depending on its value (“online” or “offline”), performs or does not perform the following actions:
Below is the body of the script. At its input, it receives (from the SEC) the channel number to which the sensor is attached, and depending on this number and the system status, performs certain actions.
To get photos from my IP camera, I use wget and a line like this:
For other IP cameras, you may need to look for other options, there is no single solution. RTFM to the camera, as they say.
Buttons on and off the system in the web interface. To enable and disable the security mode, I also added a couple of buttons to my samopisny web interface to control the lights of the smart home.
They look like this:
Everything is simple here - when you click on the "ON" button, online is written to the status file, when you click on OFF, offline.
As a result, I got a system that, when activated, takes pictures of anyone who approaches the door and sends the photo to e-mail. And in the case of movement within the apartment, it simply sends an alert by e-mail.
Something like this is a sample email message (see Figure 3). The images themselves, of course, are larger and unfold when you click on them with the mouse.
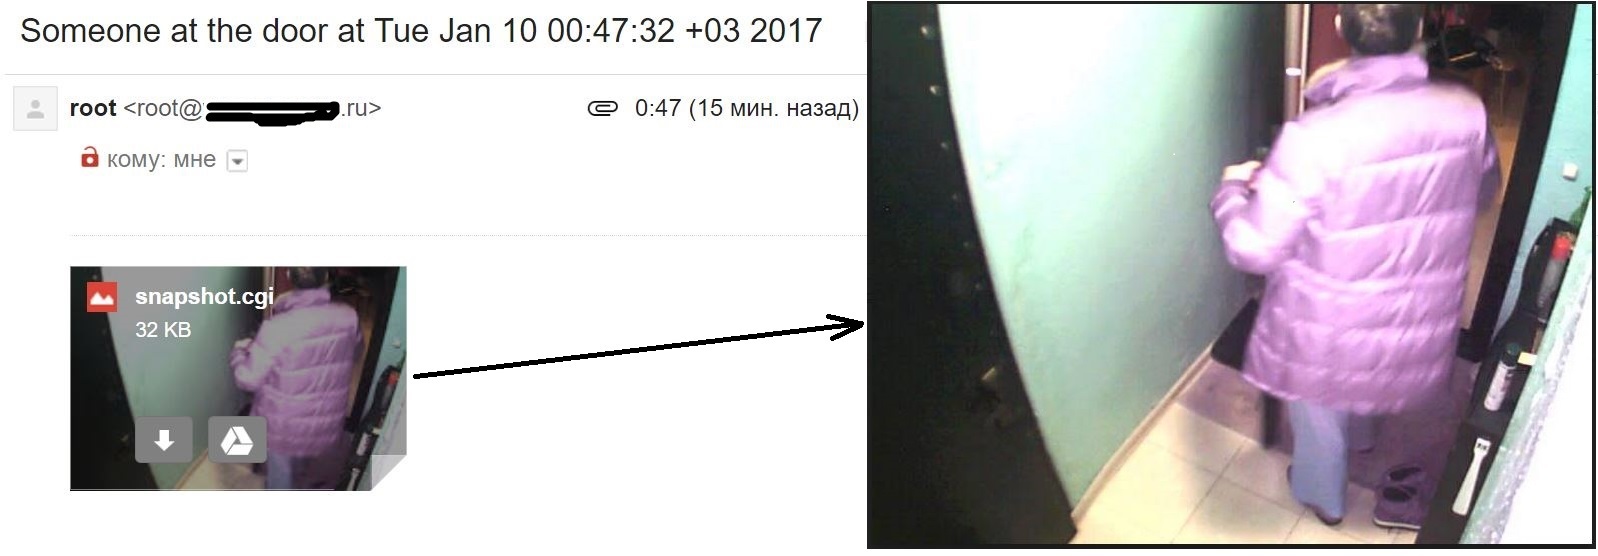
Figure 3 - Example of an email with a photo
The system can be activated and deactivated by pressing a button on the switch and also by means of buttons in the web interface of the smart home control system.
In the short term, I also want to display the current status of the system (active / inactive) in the web interface.
In short, the system I designed should, in arming mode, photograph each person approaching the front door and send a photo to an e-mail address, as well as send an e-mail message in the case of movement registration in the hallway (i.e., there is movement inside the apartment) . So, to the formulation of the problem.
1. Statement of the problem
The system I design should:
')
- in the arming mode, take photographs of each person approaching the front door and send the photo to an e-mail address;
- in the arming mode, send an e-mail message in case of registration of traffic in the hallway (without a photo, since I don’t have IP cameras);
- provide various interfaces for arming and disarming.
By various arming interfaces, I mean:
- transfer to protection mode and disarming by means of radio switches Nootech;
- transfer to protection mode and disarming via a web interface for controlling a smart home.
2. Description of the solution
To solve this problem, I used the following hardware:
- two motion sensors PM112;
- signal receiver from sensors and switches RX2164;
- switch PU311-2;
- nettop 3VI (based on the processor Atom D525);
- Chinese noname IP camera.
I have already cited a brief description of the devices for building the smart home of the company Notechnika in the “Introduction” section of the article , so I will not focus on this issue here. In addition, in all details about the devices can be found on the off.site website.
So, to the description of the system. Debian Linux 7, Simple Event Correlation (SEC) software and a linux toolkit for controlling Nootech devices from Oleg Artamonov are installed on the 3VI nettop.
Motion sensors (PM112) are installed in the vestibule in front of the entrance door and in the corridor (inside the apartment). A RX2164 USB receiver is connected to the nettop. The receiver receives signals from the sensors and switches, and the utilities for controlling the devices of the Technician (hereinafter referred to as the Noolite utilities) installed on the nettop, transmit the received signals to the syslog. SEC reads the file to which it writes syslog data and processes it according to the configured rules. As a result of processing, actions such as receiving photos from an IP camera and sending emails are performed.
Enabling (and disabling) of the security mode is carried out in two ways:
- by pushing a button on the switch PU311-2;
- pushing a button in the web interface of the smart home control system.
A block diagram illustrating the operation of the system is shown in Figure 1.
Figure 1 - Block diagram illustrating the operation of the system
3. Installing the system hardware
For this system I use the same 2 motion sensors, the installation of which I described in section 4 of the article .
In short, one of the sensors is installed near the entrance door in the vestibule (outside the apartment). The sensitivity of this sensor is set at such a level as to record movement in the immediate vicinity of the door. The second sensor is installed immediately near the entrance door, but already inside the apartment. Sensitivity is adjusted in such a way as to fix the movement in the immediate vicinity of the door.
The IP camera is installed outside the apartment in the vestibule under the ceiling. An entrance door and about 1.5 meters of space in front of her fall into her field of view.
The PU311-2 switch is installed inside the cabinet so as not to catch the eye and not be accidentally pressed.
The 3VI nettop with the RX2164 signal receiver is located nearby on the mezzanine to ensure stable reception of signals from sensors and switches.
The equipment installation diagram is shown in Figure 2.
Figure 2 - Equipment installation diagram
4. Setting up the software
Software setup includes:
- setting up Noolite utilities for receiving signals from sensors and switches;
- setting up SEC rules for triggering on signals coming from sensors and switches;
- creating a script that will receive photos from the camera and send emails;
- creation of the on / off button of the system in the web interface.
Setting up Noolite utilities for receiving signals from sensors and switches
In order for the RX2164 receiver to start receiving signals from a sensor or a switch, it is necessary to “bind” it. To do this, press the “bind” button on the sensor itself (on the back side), and execute the command on the computer to which the receiver is connected: nooliterxcfg –bind <channel number from 1 to 64>. Similarly, the binding of the switch to the receiver.
In my case, the sensor in the vestibule was connected to channel 3, the sensor in the apartment was connected to channel 2 and the two switch buttons to channels 1 and 4, respectively.
To receive signals from sensors in real time, you need to run the nooliterx utility in daemon mode. The installation process of utilities and their settings are described by the developer himself (Oleg Artamonov in the documentation for the utilities) and also by me in section 4 of the article (LINK). As a result, we obtain the recording of signals from sensors and switches in the syslog. It remains only to configure the recording of these messages to a file in the syslog itself and the output is the following (samples of messages from the sensors):
Jan 7 15:47:39 vmon nooliterx[23022]: Received: status 133, channel 3, command 25, format 1, data 2 0 0 0 Jan 7 18:43:58 vmon nooliterx[23022]: Received: status 135, channel 2, command 25, format 1, data 1 0 0 0 Sample messages from the switches (when you press the buttons on them) look a little different:
Jan 5 22:29:43 vmon nooliterx[23022]: Received: status 26, channel 1, command 4, format 0, data 1 0 0 0 Jan 5 22:27:55 vmon nooliterx[23022]: Received: status 145, channel 4, command 4, format 0, data 1 0 0 0 Set up SEC rules for triggering on signals coming from sensors and switches.
SEC is a utility for handling event logs. In short, at the input it receives a stream of events, each of which checks for compliance with the templates of customized rules. If a match is found, it launches the action specified in the corresponding rule. The thing is amazingly flexible to use. There is a detailed man page on the web.
SEC is used in my system in order to find messages from sensors and switches in the event flow in order to launch a script that takes a photo and sends emails, or simply translate the system on and off.
In the SEC, I set up 4 rules. 2 - for processing events from motion sensors and two - for processing signals from two buttons on the switch. The rules are in the /etc/sec.conf file.
Rule 1: Processing of the signal from the motion sensor in the vestibule (the sensor associated with channel 3)
type=SingleWithSuppress ptype=RegExp pattern=\w+\s+\d+\s+\d+\:\d+\:\d+\s+\w+\s+nooliterx\S+\s+Received\:\s+status\s+\d+,\s+channel\s+(3),\s+command\s+25.* desc=Motion sensor frontdoor $1 triggered action=shellcmd (/usr/local/smarthome/security/send_photo_alert.sh $1); event %s window=60 The type of this rule - “SingleWithSurpress” - is intended to respond only to the first registered event during the time interval specified by the “window” parameter in seconds. Those. this setting says that the rule will not work more than once per minute and the action specified in the “action” parameter will be launched no more than once per minute. This is done to ensure that in the event that someone tinkers around the door for a few minutes not to spam their mail with tons of letters. The “pattern” parameter contains a regular expression, according to which events are searched from the sensor tied to channel 3. The “action” parameter contains two actions - the shellcmd, which executes the script and passes the parameter selected from the regular expression (in this case of representing the number “3”), and the second action “event% s” is used to transfer the expression written in the “desc” parameter to other rules that are not necessary for the operation of this system and can be omitted. The “desc” parameter contains additional service information that is used by other rules. For this system, it is not necessary and arbitrary data can be entered there.
Rule 2: Processing the signal from the movement sensor in the corridor (sensor linked to channel 2)
type=SingleWithSuppress ptype=RegExp pattern=\w+\s+\d+\s+\d+\:\d+\:\d+\s+\w+\s+nooliterx\S+\s+Received\:\s+status\s+\d+,\s+channel\s+(2),\s+command\s+25.* desc=Motion sensor lobby $1 triggered action=shellcmd (/usr/local/smarthome/security/send_photo_alert.sh $1); event %s window=60 Here, everything is similar to rule 1. It is worth noting that the script is passed the number "2", obtained from the regular expression.
Rule 3: Processing the signal from the switch button tied to channel 1
type=single ptype=regexp pattern=\w+\s+\d+\s+\d+\:\d+\:\d+\s+\w+\s+nooliterx\S+\s+Received\:\s+status\s+\d+,\s+channel\s+(1),\s+command\s+4.* desc=switch guard mode online action=shellcmd (/bin/echo "online" > /usr/local/smarthome/security/status) This rule is still simpler - it works on every event that matches the regular expression specified in the parameter “pattern”. As an action, it records in the system status file. This file is analyzed by a script run by rules 1 and 2. In the case of the status “online”, the script is triggered, in the case of the value “offline” - the script does not trigger. More on this a little further.
Rule 4: Processing the signal from a switch button tied to channel 4
type=single ptype=regexp pattern=\w+\s+\d+\s+\d+\:\d+\:\d+\s+\w+\s+nooliterx\S+\s+Received\:\s+status\s+\d+,\s+channel\s+(4),\s+command\s+4.* desc=switch guard mode offline action=shellcmd (/bin/echo "offline" > /usr/local/smarthome/security/status) Everything is similar to rule 3, only the status is set to “offline”.
The script that performs the reception of photos from the camera and sending emails
The script run by rules 1 and 2 checks the status of the system in the status file and, depending on its value (“online” or “offline”), performs or does not perform the following actions:
- receives a photo from the IP camera in the vestibule and sends it by e-mail in the event of a sensor in the vestibule;
- sends an alarm message in the event of a sensor in the corridor.
Below is the body of the script. At its input, it receives (from the SEC) the channel number to which the sensor is attached, and depending on this number and the system status, performs certain actions.
#!/bin/sh dir="/usr/local/smarthome/security" MAIL=$dir/mail.letter stat_file="$dir/status" dt=`date` if [ "$1" -eq 2 ] then if grep "online" $stat_file then cd $dir rm -f $dir/snapshot.cgi wget http://<IP >/snapshot.cgi --user=<username> --password=<password> mpack -s "Someone at the door at $dt" $dir/snapshot.cgi d.shulinin@gmail.com fi elif [ "$1" -eq 3 ] then if grep "online" $stat_file then printf "Subject: Motion in the lobby spotted at $dt\n" > $MAIL /usr/sbin/ssmtp email@gmail.com < $MAIL fi else echo "no legitimate input detected" fi To get photos from my IP camera, I use wget and a line like this:
wget http://<IP >/snapshot.cgi --user=<username> --password=<password> For other IP cameras, you may need to look for other options, there is no single solution. RTFM to the camera, as they say.
Buttons on and off the system in the web interface. To enable and disable the security mode, I also added a couple of buttons to my samopisny web interface to control the lights of the smart home.
They look like this:
<?php if (isset($_POST['button9_on'])) { exec('/bin/echo "online" > /usr/local/smarthome/security/status'); } ?> <?php if (isset($_POST['button9_off'])) { exec('/bin/echo "offline" > /usr/local/smarthome/security/status'); } ?> <p><h2>Guard mode</h2></p> <form method="post"> <p> <button name="button9_on">ON</button> <button name="button9_off">OFF</button> </p> Everything is simple here - when you click on the "ON" button, online is written to the status file, when you click on OFF, offline.
5. Conclusion
As a result, I got a system that, when activated, takes pictures of anyone who approaches the door and sends the photo to e-mail. And in the case of movement within the apartment, it simply sends an alert by e-mail.
Something like this is a sample email message (see Figure 3). The images themselves, of course, are larger and unfold when you click on them with the mouse.
Figure 3 - Example of an email with a photo
The system can be activated and deactivated by pressing a button on the switch and also by means of buttons in the web interface of the smart home control system.
In the short term, I also want to display the current status of the system (active / inactive) in the web interface.
Source: https://habr.com/ru/post/401909/
All Articles