Multifunctional GPSLogger do it yourself. Part 1
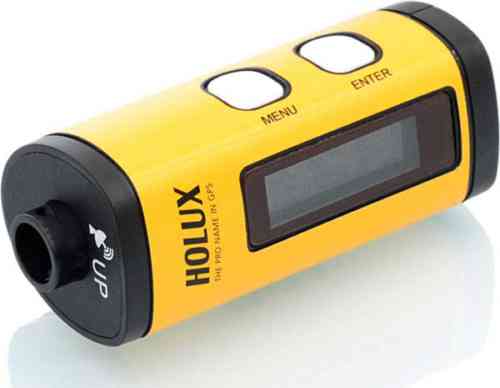
I am the owner of a wonderful device - Holux M-241 GPS logger. Stuck very comfortable and useful in traveling. With the help of the logger, I write a GPS track of the trip, on which you can then look at your path in detail, as well as attach the captured photos to GPS coordinates. And he has a small screen that shows additional information - the clock, current speed, altitude and direction, odometer and more. Here I once wrote a small review.
With all the virtues of a piece of iron, I began to grow out of it. I miss a few small but useful buns: a few odometers, showing vertical speed, measuring the parameters of the section of the path. It seems a trifle, but the Holux company considered this not sufficiently useful for implementation in the firmware. I also do not like some of the parameters of the piece of iron, and some things have become morally obsolete in 10 years ...
')
At some point, I realized that I can make a logger myself with such features as I need. Fortunately, all the necessary components are cheap and affordable. I began to make my implementation based on Arduino. Under the cut diary built where I tried to paint my technical solutions.
We are determined with features
Many will ask why I need to build my own logger, if for certain there is something ready from famous manufacturers. Maybe. To be honest, not particularly looking for. But for sure there will be something missing. In any case, this project is a fan for me. Why don't we go about building our dream device?
So, for what I appreciate my Holux M-241.
- The screen makes of “black box”, the results of which are available only after the trip, a very convenient tool, the readings of which are available here and now. The presence of the screen makes possible almost all the features in this list.
- The clock is useful in itself. When traveling by GPS, a logger dangling on a string around its neck often turns out to be closer than a mobile phone in a pocket or backpack. The watch supports all time zones (albeit with manual switching)
- The POI button allows you to mark the current coordinate on the track. For example, to note a landmark that shed outside the bus, about which you want to google later.
- Using the odometer, you can measure the distance traveled from a point. For example, the distance traveled per day, or the length of a track.
- Current speed, height and direction help you find yourself in space.
- The vitality of 12-14 hours from one AA battery in most cases makes it possible not to think about power supply issues. Those. almost always enough charge for a full day of travel.
- Compactness and ease of use - things in the modern world are very pleasant
However, some things could be done a little better:
- The power supply system on AA batteries is recorded by many as a definite plus — one battery lasts a long time, and you can stock up in any wilderness. You can even for a month of autonomous campaign stock up.
But for me, battery life is hemorrhoids. We have to carry a handful of batteries and who knows how good they are (all of a sudden they were 5 years old on the shelf and were already self-discharged). With batteries hemorrhoids even more. My charger can only charge in pairs. You have to discharge the batteries so that they are of the same degree of discharge. As a result, you never remember where already discharged, and where not yet.
For 6 years of using the logger, I only found myself in the wilderness a couple of times without electricity. As a rule, I have access to the outlet at least once a day. In this case, the built-in lithium battery would be much more convenient. Well, in extreme cases, I have a paverbank. - Indication of the degree of discharge is made very stupidly - the indicator starts to flash when the battery is about to run out. With that, after 5 minutes it can already die, and maybe another hour to work. It is very easy to miss this moment and lose part of the log.
- As a person interested in aviation, it would be very interesting for me to observe the current vertical speed .
- Multiple odometers - it is often interesting to measure more than one distance. For example, the distance traveled per day and for the entire trip.
- The odometer is reset when the device is turned off or when the battery is replaced. This is terribly uncomfortable. If you stop at a cafe to eat, then the GPS logger can not be turned off because the value will be reset. We have to leave it on, and he continues to wind kilometers and eat the battery. It would be much more convenient to be able to pause the odometer and save the values between inclusions.
- Measurement of parameters of the site . While skiing, for example, I am interested in the length of the descent, the elevation difference, the average and maximum speed on the site, and the elapsed time. At what you want to know it right away, and not at home when you download the track.
- Accuracy leaves much to be desired. When you move quickly - nothing yet. But when the speed is small, the “noises” + - 50m are clearly visible on the track. And for an hour of standing you can “insist” almost a kilometer. The benefit of technology for 10 years has gone far ahead and modern receivers provide much greater accuracy.
- The speed of merging tracks is only 38400. No, well, it is not serious in 2017 to use the COM port for transferring large amounts of data. Merging 2 megabytes of internal flash takes more than 20 minutes.
In addition, not every program can gobble up the format of the merged tracks. The native utility is very poor. The benefit is BT747, which can adequately merge the track and convert it to some kind of digestible format. - The size of the stick is only 2Mb. On the one hand, this is enough for a two-week trip with points saved every 5 s. But first, the internal packed format
requires conversion, and secondly it does not allow to increase the volume - Mass storage device for some reason is not in fashion now. Modern interfaces are trying to hide the fact of files. I’ve been with computers for 25 years, and working with files directly is much more convenient for me than any other way.
There is nothing that can not be realized without significant effort.
Any different. I do not use it myself, but suddenly it is useful for someone:
- Shows current coordinates (latitude, longitude)
- On the left side of the screen various icons are drawn whose essence without a manual I can’t remember.
- There are switching meters / km - feet / miles.
- Bluetooth - logger can be connected to mobile phones without GPS.
- Absolute distance to the point.
- Logging by time (every N seconds) or by distance (every X meters).
- Multi-language support.
Choosing iron
With the requirements more or less decided. It's time to understand what all this can be implemented. The main components I will have are:
- Microcontroller - I do not plan any sophisticated computational algorithms, so the computational power of the core is not particularly important. I also have no special filling requirements - a set of standard peripherals will do.
At hand, there was a scattering of various-sized arduinok, as well as a couple of stm32f103c8t6. I decided to start with AVR, which I know well at the controller / registers / periphery level. If you rest on the restrictions - it will be an occasion to feel the STM32. - The GPS receiver was chosen from the NEO6MV2, Beitan BN-800 and Beitan BN-880 modules. Some time googled on forums. Experienced people said that the first receiver is already the last century. The other two differ from each other only in the location of the antenna - in the BN-800 it hangs on the wire, and in the BN-880 it is glued with a sandwich on the main module. Took the BN-880 .
- Screen - the original is used LCD display 128x32 with backlight. I did not find the same. I bought an OLED 0.91 ”on the SSD1306 controller and a 1.2” LCD screen on the ST7565R controller . I decided to start with the first, because Its easier to connect a standard comb for I2C or SPI. But it is slightly smaller compared to the original, and also it will not be able to constantly display an image for reasons of fuel efficiency. The second display should be less voracious, but under it you need to unsolder the tricky connector and think of how to power the backlight.
From the little things:
- Buttons once bought a whole bag;
- Shield with for SD card - also lay at hand;
- Lithium battery charge controllers bought a couple of different things, but have not yet figured out.
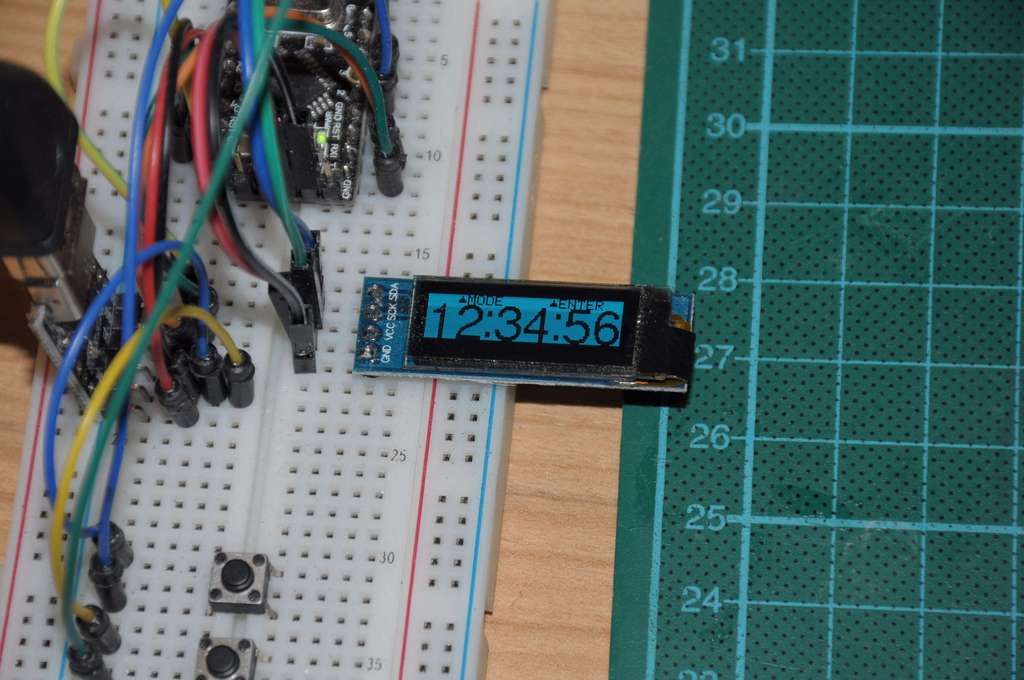
I decided to design the board at the very end, when the firmware will be ready. By this time, I will finally determine the main components and the scheme of their inclusion. At the first stage, I decided to do debugging on a breadboard by connecting components using patch cords.
But first you need to decide on a very important issue - the power components. It seemed to me reasonable to power everything from 3.3V: GPS and the screen only on it and know how to work. This is also the native voltage for USB and SD. In addition, the circuit can be powered from a single lithium can
The choice fell on the Arduino Pro Mini, which can be found in the 8MHz / 3.3V version. But she didn’t have USB on board - I had to use a USB-UART adapter.
The first steps
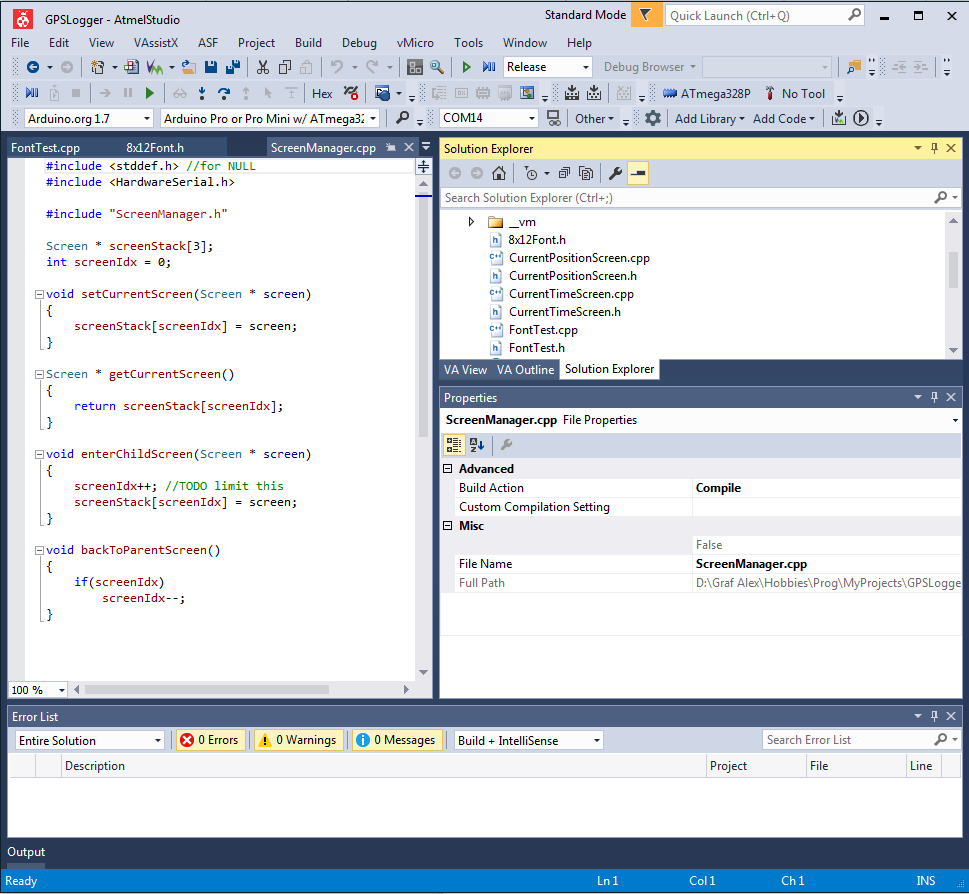
Initially, the project created in the Arduino IDE. But honestly, my language doesn’t turn to call it IDE - so, a text editor with a compiler. In any case, after Visual Studio, in which I have been working for the last 13 years, I cannot do anything serious in the Arduino IDE without tears and swearing.
Fortunately, there is a free Atmel Studio, in which even Visual Assist is out of the box !!! The program is able all that is needed, everything is familiar and in its place. Well, almost everything (I did not find only how to compile only one file, for example, to check the syntax)
I started from the screen - this is needed to debug the skeleton of the firmware, and then fill it with functionality. I stopped at the first library for SSD1306 from Adafruit . She knows everything she needs and provides a very simple interface.
Played fonts. It turned out that one font can take up to 8kb (24pt letter size) - you don’t have much fun in a 32kb controller. Large fonts are needed, for example, to display time.
Font selection code
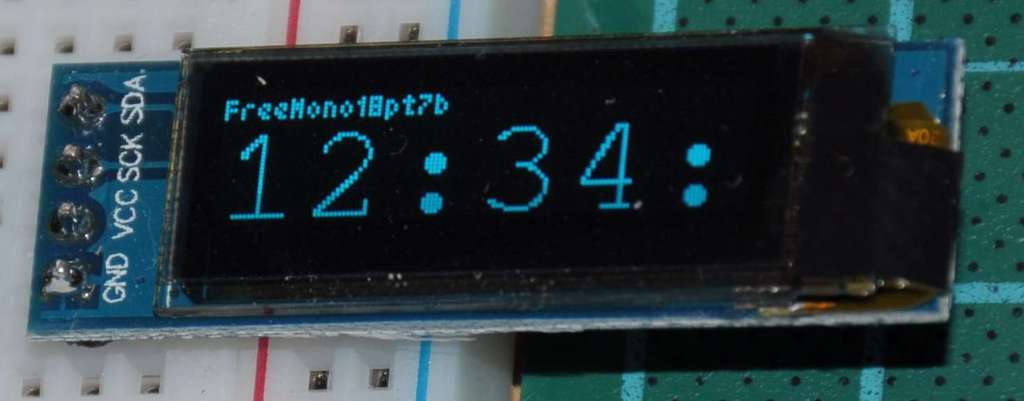
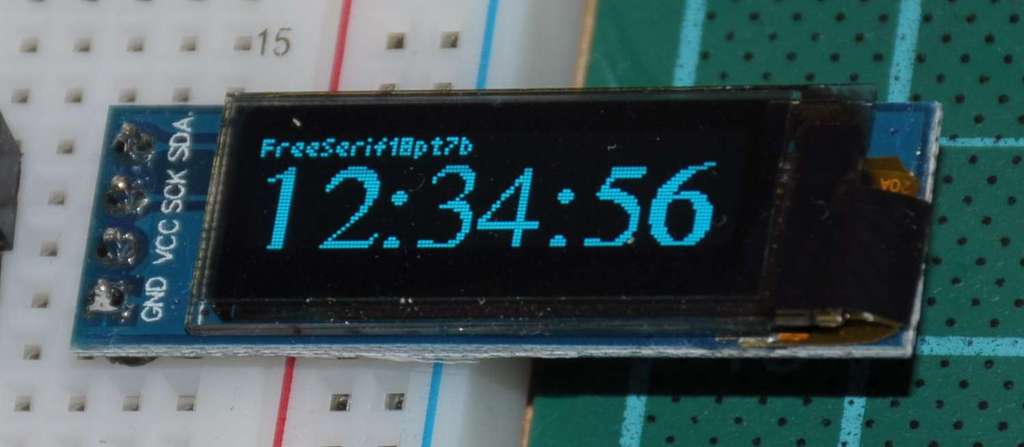
#include <Adafruit_GFX.h> #include <Adafruit_SSD1306.h> #include <gfxfont.h> #include <fonts/FreeMono12pt7b.h> #include <fonts/FreeMono18pt7b.h> ... #include <fonts/FreeSerifItalic24pt7b.h> #include <fonts/FreeSerifItalic9pt7b.h> #include <fonts/TomThumb.h> struct font_and_name { const char * PROGMEM name; GFXfont * font; }; #define FONT(name) {#name, &name} const font_and_name fonts[] = { // FONT(FreeMono12pt7b), FONT(FreeMono18pt7b), /* FONT(FreeMono24pt7b), FONT(FreeMono9pt7b), FONT(FreeMonoBold12pt7b), ... FONT(FreeSerifItalic9pt7b), FONT(TomThumb)*/ }; const unsigned int fonts_count = sizeof(fonts) / sizeof(font_and_name); unsigned int current_font = 0; extern Adafruit_SSD1306 display; void RunFontTest() { display.clearDisplay(); display.setCursor(0,30); display.setFont(fonts[current_font].font); display.print("12:34:56"); display.setCursor(0,6); display.setFont(&TomThumb); display.print(fonts[current_font].name); display.display(); } void SwitchToNextFont() { current_font = ++current_font % fonts_count; } Fonts bundled with the library are very clumsy. The monospace font turned out to be very wide - the line “12:34:56” doesn’t fit, Serif - all the figures are of different weights. Is that the standard font 5x7 in the library looks edible.
It turned out that these fonts were converted from some open-source ttf fonts that are simply not optimized for fine resolutions.
I had to draw my own fonts. More precisely, first vykolupyvat from the finished individual characters. The symbol ':' in the ASCII table is very appropriately located immediately after the numbers and can be broken out in one block. It is also convenient that you can not do the font for all characters, but only for the range, for example, from 0x30 ('0') to 0x3a (':'). So From FreeSans18pt7b it turned out to make a very compact font only for the necessary characters. I had to truthfully bit down the width so that the text would fit the width of the screen.
Patchwork font FreeSans18pt7b
// This font consists only of digits and ':' to display current time. // The font is very based on FreeSans18pt7b.h //TODO: 25 pixel height is too much for displaying time. Create another 22px font const uint8_t TimeFontBitmaps[] PROGMEM = { /* 0xFF, 0xFF, 0xFF, 0xFF, 0xFF, 0xFF, 0xE9, 0x20, 0x3F, 0xFC, 0xE3, 0xF1, 0xF8, 0xFC, 0x7E, 0x3F, 0x1F, 0x8E, 0x82, 0x41, 0x00, 0x01, 0xC3, 0x80, ... 0x03, 0x00, 0xC0, 0x60, 0x18, 0x06, 0x03, 0x00, 0xC0, 0x30, 0x18, 0x06, 0x01, 0x80, 0xC0, 0x30, 0x00, */0x07, 0xE0, 0x0F, 0xF8, 0x1F, 0xFC, 0x3C, 0x3C, 0x78, 0x1E, 0x70, 0x0E, 0x70, 0x0E, 0xE0, 0x07, 0xE0, 0x07, 0xE0, 0x07, 0xE0, 0x07, 0xE0, 0x07, 0xE0, 0x07, 0xE0, 0x07, 0xE0, 0x07, 0xE0, 0x07, 0xE0, 0x07, 0xE0, 0x0F, 0x70, 0x0E, 0x70, 0x0E, 0x78, 0x1E, 0x3C, 0x3C, 0x1F, 0xF8, 0x1F, 0xF0, 0x07, 0xE0, 0x03, 0x03, 0x07, 0x0F, 0x3F, 0xFF, 0xFF, 0x07, 0x07, 0x07, 0x07, 0x07, 0x07, 0x07, 0x07, 0x07, 0x07, 0x07, 0x07, 0x07, 0x07, 0x07, 0x07, 0x07, 0x07, 0x07, 0xE0, 0x1F, 0xF8, 0x3F, 0xFC, 0x7C, 0x3E, 0x70, 0x0F, 0xF0, 0x0F, 0xE0, 0x07, 0xE0, 0x07, 0x00, 0x07, 0x00, 0x07, 0x00, 0x0F, 0x00, 0x1E, 0x00, 0x3C, 0x00, 0xF8, 0x03, 0xF0, 0x07, 0xC0, 0x1F, 0x00, 0x3C, 0x00, 0x38, 0x00, 0x70, 0x00, 0x60, 0x00, 0xE0, 0x00, 0xFF, 0xFF, 0xFF, 0xFF, 0xFF, 0xFF, 0x07, 0xF0, 0x07, 0xFE, 0x07, 0xFF, 0x87, 0x83, 0xC3, 0x80, 0xF3, 0x80, 0x39, 0xC0, 0x1C, 0xE0, 0x0E, 0x00, 0x07, 0x00, 0x0F, 0x00, 0x7F, 0x00, 0x3F, 0x00, 0x1F, 0xE0, 0x00, 0x78, 0x00, 0x1E, 0x00, 0x07, 0x00, 0x03, 0xF0, 0x01, 0xF8, 0x00, 0xFE, 0x00, 0x77, 0x00, 0x73, 0xE0, 0xF8, 0xFF, 0xF8, 0x3F, 0xF8, 0x07, 0xF0, 0x00, 0x00, 0x38, 0x00, 0x38, 0x00, 0x78, 0x00, 0xF8, 0x00, 0xF8, 0x01, 0xF8, 0x03, 0xB8, 0x03, 0x38, 0x07, 0x38, 0x0E, 0x38, 0x1C, 0x38, 0x18, 0x38, 0x38, 0x38, 0x70, 0x38, 0x60, 0x38, 0xE0, 0x38, 0xFF, 0xFF, 0xFF, 0xFF, 0xFF, 0xFF, 0x00, 0x38, 0x00, 0x38, 0x00, 0x38, 0x00, 0x38, 0x00, 0x38, 0x00, 0x38, 0x1F, 0xFF, 0x0F, 0xFF, 0x8F, 0xFF, 0xC7, 0x00, 0x03, 0x80, 0x01, 0xC0, 0x00, 0xE0, 0x00, 0x70, 0x00, 0x39, 0xF0, 0x3F, 0xFE, 0x1F, 0xFF, 0x8F, 0x83, 0xE7, 0x00, 0xF0, 0x00, 0x3C, 0x00, 0x0E, 0x00, 0x07, 0x00, 0x03, 0x80, 0x01, 0xC0, 0x00, 0xFC, 0x00, 0xEF, 0x00, 0x73, 0xC0, 0xF0, 0xFF, 0xF8, 0x3F, 0xF8, 0x07, 0xE0, 0x00, 0x03, 0xE0, 0x0F, 0xF8, 0x1F, 0xFC, 0x3C, 0x1E, 0x38, 0x0E, 0x70, 0x0E, 0x70, 0x00, 0x60, 0x00, 0xE0, 0x00, 0xE3, 0xE0, 0xEF, 0xF8, 0xFF, 0xFC, 0xFC, 0x3E, 0xF0, 0x0E, 0xF0, 0x0F, 0xE0, 0x07, 0xE0, 0x07, 0xE0, 0x07, 0x60, 0x07, 0x70, 0x0F, 0x70, 0x0E, 0x3C, 0x3E, 0x3F, 0xFC, 0x1F, 0xF8, 0x07, 0xE0, 0xFF, 0xFF, 0xFF, 0xFF, 0xFF, 0xFF, 0x00, 0x06, 0x00, 0x0E, 0x00, 0x1C, 0x00, 0x18, 0x00, 0x38, 0x00, 0x70, 0x00, 0x60, 0x00, 0xE0, 0x00, 0xC0, 0x01, 0xC0, 0x01, 0x80, 0x03, 0x80, 0x03, 0x80, 0x07, 0x00, 0x07, 0x00, 0x07, 0x00, 0x0E, 0x00, 0x0E, 0x00, 0x0E, 0x00, 0x0C, 0x00, 0x1C, 0x00, 0x1C, 0x00, 0x07, 0xF0, 0x0F, 0xFE, 0x0F, 0xFF, 0x87, 0x83, 0xC7, 0x80, 0xF3, 0x80, 0x39, 0xC0, 0x1C, 0xE0, 0x0E, 0x78, 0x0F, 0x1E, 0x0F, 0x07, 0xFF, 0x01, 0xFF, 0x03, 0xFF, 0xE3, 0xE0, 0xF9, 0xC0, 0x1D, 0xC0, 0x0F, 0xE0, 0x03, 0xF0, 0x01, 0xF8, 0x00, 0xFC, 0x00, 0xF7, 0x00, 0x73, 0xE0, 0xF8, 0xFF, 0xF8, 0x3F, 0xF8, 0x07, 0xF0, 0x00, 0x07, 0xE0, 0x1F, 0xF8, 0x3F, 0xFC, 0x7C, 0x3C, 0x70, 0x0E, 0xF0, 0x0E, 0xE0, 0x06, 0xE0, 0x07, 0xE0, 0x07, 0xE0, 0x07, 0xE0, 0x0F, 0x70, 0x0F, 0x78, 0x3F, 0x3F, 0xFF, 0x1F, 0xF7, 0x07, 0xC7, 0x00, 0x07, 0x00, 0x06, 0x00, 0x0E, 0x70, 0x0E, 0x70, 0x1C, 0x78, 0x3C, 0x3F, 0xF8, 0x1F, 0xF0, 0x07, 0xC0, 0xFF, 0xF0, 0x00, 0x00, 0x00, 0x07, 0xFF, 0x80 /*, 0xFF, 0xF0, 0x00, 0x00, 0x00, 0x07, 0xFF, 0xB6, 0xD6, 0x00, 0x00, 0x80, 0x03, 0xC0, 0x07, 0xE0, 0x0F, 0xC0, 0x3F, 0x80, 0x7E, 0x00, 0xFC, 0x01, 0xF0, 0x00, 0xE0, 0x00, ... 0x38, 0x38, 0xF8, 0xF0, 0xE0, 0x38, 0x00, 0xFC, 0x03, 0xFC, 0x1F, 0x3E, 0x3C, 0x1F, 0xE0, 0x1F, 0x80, 0x1E, 0x00 */ }; //TODO Recalc offset numbers const GFXglyph TimeFontGlyphs[] PROGMEM = { { 449-449, 16, 25, 19, 2, -24 }, // 0x30 '0' { 499-449, 8, 25, 19, 4, -24 }, // 0x31 '1' { 524-449, 16, 25, 19, 2, -24 }, // 0x32 '2' { 574-449, 17, 25, 19, 1, -24 }, // 0x33 '3' { 628-449, 16, 25, 19, 1, -24 }, // 0x34 '4' { 678-449, 17, 25, 19, 1, -24 }, // 0x35 '5' { 732-449, 16, 25, 19, 2, -24 }, // 0x36 '6' { 782-449, 16, 25, 19, 2, -24 }, // 0x37 '7' { 832-449, 17, 25, 19, 1, -24 }, // 0x38 '8' { 886-449, 16, 25, 19, 1, -24 }, // 0x39 '9' { 936-449, 3, 19, 7, 2, -20 }, // 0x3A ':' }; const GFXfont TimeFont PROGMEM = { (uint8_t *)TimeFontBitmaps, (GFXglyph *)TimeFontGlyphs, 0x30, 0x3A, 20 }; It turned out that the 18pt font is actually 25 pixels high. Because of this, he slightly clings to another inscription
An inverted display, by the way, helps to understand where the boundaries of the drawing area actually are and how the line lies relative to this border - the display has quite large frames.
Long googled ready-made fonts, but they did not fit either in size, or in shape, or in content. For example, on the Internet with a shaft of 8x12 fonts (dumps of character generators of VGA cards). But in fact these fonts are 6x8, i.e. walking a lot of places - in the case of such a small resolution and size as I have it is critical.
I had to draw my own fonts, since the Adafruit library's font format is very simple. I prepared the picture in Paint.net - I just drew the letters with the right font, then adjusted it with a pencil. He saved the picture as png, and then sent a Python script written on his knee to a quick search. This script generated a semifinished code that has already dotted the rules in the IDE right in hex codes.
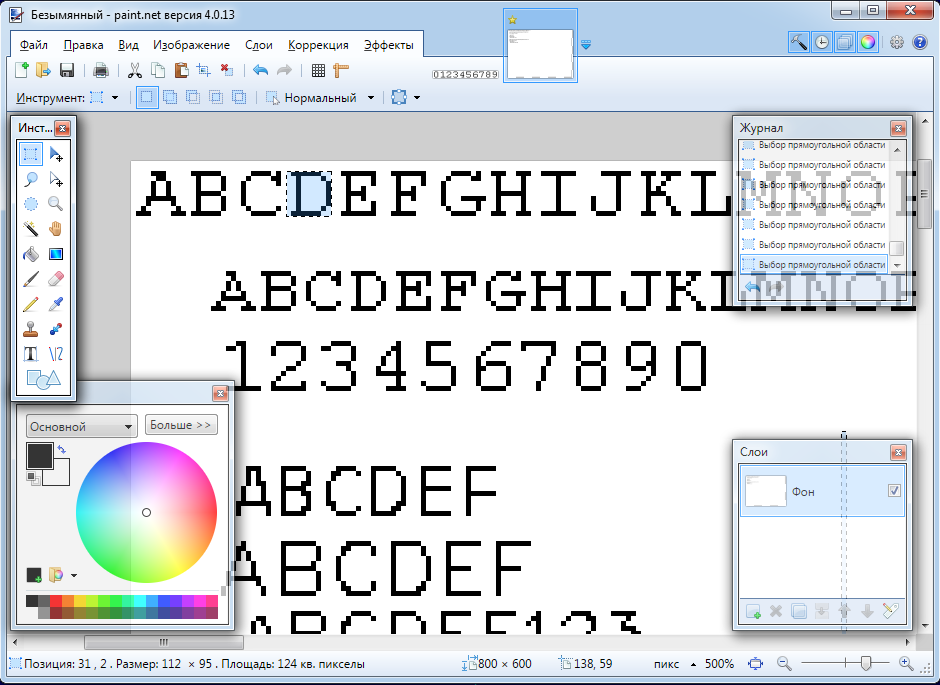
For example, this is how the process of creating an 8x12 monospace font with small letter and line spacing looks. Each character in the end turned out about 7x10, and the default occupied 10 bytes. It would be possible to pack each character in 8-9 bytes (the library allows it), but I did not bother. In addition, in this form, you can edit individual pixels directly in the code.
Font 8x12
// A simple 8x12 font (slightly modifier Courier New) const uint8_t Monospace8x12Bitmaps[] PROGMEM = { 0x1e, 0x21, 0x21, 0x21, 0x21, 0x21, 0x21, 0x21, 0x21, 0x1e, //0 0x18, 0x68, 0x08, 0x08, 0x08, 0x08, 0x08, 0x08, 0x08, 0x7f, //1 0x3e, 0x41, 0x41, 0x01, 0x02, 0x0c, 0x10, 0x20, 0x41, 0x7f, //2 0x3e, 0x41, 0x01, 0x01, 0x0e, 0x02, 0x01, 0x01, 0x41, 0x3e, //3 0x02, 0x06, 0x0a, 0x12, 0x12, 0x22, 0x3f, 0x02, 0x02, 0x0f, //4 0x7f, 0x41, 0x40, 0x40, 0x7e, 0x01, 0x01, 0x01, 0x41, 0x3e, //5 0x1e, 0x21, 0x40, 0x40, 0x5e, 0x61, 0x41, 0x41, 0x41, 0x3e, //6 0x7f, 0x41, 0x01, 0x02, 0x02, 0x04, 0x04, 0x04, 0x08, 0x08, //7 0x1e, 0x21, 0x21, 0x21, 0x1e, 0x21, 0x21, 0x21, 0x21, 0x1e, //8 0x1e, 0x21, 0x21, 0x21, 0x23, 0x1d, 0x01, 0x01, 0x22, 0x1c, //9 0x00, 0x00, 0x18, 0x18, 0x00, 0x00, 0x00, 0x18, 0x18, 0x00, //: }; const GFXglyph Monospace8x12Glyphs[] PROGMEM = { { 0, 8, 10, 8, 0, -11 }, // 0x30 '0' { 10, 8, 10, 8, 0, -11 }, // 0x31 '1' { 20, 8, 10, 8, 0, -11 }, // 0x32 '2' { 30, 8, 10, 8, 0, -11 }, // 0x33 '3' { 40, 8, 10, 8, 0, -11 }, // 0x34 '4' { 50, 8, 10, 8, 0, -11 }, // 0x35 '5' { 60, 8, 10, 8, 0, -11 }, // 0x36 '6' { 70, 8, 10, 8, 0, -11 }, // 0x37 '7' { 80, 8, 10, 8, 0, -11 }, // 0x38 '8' { 90, 8, 10, 8, 0, -11 }, // 0x39 '9' { 100, 8, 10, 8, 0, -11 }, // 0x3A ':' }; const GFXfont Monospace8x12Font PROGMEM = { (uint8_t *)Monospace8x12Bitmaps, (GFXglyph *)Monospace8x12Glyphs, 0x30, 0x3A, 12 }; Frame
The original device provides a very simple and convenient interface. Information is grouped into categories, which are shown from individual pages (screens). Using the button, you can cycle through the pages, and use the second button to select the current item or perform the action indicated in the label under the button. This approach seems to me to be very convenient and I don’t need to change anything.
I like the beauty of OOP, because I immediately blinded a small interface, each page implements the interface as it needs. The page knows how to draw itself and realizes the reaction to the buttons.
class Screen { Screen * nextScreen; public: Screen(); virtual ~Screen() {} virtual void drawScreen() = 0; virtual void drawHeader(); virtual void onSelButton(); virtual void onOkButton(); virtual PROGMEM const char * getSelButtonText(); virtual PROGMEM const char * getOkButtonText(); Screen * addScreen(Screen * screen); }; Depending on the current screen, the buttons can perform various actions. Therefore, I took the top of the screen 8 pixels high to the captions for the buttons. Text for captions depends on the current screen and is returned by the virtual functions getSelButtonText () and getOkButtonText (). Also in the header will be displayed service items such as the level of the GPS signal and battery charge. The remaining ¾ screens are available for useful information.
As I said, screenshots can turn over, which means that somewhere there should be a list of objects for different pages. What is more than one - screens can be nested as a submenu. I even started a ScreenManager class, which was supposed to manage these lists, but then I found the solution easier.
So each screen just has a pointer to the next one. If the screen allows you to enter the submenu, then it adds another pointer to the screen of this submenu.
class Screen { Screen * nextScreen; … }; class ParentScreen : public Screen { Screen * childScreen; … }; By default, the button handler simply calls the screen change function, passing it the desired pointer. The function turned out to be trivial - it just switched the pointer to the current screen. To make the screens nesting, I made a small stack. So the whole screen manager I fit in 25 lines and 4 small functions.
Screen * screenStack[3]; int screenIdx = 0; void setCurrentScreen(Screen * screen) { screenStack[screenIdx] = screen; } Screen * getCurrentScreen() { return screenStack[screenIdx]; } void enterChildScreen(Screen * screen) { screenIdx++; //TODO limit this screenStack[screenIdx] = screen; } void backToParentScreen() { if(screenIdx) screenIdx--; } True, the code for filling these structures does not look very nice, but so far has not been invented better.
Screen * createCurrentTimeScreen() { TimeZoneScreen * tzScreen = new TimeZoneScreen(1, 30); tzScreen = tzScreen->addScreen(new TimeZoneScreen(2, 45)); tzScreen = tzScreen->addScreen(new TimeZoneScreen(-3, 30)); // TODO Add real timezones here CurrentTimeScreen * screen = new CurrentTimeScreen(); screen->addChildScreen(tzScreen); return screen; } Think
The structure, of course, turned out to be beautiful, but I fear it eats a lot of memory. We'll have to go against ourselves and zafigachit large static table with pointers.
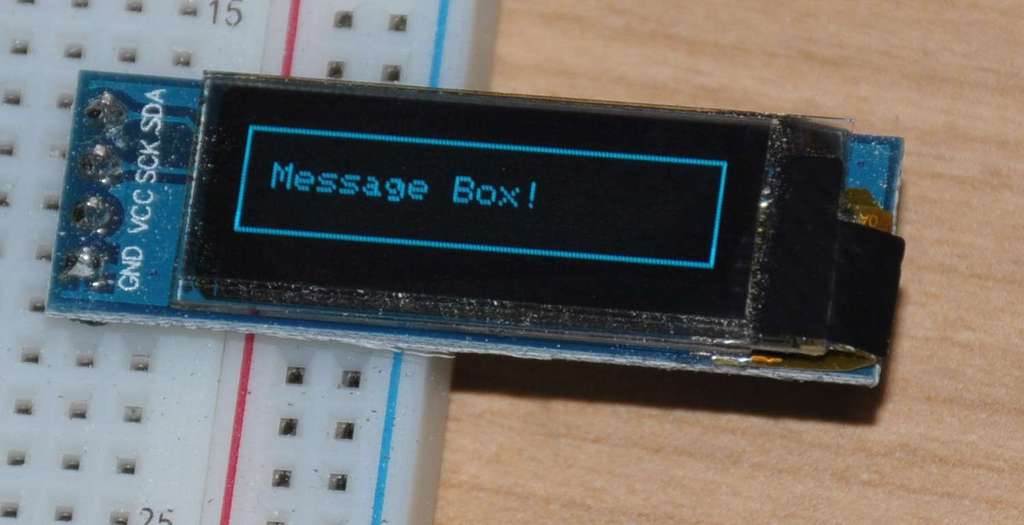
Go ahead. In my implementation of the interface, I wanted to do something like a message box, a short message that would show for a second or two, and then disappear. For example, if you press the POI (Point Of Interest) button on the screen with current coordinates, then in addition to recording a point in the track, it would be nice to show the user the message “Waypoint Saved” (an additional icon is shown in the original device for a second). Or when discharging the battery, “cheer up” the user with the appropriate message.
Since the data from the GPS will come all the time, there can be no talk of any blocking functions. Therefore, we had to invent a simple state machine (state machine), which, in the loop () function, would choose what to do — show the current screen or message box.
enum State { IDLE_DISPLAY_OFF, IDLE, MESSAGE_BOX, BUTTON_PRESSED, }; Also, using the state machine it is convenient to handle button presses. Perhaps it would be correct through interruptions, but it also turned out well. It works like this: if the button was pressed in the IDLE state, we will remember the time it was pressed and go to the BUTTON_PRESSED state. In this state, wait until the user releases the button. Here we can calculate the duration when the button was pressed. Short triggers (<30ms) are simply ignored - most likely it is contact bounce. Long operations can already be interpreted as pressing a button.
I plan to use both short button presses for normal actions and long ones (> 1c) for special functions. For example, a short press starts / stops the odometer, a long press resets the counter value to 0.
Perhaps other states will be added. So, for example, in the original logger, after switching to the next page, the values on the screen change frequently, and after a couple of seconds less often - once a second. This can be done by adding another state.
When the frame was ready, I already, it was, began to connect the GPS. But then there are nuances that made me postpone this task.
Firmware optimization
Before moving on, I need to get away with some technical details. The fact is that around this place I began to butt with a growing memory consumption. It turned out that the line was recklessly declared without the PROGMEM modifier at the start of the firmware is copied into the RAM and takes place there during the entire execution time.
Various architectures
In a nutshell. On large computers, Von Neumann architecture is used where code and data are located in the same address space. Those. data from both RAM and ROM will be read in the same way.
Microcontrollers typically use the Harvard architecture , where code and data are separated. So You have to use various functions for reading memory and flash. From the point of view of the C / C ++ language, the pointers look the same, but when writing a program we need to know exactly where our pointer points to which memory and call the corresponding functions.
Microcontrollers typically use the Harvard architecture , where code and data are separated. So You have to use various functions for reading memory and flash. From the point of view of the C / C ++ language, the pointers look the same, but when writing a program we need to know exactly where our pointer points to which memory and call the corresponding functions.
Benefit library developers have, in part, taken care of this. The main display library class, Adafruit_SSD1306, is inherited from the Print class from the Arduinov standard library.
This provides us with a whole series of different modifications of the print method — for printing lines, individual characters, numbers, and something else. So there are 2 separate functions for printing lines:
size_t print(const __FlashStringHelper *); size_t print(const char[]); The first knows that you need to print a string from a flash drive and loads it by character. The second prints characters from RAM. In fact, both of these functions take a pointer to a string, only from different address spaces.
I have been looking for this very __FlashStringHelper in the Arduino code to learn how to call the desired print () function. It turned out the guys acted slyly: they simply declared this type with the help of a forward declaration (without the type itself) and wrote a macro that casts pointers to strings in a flash to the type __FlashStringHelper. Just for the compiler to select the desired overloaded function.
class __FlashStringHelper; #define F(string_literal) (reinterpret_cast<const __FlashStringHelper *>(PSTR(string_literal))) This allows you to write like this:
display.print(F(“String in flash memory”)); But does not allow to write like that
const char text[] PROGMEM = "String in flash memory"; display.print(F(text)); And, apparently, the library does not provide anything that could be done that way. I know that it’s not good to use private libraries in my code, but what could I do? I drew my macro, which did what I needed.
#define USE_PGM_STRING(x) reinterpret_cast<const __FlashStringHelper *>(x) So the cap drawing function began to look like this:
void Screen::drawHeader() { display.setFont(NULL); display.setCursor(20, 0); display.print('\x1e'); display.print(USE_PGM_STRING(getSelButtonText())); display.setCursor(80, 0); display.print('\x1e'); display.print(USE_PGM_STRING(getOkButtonText())); } Well, since I already got into the low-level pieces of the firmware, I decided to study more deeply how it was all arranged inside.
In general, the guys who came up with Arduino need to erect a monument. They made a simple and convenient platform for prototyping and crafts. A huge number of people with minimal knowledge of electronics and programming were able to enter the world of Arduino. But all this is smooth and beautiful while doing bullshit-type garbage with light-emitting diodes or reading thermometer readings. As soon as you threaten something serious, you immediately have to understand more deeply than you would like from the very beginning.
So, after each added library or even class, I noted how quickly memory consumption grows. At this point, I had more than 14 KB of 32 KB of flash and 1300 bytes of RAM (of 2k). Each careless movement added another 10 percent to the already used one. But I still didn’t really connect the GPS and SD / FAT32 libraries, but the cat itself was crying for the functionality itself. I had to take the disassembler into my hand and study what the compiler of such a compiler had to do there.
I was secretly hoping that the linker throws out unused functions. But it turned out that the linker inserts some of them almost entirely. In the firmware, I found the functions of drawing lines and some others from the screen library, although in the code I did not explicitly call them at that time. Implicitly, they also should not be called - why do I need the function of drawing a line, if I only draw letters from the batmapock? More than 5.2kb out of the blue (and that's not counting fonts).
In addition to the display management library, I also found:
- 2.6 KB - on SoftwareSerial (I pulled it into the project at some point)
- 1.6 kb - I2C
- 1.3 kb - HardwareSerial
- 2 Kb - TinyGPS
- 2.5 kb on arduino itself (initialization, pins, various tables, main timer for millis () and delay () functions),
The figures are very approximate, because The optimizer seriously mixes the code. In one place some function can begin, and then immediately after it another from another library, which is called from the first, can follow. Moreover, individual branches of these functions can be located at the other end of the flush.
Also in the code I found:
- Screen control by SPI (although I have it connected via I2C)
- Methods of base classes that are not called themselves, since redefined as heirs
- Destructors that are never called by design.
- Drawing functions (and not all - part of the functions the linker all the same threw up)
- malloc / free while in my code all objects are essentially static
But leaps and bounds increase not only the consumption of flash memory, but also SRAM:
- 130 bytes - I2C
- 100 bytes - SoftwareSerial
- 157 bytes - Serial
- 558 bytes - Display (of which 512 is a frame buffer)
No less entertaining was the .data section. There are about 700 bytes and this thing is loaded from a flash to RAM at the start. It turned out that space for variables in the memory was reserved there, along with initialization values. Here live those variables and constants that are forgotten to declare as const PROGMEM.
Among this, there was a hefty array with a splashscreen of the screen — the initial values of the frame buffer. Theoretically, if you make the display () right after the start, you can see the flower and the Adafruit inscription, but in my case it is pointless to spend on this flash memory.
The .data section also contains vtables. They are copied into memory from a flash drive, apparently for efficiency reasons in runtime. But you have to sacrifice a fairly large piece of RAM - a dozen classes more than 150 bytes. And it seems that there is no compiler key, which, sacrificing performance, will leave virtual tables in flash memory.
What to do with it? I don't know yet. It will depend on how consumption grows further. For good found shoals need to be mercilessly repaired. Apparently, I will have to draw all the libraries into my project explicitly, and then you can poke them thoroughly. And you may also have to rewrite some of the pieces differently in order to optimize the memory. Or switch to more powerful hardware. In any case, now I know about the problem and there is a strategy how to fix it.
UPDATE:
Little progress in resource efficiency. I make an update to this part, because next I want to focus on completely different things.
In comments, there is some confusion about using C ++. In particular, why is he so bad and vtable stores in precious RAM? And in general, virtual functions, constructors and destructors are overhead. What for? Let's figure it out!
Here are statistics on memory at some stage of the project.
Program size: 15,458 bytes (used 50% of a 30,720 byte maximum) (2.45 secs)
Minimum Memory Usage: 1258 bytes (61% of a 2048 byte maximum)
Experiment number 1 - rewritten in C.
I threw out classes, rewrote everything on tables with function pointers. , .
Program size: 14 568 bytes (used 47% of a 30 720 byte maximum) (2,35 secs)
Minimum Memory Usage: 1176 bytes (57% of a 2048 byte maximum)
Total 900 80 . . 80 vtable'. ( ) .
, — , . “” . .
, , . . « », . .
№2 — ++
, . . . new/delete.
Program size: 15 408 bytes (used 50% of a 30 720 byte maximum) (2,60 secs)
Minimum Memory Usage: 1273 bytes (62% of a 2048 byte maximum)
. , , . . Those. , . .
. , . Those. “” . , , .
, . , vtable. :
Program size: 14 704 bytes (used 48% of a 30 720 byte maximum) (2,94 secs)
Minimum Memory Usage: 1211 bytes (59% of a 2048 byte maximum)
vtable' , 2. . ( ), free, (-12 ). (8 ) , (Screen, ParentScreen — 40 )
— 700 . , malloc/free/new/delete. 700 ! 700 , !
-,
| It was | C | C ++ | |
|---|---|---|---|
| Flash | 15 458 | 14 568 | 14 704 |
| Ram | 1258 | 1176 | 1211 |
: ++ . , . . , , ++?
Afterword
. , . . : , , .
— GPS. , .
10 . , ATMega32. , . — ATMega64 STM32.
- . — . .
.
The second part of
Source: https://habr.com/ru/post/401899/
All Articles