3D scanning and 3D printing in action (dedicated to motorcyclists)
Hello. Today we will tell a little story about a bit unusual application of a 3D printer and a 3D scanner.
For scanning, we used a second-generation scanner from Sense. Sense is a budget handheld scanner. Its cost is 38 900 rubles.
')
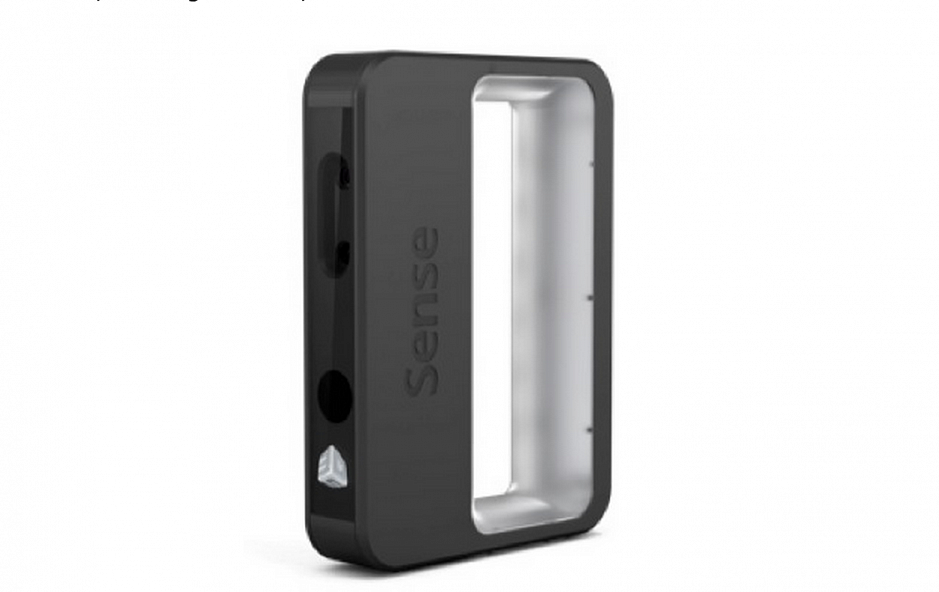
Unlike the first generation of Sense scanners, the size of the maximum scan area became smaller, but the quality of the scan and the resolution of the camera improved. Software designed for Windows 8.1 or higher. The scanner is powered by Intel RealSense technology.
The device scanner is quite simple. The case is made of soft soft-touch plastic. There are 2 cameras in the housing - a camera that is responsible for transmitting the depth of the object and a camera that is responsible for the color rendition. Below is the source of infrared laser radiation.
As such, the configuration of the scanner is not. The box in which the scanner is packed and the colorful instruction with pictures.

Suddenly it turned out that a budget computer is needed for a budget scanner. Connecting scanners is recommended via USB 3.0.
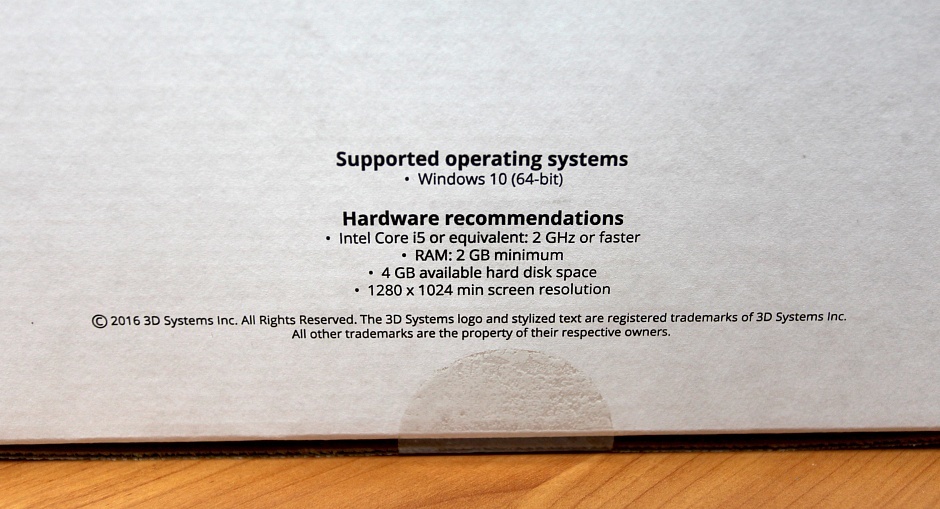
On a computer with such requirements, programs for scanning start, but this is all limited. At different stages, the program simply tightly hangs itself or "hangs up" the computer. Tried a bunch of computers. As a result, it was launched on a laptop with i7 and 16GB of RAM.
The main difference between scanners is software. It depends on it the quality and ease of scanning.
Sense offers you to download 3D Systems Sense from the site. We swing. We connect the scanner. The program will immediately offer to register the scanner. Without registration, the scanner will not work.
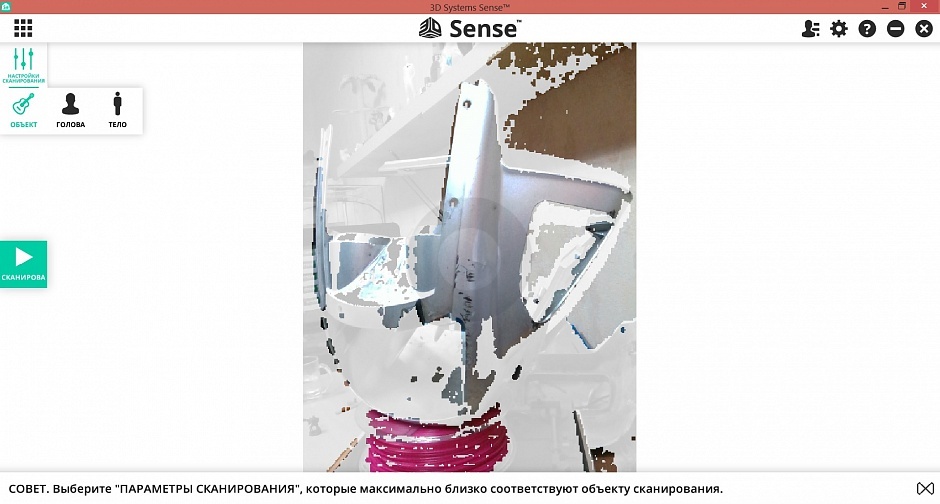
The interface is completely Russified. It is nice and very comfortable. Before scanning it is proposed to choose one of 3 scanning options. In each mode, the scanner captures a larger or smaller area for scanning.
An object.
Head.
Body.
In the upper right corner there are additional settings. (I did not touch them and left "as is").

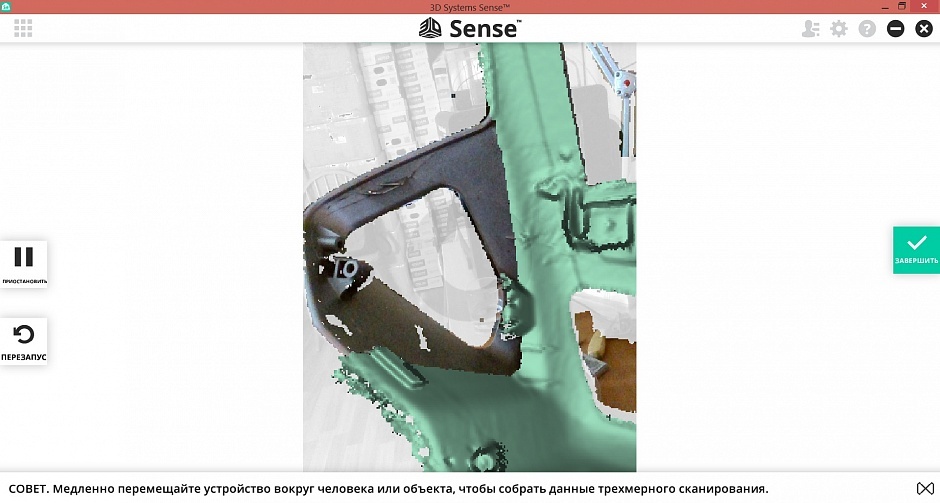
Select the appropriate mode. Click the scan button. The scanner starts counting (almost like when launching a rocket) 3,2,1 ... We scan)
In scan mode, pause mode and restart scan appear. During scanning, the program tells you what to do.
Everything is quite convenient and understandable. At first, when I lost control of the scanner, I was hysterical and tried to combine the red porridge with the scanned object (which is sometimes problematic), but it turned out not to be necessary. You can direct the scanner to an already scanned area, even if it is on the other side of the scanned object.
After scanning, click the button "complete". The program begins to collect everything in the model. (some inscriptions amused)
It turned out this model.

In the upper left corner there is a menu of tools for editing the model. There are not many of them, but they are enough for quick stripping of the model from randomly “caught in a frame” pieces. There is also a tool for a small adjustment of the color of the model.
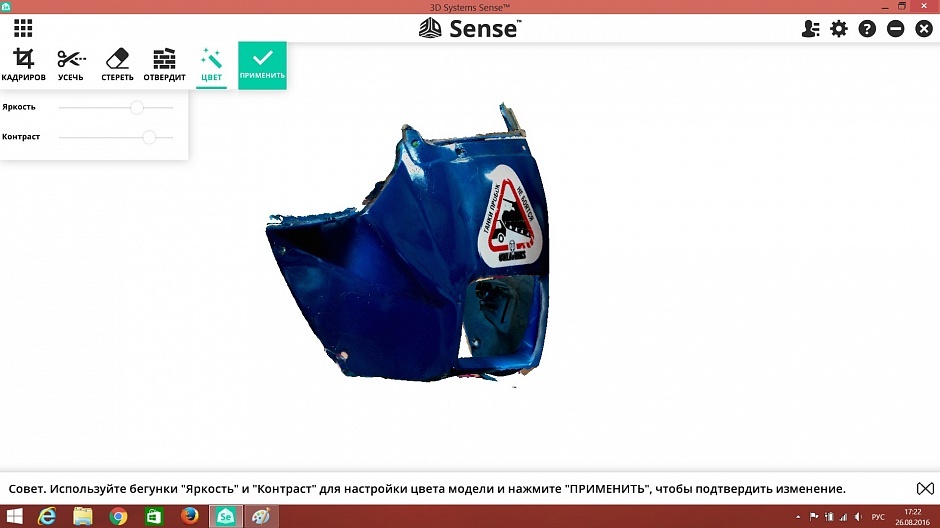
The most interesting tool in my opinion is to “harden”. It closes all the gaps in the model and makes it solid, which allows you to immediately send it to print to a 3D printer. This is how the muzzle of the motorcycle “turned away”.

For convenience, there are settings for displaying the model. In color, one-color or frame model.

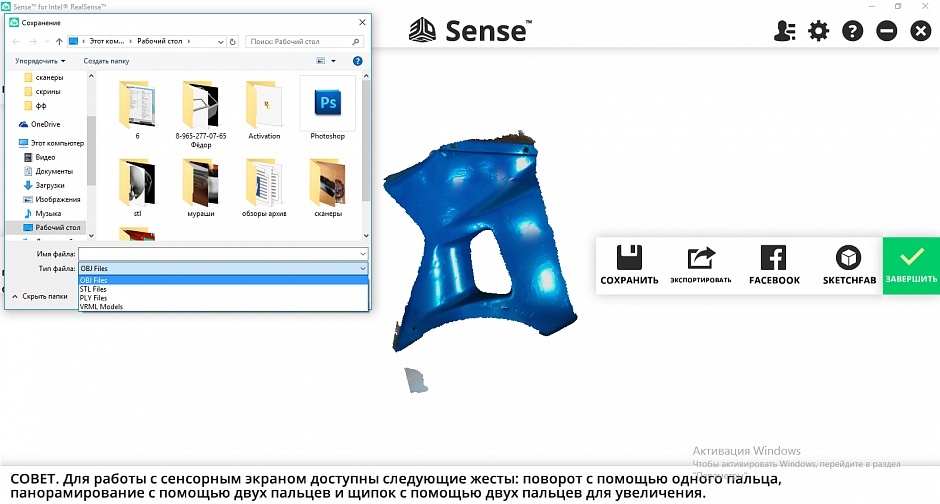
You can save in multiple formats. By default, all scans and textures are in the 3D Systems folder in obj format. But you can save the file in several formats.
At first, it was unusual to scan, but thanks to the prompts I quickly figured it all out. Although a couple of shortcomings are still there.
It turned out the scanner has a "software zero". Start scanning a large object from the highest point. Or you can get into trouble for example in the form of a person without a part of the head.

Sometimes the scanner refuses to see some piece of the object as it is not guided. We have to restart the scan, and the problem disappears.
And of course, the scanner does not see any mirror, transparent and black matte objects at all.
Even before printing, we asked the person processing the scans to measure some of the dimensions and compared them with the actual dimensions on the plastic.
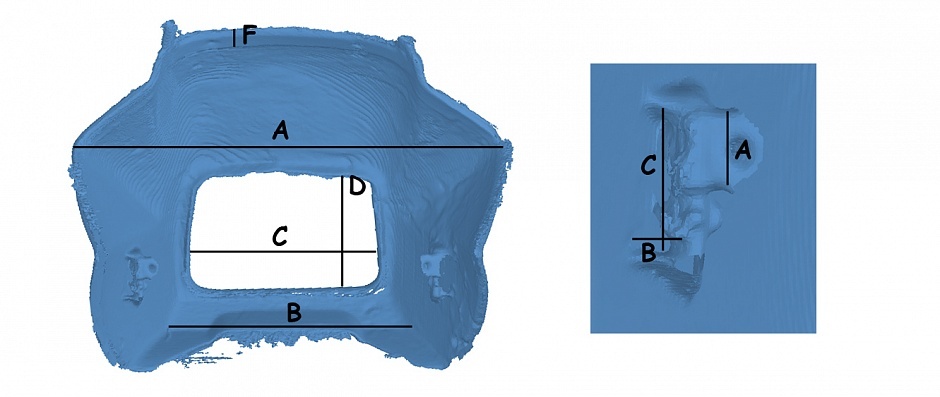
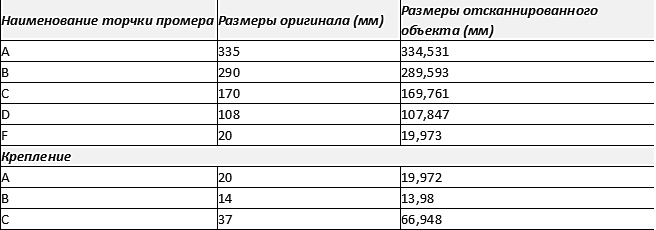
The large error in fastening is most likely due to the fact that they measured different (left / right). They are restored and not very symmetrical.
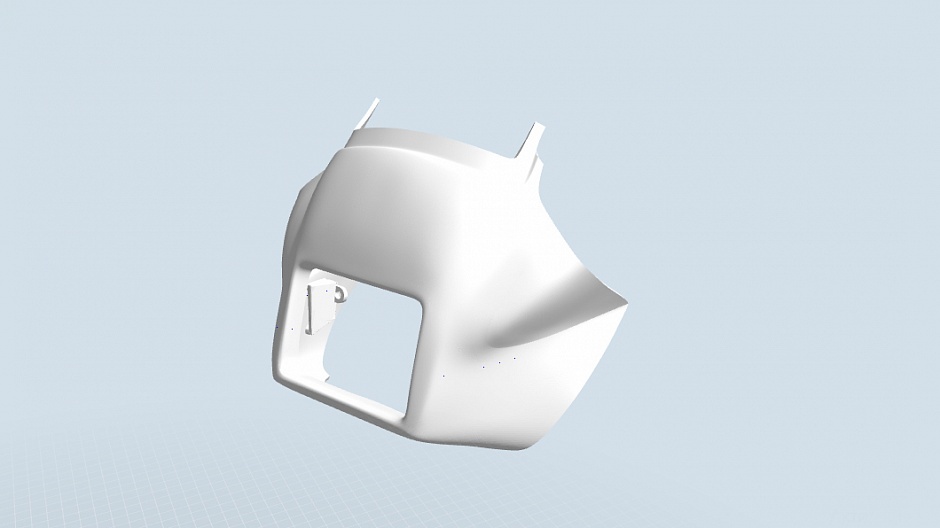
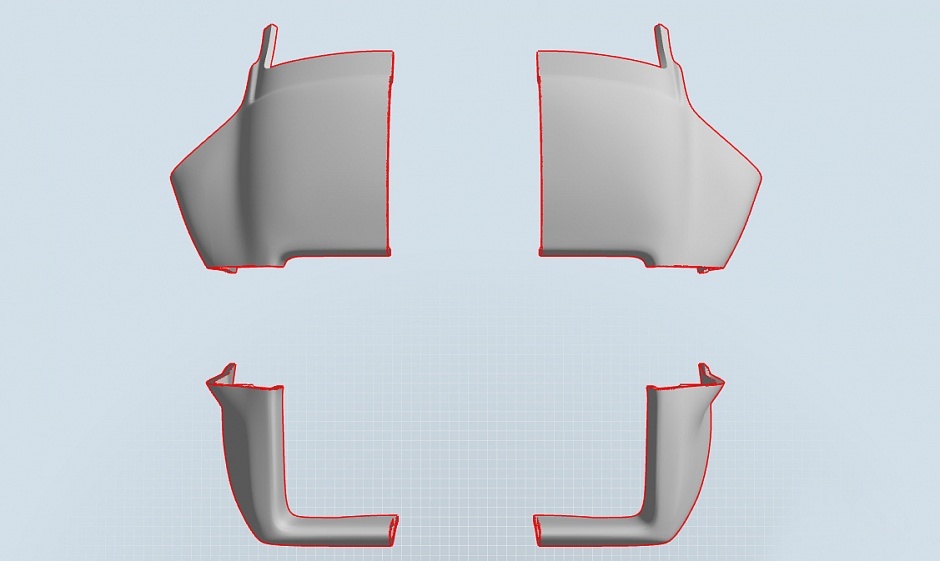
After processing, we got this model.
And we began to think from what and on what to print.
The question "of what" was resolved quickly. ABS is more flexible than PLA, it is easier to glue, and compared to specials. plastics it is inexpensive. We used ABS production ESUN, the color is dark green.
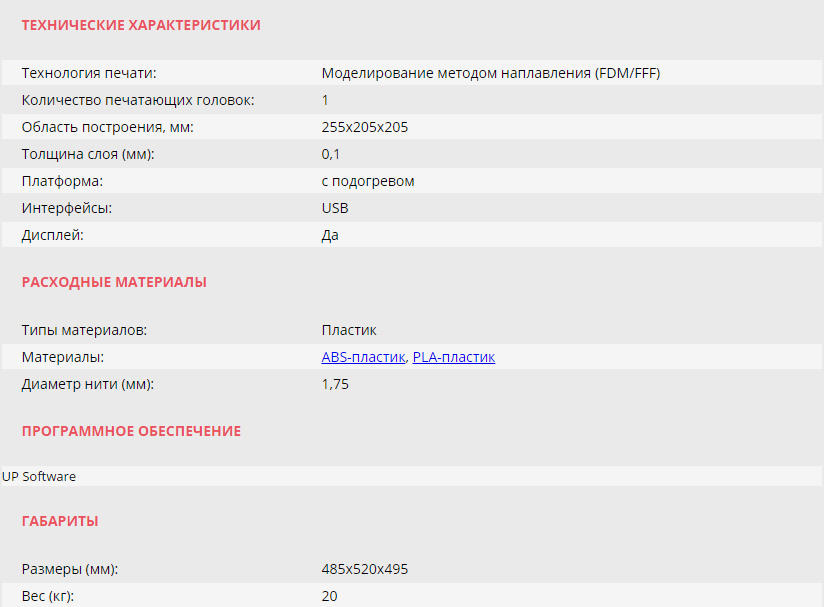
It was harder. Since the parts are large enough, the printer should be closed with a camera. At the same time, with a large platform that would not have to collect then the "puzzle" of 1000 parts. It is desirable to print not from the computer, because the printing time will be quite long. The choice fell on UP! BOX.

UP BOX has a large print area, a closed camera, after sending a file to print it is fully loaded into the device’s memory and the computer can be turned off.
A little about the configuration and features UP BOX
The cost of the printer is 138,000 rubles.
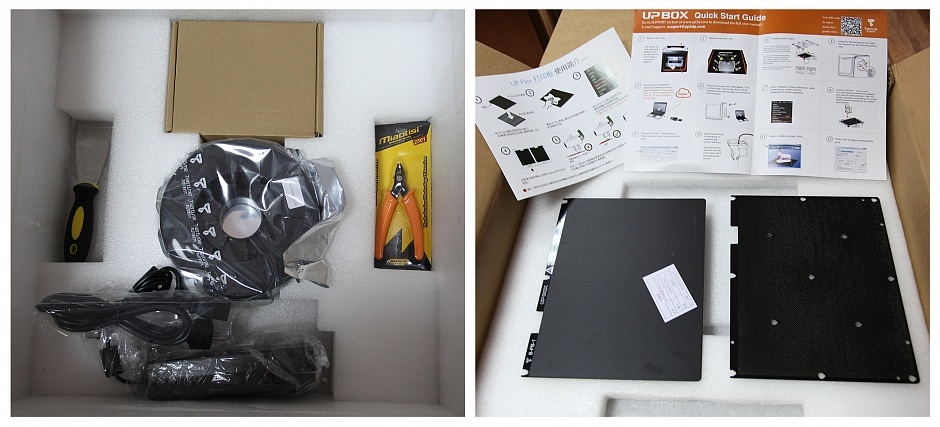
The package includes 2 spare pads - perforated and with a special coating. ABS plastic coil 0.5 kg, spatula, pliers and a small set of tools for servicing the printer.
The package bundle may seem scarce, but for a printer that does not require assembly and rework, I find it quite enough.
Externally, the printer looks very elegant. All mechanisms are hidden inside the printer.
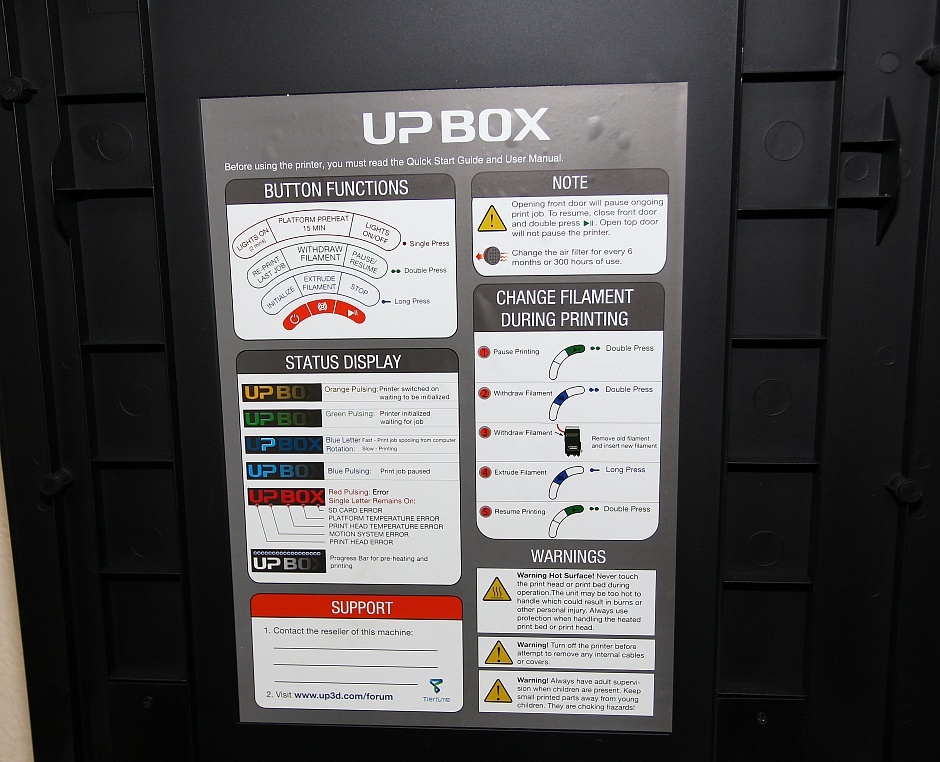
Control is carried out using only 3 buttons. Depending on the duration of pressing the buttons are responsible for different actions. You can launch the last printed file in just 2 clicks.

The printer informs about the readiness for printing, malfunctions or the course of printing with the help of the light indication.
Instructions for decoding the display and use of buttons is located under the top cover.
An air purifier with a carbon filter is installed inside the chamber. You can finally forget about the unpleasant smell of ABS when printing.

The printer has auto table level calibration.

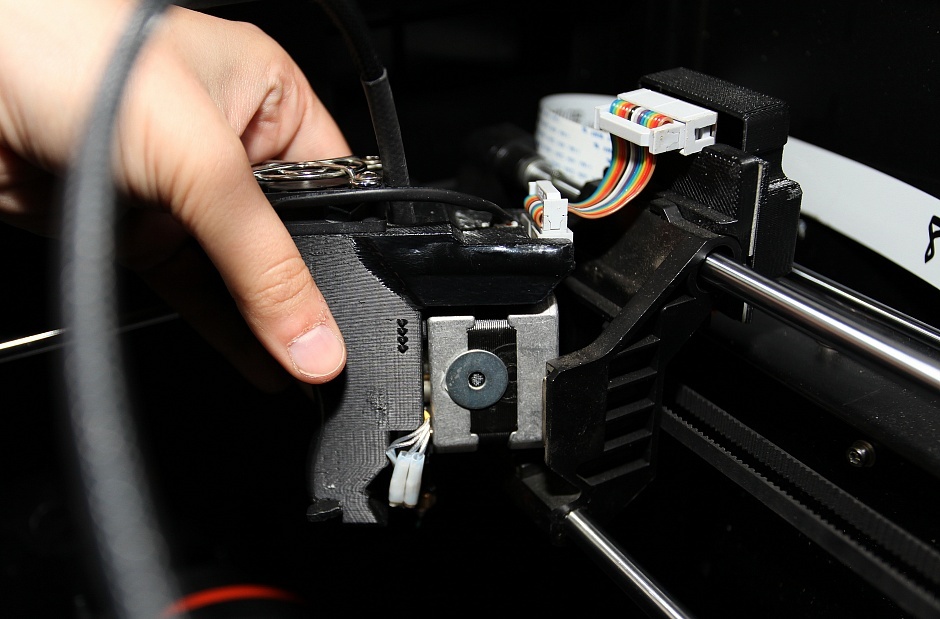
The extruder is mounted on magnets. This facilitates the disassembly of the extruder and does not allow the printer to "suicide".
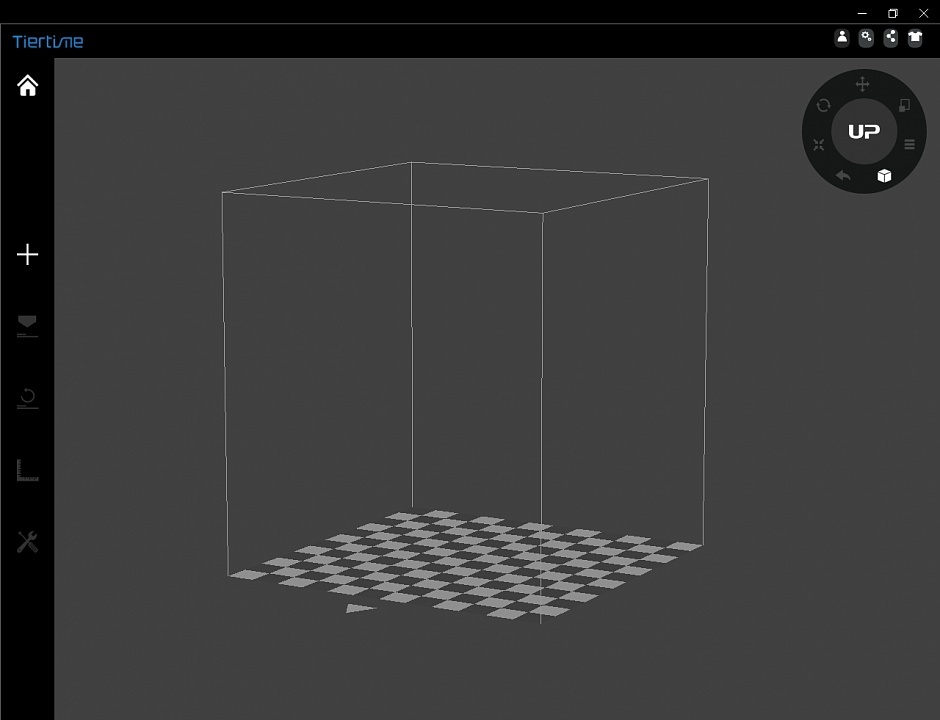
The printer has its UPStudio slicer.
A plus for me was the minimum number of settings. On the one hand, this can be inconvenient, especially if you plan to use exotic types of plastic. On the other hand, it eliminated the long setup of the printer.
We loaded the model, chose the material, chose the layer thickness and filling. We control the printing of the first layer just in case. Everything.
The only inconvenience that we encountered is the mounting of the coil. In UP BOX, the mount is recessed into the case and is designed for a “native” coil weighing 0.5 kg. They are quite expensive so I had to think of mounting under the ESUN kilogram coil.

Print
Model "muzzle" cut into 4 parts. Each part, though placed on the table end-to-end, was cut in half.
Printing time 1 \ 4 was from 14 to 17 hours. Layer 0.2, medium filling.

Raft and support separated surprisingly easily.

After 2.5 days of continuous printing, we got such details.

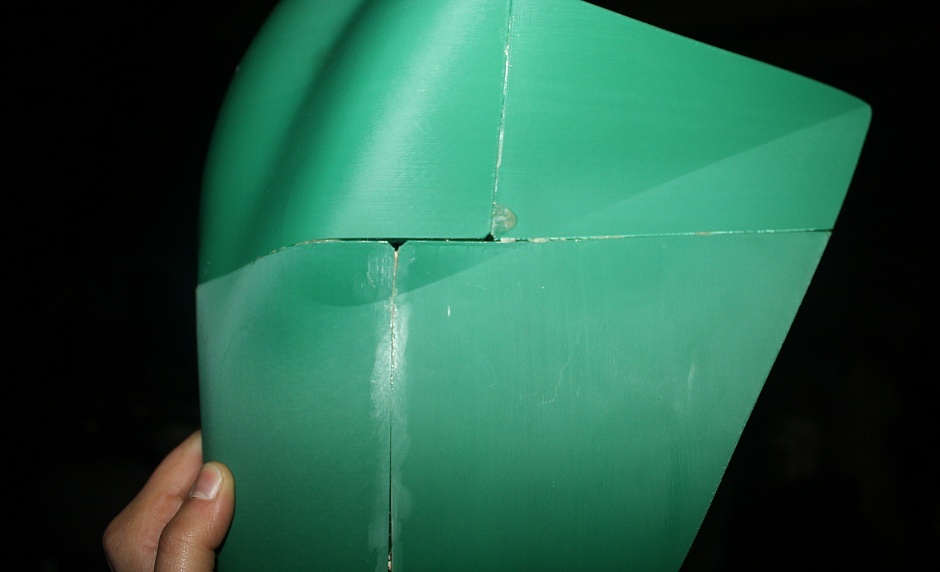
The initial gluing was done with acetone and ABS diluted in it. Plastic, of course, sat down somewhere and slightly deformed, but the gaps turned out to be even smaller than expected.
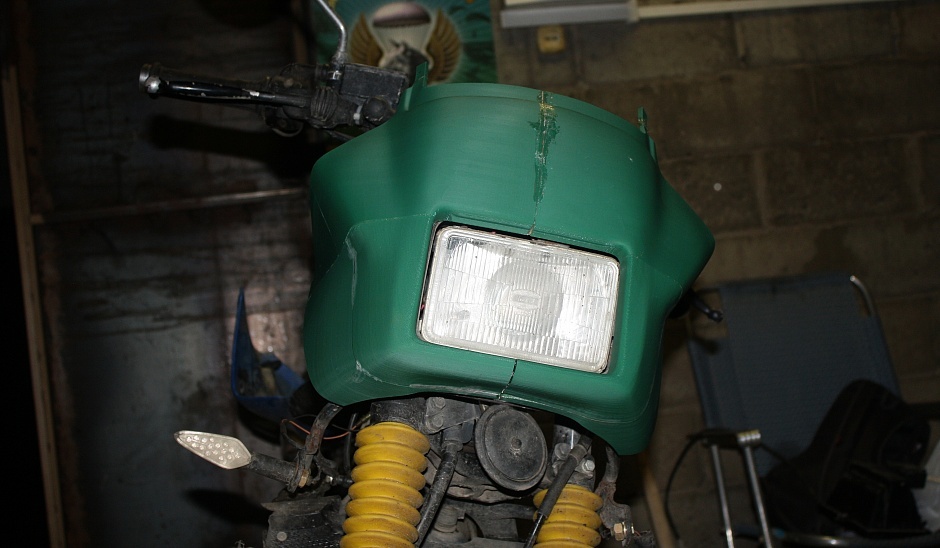
After gluing, they immediately tried on a motorcycle. Despite the preliminary measurements, until the last moment there were fears that the plastic “would not sit down” somewhere. The fears were in vain. The whole village on fasteners like the original plastic.
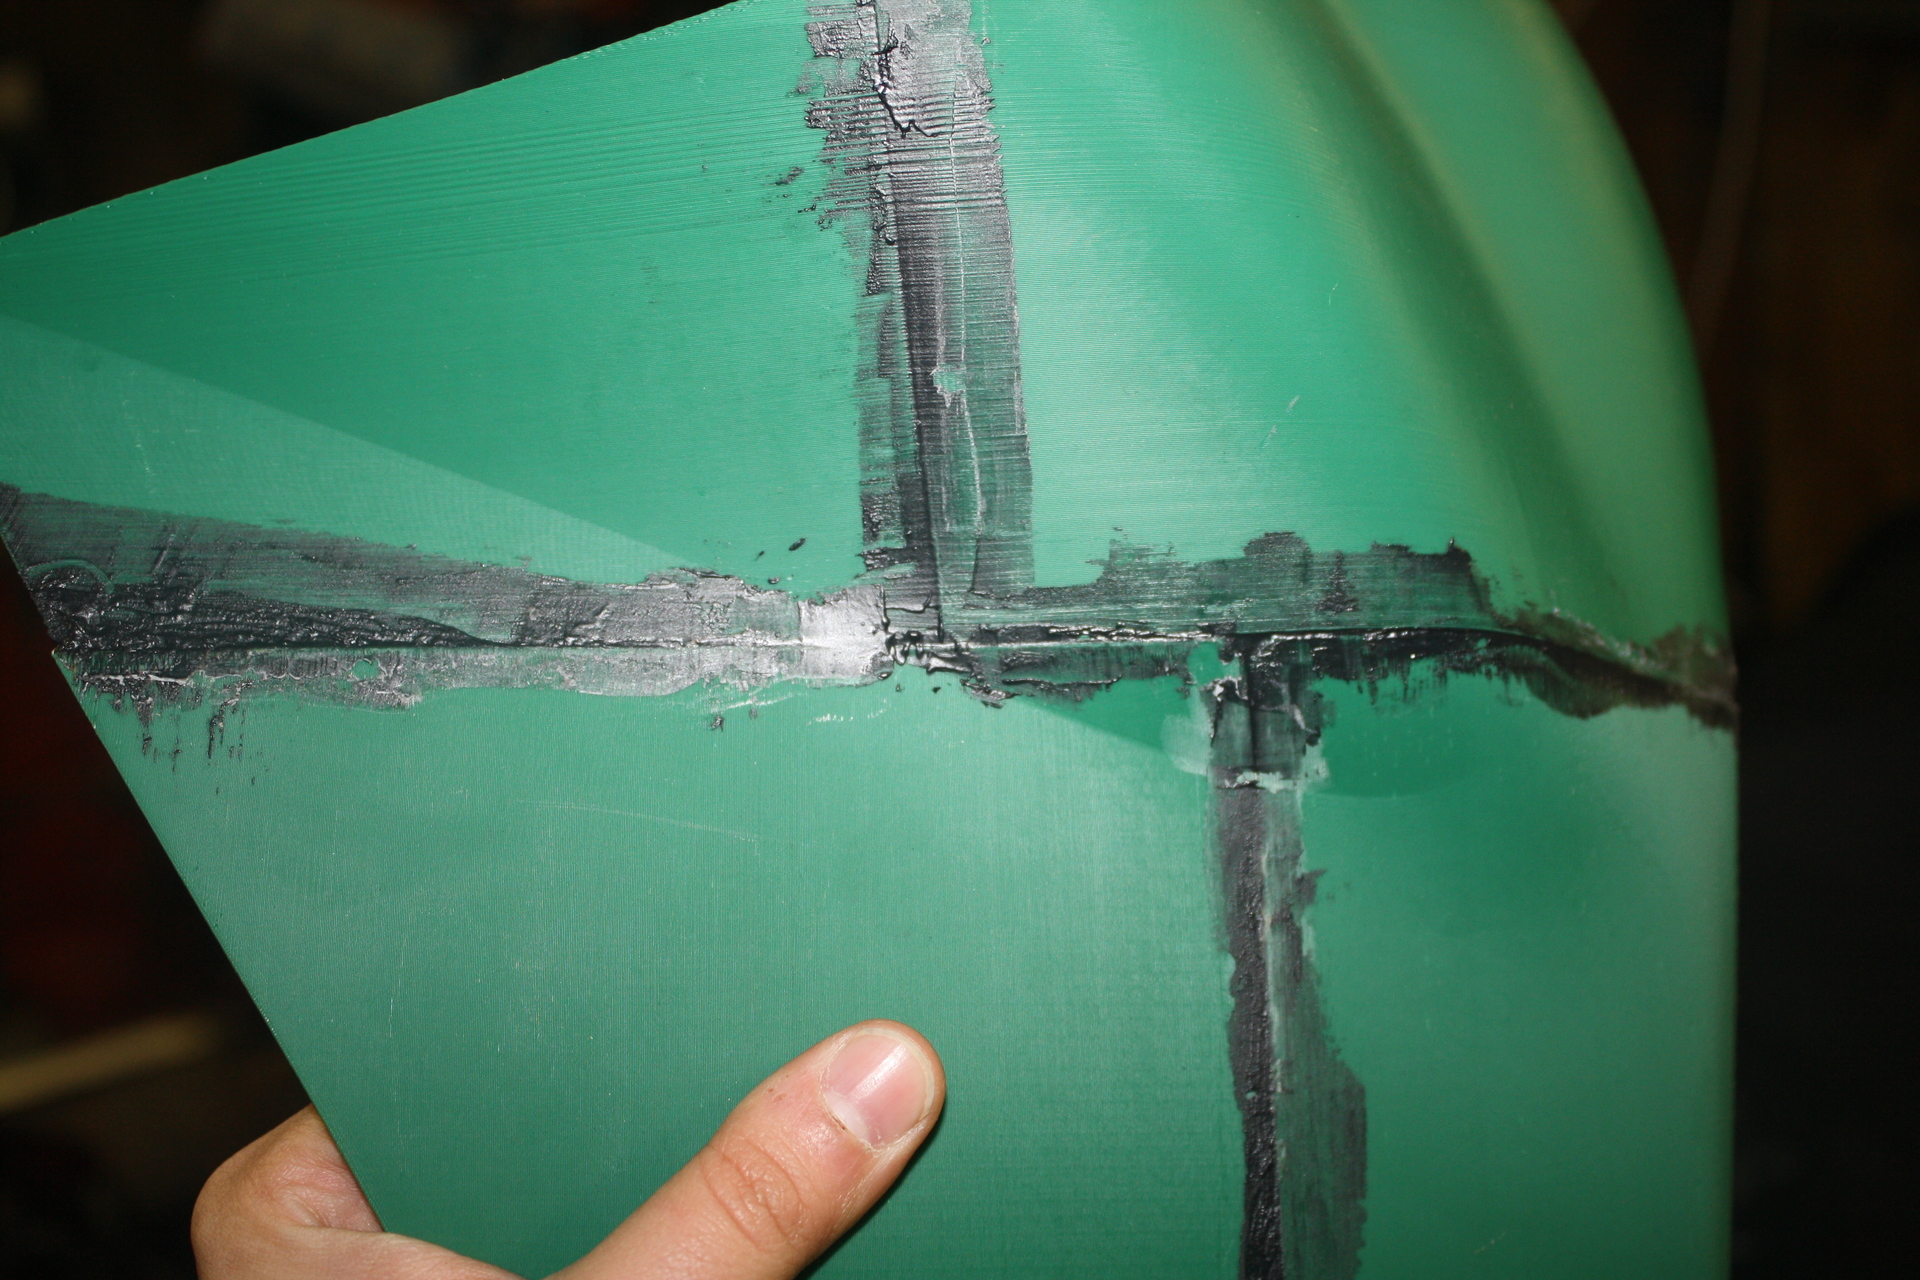
Now the slits on the plastic neatly putty. Post-processing and painting is coming. Inside, for greater strength, there will be reinforcement of fiberglass and injection molded plastic.
Despite the fact that I used the scanner for the first time, I did not have any difficulties with Sense. The interface is intuitive. Management is simple. Although it is not suitable for very small parts (we tried to scan Warhammer 40k figures and nothing came of it). The scanner is well suited for scanning large items.
And in any case, you will have to decently refine the scanned models.
It took a little less than 1 kg to print a fairing. plastic. Given the average price for a coil, it came out much cheaper and faster than ordering the original plastic.
UP! BOX turned out to be a very decent printer. Excellent "workhorse" does not require painstaking settings and gives a very decent quality.
Most recently, TierTime has released an updated version of UP! BOX.
In the new version, the ability to adjust the temperature has become available! Now you can print with almost any kind of plastic. Adding new profiles for printing is available after registering on the site UP and binding the printer.
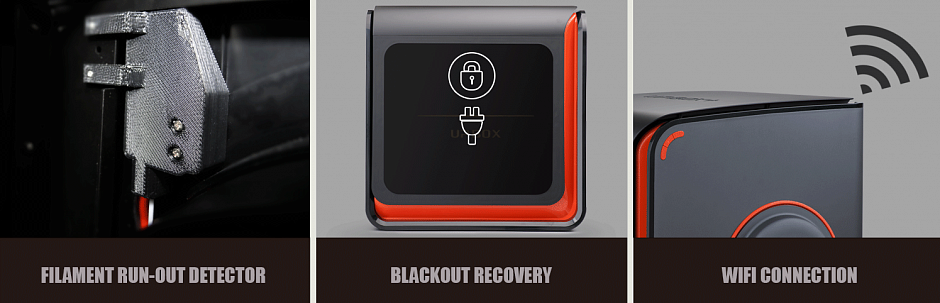
A filament sensor has been added. Now you can not worry that the plastic will end at the wrong time).
Added function to restore printing after a power outage.
A nice bonus is the availability of Wi-Fi. Someone says that the thing is useless, but given that UP UP has added applications for printing from a phone / tablet, we believe that this is a justified innovation.
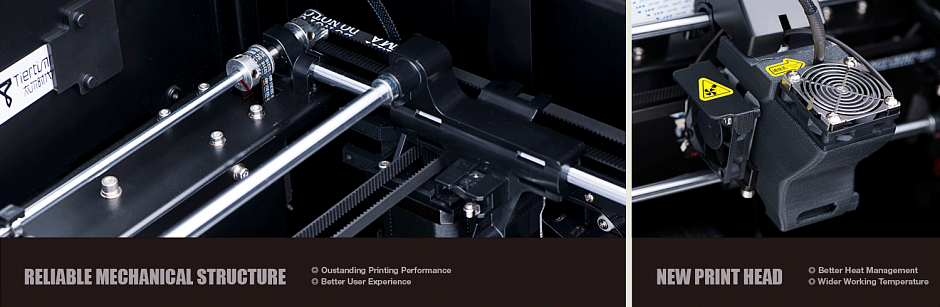
Not without changes in the design of the printer.
The mechanic and the print head were modified.
And as a small bonus - now in the UP! BOX + fits a 1 kg reel.
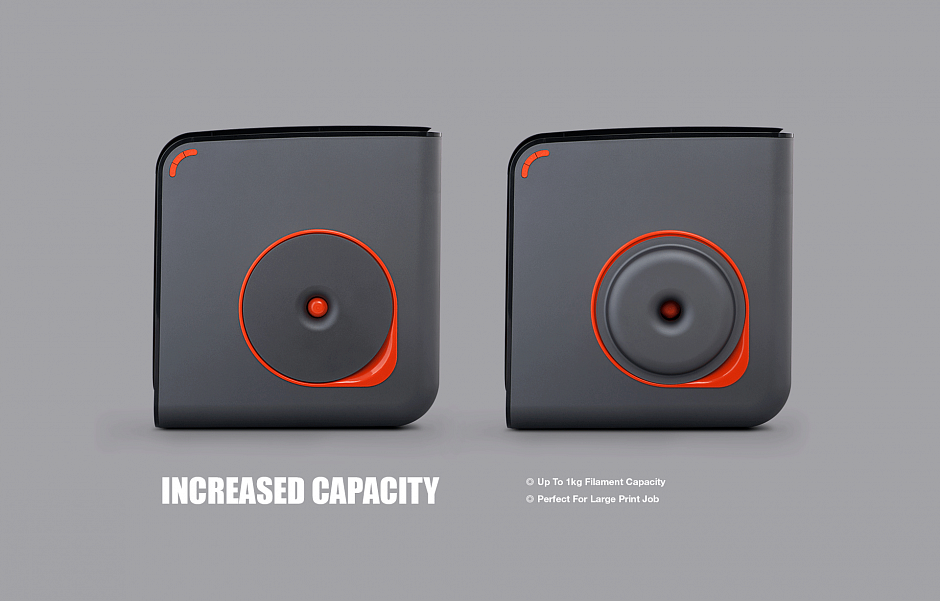
Now you do not have to invent a holder for the coil, as we are in this story. =)
Almost all the shortcomings that we identified in this article have been modified or eliminated in the new version of the UP BOX.
By tradition, a minute of advertising) Buying equipment in our company, you get 10 advantages:
1. Ability to use the program Trade In.
2. Warranty - 12 months
3. Instructions in Russian
4. Technical support throughout the lifetime
5. You buy a 3D printer from an official distributor in Russia
6. Free shipping
7. Free training in our office
8. The ability to buy a printer on credit through banks TKS, OTP, Renaissance
9. 10% discount on plastic forever
10. Opportunity to get acquainted with the printer in our demo room
The review was prepared by the specialist in 3D printing of Color World company, Anna Panfilova.
Subscribe to our groups on Facebook , VK and YouTube to keep up with the latest events.
- We know that there are other methods to do the same without using 3D printing. But it was in our opinion a good indicator of the capabilities of the printer and scanner. And a good man made nice)
A bit of background
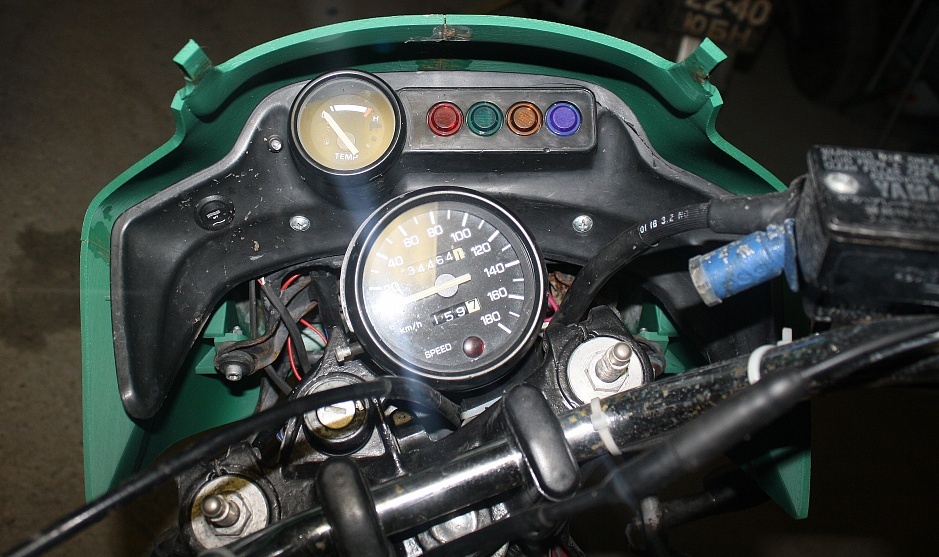
My good friend the owner of an old Yamaha motorcycle, at the end of the season managed to get into an accident. Nothing serious, but the plastic on the bike was broken. To get it problematic and quite expensive. I did not want to restore it again.
It was around this time that the second-generation Sense handheld scanner was released into my hands. After some discussion, we decided to try scanning the plastic and printing it on a 3D printer. I was also given a battered face from “Ebrika” (Yamaha YBR 125).
It was around this time that the second-generation Sense handheld scanner was released into my hands. After some discussion, we decided to try scanning the plastic and printing it on a 3D printer. I was also given a battered face from “Ebrika” (Yamaha YBR 125).
Scanning
For scanning, we used a second-generation scanner from Sense. Sense is a budget handheld scanner. Its cost is 38 900 rubles.
')
Unlike the first generation of Sense scanners, the size of the maximum scan area became smaller, but the quality of the scan and the resolution of the camera improved. Software designed for Windows 8.1 or higher. The scanner is powered by Intel RealSense technology.
The device scanner is quite simple. The case is made of soft soft-touch plastic. There are 2 cameras in the housing - a camera that is responsible for transmitting the depth of the object and a camera that is responsible for the color rendition. Below is the source of infrared laser radiation.
As such, the configuration of the scanner is not. The box in which the scanner is packed and the colorful instruction with pictures.
Suddenly it turned out that a budget computer is needed for a budget scanner. Connecting scanners is recommended via USB 3.0.
On a computer with such requirements, programs for scanning start, but this is all limited. At different stages, the program simply tightly hangs itself or "hangs up" the computer. Tried a bunch of computers. As a result, it was launched on a laptop with i7 and 16GB of RAM.
BY
The main difference between scanners is software. It depends on it the quality and ease of scanning.
Sense offers you to download 3D Systems Sense from the site. We swing. We connect the scanner. The program will immediately offer to register the scanner. Without registration, the scanner will not work.
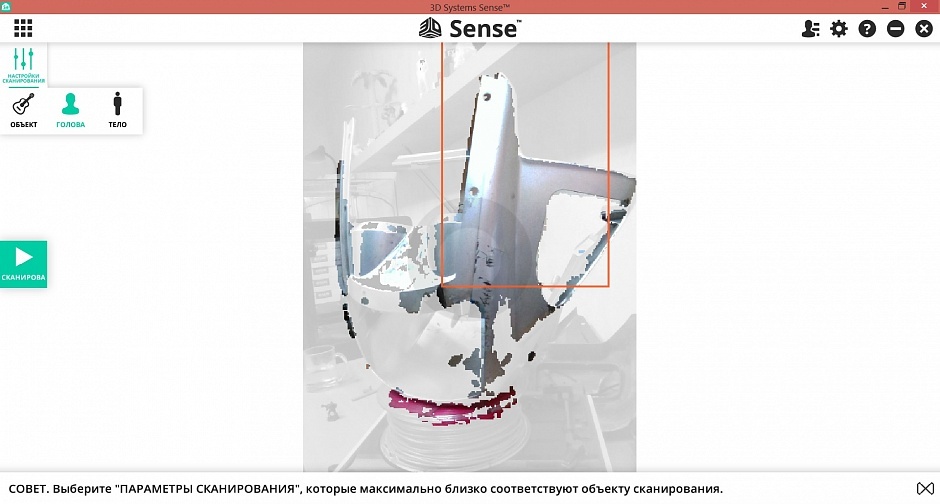
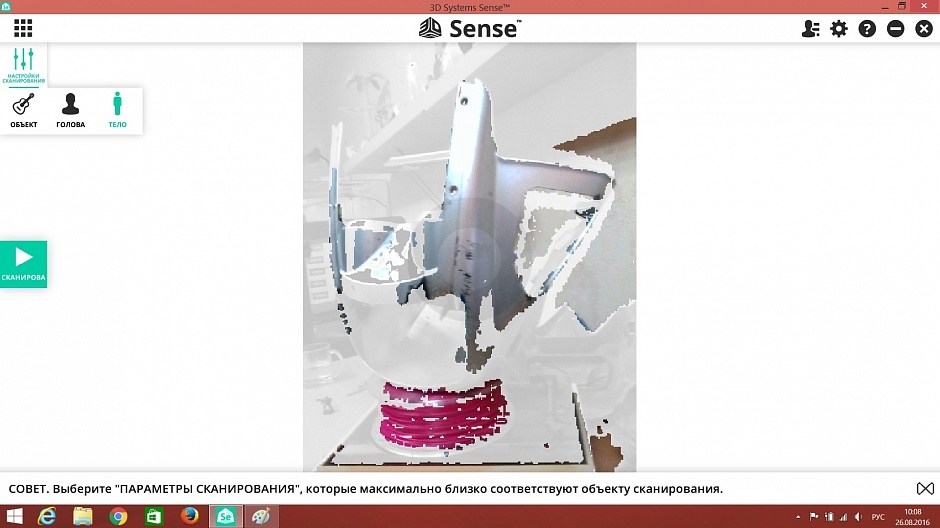
The interface is completely Russified. It is nice and very comfortable. Before scanning it is proposed to choose one of 3 scanning options. In each mode, the scanner captures a larger or smaller area for scanning.
An object.
Head.
Body.
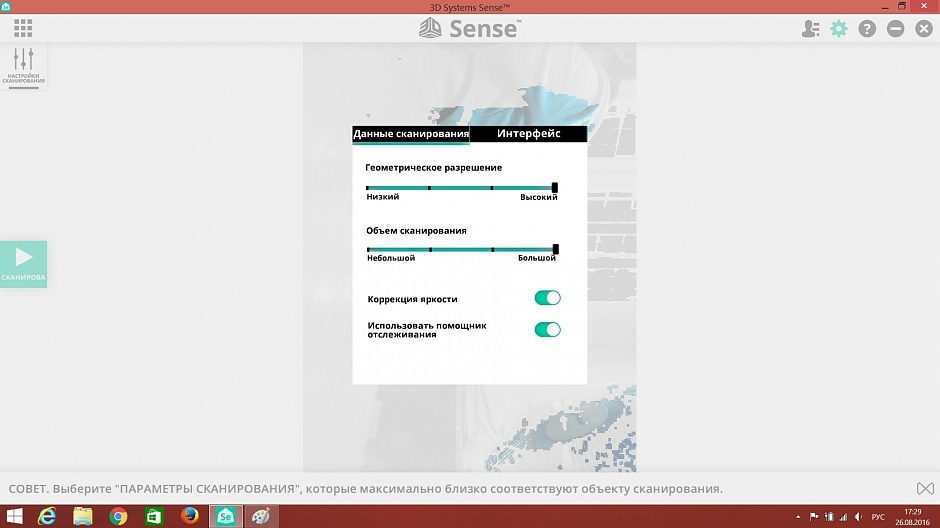
In the upper right corner there are additional settings. (I did not touch them and left "as is").
Select the appropriate mode. Click the scan button. The scanner starts counting (almost like when launching a rocket) 3,2,1 ... We scan)
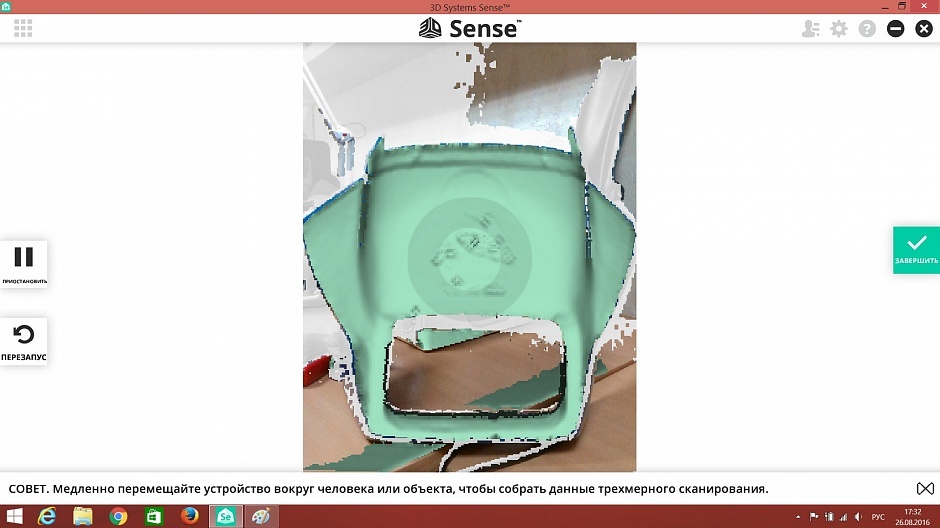
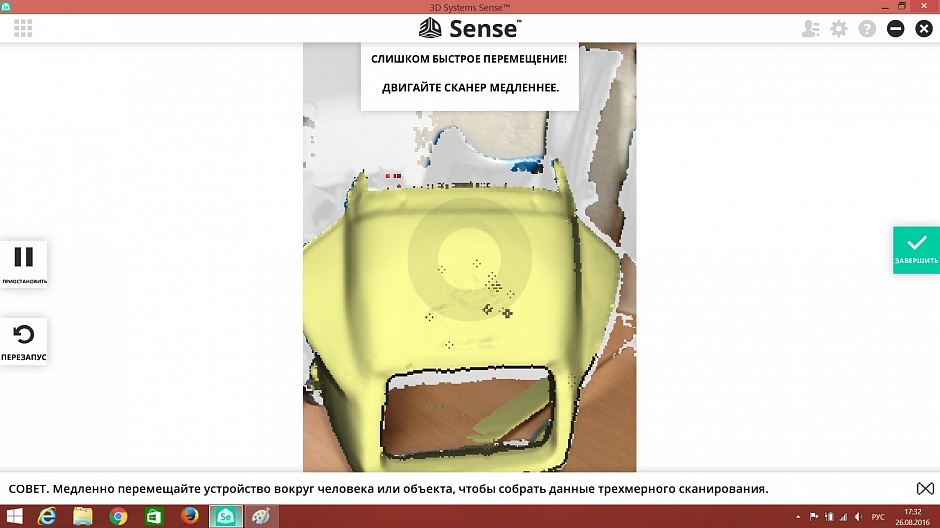
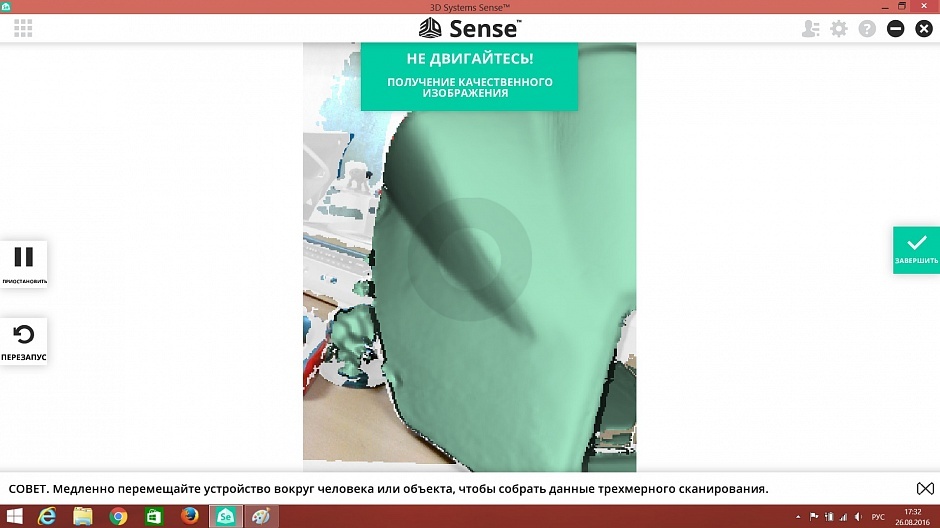
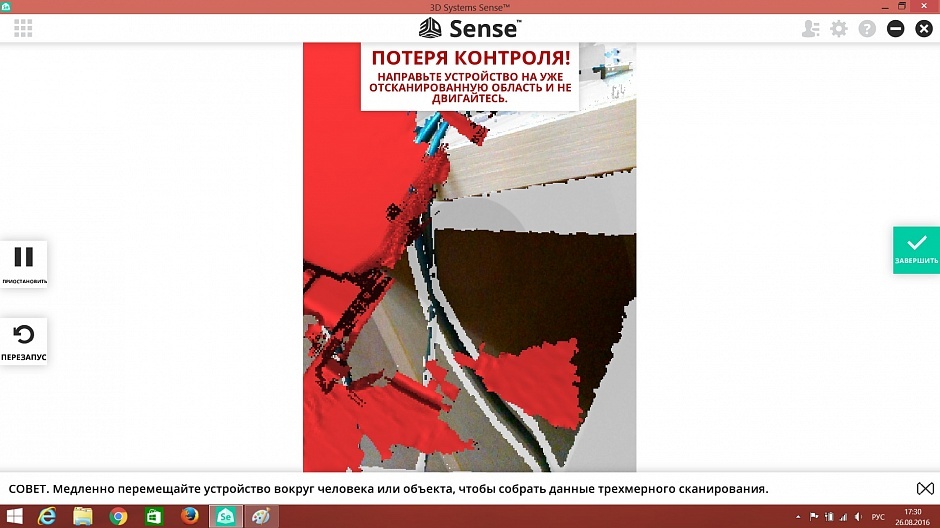
In scan mode, pause mode and restart scan appear. During scanning, the program tells you what to do.
Everything is quite convenient and understandable. At first, when I lost control of the scanner, I was hysterical and tried to combine the red porridge with the scanned object (which is sometimes problematic), but it turned out not to be necessary. You can direct the scanner to an already scanned area, even if it is on the other side of the scanned object.
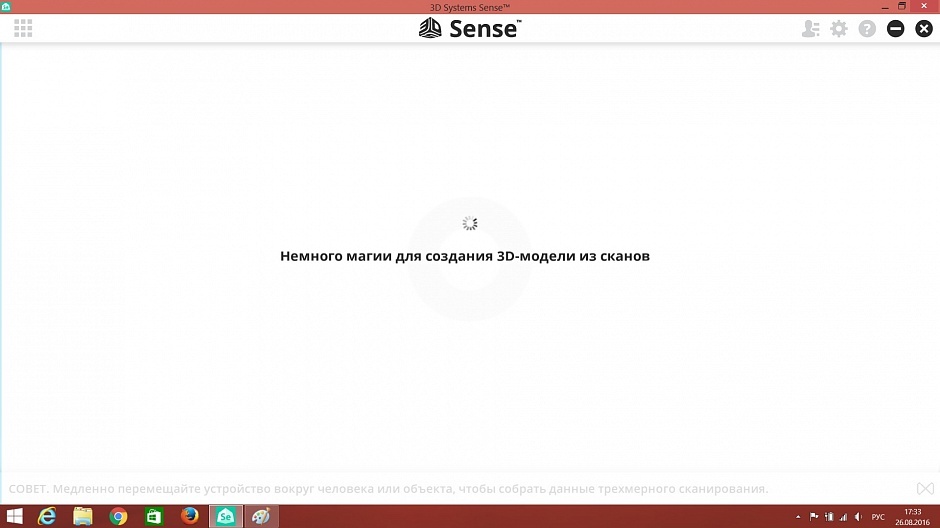
After scanning, click the button "complete". The program begins to collect everything in the model. (some inscriptions amused)
It turned out this model.
In the upper left corner there is a menu of tools for editing the model. There are not many of them, but they are enough for quick stripping of the model from randomly “caught in a frame” pieces. There is also a tool for a small adjustment of the color of the model.
The most interesting tool in my opinion is to “harden”. It closes all the gaps in the model and makes it solid, which allows you to immediately send it to print to a 3D printer. This is how the muzzle of the motorcycle “turned away”.
For convenience, there are settings for displaying the model. In color, one-color or frame model.
You can save in multiple formats. By default, all scans and textures are in the 3D Systems folder in obj format. But you can save the file in several formats.
At first, it was unusual to scan, but thanks to the prompts I quickly figured it all out. Although a couple of shortcomings are still there.
It turned out the scanner has a "software zero". Start scanning a large object from the highest point. Or you can get into trouble for example in the form of a person without a part of the head.
Sometimes the scanner refuses to see some piece of the object as it is not guided. We have to restart the scan, and the problem disappears.
And of course, the scanner does not see any mirror, transparent and black matte objects at all.
Even before printing, we asked the person processing the scans to measure some of the dimensions and compared them with the actual dimensions on the plastic.
The large error in fastening is most likely due to the fact that they measured different (left / right). They are restored and not very symmetrical.
After processing, we got this model.
And we began to think from what and on what to print.
Of what?
The question "of what" was resolved quickly. ABS is more flexible than PLA, it is easier to glue, and compared to specials. plastics it is inexpensive. We used ABS production ESUN, the color is dark green.
On what?
It was harder. Since the parts are large enough, the printer should be closed with a camera. At the same time, with a large platform that would not have to collect then the "puzzle" of 1000 parts. It is desirable to print not from the computer, because the printing time will be quite long. The choice fell on UP! BOX.
UP BOX has a large print area, a closed camera, after sending a file to print it is fully loaded into the device’s memory and the computer can be turned off.
A little about the configuration and features UP BOX
The cost of the printer is 138,000 rubles.
The package includes 2 spare pads - perforated and with a special coating. ABS plastic coil 0.5 kg, spatula, pliers and a small set of tools for servicing the printer.
The package bundle may seem scarce, but for a printer that does not require assembly and rework, I find it quite enough.
Externally, the printer looks very elegant. All mechanisms are hidden inside the printer.
Control is carried out using only 3 buttons. Depending on the duration of pressing the buttons are responsible for different actions. You can launch the last printed file in just 2 clicks.
The printer informs about the readiness for printing, malfunctions or the course of printing with the help of the light indication.
Instructions for decoding the display and use of buttons is located under the top cover.
An air purifier with a carbon filter is installed inside the chamber. You can finally forget about the unpleasant smell of ABS when printing.
The printer has auto table level calibration.
The extruder is mounted on magnets. This facilitates the disassembly of the extruder and does not allow the printer to "suicide".
The printer has its UPStudio slicer.
A plus for me was the minimum number of settings. On the one hand, this can be inconvenient, especially if you plan to use exotic types of plastic. On the other hand, it eliminated the long setup of the printer.
We loaded the model, chose the material, chose the layer thickness and filling. We control the printing of the first layer just in case. Everything.
The only inconvenience that we encountered is the mounting of the coil. In UP BOX, the mount is recessed into the case and is designed for a “native” coil weighing 0.5 kg. They are quite expensive so I had to think of mounting under the ESUN kilogram coil.
Model "muzzle" cut into 4 parts. Each part, though placed on the table end-to-end, was cut in half.
Printing time 1 \ 4 was from 14 to 17 hours. Layer 0.2, medium filling.
Raft and support separated surprisingly easily.
After 2.5 days of continuous printing, we got such details.
The initial gluing was done with acetone and ABS diluted in it. Plastic, of course, sat down somewhere and slightly deformed, but the gaps turned out to be even smaller than expected.
After gluing, they immediately tried on a motorcycle. Despite the preliminary measurements, until the last moment there were fears that the plastic “would not sit down” somewhere. The fears were in vain. The whole village on fasteners like the original plastic.
Now the slits on the plastic neatly putty. Post-processing and painting is coming. Inside, for greater strength, there will be reinforcement of fiberglass and injection molded plastic.
Results
Despite the fact that I used the scanner for the first time, I did not have any difficulties with Sense. The interface is intuitive. Management is simple. Although it is not suitable for very small parts (we tried to scan Warhammer 40k figures and nothing came of it). The scanner is well suited for scanning large items.
Print purity scanned Sense and without processing printed on the Wanhao Duplicator 6.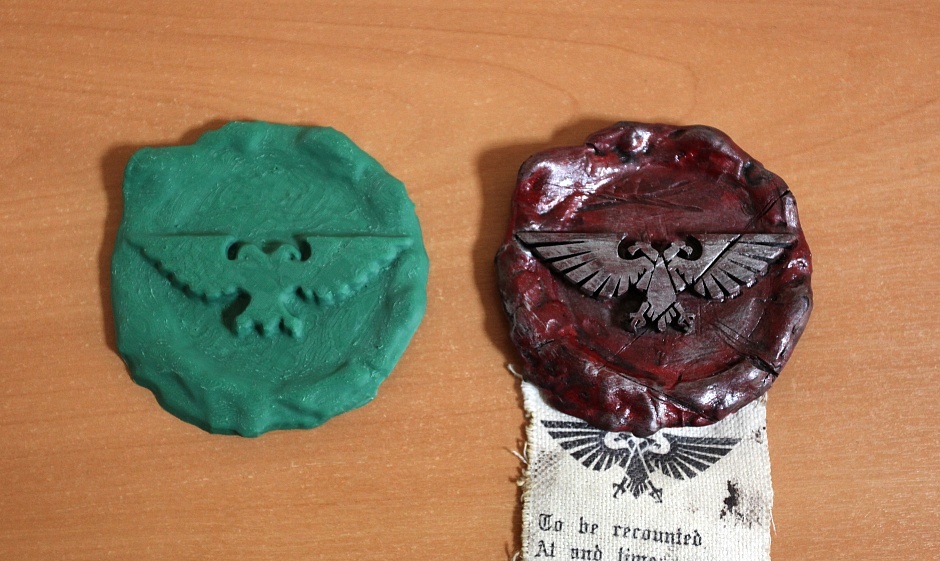
And in any case, you will have to decently refine the scanned models.
It took a little less than 1 kg to print a fairing. plastic. Given the average price for a coil, it came out much cheaper and faster than ordering the original plastic.
UP! BOX turned out to be a very decent printer. Excellent "workhorse" does not require painstaking settings and gives a very decent quality.
Most recently, TierTime has released an updated version of UP! BOX.
In the new version, the ability to adjust the temperature has become available! Now you can print with almost any kind of plastic. Adding new profiles for printing is available after registering on the site UP and binding the printer.
A filament sensor has been added. Now you can not worry that the plastic will end at the wrong time).
Added function to restore printing after a power outage.
A nice bonus is the availability of Wi-Fi. Someone says that the thing is useless, but given that UP UP has added applications for printing from a phone / tablet, we believe that this is a justified innovation.
Not without changes in the design of the printer.
The mechanic and the print head were modified.
And as a small bonus - now in the UP! BOX + fits a 1 kg reel.
Now you do not have to invent a holder for the coil, as we are in this story. =)
Almost all the shortcomings that we identified in this article have been modified or eliminated in the new version of the UP BOX.
By tradition, a minute of advertising) Buying equipment in our company, you get 10 advantages:
1. Ability to use the program Trade In.
2. Warranty - 12 months
3. Instructions in Russian
4. Technical support throughout the lifetime
5. You buy a 3D printer from an official distributor in Russia
6. Free shipping
7. Free training in our office
8. The ability to buy a printer on credit through banks TKS, OTP, Renaissance
9. 10% discount on plastic forever
10. Opportunity to get acquainted with the printer in our demo room
The review was prepared by the specialist in 3D printing of Color World company, Anna Panfilova.
Subscribe to our groups on Facebook , VK and YouTube to keep up with the latest events.
Source: https://habr.com/ru/post/401891/
All Articles