Waffle iron for printed circuit boards

Greetings dear colleagues! In this article I will share the experience of creating a simple thermal press for the manufacture of printed circuit boards based on a cheap electric waffle iron. I think many fans of electronics, as well as those who may need reliable transfer of toner to a small flat surface, for example, for decoration purposes, this device will bring considerable benefits and joy. Irons, stoves and pots, muffle and other furnaces, newspapers, books and rollers are not required, water is not needed to be boiled, we simply lay the board in a civilized, clean and safe desktop device, turn it on and have a rest or do our own thing, and after half an hour, including cooling, we can continue to work on the board. All household and kitchen utensils are in place, the kitchen itself is free, there are no extraneous smells. Happy amateur radio and his whole family.
Lyrical introduction, you can ponozhalgirovat
At the beginning of self-interest in electronics, a few years later of the unsuccessful attempt to build the radio boy Malchish with my dad, my first boards were cartridges with holes punched with awl for the conclusions of parts dropped from different fragments and junk, which then, in the early 90s, were thrown away right in the courtyards several times a week, without even bothering to get to the garbage containers. The germanium pnp transistors MP39-42 served as work horses of my circuits, the electrolytes were often dried, the resistors changed color from overheating in their previous workplaces, the installation wire was taken from the telephones that were generously removed by telephonists, there it was like a twisted pair, then unknown to me and he loved the ease of stripping, tinning and soldering such wires, as well as the fact that they were of a different color. The wiring diagram, often innocently redrawn in principle, was applied to the cardboard with a ballpoint pen. All this, after many efforts and burns, most often worked somehow, served as radio receivers in the country, fantastic toys and a field of experiments, pleased and even brought prizes in the activities of the scientific community of students and the program “Step into the Future”, which ultimately made it possible to enter the university without exams.
Then there was the fascination with lamp technology, which was assembled by mounting on plywood and tin, several electric guitars, self-made and purchased second-hand, overdrive from the reproduction amplifier of the Beacon tape recorder, in which for the required gain factor the channels were consistently connected in series, and the drive was warm, similar to the sound of the cello, just the way I wanted. There was a UMZCH on the TDA1557Q, where one of the garbage capacitors struck in a terrible filter battery, which was accompanied by a monstrous sound strike, but it withstood with 35-109 with honor. Favorite tube TV Spring, in which the PTK is replaced by two semiconductor selectors, the switching of ranges was carried out by two toggle switches, and the setting of a ten-turn potentiometer from an analog computer, and such a collective wonder allowed to watch all channels. The self-assembly from zero began in parallel of two TVs - a stationary tube with a long round-screen kinescope and a portable transistor with an oscillograph tube, but in those years television ceased to be my childhood magic, and the projects were abandoned halfway through.
')
The self-made dim, due to insufficient anode voltage, the oscilloscope, along with a pair of pocket tube radio receivers, a 0-V-1 receiver on the thyratron (yes, it turned out to be possible, only very uneconomic and unstable), and some other curious handicrafts disappeared when moving. It is a pity that something could now be brought to mind and even applied, oh well. In the following years, my interests and professional classes became computer rather than electronic, but a few years ago my heart was still drawn to first love - the development and prototyping of electronic devices.
The experience of childhood fun was very useful. Thanks to him, filling gaps in knowledge and the development of microcontrollers, operational amplifiers, standard logic, PWM, control of stepper motors and other relevant things did not take much time and was not a hardship, but a happy magic game, full of joy. Childhood is back. Moreover, it became clear to me that childhood, up to 17–20 years, is only a demo version of a wonderful childhood, which can and should last a lifetime, when everything is available, thanks to the independent management of a mature person and the development of technological base, coupled with the culture of its application.
For several years, matrix prototyping boards have become my joy and the embodiment of a dream, something that was so lacking in early childhood. Pleased with new silicon transistors, elegant small-sized radio components, beautiful convenient connectors and handles of variable resistors, shrinking, soldering station with a “eternal sting” and “third hand” with a magnifying glass, digital multimeters and recently acquired in the company to the second homemade, no longer dim, toy digital oscilloscope designer, the assembly of which has become a great holiday, and the parameters are quite sufficient for my current tasks. I'll have to figure out the case for him, but until the design concept comes, so let him wait. Dremel with a luxurious set of nozzles, including diamond discs, a lightweight drill / screwdriver and an even lighter electric screwdriver, also played an important role in assembling a convenient home workshop. What previously had to do with the torment and failure, now embodied qualitatively, quickly and easily.
But dwell on dummies should not be. The soldering of devices to them nevertheless significantly takes time and effort, replacing parts and changing the scheme is difficult, aesthetics and visibility leave much to be desired, and it’s time to replicate a small series of some developments - for myself, when you need several identical modules, and for bread. with rosin, in order to feed on both body and spirit, and to earn more favorite hobby, rather than side ones. Finally, surface mounting, with its gain in reliability with vibrations, compactness and price of parts, no need for drilling for each output, is sometimes possible on a matrix breadboard, tested in practice, but this is not the case, and not even a hobby, but an extreme sport. It's time to poison the board. Therefore, a search was made for information on this topic.
Photo Resist Excellent quality, but high cost, limited shelf life of materials, the risk of acquiring unsuitable, more technological operations and reagents, including aggressive ones, the need to print a photomask. I currently do not fit. Order at the factory. Ideally, when you need a certain amount, but after the development of prototypes, and with the confidence that the whole party will be required. LUT - laser-iron technology. Nice, but you need to master the art of working with an iron, too many shamanistic subtleties, there is a high probability of failure, especially at first. I do not like to translate time and materials for training, this is a painful topic from my childhood. Laminator? I do not have it, and with him, they write, not everything is so simple. Boil a sandwich from the board, paper with a toner print, silicone gaskets and bolted plates in boiling water ... This is already interesting! But the water bath here, obviously, is only a thermostat. Why then such a thermostat, if we are electronics engineers, and we can build more than one electronic variant, or even just a mechanical one, with a bimetallic plate ?! So, thermopress.
When I need something for a new idea, I rummage through my trash. I try to keep it clean and sorted, otherwise the search for necessary and desirable components for business and hobby will not be a joy, but torture for me and family members, and ultimately, there will not be enough time and effort for the project phase, I will have to digress for something else, there the project is abandoned, forgotten. Who is not familiar? There were no suitable plates for textolite with paper in the bins, but there was an electric waffle maker, once bought for pennies in the corner of Auchan's devalued goods. Waffle oven in it a couple of times tried, did not work, since then lies. But the waffle iron is a ready-made thermopress, only for its use in an electronic workshop it needs to be slightly modified.
Device manufacturing process
First, the electric waffle maker opens on a hinge and clutches on the opposite side with a latch. The eternal imbalance. To transfer toner is unacceptable, you need a parallel clamp, for example, four nuts on the heels. We disassemble the waffle iron, take the M6 bolts, drill holes in the bottom plate for the bolt, in the top under the nut. Heater, wires and fasteners do not interfere with this operation, aluminum alloy is drilled easily, conceived - done. Saw off the interfering parts of the hinge.

That the lower nuts did not turn away at operation of a press, and under a head of a bolt, and under a nut we put rotary washers. But before you install and tighten the nuts, make the second necessary modification.

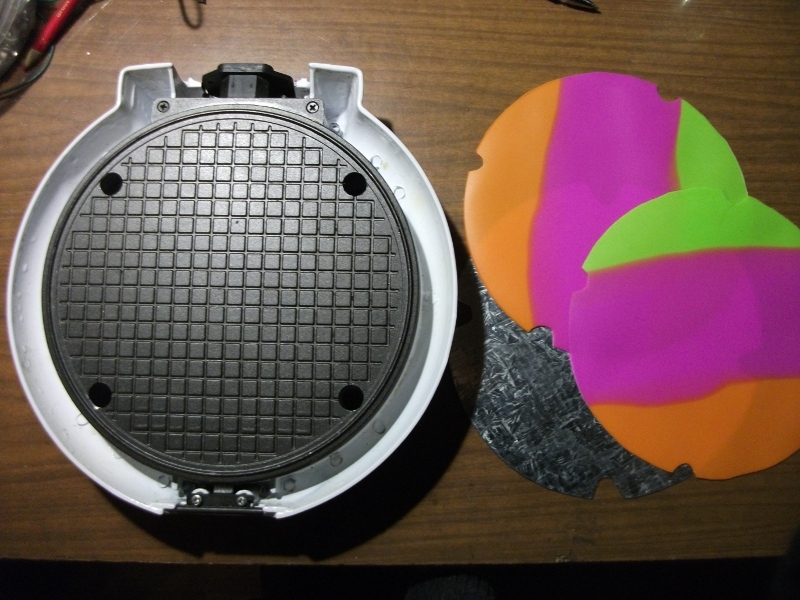
The working surface of the waffle iron is corrugated, with checkered ledges. Of course, it is possible to grind them with patience, but then the stove will be destroyed, because the Chinese manufacturers have tried to save metal to fame. Therefore, we take the usual flat tin, cut two circles out of it, drill holes. We put one of the circles under the nuts with the growers, now it is possible to tighten, controlling the effort, so as not to twist the failed kitchen utensils into the ram's horn.

We also drill, in the upper case cover, of a somewhat larger diameter, holes for our bolts. Tightening the nuts and washers during operation will be on top of this cover. What is interesting, as it turned out when drilling, it is made, like the bottom stand, from bakelite. It means to protect from impacts, and when tightening the case may crack. You can avoid this by putting sleeves on the bolts that will transmit the force of the nuts to the top plate, bypassing the cover. Over time, we will definitely do it, but first we will try without sleeves.
The waffle iron circuitry can still be left unchanged, because it has a bimetallic thermostat, the accuracy and stability of which can be enough to set the thermal transfer mode. If not enough, we will assemble an electronic thermostat, we can do this even from school. A lot of thermostats had to be built, the first was even with a mercury contact thermometer and a relay, then the thyristor went, and now it is possible with a smooth power adjustment and a programmable timer, if there is a desire.
But now the lid is not connected to the base with a hinge, but has become removable. Therefore, it is necessary to extend the three-wire cord connecting the half of the waffle iron, and, if desired, provide it with a connector. Although we will heat the device no higher than 160 degrees Celsius, we will take care of the heat resistance of all wires and parts that may come into contact with heated surfaces. And do not throw out the ground wire: the well-being of us with you, our workshops and houses are much more expensive than a few centimeters of a copper conductor and a couple of minutes for its connection. Continuing the discussion on safety, I remind you that the plates, bolts and nuts of our crafts in the process of work and some time after it will be hot, so we will save ourselves, our children and pets from contact with them. In the original design of the waffle iron, it was hotter in depth, it is difficult to get burned, but after the modification, bolts and nuts appear on the surface, having thermal and electrical connections to the TENs housings. And do not even think about switching on one TEN waffle iron directly to the grid! It is 110 volts, the network 220 includes two in series, not in parallel, as it would be in the version for countries with 110-volt wiring.
Our thermotransfer press is ready. Cut two circles from silicone bakeware, purchased at a fixed price store. They are almost perfect in diameter, and will be reusable heat-resistant pads between tin circles and a textolite sandwich and paper print. We put a thermocouple between the gaskets, assemble our press without delay, and try to calibrate its thermostat.
That the lower nuts did not turn away at operation of a press, and under a head of a bolt, and under a nut we put rotary washers. But before you install and tighten the nuts, make the second necessary modification.
The working surface of the waffle iron is corrugated, with checkered ledges. Of course, it is possible to grind them with patience, but then the stove will be destroyed, because the Chinese manufacturers have tried to save metal to fame. Therefore, we take the usual flat tin, cut two circles out of it, drill holes. We put one of the circles under the nuts with the growers, now it is possible to tighten, controlling the effort, so as not to twist the failed kitchen utensils into the ram's horn.
We also drill, in the upper case cover, of a somewhat larger diameter, holes for our bolts. Tightening the nuts and washers during operation will be on top of this cover. What is interesting, as it turned out when drilling, it is made, like the bottom stand, from bakelite. It means to protect from impacts, and when tightening the case may crack. You can avoid this by putting sleeves on the bolts that will transmit the force of the nuts to the top plate, bypassing the cover. Over time, we will definitely do it, but first we will try without sleeves.
The waffle iron circuitry can still be left unchanged, because it has a bimetallic thermostat, the accuracy and stability of which can be enough to set the thermal transfer mode. If not enough, we will assemble an electronic thermostat, we can do this even from school. A lot of thermostats had to be built, the first was even with a mercury contact thermometer and a relay, then the thyristor went, and now it is possible with a smooth power adjustment and a programmable timer, if there is a desire.
But now the lid is not connected to the base with a hinge, but has become removable. Therefore, it is necessary to extend the three-wire cord connecting the half of the waffle iron, and, if desired, provide it with a connector. Although we will heat the device no higher than 160 degrees Celsius, we will take care of the heat resistance of all wires and parts that may come into contact with heated surfaces. And do not throw out the ground wire: the well-being of us with you, our workshops and houses are much more expensive than a few centimeters of a copper conductor and a couple of minutes for its connection. Continuing the discussion on safety, I remind you that the plates, bolts and nuts of our crafts in the process of work and some time after it will be hot, so we will save ourselves, our children and pets from contact with them. In the original design of the waffle iron, it was hotter in depth, it is difficult to get burned, but after the modification, bolts and nuts appear on the surface, having thermal and electrical connections to the TENs housings. And do not even think about switching on one TEN waffle iron directly to the grid! It is 110 volts, the network 220 includes two in series, not in parallel, as it would be in the version for countries with 110-volt wiring.
Our thermotransfer press is ready. Cut two circles from silicone bakeware, purchased at a fixed price store. They are almost perfect in diameter, and will be reusable heat-resistant pads between tin circles and a textolite sandwich and paper print. We put a thermocouple between the gaskets, assemble our press without delay, and try to calibrate its thermostat.
Setting the thermostat
Measurements confirm the long-standing hypothesis about the reason for the inability of this waffle iron acceptable to fulfill its original purpose. Two heating elements of 375 watts heat up very quickly, and the thermal conductivity of thin plates is insufficient for the distribution of such thermal power. As a result, we have a significant non-uniformity of heating over the area, non-penetration and burning. In addition, the mechanical regulator together with the design of its mounting is too inert, and the temperature of such a mountain thermostat fluctuates within tens of degrees Celsius in minutes.
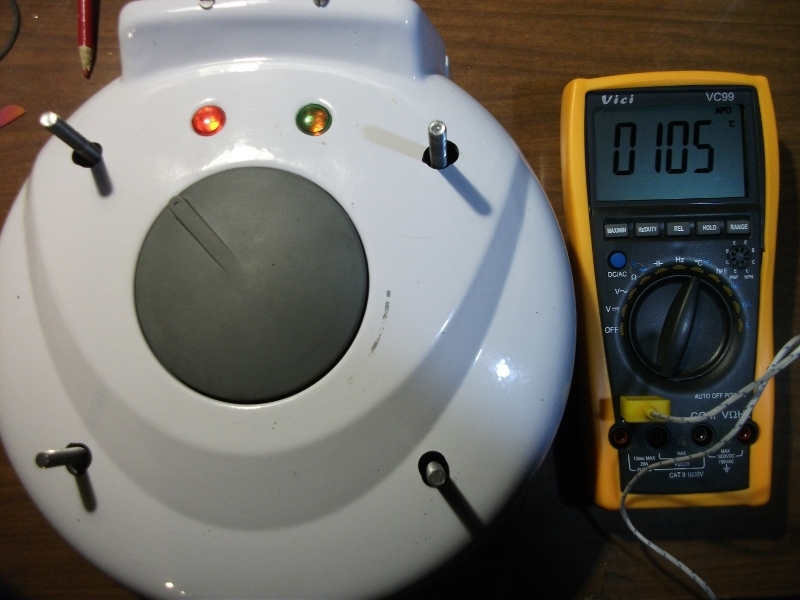
But not in a hurry to remove the bimetallic switch. Thermal transfer - not waffles, there is no need to evaporate water and make physical and chemical changes of the test, 750 W is too much, 375 is enough for us. Let us limit the heating power in the simplest way - by switching on the silicon rectifier diode 400V 3A in series with the electrical circuit. It is conveniently located in the terminal block below the case, where overheating is not threatened. Repeat the measurement. The device began to act more gently, the thermostat is now keeping pace with heating elements, the amplitude of temperature fluctuations in the working area does not exceed 20 degrees. This is already acceptable, so I don’t see the need to replace the thermostat. It's time to try out the homemade in action.
But not in a hurry to remove the bimetallic switch. Thermal transfer - not waffles, there is no need to evaporate water and make physical and chemical changes of the test, 750 W is too much, 375 is enough for us. Let us limit the heating power in the simplest way - by switching on the silicon rectifier diode 400V 3A in series with the electrical circuit. It is conveniently located in the terminal block below the case, where overheating is not threatened. Repeat the measurement. The device began to act more gently, the thermostat is now keeping pace with heating elements, the amplitude of temperature fluctuations in the working area does not exceed 20 degrees. This is already acceptable, so I don’t see the need to replace the thermostat. It's time to try out the homemade in action.
Laser wafer manufacturing technology of printed circuit boards
We cut off a piece of foil-coated textolite, we clean it with a wet gruel of water and a detergent based on powdered chalk, and, in my understanding, the used powder should not contain bleaches, antiseptics and other chemically active substances potentially capable of oxidizing copper. Additionally, let's go through the eraser for a ballpoint pen, thus creating microscratches for better adhesion of the toner. Degrease with acetone or isopropanol and do not touch the foil surface. Textolite is ready to transfer toner, let's do some paper.
I took inexpensive glossy photo paper for Revcol inkjet printers with a density of 230. We prepare a mirror image of the correct size and send it to a laser printer, in my case, the good old HP LJ 1200. In the print settings, we disable toner saving, we set up the settings for the thickest paper. If the design of the printer allows, we make sure that the paper, passing through it, experiences as few bends as possible. In my LaserJet for this opens the back cover. We do not touch the glossy surface of the paper, like textolite, and protect it from contamination. Cut out a portion of photo paper by board size, apply a print to the foil side, put the resulting sandwich on the bottom silicone pad with photo paper down. Next, put the top gasket, tin circle and the lid of the waffle iron, put on washers, screw on the nuts, and finally, evenly tighten them, little by little, in several moves, crosswise. We look to avoid distortions, and do not overdo it with a puff. Personally, I control the torque of such a delicate thread, like the M6, turning the wrench with my finger, rather than pinching it in my fist.

We include our thermopress with the position of the regulator corresponding to the temperature range of 120-140 degrees Celsius for twenty minutes. After that, turn off, let cool to 60-70 degrees, and gradually loosen the nuts, again in several steps, so as not to cause distortion and deformation of our new tool, assistant and friend. We remove the nuts and washers, the cover and the gaskets, carefully take the PCB with paper and fill it with hot water in a suitable container, with boiling water.

As the paper is soaked and lagging, we help it without haste and coarseness, we roll the paper gruel with our fingers layer by layer, we can gently help with a toothbrush of moderate hardness. Toner stuck very firmly, there is a gap in the track in only two places, my inexperience is to blame, the press is not to blame.

The Habr logo is chosen for the first ever etching of foil-covered textolite, not only out of respect for the beloved resource, which has enriched my life with many clever wonders, and because it is very cute and inspiring, but also because of its complexity, which allows to objectively evaluate the possibilities of homemade. Some white dots and corners of the pattern surrounded by copper turned out to be so small that neither the bristles of a toothbrush, nor the pads of fingers could cope with the removal of paper residues from them. Therefore, the point of a thin needle was used to clean these places. Carefully wipe the board with a lint-free cloth with isopropyl alcohol, and proceed to the etching. I used a solution of ferric chloride at a temperature of 40-50 degrees Celsius.
I took inexpensive glossy photo paper for Revcol inkjet printers with a density of 230. We prepare a mirror image of the correct size and send it to a laser printer, in my case, the good old HP LJ 1200. In the print settings, we disable toner saving, we set up the settings for the thickest paper. If the design of the printer allows, we make sure that the paper, passing through it, experiences as few bends as possible. In my LaserJet for this opens the back cover. We do not touch the glossy surface of the paper, like textolite, and protect it from contamination. Cut out a portion of photo paper by board size, apply a print to the foil side, put the resulting sandwich on the bottom silicone pad with photo paper down. Next, put the top gasket, tin circle and the lid of the waffle iron, put on washers, screw on the nuts, and finally, evenly tighten them, little by little, in several moves, crosswise. We look to avoid distortions, and do not overdo it with a puff. Personally, I control the torque of such a delicate thread, like the M6, turning the wrench with my finger, rather than pinching it in my fist.
We include our thermopress with the position of the regulator corresponding to the temperature range of 120-140 degrees Celsius for twenty minutes. After that, turn off, let cool to 60-70 degrees, and gradually loosen the nuts, again in several steps, so as not to cause distortion and deformation of our new tool, assistant and friend. We remove the nuts and washers, the cover and the gaskets, carefully take the PCB with paper and fill it with hot water in a suitable container, with boiling water.
As the paper is soaked and lagging, we help it without haste and coarseness, we roll the paper gruel with our fingers layer by layer, we can gently help with a toothbrush of moderate hardness. Toner stuck very firmly, there is a gap in the track in only two places, my inexperience is to blame, the press is not to blame.
The Habr logo is chosen for the first ever etching of foil-covered textolite, not only out of respect for the beloved resource, which has enriched my life with many clever wonders, and because it is very cute and inspiring, but also because of its complexity, which allows to objectively evaluate the possibilities of homemade. Some white dots and corners of the pattern surrounded by copper turned out to be so small that neither the bristles of a toothbrush, nor the pads of fingers could cope with the removal of paper residues from them. Therefore, the point of a thin needle was used to clean these places. Carefully wipe the board with a lint-free cloth with isopropyl alcohol, and proceed to the etching. I used a solution of ferric chloride at a temperature of 40-50 degrees Celsius.
Results
Remove the toner cloth with acetone and admire the results. Joking no. I consider today's first experience very worthy. Now I can, at any time, without difficulty make the necessary boards in my home workshop. So, the quality of the transfer of toner to the copper foil with a homemade press pleased the first time. It turned out a good tool, and the costs are minimal: an electric waffle-iron machine, 2 baking dishes for 51 rubles each, 4 bolts with nuts and growers, tin, a little wire, solder, heat shrinkage, a diode and an optional connector. Thank you for your attention, I hope this idea and the experience of its implementation will be useful to you!
Remove the toner cloth with acetone and admire the results. Joking no. I consider today's first experience very worthy. Now I can, at any time, without difficulty make the necessary boards in my home workshop. So, the quality of the transfer of toner to the copper foil with a homemade press pleased the first time. It turned out a good tool, and the costs are minimal: an electric waffle-iron machine, 2 baking dishes for 51 rubles each, 4 bolts with nuts and growers, tin, a little wire, solder, heat shrinkage, a diode and an optional connector. Thank you for your attention, I hope this idea and the experience of its implementation will be useful to you!
Source: https://habr.com/ru/post/401685/
All Articles