Climate control is cheap and cheerful (IRremoteESP8266 library and Tion 02 breather)
I found a way to make friends with an air conditioner (or another device controlled by a remote control) and a smart home, or to control this device, for example, from a cell phone.
In theory, it's simple, we connect esp8266 (about $ 2 from the Chinese) to an infrared LED, fill in the firmware and is ready.

In practice, everything turned out to be somewhat more complicated, since I had an esp-01 revision that I had to solder ( like this ) the wiring to the leg of a 5 * 5mm chip, to bring out an additional GPIO. I recommend using an older revision, for example ESP-12.
Readers are not familiar with esp8266, I propose to read this article .
* Esp8266 revision esp-01
* FT232RL: USB to Serial 232 TTL Adapter + wires for connection
* Tsop 4838 Photo Detector
* 3.3v controller
* S9014 transistor
* 5013IRAB infrared LED (wavelength 940 nm)
* 330Ω resistor
* Project fee
* Soldering iron, solder, flux.
* For work with IR the remarkable IRremoteESP8266 library is used . Authors Mark Szabo, Sebastien Warin, Ken Shirriff.
* We connect the photodetector , VCC at +3.3, GND to zero, OUT to GPIO.
* Open an example for dumping codes from our library \ IRremoteESP8266 \ examples \ IRrecvDump \ IRrecvDump.ino
* If necessary, change the pin number to which we connected the photoreceiver's OUT (the string “int RECV_PIN = 2;”).
* Fill the firmware. Connect to the output module. Alternately, we clamp the buttons of the console for dump codes.
For the Tion O2 breather, I got the following code:
')
The photodetector is no longer needed until you need to “grab” the code of another remote.
* Connect the IR LED scheme.
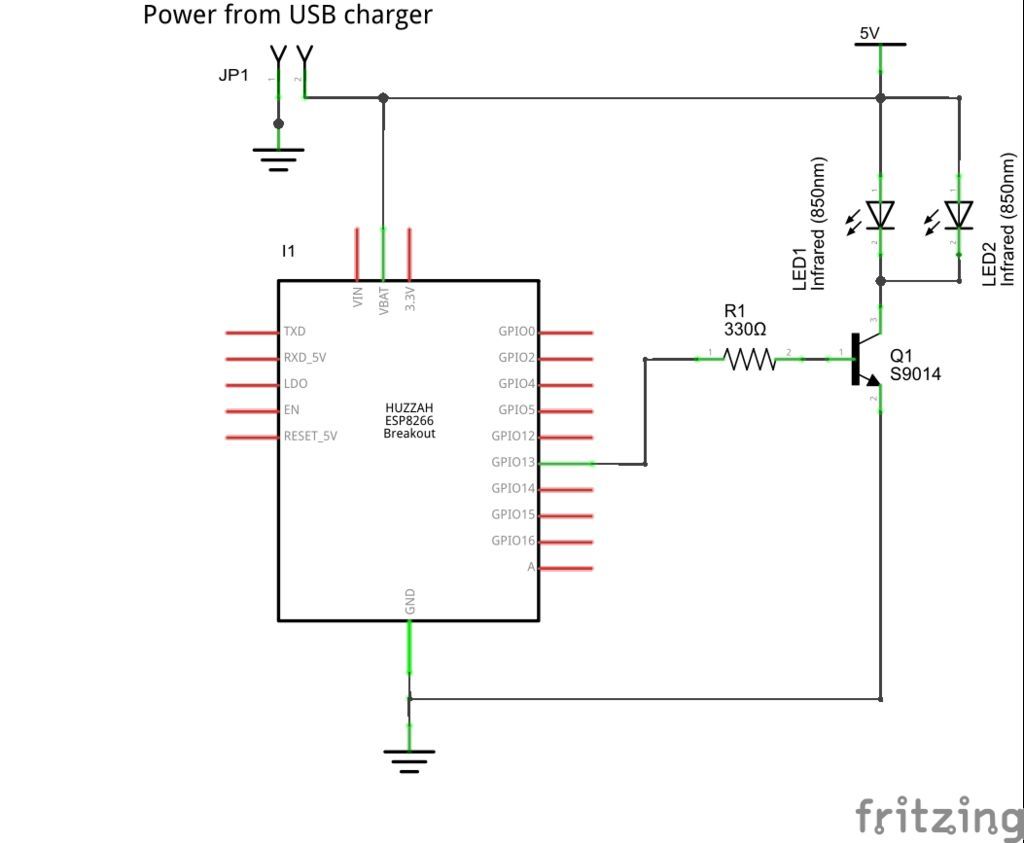
(Picture taken from Fritzing)
GPIO can use another. From the voltage of 3.3v, the LED also works normally.
UPD: As rightly noted in the comments, it is desirable to use a current-limiting resistor .
* Demo firmware with the server is here.
\ IRremoteESP8266 \ examples \ IRServer \ IRServer.ino
* We change the name and password of your access point in it so that esp can connect to it. And also the number of GPIO used
* Stitch the module.
* When connected to the console, the selected esp IP address will be displayed.
Now you can send the code by entering into the browser an address of the form 192.168.1.1/ir?code=16720095 (just substitute the desired IP and code).
I made this page for the convenience of managing my breather.
Specifically, in my case, the breather works with the remote control unusually, when it is pressed for the first time, it “wakes up”, namely it turns on the backlight of the screen, and only after that it starts receiving commands. Automation should take this into account.
I hope this manual is useful to someone. Please share the updated firmware.
In theory, it's simple, we connect esp8266 (about $ 2 from the Chinese) to an infrared LED, fill in the firmware and is ready.
In practice, everything turned out to be somewhat more complicated, since I had an esp-01 revision that I had to solder ( like this ) the wiring to the leg of a 5 * 5mm chip, to bring out an additional GPIO. I recommend using an older revision, for example ESP-12.
Readers are not familiar with esp8266, I propose to read this article .
Components and modules
* Esp8266 revision esp-01
* FT232RL: USB to Serial 232 TTL Adapter + wires for connection
* Tsop 4838 Photo Detector
* 3.3v controller
* S9014 transistor
* 5013IRAB infrared LED (wavelength 940 nm)
* 330Ω resistor
* Project fee
* Soldering iron, solder, flux.
* For work with IR the remarkable IRremoteESP8266 library is used . Authors Mark Szabo, Sebastien Warin, Ken Shirriff.
Saving codes
* We connect the photodetector , VCC at +3.3, GND to zero, OUT to GPIO.
* Open an example for dumping codes from our library \ IRremoteESP8266 \ examples \ IRrecvDump \ IRrecvDump.ino
* If necessary, change the pin number to which we connected the photoreceiver's OUT (the string “int RECV_PIN = 2;”).
* Fill the firmware. Connect to the output module. Alternately, we clamp the buttons of the console for dump codes.
For the Tion O2 breather, I got the following code:
Down
16711935
Decoded NEC: FF00FF (32 bits)
- Up
16724175
Decoded NEC: FF30CF (32 bits)
- Set
16722135
Decoded NEC: FF28D7 (32 bits)
- Power
16720095
Decoded NEC: FF20DF (32 bits)
')
The photodetector is no longer needed until you need to “grab” the code of another remote.
Device control
* Connect the IR LED scheme.
(Picture taken from Fritzing)
GPIO can use another. From the voltage of 3.3v, the LED also works normally.
UPD: As rightly noted in the comments, it is desirable to use a current-limiting resistor .
* Demo firmware with the server is here.
\ IRremoteESP8266 \ examples \ IRServer \ IRServer.ino
* We change the name and password of your access point in it so that esp can connect to it. And also the number of GPIO used
const char* ssid = ".....";
const char* password = ".....";
IRsend irsend(0);
* Stitch the module.
* When connected to the console, the selected esp IP address will be displayed.
Now you can send the code by entering into the browser an address of the form 192.168.1.1/ir?code=16720095 (just substitute the desired IP and code).
Upgrade firmware code over the air
/* * IRremoteESP8266: IRServer - demonstrates sending IR codes controlled from a webserver * An IR LED must be connected to ESP8266 pin 0. * Version 0.1 June, 2015 */ #include <ESP8266WiFi.h> #include <WiFiClient.h> #include <ESP8266WebServer.h> #include <ESP8266mDNS.h> #include <IRremoteESP8266.h> const char* ssid = "FFFF"; const char* password = "XXXX"; unsigned long last_cmd_send_time = 0; MDNSResponder mdns; ESP8266WebServer server(80); const char* serverIndex = "<form method='POST' action='/update' enctype='multipart/form-data'><input type='file' name='update'><input type='submit' value='Update'></form>"; // IRsend irsend(2); IRsend irsend(13); void handleRoot() { server.send(200, "text/html", "<html><head> <title>ESP8266 Demo (Web Update)</title></head><body><h1>Hello from ESP8266, you can send NEC encoded IR signals from here!</h1><p><a href=\"ir?code=16769055\">Send 0xFFE01F</a></p><p><a href=\"ir?code=16429347\">Send 0xFAB123</a></p><p><a href=\"ir?code=16771222\">Send 0xFFE896</a></p></body></html>"); } void handleIr(){ for (uint8_t i=0; i<server.args(); i++){ if(server.argName(i) == "code") { unsigned long code = server.arg(i).toInt(); irsend.sendNEC(code, 32); } } handleRoot(); } void handleSeq(){ unsigned long code = 0; unsigned long cnt = 0; unsigned long dl = 0; unsigned long nwt = 0; for (uint8_t i=0; i<server.args(); i++){ if(server.argName(i) == "code") { code = server.arg(i).toInt(); } if(server.argName(i) == "count") { cnt = server.arg(i).toInt(); } if(server.argName(i) == "delay") { dl = server.arg(i).toInt(); } if(server.argName(i) == "need_wait") { nwt = server.arg(i).toInt(); } } if (nwt > 0){ unsigned long wt = millis() - last_cmd_send_time; if (wt < nwt && wt > 0) { delay(nwt - wt); } } if (code != 0) { for (uint8_t i=0; i<cnt; i++){ irsend.sendNEC(code, 32); delay(dl); } } last_cmd_send_time = millis(); handleRoot(); } void handleNotFound(){ String message = "File Not Found\n\n"; message += "URI: "; message += server.uri(); message += "\nMethod: "; message += (server.method() == HTTP_GET)?"GET":"POST"; message += "\nArguments: "; message += server.args(); message += "\n"; for (uint8_t i=0; i<server.args(); i++){ message += " " + server.argName(i) + ": " + server.arg(i) + "\n"; } server.send(404, "text/plain", message); } void setup(void){ irsend.begin(); Serial.begin(115200); WiFi.mode(WIFI_AP_STA); WiFi.begin(ssid, password); Serial.println(""); // Wait for connection while (WiFi.status() != WL_CONNECTED) { delay(500); Serial.print("."); } Serial.println(""); Serial.print("Connected to "); Serial.println(ssid); Serial.print("IP address: "); Serial.println(WiFi.localIP()); if (mdns.begin("esp8266", WiFi.localIP())) { Serial.println("MDNS responder started"); } server.on("/", handleRoot); server.on("/ir", handleIr); server.on("/seq", handleSeq); server.on("/inline", [](){ server.send(200, "text/plain", "this works as well"); }); server.on("/update", HTTP_GET, [](){ server.sendHeader("Connection", "close"); server.sendHeader("Access-Control-Allow-Origin", "*"); server.send(200, "text/html", serverIndex); }); server.on("/update", HTTP_POST, [](){ server.sendHeader("Connection", "close"); server.sendHeader("Access-Control-Allow-Origin", "*"); server.send(200, "text/plain", (Update.hasError())?"FAIL":"OK"); ESP.restart(); },[](){ HTTPUpload& upload = server.upload(); if(upload.status == UPLOAD_FILE_START){ Serial.setDebugOutput(true); WiFiUDP::stopAll(); Serial.printf("Update: %s\n", upload.filename.c_str()); uint32_t maxSketchSpace = (ESP.getFreeSketchSpace() - 0x1000) & 0xFFFFF000; if(!Update.begin(maxSketchSpace)){//start with max available size Update.printError(Serial); } } else if(upload.status == UPLOAD_FILE_WRITE){ if(Update.write(upload.buf, upload.currentSize) != upload.currentSize){ Update.printError(Serial); } } else if(upload.status == UPLOAD_FILE_END){ if(Update.end(true)){ //true to set the size to the current progress Serial.printf("Update Success: %u\nRebooting...\n", upload.totalSize); } else { Update.printError(Serial); } Serial.setDebugOutput(false); } yield(); }); server.onNotFound(handleNotFound); server.begin(); Serial.println("HTTP server started"); } void loop(void){ server.handleClient(); } I made this page for the convenience of managing my breather.
brizer.html
<html> <head> <script> function sendIR(str) { if (str.length == 0) { // document.getElementById("txtHint").innerHTML = ""; return; } else { var xmlhttp = new XMLHttpRequest(); xmlhttp.onreadystatechange = function() { if (this.readyState == 4 && this.status == 200) { // document.getElementById("txtHint").innerHTML = this.responseText; } }; xmlhttp.open("GET", "http://192.168.0.193/" + str, true); xmlhttp.send(); } } </script> </head> <body> <div id="demo"> <button type="button" onclick="sendIR('ir?code=16724175')">Up</button> <button type="button" onclick="sendIR('ir?code=16711935')">Down</button> <button type="button" onclick="sendIR('ir?code=16722135')">Set</button> <button type="button" onclick="sendIR('ir?code=16720095')">Power</button> <button type="button" onclick="sendIR('seq?need_wait=11000&code=16722135&count=2&delay=20');sendIR('seq?code=16711935&count=50&delay=20');sendIR('seq?code=16724175&count=21&delay=20')">day</button> <button type="button" onclick="sendIR('seq?need_wait=11000&code=16722135&count=2&delay=20');sendIR('seq?code=16711935&count=50&delay=20');sendIR('seq?code=16724175&count=35&delay=20')">night</button> <a href="http://192.168.0.193/update">update</a> </div> </body> </html> Specifically, in my case, the breather works with the remote control unusually, when it is pressed for the first time, it “wakes up”, namely it turns on the backlight of the screen, and only after that it starts receiving commands. Automation should take this into account.
I hope this manual is useful to someone. Please share the updated firmware.
Source: https://habr.com/ru/post/401637/
All Articles