Working with People Monitoring in Python with Raspberry Pi
 Trying to connect my DS18B20 temperature sensor to my smart greenhouse , I found that the Internet does not have full instructions for connecting this sensor using the Python programming language. I use it as I work with the Raspberry Pi platform. I decided to fix this problem. It turns out to work with TCP is not so difficult, but you need to understand what we are doing and why. A two-hour dance with a tambourine obviously pissed me off. So here, in addition to the program part, I want to tell the whole algorithm from beginning to end. I think that other sensors work similarly, so a big article will be the same for everyone. I hope that if you want to connect your sensor, you will not need a tambourine already :) And so, let's get started, I ask you under Habrokat.
 Shamanism with a sensor
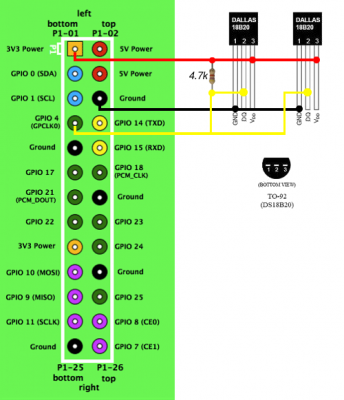 For we need to connect the sensor itself. I will work with the DS18B20 temperature sensor. There are lots of articles on this topic, we will not duplicate them. You can read about the connection here . Then we need to get data from the sensor. We will do the same as stated in the article above. There is a great example in Python, of which I am a fan.
import os tfile=open("/sys/bus/w1/devices/28-000000d7970b/w1_slave") ttext=tfile.read() tfile.close() temp=ttext.split("\n")[1].split(" ")[9] temperature=float(temp[2:])/1000 print temperature Do not forget to replace the data on your sensor.
')
As we can see, the temperature takes the variable temperature (who would have thought), and that we will need further.
We conjure with monitoring
Well, first you need to register narodmon.ru , those who have not done it yet. The service API offers us to transfer data over TCP. So do. We are asked to transmit the text in the following format:
#MAC[#NAME][#LAT][#LNG][#ELE]\n #mac1#value1[#time1][#name1]\n ... #macN#valueN[#timeN][#nameN]\n ## But in fact, we need to transfer only three parameters: the MAC of the device, the name of the sensor and its value. The rest is not necessary, and not really we need.
In the first line, we need to pass the pound, MAC, and line feed character \ n.
In the second and subsequent lines, we again transmit the grid, sensor name, grid again and sensor readings. We end this with the newline character \ n.
In the last line, you must pass two grids to complete the package.
As a result, the format remains as follows:
#MAC\n #mac1#value1\n #macN#valueN\n ## We write the program in Python
We will write the program in Python 2. The algorithm will be like this. Receive data from the sensor and write to the temperature variable. Then we form the package and send it to the server of the National Monitoring. We will run the script every 10 minutes (the minimum allowed interval for sending readings is 5 minutes) via cron.
Sending occurs as follows (example shown on the monitoring site):
Send script code
#!/usr/bin/env python2 # -*- coding: utf-8 -*- # by Roman Vishnevsky aka.x0x01 @ gmail.com import socket # MAC . ! DEVICE_MAC = '0123456789012' # , 01 (02) mac SENSOR_ID_1 = DEVICE_MAC + '01' SENSOR_ID_2 = DEVICE_MAC + '02' # , float/integer sensor_value_1 = 20 sensor_value_2 = -20.25 # sock = socket.socket() # try: # sock.connect(('narodmon.ru', 8283)) # sock.send("#{}\n#{}#{}\n##".format(DEVICE_MAC, SENSOR_ID_1, sensor_value_1)) # # sock.send("#{}\n#{}#{}\n#{}#{}\n##".format(DEVICE_MAC, SENSOR_ID_1, sensor_value_1, SENSOR_ID_2, sensor_value_2)) # data = sock.recv(1024) sock.close() print data except socket.error, e: print('ERROR! Exception {}'.format(e)) We connect to the server narodmon.ru:8283
As a result, we get this script:
Ready script code
#!/usr/bin/env python2 # -*- coding: utf-8 -*- import socket import os import fnmatch # MAC . ! DEVICE_MAC = 'FF:FF:FF:FF:FF:FF' # SENSOR_ID_1 = 'T1' SENSOR_ID_2 = 'T2' # temperature = [] IDs = [] for filename in os.listdir("/sys/bus/w1/devices"): if fnmatch.fnmatch(filename, '28-031652ddbdff'): with open("/sys/bus/w1/devices/" + filename + "/w1_slave") as fileobj: lines = fileobj.readlines() if lines[0].find("YES"): pok = lines[1].find('=') temperature.append(float(lines[1][pok+1:pok+7])/1000) IDs.append(filename) else: logger.error("Error reading sensor with ID: %s" % (filename)) temperature2 = [] for filename in os.listdir("/sys/bus/w1/devices"): if fnmatch.fnmatch(filename, '28-011563e8d2ff'): with open("/sys/bus/w1/devices/" + filename + "/w1_slave") as fileobj: lines = fileobj.readlines() if lines[0].find("YES"): pok = lines[1].find('=') temperature2.append(float(lines[1][pok+1:pok+7])/1000) IDs.append(filename) else: logger.error("Error reading sensor with ID: %s" % (filename)) sock = socket.socket() # try: sock.connect(('narodmon.ru', 8283)) # , sock.send("#{}\n#{}#{}\n#{}#{}\n##".format(DEVICE_MAC, SENSOR_ID_1, str(temperature)[1:-1], SENSOR_ID_2, str(temperature2)[1:-1])) # data=sock.recv(1024) sock.close() print data except socket.error, e: print('ERROR! Exception {}'.format(e)) print str(temperature)[1:-1] print str(temperature2)[1:-1] This is how sending data from two sensors looks like. If you give the sensor a name starting with T, the server itself will determine that it is a temperature sensor.
Now we need to add a sensor to cron. We type:
crontab -e and add this line to it: */10 * * * * sudo python /home/pi/narod.py We are waiting for the script to start.
Now go here narodmon.ru/ip and see if the data was transmitted. If everything is in order, then click on the “Add device” button on the main page in the menu and specify the MAC. Now we can customize everything to taste (name, type, location, etc.). The sensor can be made public one day after the start of the transfer of evidence.
That's all. I wish you good luck in connecting sensors. Do it more often, because it is so convenient from home to see the temperature in advance at the place where you are going.
See you soon :)
Source: https://habr.com/ru/post/401313/
All Articles