FLProg + RemoteXY = Wireless keyboard for computer on your phone
I had an interesting situation at home. The TV in the bedroom is connected to a computer located in another room, and in order for the wife to watch the next episode of the series (although I have an android console that stands next to the TV, she prefers to watch from the computer), it takes a lot of effort. In view of the presence of children, wireless mice and keyboards do not take root. I have long been watching with interest the possibility of the Arduino Leonardo to pretend to be a mouse and keyboard, and when this board came to me, I realized this possibility in FLProg version 2.2. Together with the capabilities of the RevoteXY project, a very interesting thing turned out. To start the video work of the resulting device.
First of all, a project is created on the RemoteXY website. The peculiarity of this project is that the interface you created does not need to be loaded onto the phone. It is enough to have the RemoteXY program on the phone, and all created interfaces are stored in the Arduino firmware. When connected to it, the description of the interface is transmitted to the phone, and opens in the program.
Now on the RemoteXY site there is an opportunity to share my projects, and here is a link to my project for the device discussed in this lesson. The project consists of four screens.
')
The first screen is mouse control.
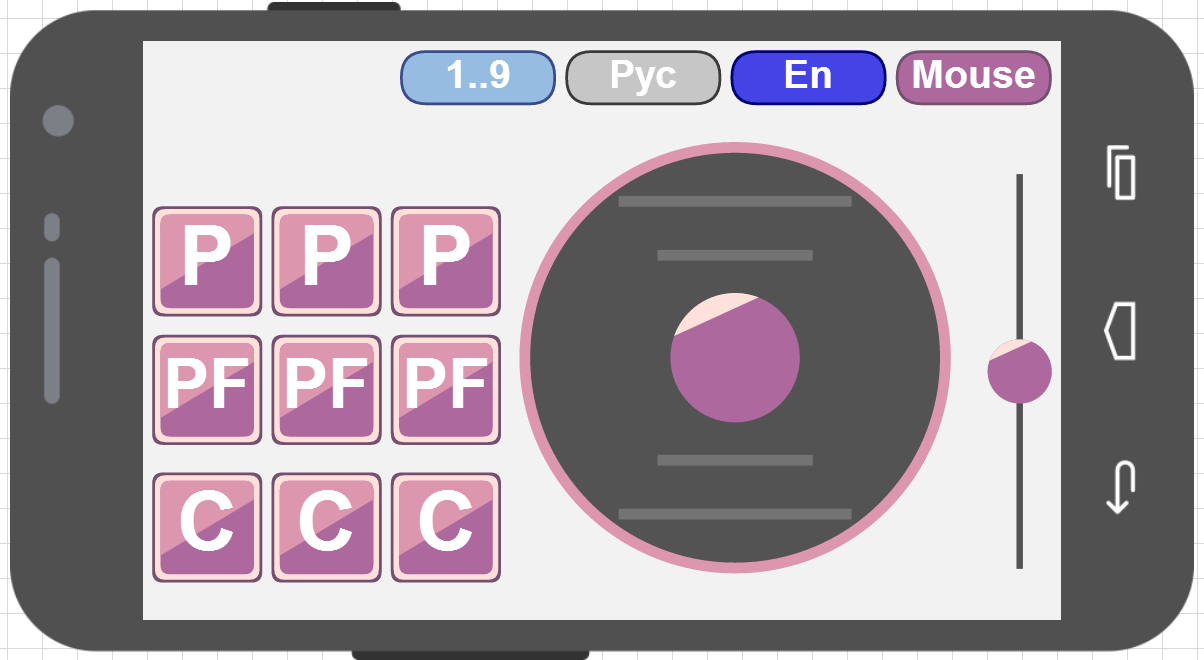
To control the movement of the mouse is a joystick. Management with the help of it is very similar to management with the help of the thing that stuck out in the middle of the keyboard on the famous "ThinkPad T41".

I had such a long time, so there is experience. The developers of the RemoteXY project promised to make a new element - “Touch Panel”, with which you can completely imitate the touchpad of a laptop. When this happens in this project, I will replace the joystick with it. The slider on the right side of the screen simulates a scroll wheel. The stronger its shift from the center, the faster the virtual mouse wheel will spin.
Three columns of buttons on the left side of the screen simulate various button presses on a virtual mouse. Each column is responsible for its own button - left, middle, and right, respectively. The top row of buttons (with the “P” symbol) simulates a normal press. That is, when you click on this button, the corresponding button of the virtual mouse will be pressed, and when released, it will be released. The second row (with the “PF” symbol) simulates pressing with fixation. The first time you click on this button, the virtual mouse button will be pressed, while the second one will be released. This is useful when dragging windows for example. Hover the mouse over the window title, press the “PF” button (pin the window to the mouse), drag the window, press the “PF” button again (release the window). And the third row (with the “C” symbol) is to click on the corresponding button of the virtual mouse.
The second screen is an English keyboard.
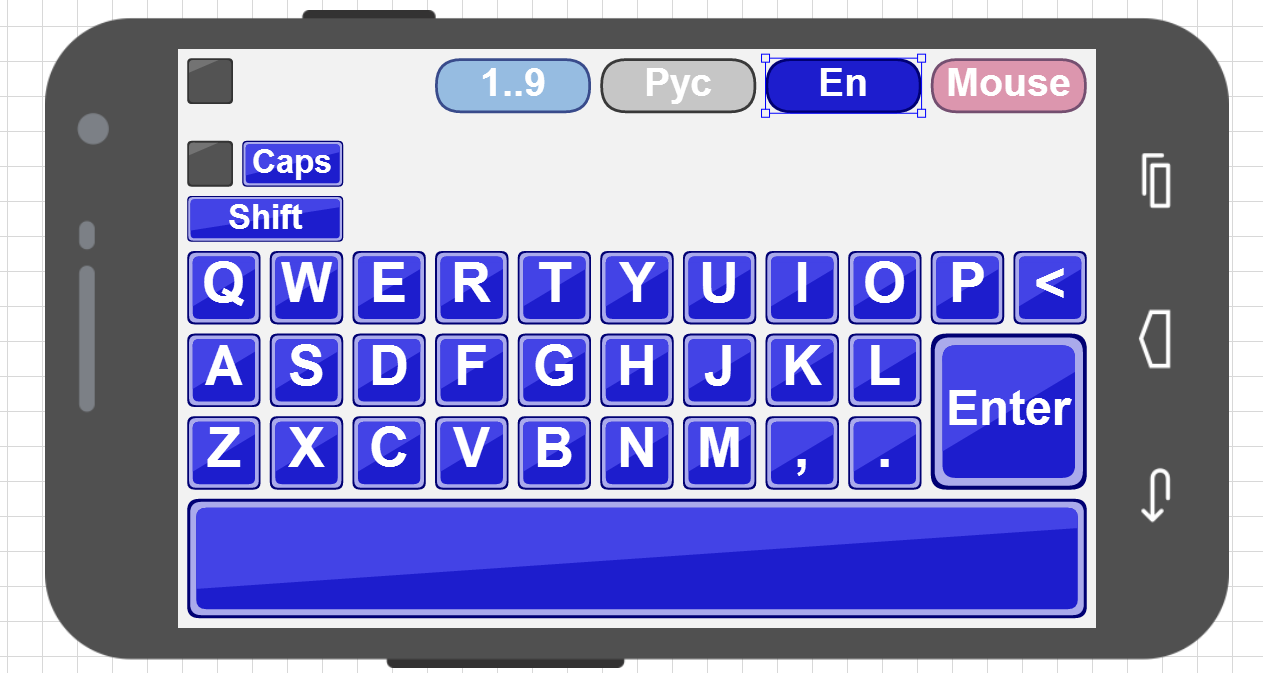
There is nothing to explain here. The “Caps” button includes the input of uppercase characters, the “Shft” button includes uppercase characters for one character. After entering one character, it is reset.
The third screen - Russian keyboard
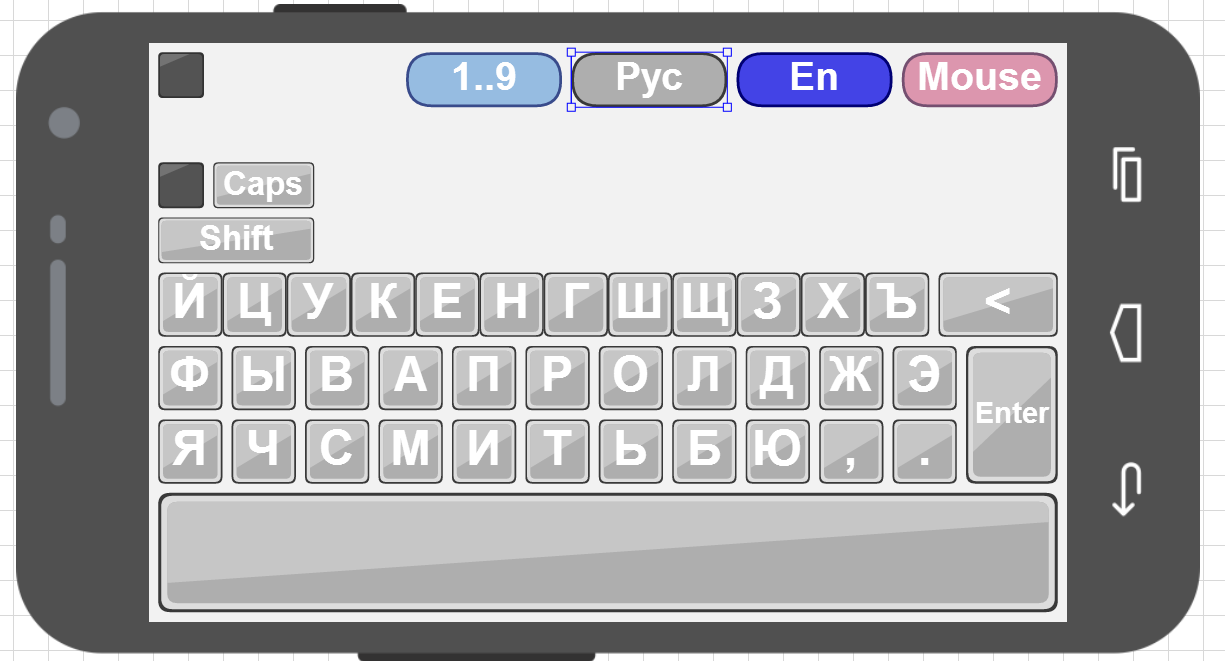
Here everything is clear. The “Caps” and “Shift” keys work the same as on the previous screen.
Well, the last screen - numbers and special characters

There is a small subtlety. In the online editor RemoteXY revealed a small bug. If the “\” symbol is used in the inscription on the button, then the project is not saved or processed. Therefore, for the button of this symbol, I used the inscription “not /”. Well, I did not think of anything better.
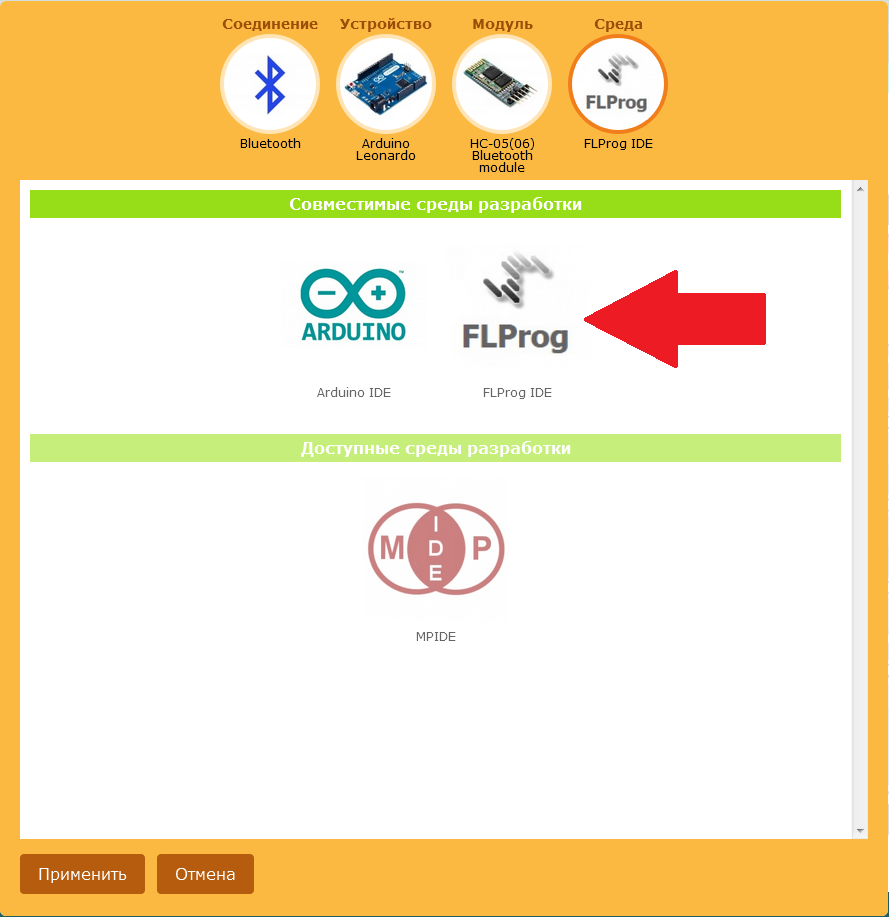
After creating a project on the RemoteXY website, you need to get the code for uploading to the “RemoteXY” block in the FLProg project. To do this, in the properties of the project RemoteXY choose the programming environment - FLProg.
With the RemoteXY site we are done. Go to the project on FLProg.
The Arduino Leonardo controllers (checked), the Arduino DUE (support for this controller came from version 2.3 — tested), and the Arduino Micro (theoretically, not yet arrived, waiting to check) can pretend to be a standard mouse and keyboard as a standard mouse and keyboard. .
The FLProg project for this tutorial can be downloaded here . The Bluetooth module HC-05 is used as a communication device with the phone. It is connected in accordance with the table.
Consider the project:

There is a very large “RemoteXY” unit that provides communication with the phone. To configure it, you need to load the code received from the RemoteXY project site into it. The loading process is described in detail in the information for the block (block properties -> “Information” tab), so we will not duplicate it here. I will note only for those who work in the version FLProg 2.3 and younger. In these versions there is a small bug. If, when creating a project on the RemoteXY site, in the settings, select a port that is missing or busy in the project where the description will be loaded, then the program will crash when loading. To avoid this, you must FIRST select a free port in the block settings, and THEN load the description. In later versions of FLProg, this error has been fixed.
CD blocks (encoder) are used to determine the number of the pressed button. They give out at their output the number of the input on which logical one appeared. In the absence of a log. 1 at all inputs, at the output of this block 0.

Here we are from the data obtained from the phone to detect the direction of movement of the mouse and wheel. I chose 5 units of dead band (with the maximum signal change from the joystick and the slider 0-100 to each side). In principle, to improve the work with the mouse, this value can be played. Also here is determined by the step size (the speed of movement of the mouse or scroll). The parameters of the “Scale” blocks can also be played for more comfortable mouse control.

Here we directly send commands to move the virtual mouse. For this we use the new “Mouse move” block. Each block sends a command to move the mouse in a certain direction every 10ms (set in the block settings), a step calculated in the previous board if there is a high level at the “Send” input.

It also uses the new “Mouse wheel” block. That block sends a command to rotate the scroll wheel of a virtual mouse. Here, to achieve the effect of smoothness, a different (different from moving the mouse) principle is used. If there is a high level at the “Send” input, the block sends to the virtual mouse a command to rotate the scroll wheel one step, but with a periodicity calculated on board 2. This periodicity depends on the position of the slider on the phone and changes from 200 milliseconds to 5 milliseconds when the value changes received from the slider from 5 (dead zone) to 100 (extreme position).

It uses the “MousePressKey” block. At a high level at the “Send” input, it keeps the button of the virtual mouse selected in the settings, at low - it releases it. To implement the effect of pressing with fixation, TT triggers are used (counting triggers). On the first leading edge at their entrance, they transfer their output to the log state. 1 and the second drop it to 0. And so on the circle.
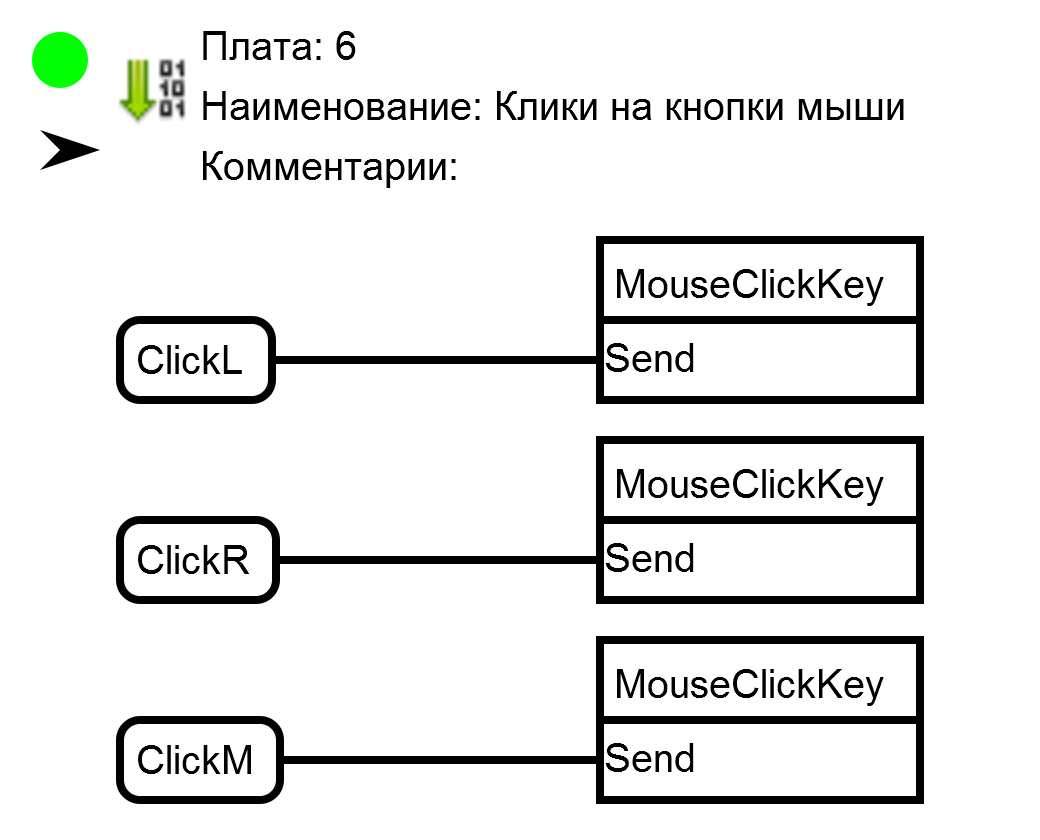
Here, the “MouseClickKey” block is used, which, on the leading edge of the “Send” input, makes a short click on the virtual mouse button selected in the block settings.
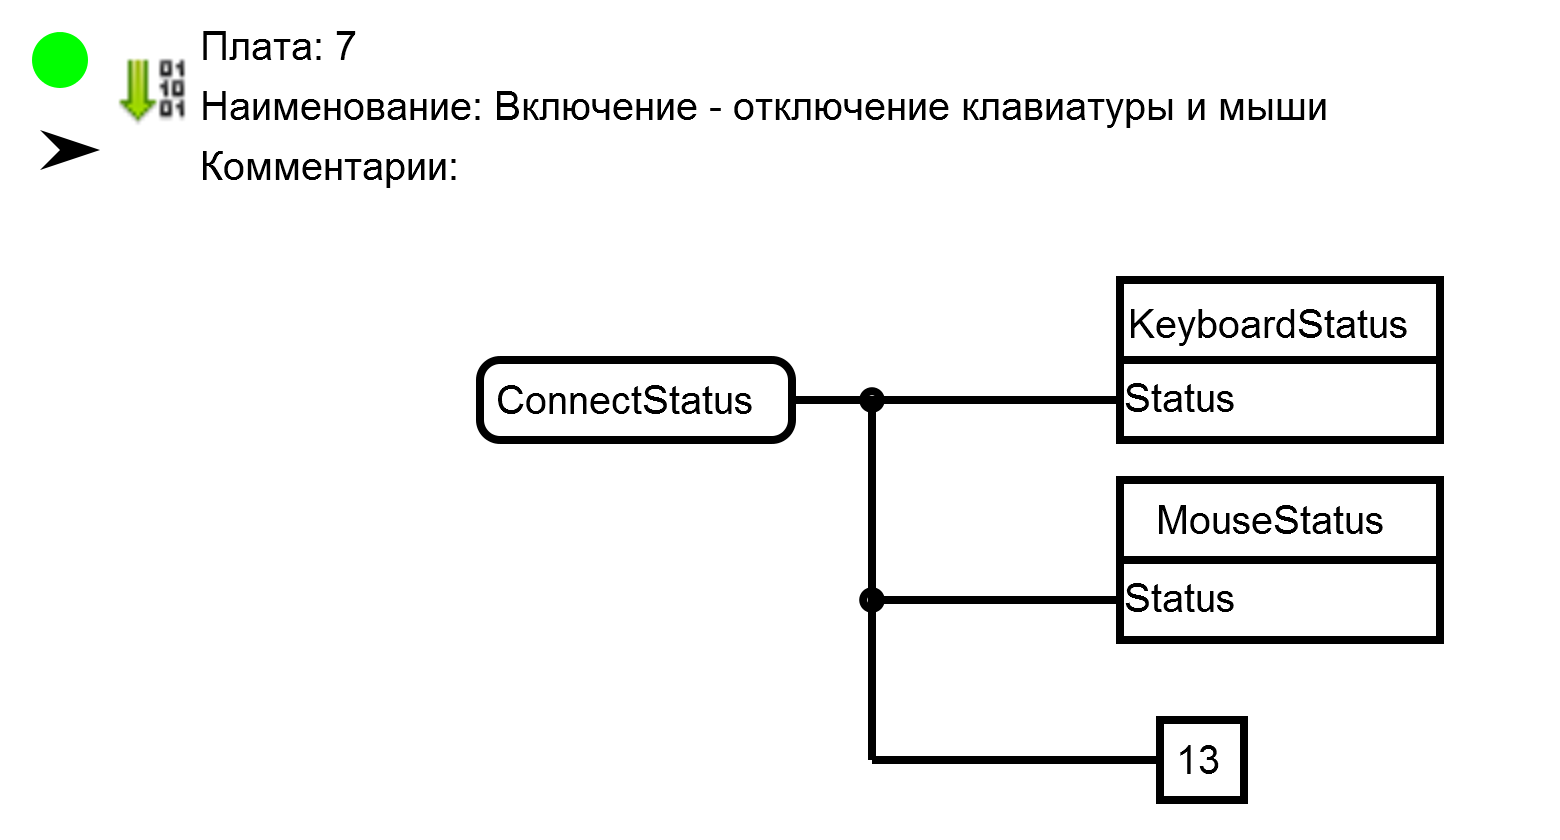
Here, the “KeyboardStatus” and “MouseStatus” blocks are used, which at a high level at the “Status” input turn on the virtual keyboard and mouse, respectively, and at a low level, turn them off. In this scheme, to control the on and off is the signal that the phone is connected to an arduinka. It is formed at the output of the “CS” of the “RemoteXY” block (board 1). In addition, if there is a connection, we light the LED built into the Arduino board (pin 13).

This determines whether a button is pressed on one of the keyboards in the application on the phone, and on which keypad the button was pressed - Russian or English. In addition, signals are generated for the ignition of the LED located in the upper right corner of each of the application keyboards on the phone. This LED indicates that the button press signal has reached the controller. I used it when setting up, but decided to leave it in the final version of the application.
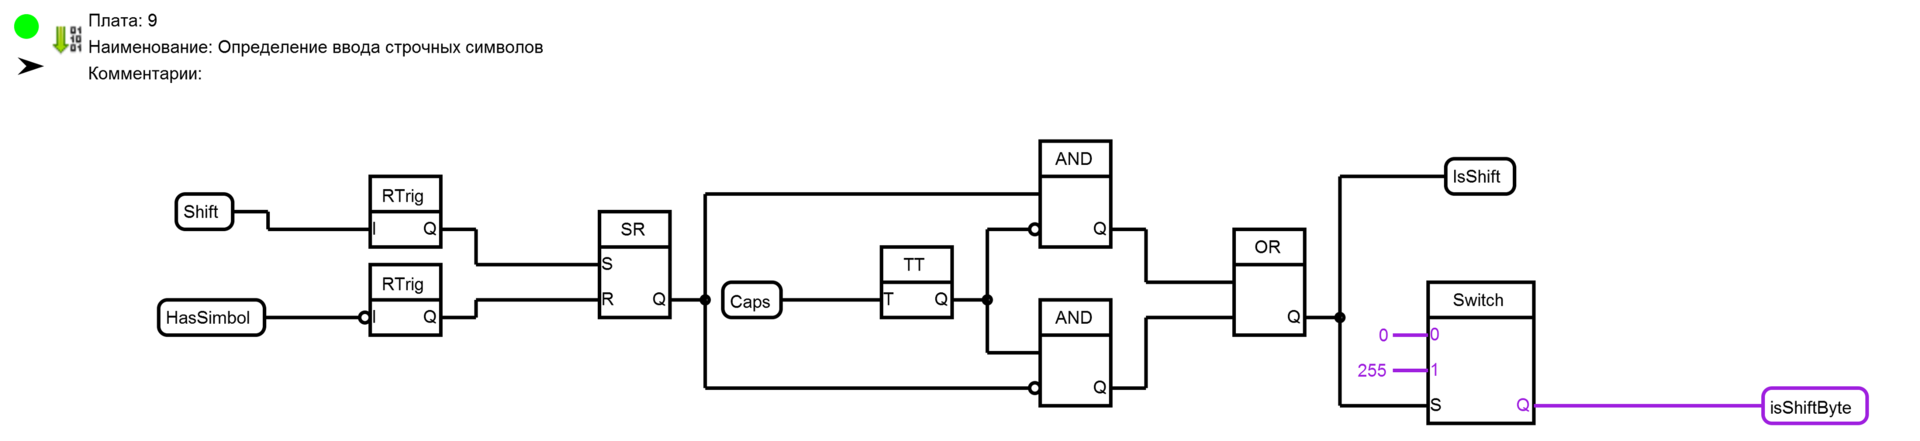
This defines the need for an uppercase character. The front edge of pressing the “Shift” button in the application on the phone sets the SR trigger to the log.1 state. After the end of the character input (the falling edge of the signal of the presence of the pressed character), the trigger is reset to 0.
Each press of the “Caps” button in the application on the phone inverts the operation of the “Shift” button. That is, in the initial position, the main input state is lowercase characters, and when you press the “Shift” button, one uppercase character is entered, then once you press the “Caps” button, the mode changes. Capital letters become basic, and when you press the “Shift” button, one lower case character is entered. When you press the “Caps” button again, the input is transferred to the main mode. In addition, a signal is generated for ignition of the “Shift” indicator in the application on the phone.

Here, from the number pressed on the keyboard in the application on the button telephone, the code of the symbol of this button is formed. This is done using the “Code table” block. This block produces at the output “Q” a code whose number in the table loaded in the block corresponds to the value at the input “I”.
Please note that for both Russian characters and English characters one code table is used. The fact is that the Keybord library understands only single-byte codes, and actually presses the button of the virtual keyboard on which the character with the code passed to it is written. To enter Russian characters, the input method on the computer is forcibly switched to Russian as they are entered. How this is done consider on the next board.

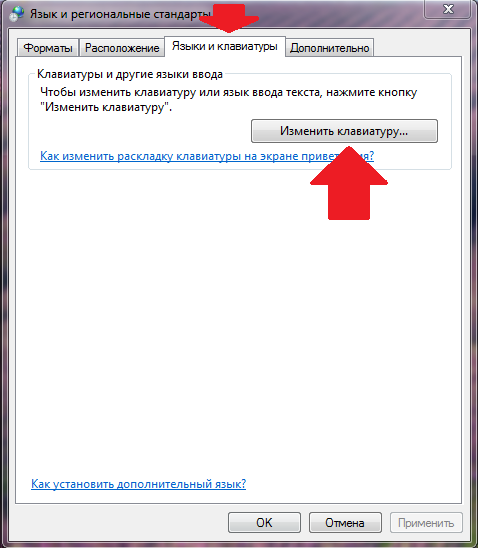
Here, two “SequenceKeybord” blocks are used. These blocks, on the leading edge at the “Send” input, execute a script of actions with a keyboard that was configured when setting up the block. It is with this block that we can configure the input of Russian or English characters, as well as the switching of lowercase or uppercase characters. But this also requires some setup of the computer to which our device is connected. You need to configure the keyboard shortcut to enable Russian and Angdean layouts. This is done in the control panel of the computer.

For this device, I set up the inclusion of English using the CTRL + 1 keys and the Russian CTRL + 0. It is these combinations that are used by script blocks.
Consider the upper block script.
The script is executed in steps from top to bottom along the leading edge at the “Send” input (When the signal for the presence of a pressed character appears on the keyboard of the application in the phone). In the first step, the CTRL button is pressed and held on the virtual keyboard. In the second step, a short press on the button, the code that is fed to the input “Code Step 2”, is made. If the press was on the Russian keyboard, it will be 48 (character code 1) and if in English - 49 (character code 0). In the third step, the CTRL button is released. Thus, we switched the input language to the one we need to enter this character.
Performing the next step depends on having a high level at the input of “Activity Step 4”. It occurs when the active mode of entering uppercase characters. In this case, step 4 is performed, and the “Shift” button on the virtual keyboard is pressed and held. Thus, capitalization is entered.
Well, at the last step, the button of the virtual keyboard is pressed and held, the code that comes to the input of “Code Step 5” (the code of the button we pressed on the keyboard in the application on the phone).
When the signal of the presence of the pressed button on the keyboard disappears in the application on the phone, due to the inversion at the input of the lower block of the script, the script configured in it is executed.
First we release the previously pressed symbol button, and then release the “Shift” button

Here, similarly to board 10, we form a signal about the presence of special characters and numbers on the keyboard of the application on the phone, and the code of this button.

When a signal appears, the pressed key on the keyboard of special characters in the application on the phone runs the script configured in the “SequenceKeyboard” block. In it, we first translate the input method into English (pressing the “CTRL” key → pressing the “1” key → releasing the “CTRL” key), and then pressing the desired symbol key. When the signal of the presence of the pressed button disappears, a block of one-time impact on the keyboard “OneKeyboard” is performed, which performs one action programmed in the settings. In this case, releases the previously pressed special character key.
After compilation, this project takes up a little more than half of the memory of the Arduino Leonardo controller, which allows you to make various improvements to this project.
Good luck to you creativity.
First of all, a project is created on the RemoteXY website. The peculiarity of this project is that the interface you created does not need to be loaded onto the phone. It is enough to have the RemoteXY program on the phone, and all created interfaces are stored in the Arduino firmware. When connected to it, the description of the interface is transmitted to the phone, and opens in the program.
Now on the RemoteXY site there is an opportunity to share my projects, and here is a link to my project for the device discussed in this lesson. The project consists of four screens.
')
The first screen is mouse control.
To control the movement of the mouse is a joystick. Management with the help of it is very similar to management with the help of the thing that stuck out in the middle of the keyboard on the famous "ThinkPad T41".
I had such a long time, so there is experience. The developers of the RemoteXY project promised to make a new element - “Touch Panel”, with which you can completely imitate the touchpad of a laptop. When this happens in this project, I will replace the joystick with it. The slider on the right side of the screen simulates a scroll wheel. The stronger its shift from the center, the faster the virtual mouse wheel will spin.
Three columns of buttons on the left side of the screen simulate various button presses on a virtual mouse. Each column is responsible for its own button - left, middle, and right, respectively. The top row of buttons (with the “P” symbol) simulates a normal press. That is, when you click on this button, the corresponding button of the virtual mouse will be pressed, and when released, it will be released. The second row (with the “PF” symbol) simulates pressing with fixation. The first time you click on this button, the virtual mouse button will be pressed, while the second one will be released. This is useful when dragging windows for example. Hover the mouse over the window title, press the “PF” button (pin the window to the mouse), drag the window, press the “PF” button again (release the window). And the third row (with the “C” symbol) is to click on the corresponding button of the virtual mouse.
The second screen is an English keyboard.
There is nothing to explain here. The “Caps” button includes the input of uppercase characters, the “Shft” button includes uppercase characters for one character. After entering one character, it is reset.
The third screen - Russian keyboard
Here everything is clear. The “Caps” and “Shift” keys work the same as on the previous screen.
Well, the last screen - numbers and special characters
There is a small subtlety. In the online editor RemoteXY revealed a small bug. If the “\” symbol is used in the inscription on the button, then the project is not saved or processed. Therefore, for the button of this symbol, I used the inscription “not /”. Well, I did not think of anything better.
After creating a project on the RemoteXY website, you need to get the code for uploading to the “RemoteXY” block in the FLProg project. To do this, in the properties of the project RemoteXY choose the programming environment - FLProg.
The code received on the RemoteXY website for this lesson
REMOTEXY_MODE__SOFTSERIAL
REMOTEXY_SERIAL_RX 8
REMOTEXY_SERIAL_TX 9
REMOTEXY_SERIAL_SPEED 9600
[128,5,144,5,6,8,4,5,32,41
11,47,47,7,1,4,48,92,11,7
, 50,7,1,1,1,1,18,12,12,7
, 1,80,0,1,1,14,18,12,12,7
, 1,80,0,1,1,27,18,12,12,7
, 1,80,0,1,1,1,32,12,12,7
, 1,80,70,0,1,1,14,32,12,12
, 7.1,80,70,0,1,1,27,32,12
, 12,7,1,80,70,0,1,1,1,47
, 12,12,7,1,67,0,1,1,14,47
, 12,12,7,1,67,0,1,1,27,47
, 12,12,7,1,67,0,1,1,1,22
, 8,8,6,2,81,0,1,1,10,22
, 8,8,6,2,87,0,1,1,19,22
, 8,8,6,2,69,0,1,1,28,22
, 8,8,6,2,82,0,1,1,37,22
, 8,8,6,2,84,0,1,1,46,22
, 8,8,6,2,89,0,1,1,55,22
, 8,8,6,2,85,0,1,1,64,22
, 8,8,6,2,73,0,1,1,73,22
, 8,8,6,2,79,0,1,1,82,22
8,8,6,2,80,0,1,1,1,31
, 8,8,6,2,65,0,1,1,10,31
, 8,8,6,2,83,0,1,1,19,31
, 8,8,6,2,68,0,1,1,28,31
, 8,8,6,2,70,0,1,1,37,31
, 8,8,6,2,71,0,1,1,46,31
, 8,8,6,2,72,0,1,1,55,31
, 8,8,6,2,74,0,1,1,64,31
, 8,8,6,2,75,0,1,1,1,40
, 8,8,6,2,90,0,1,1,10,40
, 8,8,6,2,88,0,1,1,19,40
, 8,8,6,2,67,0,1,1,28,40
, 8,8,6,2,86,0,1,1,37,40
, 8,8,6,2,66,0,1,1,46,40
, 8,8,6,2,78,0,1,1,55,40
, 8,8,6,2,77,0,1,1,1,49
, 98,13,6,2,0,1,1,73,31,8
, 8,6,2,76,0,1,1,91,22,8
, 8,6,2,60,0,1,1,82,31,17
, 17,6,2,69,110,116,101,114,0,1
, 1,64,40,8,8,6,2,44,0,1
1,73,40,8,8,6,2,46,0,1
1,1,16,17,5,6,2,83,104,105
, 102,116,0,1,1,7,10,11,5,6
, 2,67,97,112,115,0,1,1,1,25
, 7,7,0,3,208,153,0,1,1,8
, 25,7,7,0,3,208,166,0,1,1
15.25,7,7,0,3,208,163,0,1
, 1,22,25,7,7,0,3,208,154,0
1,1,29,25,7,7,0,3,208,149
, 0,1,1,43,25,7,7,0,3,208
, 147,0,1,1,57,25,7,7,0,3
, 208,169,0,1,1,78,25,7,7,0
, 3,208,170,0,1,1,36,25,7,7
, 0,3,208,157,0,1,1,64,25,7
, 7,0,3,208,151,0,1,1,71,25
, 7,7,0,3,208,165,0,1,1,50
, 25,7,7,0,3,208,168,0,1,1
, 86,25,13,7,0,3,60,0,1,1
, 1,49,98,13,0,3,0,1,1,1,1
, 41,7,7,0,3,208,175,0,1,1
, 9,41,7,7,0,3,208,167,0,1
1,17,41,7,7,0,3,208,161,0
1,1,25,41,7,7,0,3,208,156
, 0,1,1,33,41,7,7,0,3,208
, 152,0,1,1,41,41,7,7,0,3
, 208,162,0,1,1,49,41,7,7,0
, 3,208,172,0,1,1,57,41,7,7
, 0,3,208,145,0,1,1,65,41,7
, 7,0,3,208,174,0,1,1,1,33
, 7,7,0,3,208,164,0,1,1,9
, 33,7,7,0,3,208,171,0,1,1
17.33,7,7,0,3,208,146,0,1
, 1,25,33,7,7,0,3,208,144,0
, 1,1,33,33,7,7,0,3,208,159
, 0,1,1,41,33,7,7,0,3,208
, 160,0,1,1,49,33,7,7,0,3
, 208,158,0,1,1,57,33,7,7,0
, 3,208,155,0,1,1,65,33,7,7
, 0,3,208,148,0,1,1,73,33,7
, 7,0,3,208,150,0,1,1,81,33
, 7,7,0,3,208,173,0,1,1,73
, 41,7,7,0,3,44,0,1,1,81
, 41,7,7,0,3,46,0,1,1,89
, 33,10,15,0,3,69,110,116,101,114
, 0,1,1,7,13,11,5,0,3,67
, 97,112,115,0,1,1,1,19,17,5
, 0,3,83,104,105,102,116,0,1,1
1,13,9,8,5,4,49,0,1,1
, 11,13,9,8,5,4,50,0,1,1
, 21,13,9,8,5,4,51,0,1,1
, 41,13,9,8,5,4,53,0,1,1
51,33,9,8,5,4,54,0,1,1
, 61,13,9,8,5,4,55,0,1,1
, 91,13,9,8,5,4,48,0,1,1
, 81,13,9,8,5,4,57,0,1,1
, 71,13,9,8,5,4,56,0,1,1
, 31,13,9,8,5,4,52,0,1,1
, 32,49,68,13,5,4,0,1,1,1,51
, 40,9,8,5,4,60,0,1,1,61
, 40,9,8,5,4,39,0,1,1,71
, 40,9,8,5,4,34,0,1,1,1
, 31,9,8,5,4,95,0,1,1,91
, 22,9,8,5,4,60,60,0,1,1
41,40,9,8,5,4,62,0,1,1
, 31,40,9,8,5,4,125,0,1,1
21,40,9,8,5,4,123,0,1,1
, 11,40,9,8,5,4,93,0,1,1
, 1.40,9,8,5,4,91,0,1,1
, 51,22,9,8,5,4,38,0,1,1
, 61,31,9,8,5,4,124,0,1,1
51,31,9,8,5,4,110,111,116,47
0,1,1,41,31,9,8,5,4,47
, 0,1,1,31,31,9,8,5,4,61
, 0,1,1,21,31,9,8,5,4,45
0,1,1,11,31,9,8,5,4,43
, 0,1,1,71,31,9,8,5,4,63
, 0,1,1,1,22,9,8,5,4,33
, 0,1,1,11,22,9,8,5,4,64
, 0,1,1,21,22,9,8,5,4,35
, 0,1,1,31,22,9,8,5,4,36
, 0,1,1,41,22,9,8,5,4,94
, 0,1,1,61,22,9,8,5,4,42
, 0,1,1,71,22,9,8,5,4,40
, 0,1,1,81,22,9,8,5,4,41
, 0,1,1,81,40,9,8,5,4,44
, 0,1,1,91,40,9,8,5,4,46
, 0,1,1,91,31,9,8,5,4,69
, 110,116,101,114,0,1,1,81,31,9
, 8,5,4,37,0,1,1,1,49,9
, 8,5,4,58,0,1,1,11,49,9
, 8,5,4,59,0,1,1,21,49,9
, 8,5,4,126,0,65,10,1,10,5
5,2,2,65,10,1,13,5,5,2
, 3,65,9,1,1,5,5,2,2,65
, 9,1,1,5,5,2,3,65,9,1
, 1,5,5,2,4,131,1,82,1,17
, 6,7,1,77,111,117,115,101,0,131
, 0,64,1,17,6,6,2,69,110,0
, 131,0,46,1,17,6,0,3,208,160
, 209,131,209,129,0,131,0,28,1,17
, 6,5,4,49,46,46,57,0];
input signed char joystick_1_x; / * = -100..100 x coordinate of the joystick position * /
input signed char joystick_1_y; / * = -100..100 y coordinate of the joystick position * /
input signed char slider_1; / * = -100..100 position of the slider * /
input unsigned char pressL; / * = 1 if the button is pressed, otherwise = 0 * /
input unsigned char PressM; / * = 1 if the button is pressed, otherwise = 0 * /
input unsigned char PressR; / * = 1 if the button is pressed, otherwise = 0 * /
input unsigned char pressLF; / * = 1 if the button is pressed, otherwise = 0 * /
input unsigned char pressMF; / * = 1 if the button is pressed, otherwise = 0 * /
input unsigned char pressRF; / * = 1 if the button is pressed, otherwise = 0 * /
input unsigned char ClickL; / * = 1 if the button is pressed, otherwise = 0 * /
input unsigned char ClickM; / * = 1 if the button is pressed, otherwise = 0 * /
input unsigned char ClickR; / * = 1 if the button is pressed, otherwise = 0 * /
input unsigned char bQ; / * = 1 if the button is pressed, otherwise = 0 * /
input unsigned char bW; / * = 1 if the button is pressed, otherwise = 0 * /
input unsigned char bE; / * = 1 if the button is pressed, otherwise = 0 * /
input unsigned char bR; / * = 1 if the button is pressed, otherwise = 0 * /
input unsigned char bT; / * = 1 if the button is pressed, otherwise = 0 * /
input unsigned char bY; / * = 1 if the button is pressed, otherwise = 0 * /
input unsigned char bU; / * = 1 if the button is pressed, otherwise = 0 * /
input unsigned char bI; / * = 1 if the button is pressed, otherwise = 0 * /
input unsigned char bO; / * = 1 if the button is pressed, otherwise = 0 * /
input unsigned char bP; / * = 1 if the button is pressed, otherwise = 0 * /
input unsigned char bA; / * = 1 if the button is pressed, otherwise = 0 * /
input unsigned char bS; / * = 1 if the button is pressed, otherwise = 0 * /
input unsigned char bD; / * = 1 if the button is pressed, otherwise = 0 * /
input unsigned char bF; / * = 1 if the button is pressed, otherwise = 0 * /
input unsigned char bG; / * = 1 if the button is pressed, otherwise = 0 * /
input unsigned char bH; / * = 1 if the button is pressed, otherwise = 0 * /
input unsigned char bJ; / * = 1 if the button is pressed, otherwise = 0 * /
input unsigned char bK; / * = 1 if the button is pressed, otherwise = 0 * /
input unsigned char bZ; / * = 1 if the button is pressed, otherwise = 0 * /
input unsigned char bX; / * = 1 if the button is pressed, otherwise = 0 * /
input unsigned char bC; / * = 1 if the button is pressed, otherwise = 0 * /
input unsigned char bV; / * = 1 if the button is pressed, otherwise = 0 * /
input unsigned char bB; / * = 1 if the button is pressed, otherwise = 0 * /
input unsigned char bN; / * = 1 if the button is pressed, otherwise = 0 * /
input unsigned char bM; / * = 1 if the button is pressed, otherwise = 0 * /
input unsigned char bSpace; / * = 1 if the button is pressed, otherwise = 0 * /
input unsigned char bL; / * = 1 if the button is pressed, otherwise = 0 * /
input unsigned char bBacspace; / * = 1 if the button is pressed, otherwise = 0 * /
input unsigned char bEnter; / * = 1 if the button is pressed, otherwise = 0 * /
input unsigned char bZap; / * = 1 if the button is pressed, otherwise = 0 * /
input unsigned char bTochka; / * = 1 if the button is pressed, otherwise = 0 * /
input unsigned char ShiftEn; / * = 1 if the button is pressed, otherwise = 0 * /
input unsigned char CapsEn; / * = 1 if the button is pressed, otherwise = 0 * /
input unsigned char bQR; / * = 1 if the button is pressed, otherwise = 0 * /
input unsigned char bWR; / * = 1 if the button is pressed, otherwise = 0 * /
input unsigned char bER; / * = 1 if the button is pressed, otherwise = 0 * /
input unsigned char bRR; / * = 1 if the button is pressed, otherwise = 0 * /
input unsigned char bTR; / * = 1 if the button is pressed, otherwise = 0 * /
input unsigned char bUR; / * = 1 if the button is pressed, otherwise = 0 * /
input unsigned char bOR; / * = 1 if the button is pressed, otherwise = 0 * /
input unsigned char bTverdR; / * = 1 if the button is pressed, otherwise = 0 * /
input unsigned char bYR; / * = 1 if the button is pressed, otherwise = 0 * /
input unsigned char bPR; / * = 1 if the button is pressed, otherwise = 0 * /
input unsigned char bXXR; / * = 1 if the button is pressed, otherwise = 0 * /
input unsigned char bIR; / * = 1 if the button is pressed, otherwise = 0 * /
input unsigned char bBacspaceR; / * = 1 if the button is pressed, otherwise = 0 * /
input unsigned char bSpaceR; / * = 1 if the button is pressed, otherwise = 0 * /
input unsigned char bZR; / * = 1 if the button is pressed, otherwise = 0 * /
input unsigned char bXR; / * = 1 if the button is pressed, otherwise = 0 * /
input unsigned char bCR; / * = 1 if the button is pressed, otherwise = 0 * /
input unsigned char bVR; / * = 1 if the button is pressed, otherwise = 0 * /
input unsigned char bBR; / * = 1 if the button is pressed, otherwise = 0 * /
input unsigned char bNR; / * = 1 if the button is pressed, otherwise = 0 * /
input unsigned char bMR; / * = 1 if the button is pressed, otherwise = 0 * /
input unsigned char bRusBR; / * = 1 if the button is pressed, otherwise = 0 * /
input unsigned char bRusUR; / * = 1 if the button is pressed, otherwise = 0 * /
input unsigned char bAR; / * = 1 if the button is pressed, otherwise = 0 * /
input unsigned char bSR; / * = 1 if the button is pressed, otherwise = 0 * /
input unsigned char bDR; / * = 1 if the button is pressed, otherwise = 0 * /
input unsigned char bFR; / * = 1 if the button is pressed, otherwise = 0 * /
input unsigned char bGR; / * = 1 if the button is pressed, otherwise = 0 * /
input unsigned char bHR; / * = 1 if the button is pressed, otherwise = 0 * /
input unsigned char bJR; / * = 1 if the button is pressed, otherwise = 0 * /
input unsigned char bKR; / * = 1 if the button is pressed, otherwise = 0 * /
input unsigned char bLR; / * = 1 if the button is pressed, otherwise = 0 * /
input unsigned char bRusGR; / * = 1 if the button is pressed, otherwise = 0 * /
input unsigned char bRusER; / * = 1 if the button is pressed, otherwise = 0 * /
input unsigned char bZapR; / * = 1 if the button is pressed, otherwise = 0 * /
input unsigned char bTochkaR; / * = 1 if the button is pressed, otherwise = 0 * /
input unsigned char bEnterR; / * = 1 if the button is pressed, otherwise = 0 * /
input unsigned char CapsRus; / * = 1 if the button is pressed, otherwise = 0 * /
input unsigned char ShiftRus; / * = 1 if the button is pressed, otherwise = 0 * /
input unsigned char bNum1; / * = 1 if the button is pressed, otherwise = 0 * /
input unsigned char bNum2; / * = 1 if the button is pressed, otherwise = 0 * /
input unsigned char bNum3; / * = 1 if the button is pressed, otherwise = 0 * /
input unsigned char bNum5; / * = 1 if the button is pressed, otherwise = 0 * /
input unsigned char bNum6; / * = 1 if the button is pressed, otherwise = 0 * /
input unsigned char bNum7; / * = 1 if the button is pressed, otherwise = 0 * /
input unsigned char bNum0; / * = 1 if the button is pressed, otherwise = 0 * /
input unsigned char bNum9; / * = 1 if the button is pressed, otherwise = 0 * /
input unsigned char bNum8; / * = 1 if the button is pressed, otherwise = 0 * /
input unsigned char bNum4; / * = 1 if the button is pressed, otherwise = 0 * /
input unsigned char bSpaceSim; / * = 1 if the button is pressed, otherwise = 0 * /
input unsigned char bSim24; / * = 1 if the button is pressed, otherwise = 0 * /
input unsigned char bSim25; / * = 1 if the button is pressed, otherwise = 0 * /
input unsigned char bSim26; / * = 1 if the button is pressed, otherwise = 0 * /
input unsigned char bSim10; / * = 1 if the button is pressed, otherwise = 0 * /
input unsigned char bBacspaceSim; / * = 1 if the button is pressed, otherwise = 0 * /
input unsigned char bSim23; / * = 1 if the button is pressed, otherwise = 0 * /
input unsigned char bSim22; / * = 1 if the button is pressed, otherwise = 0 * /
input unsigned char bSim21; / * = 1 if the button is pressed, otherwise = 0 * /
input unsigned char bSim20; / * = 1 if the button is pressed, otherwise = 0 * /
input unsigned char bSim19; / * = 1 if the button is pressed, otherwise = 0 * /
input unsigned char bSim6; / * = 1 if the button is pressed, otherwise = 0 * /
input unsigned char bSim16; / * = 1 if the button is pressed, otherwise = 0 * /
input unsigned char bSim15; / * = 1 if the button is pressed, otherwise = 0 * /
input unsigned char bSim14; / * = 1 if the button is pressed, otherwise = 0 * /
input unsigned char bSim13; / * = 1 if the button is pressed, otherwise = 0 * /
input unsigned char bSim12; / * = 1 if the button is pressed, otherwise = 0 * /
input unsigned char bSim11; / * = 1 if the button is pressed, otherwise = 0 * /
input unsigned char bSim17; / * = 1 if the button is pressed, otherwise = 0 * /
input unsigned char bSim1; / * = 1 if the button is pressed, otherwise = 0 * /
input unsigned char bSim2; / * = 1 if the button is pressed, otherwise = 0 * /
input unsigned char bSim3; / * = 1 if the button is pressed, otherwise = 0 * /
input unsigned char bSim4; / * = 1 if the button is pressed, otherwise = 0 * /
input unsigned char bSim5; / * = 1 if the button is pressed, otherwise = 0 * /
input unsigned char bSim7; / * = 1 if the button is pressed, otherwise = 0 * /
input unsigned char bSim8; / * = 1 if the button is pressed, otherwise = 0 * /
input unsigned char bSim9; / * = 1 if the button is pressed, otherwise = 0 * /
input unsigned char bSim27; / * = 1 if the button is pressed, otherwise = 0 * /
input unsigned char bSim28; / * = 1 if the button is pressed, otherwise = 0 * /
input unsigned char bEnterSim; / * = 1 if the button is pressed, otherwise = 0 * /
input unsigned char bSim18; / * = 1 if the button is pressed, otherwise = 0 * /
input unsigned char bSim29; / * = 1 if the button is pressed, otherwise = 0 * /
input unsigned char bSim30; / * = 1 if the button is pressed, otherwise = 0 * /
input unsigned char bSim31; / * = 1 if the button is pressed, otherwise = 0 * /
output unsigned char IsShiftEn_g; / * = 0..255 green brightness of the indicator * /
output unsigned char IsShiftRus_g; / * = 0..255 green brightness of the indicator * /
output unsigned char hasEngSim_b; / * = 0..255 indicator blue brightness * /
output unsigned char hasRusSim_b; / * = 0..255 indicator blue brightness * /
output unsigned char hasSpecSim_b; / * = 0..255 indicator blue brightness * /
With the RemoteXY site we are done. Go to the project on FLProg.
The Arduino Leonardo controllers (checked), the Arduino DUE (support for this controller came from version 2.3 — tested), and the Arduino Micro (theoretically, not yet arrived, waiting to check) can pretend to be a standard mouse and keyboard as a standard mouse and keyboard. .
The FLProg project for this tutorial can be downloaded here . The Bluetooth module HC-05 is used as a communication device with the phone. It is connected in accordance with the table.
| Module HC-051 | Arduino leonardo |
|---|---|
| VCC | + 5V |
| GND | GND |
| Txd | D0 (RX1) |
| Rxd | D1 (TX1) |
Consider the project:
There is a very large “RemoteXY” unit that provides communication with the phone. To configure it, you need to load the code received from the RemoteXY project site into it. The loading process is described in detail in the information for the block (block properties -> “Information” tab), so we will not duplicate it here. I will note only for those who work in the version FLProg 2.3 and younger. In these versions there is a small bug. If, when creating a project on the RemoteXY site, in the settings, select a port that is missing or busy in the project where the description will be loaded, then the program will crash when loading. To avoid this, you must FIRST select a free port in the block settings, and THEN load the description. In later versions of FLProg, this error has been fixed.
CD blocks (encoder) are used to determine the number of the pressed button. They give out at their output the number of the input on which logical one appeared. In the absence of a log. 1 at all inputs, at the output of this block 0.
Here we are from the data obtained from the phone to detect the direction of movement of the mouse and wheel. I chose 5 units of dead band (with the maximum signal change from the joystick and the slider 0-100 to each side). In principle, to improve the work with the mouse, this value can be played. Also here is determined by the step size (the speed of movement of the mouse or scroll). The parameters of the “Scale” blocks can also be played for more comfortable mouse control.
Here we directly send commands to move the virtual mouse. For this we use the new “Mouse move” block. Each block sends a command to move the mouse in a certain direction every 10ms (set in the block settings), a step calculated in the previous board if there is a high level at the “Send” input.
It also uses the new “Mouse wheel” block. That block sends a command to rotate the scroll wheel of a virtual mouse. Here, to achieve the effect of smoothness, a different (different from moving the mouse) principle is used. If there is a high level at the “Send” input, the block sends to the virtual mouse a command to rotate the scroll wheel one step, but with a periodicity calculated on board 2. This periodicity depends on the position of the slider on the phone and changes from 200 milliseconds to 5 milliseconds when the value changes received from the slider from 5 (dead zone) to 100 (extreme position).
It uses the “MousePressKey” block. At a high level at the “Send” input, it keeps the button of the virtual mouse selected in the settings, at low - it releases it. To implement the effect of pressing with fixation, TT triggers are used (counting triggers). On the first leading edge at their entrance, they transfer their output to the log state. 1 and the second drop it to 0. And so on the circle.
Here, the “MouseClickKey” block is used, which, on the leading edge of the “Send” input, makes a short click on the virtual mouse button selected in the block settings.
Here, the “KeyboardStatus” and “MouseStatus” blocks are used, which at a high level at the “Status” input turn on the virtual keyboard and mouse, respectively, and at a low level, turn them off. In this scheme, to control the on and off is the signal that the phone is connected to an arduinka. It is formed at the output of the “CS” of the “RemoteXY” block (board 1). In addition, if there is a connection, we light the LED built into the Arduino board (pin 13).
This determines whether a button is pressed on one of the keyboards in the application on the phone, and on which keypad the button was pressed - Russian or English. In addition, signals are generated for the ignition of the LED located in the upper right corner of each of the application keyboards on the phone. This LED indicates that the button press signal has reached the controller. I used it when setting up, but decided to leave it in the final version of the application.
This defines the need for an uppercase character. The front edge of pressing the “Shift” button in the application on the phone sets the SR trigger to the log.1 state. After the end of the character input (the falling edge of the signal of the presence of the pressed character), the trigger is reset to 0.
Each press of the “Caps” button in the application on the phone inverts the operation of the “Shift” button. That is, in the initial position, the main input state is lowercase characters, and when you press the “Shift” button, one uppercase character is entered, then once you press the “Caps” button, the mode changes. Capital letters become basic, and when you press the “Shift” button, one lower case character is entered. When you press the “Caps” button again, the input is transferred to the main mode. In addition, a signal is generated for ignition of the “Shift” indicator in the application on the phone.
Here, from the number pressed on the keyboard in the application on the button telephone, the code of the symbol of this button is formed. This is done using the “Code table” block. This block produces at the output “Q” a code whose number in the table loaded in the block corresponds to the value at the input “I”.
The code table is loaded into the “Code table” block on this board.
| Code | Value |
|---|---|
| 113 | Lowercase q |
| 119 | Lowercase w |
| 101 | Lowercase e |
| 114 | Lower case character r |
| 116 | Lowercase t |
| 121 | Lowercase y |
| 117 | Lowercase u |
| 105 | Lowercase i |
| 111 | Lowercase o |
| 112 | Lowercase p |
| 97 | Lower case character a |
| 115 | Lowercase s |
| 100 | Lowercase d |
| 102 | Lowercase f |
| 103 | Lowercase g |
| 104 | Lowercase h |
| 106 | Lowercase j |
| 107 | Lowercase k |
| 108 | Lowercase l |
| 122 | Lower case character z |
| 120 | Lowercase x |
| 99 | Lowercase c |
| 118 | Lowercase v |
| 98 | Lowercase b |
| 110 | Lowercase n |
| 109 | Lowercase m |
| 91 | Special character [ |
| 93 | Special character] |
| 59 | Special character |
| 39 | Special character ' |
| 44 | Special character |
| 46 | Special character. |
Please note that for both Russian characters and English characters one code table is used. The fact is that the Keybord library understands only single-byte codes, and actually presses the button of the virtual keyboard on which the character with the code passed to it is written. To enter Russian characters, the input method on the computer is forcibly switched to Russian as they are entered. How this is done consider on the next board.
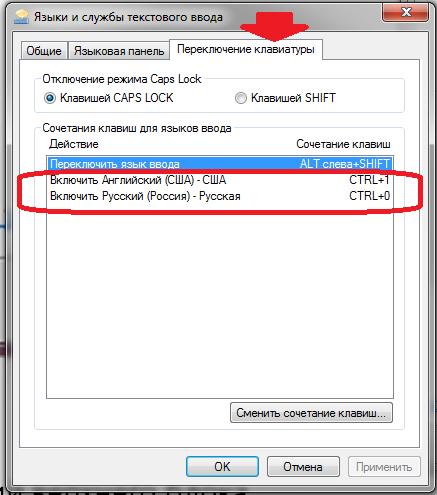
Here, two “SequenceKeybord” blocks are used. These blocks, on the leading edge at the “Send” input, execute a script of actions with a keyboard that was configured when setting up the block. It is with this block that we can configure the input of Russian or English characters, as well as the switching of lowercase or uppercase characters. But this also requires some setup of the computer to which our device is connected. You need to configure the keyboard shortcut to enable Russian and Angdean layouts. This is done in the control panel of the computer.
For this device, I set up the inclusion of English using the CTRL + 1 keys and the Russian CTRL + 0. It is these combinations that are used by script blocks.
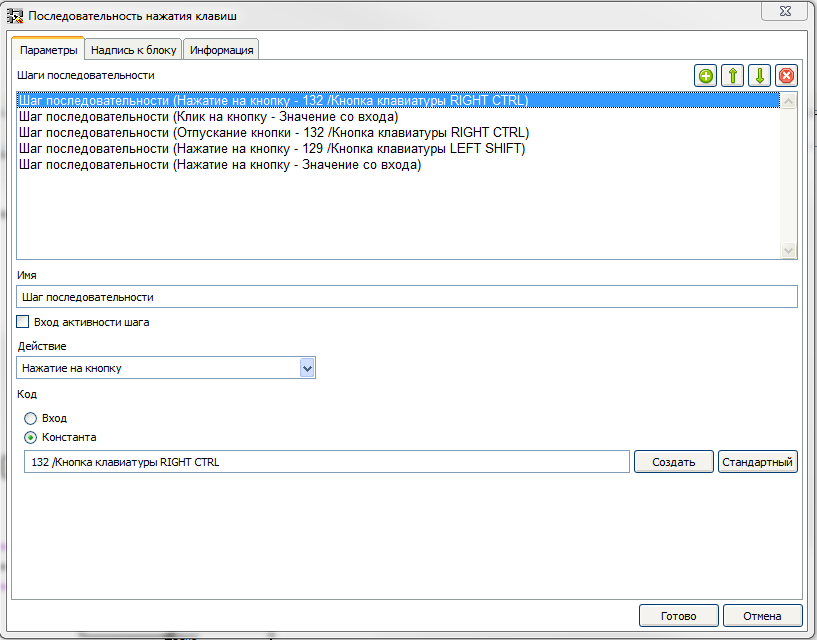
Consider the upper block script.
The script is executed in steps from top to bottom along the leading edge at the “Send” input (When the signal for the presence of a pressed character appears on the keyboard of the application in the phone). In the first step, the CTRL button is pressed and held on the virtual keyboard. In the second step, a short press on the button, the code that is fed to the input “Code Step 2”, is made. If the press was on the Russian keyboard, it will be 48 (character code 1) and if in English - 49 (character code 0). In the third step, the CTRL button is released. Thus, we switched the input language to the one we need to enter this character.
Performing the next step depends on having a high level at the input of “Activity Step 4”. It occurs when the active mode of entering uppercase characters. In this case, step 4 is performed, and the “Shift” button on the virtual keyboard is pressed and held. Thus, capitalization is entered.
Well, at the last step, the button of the virtual keyboard is pressed and held, the code that comes to the input of “Code Step 5” (the code of the button we pressed on the keyboard in the application on the phone).
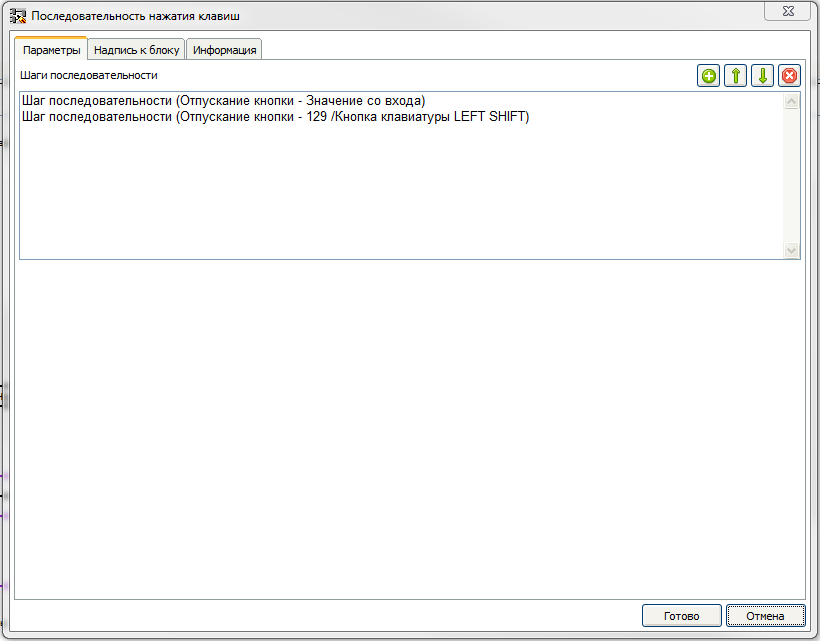
When the signal of the presence of the pressed button on the keyboard disappears in the application on the phone, due to the inversion at the input of the lower block of the script, the script configured in it is executed.
First we release the previously pressed symbol button, and then release the “Shift” button
Here, similarly to board 10, we form a signal about the presence of special characters and numbers on the keyboard of the application on the phone, and the code of this button.
“Code table” .
| Code | Description |
|---|---|
| 44 | , |
| 44 | , |
| 46 | . |
| 46 | . |
| 178 | BACKSPACE |
| 178 | BACKSPACE |
| 178 | BACKSPACE |
| 32 | «» |
| 32 | «» |
| 32 | «» |
| 176 | RETURN |
| 176 | RETURN |
| 176 | RETURN |
| 49 | 1 |
| 50 | 2 |
| 51 | 3 |
| 52 | 4 |
| 53 | 5 |
| 54 | 6 |
| 55 | 7 |
| 56 | 8 |
| 57 | 9 |
| 48 | 0 |
| 33 | ! |
| 64 | @ |
| 35 | # |
| 36 | $ |
| 94 | ^ |
| 38 | & |
| 42 | * |
| 40 | ( |
| 41 | ) |
| 95 | _ |
| 43 | + |
| 45 | - |
| 61 | = |
| 47 | / |
| 92 | \ |
| 124 | | |
| 63 | ? |
| 37 | % |
| 91 | [ |
| 93 | ] |
| 123 | { |
| 125 | } |
| 62 | > |
| 60 | < |
| 39 | ' |
| 34 | " |
| 44 | , |
| 46 | . |
| 58 | : |
| 59 | |
| 126 | ~ |
When a signal appears, the pressed key on the keyboard of special characters in the application on the phone runs the script configured in the “SequenceKeyboard” block. In it, we first translate the input method into English (pressing the “CTRL” key → pressing the “1” key → releasing the “CTRL” key), and then pressing the desired symbol key. When the signal of the presence of the pressed button disappears, a block of one-time impact on the keyboard “OneKeyboard” is performed, which performs one action programmed in the settings. In this case, releases the previously pressed special character key.
After compilation, this project takes up a little more than half of the memory of the Arduino Leonardo controller, which allows you to make various improvements to this project.
Good luck to you creativity.
Source: https://habr.com/ru/post/400655/
All Articles