What to do on the weekend: remote control intercom, budgetary remapping Nextion, disassembly with Onlaym
Sometimes on Fridays here is considered permissible publication of fiction. Today, of course, not Friday, but this is not quite fiction, but rather three mini-novels that have something to do with my life.
A hurried reader may also wonder what, in fact, the relationship can generally intercom and Internet service provider. And he will be right, because I, too, did not immediately come to this.
')
But about everything (Arduino, banal lifehacks, phone squabbles) in order.
Sim, open up!
To be honest, the remote control of the intercom according to my version is almost useless, and I was fully aware of this even before I started. Therefore, to justify the venture, I had to use all the power of imagination to come up with a couple of cases, as they say.
To begin with, I decided that I would allow guests to bask in the entrance in this way, if I did not even have time to reach the house myself. Or, I won't bother too much, getting the keys in advance, because you can just set up the phone so that it issues a command to open the door when I come to the house.
It sounds pretty crazy to ordinary people, but, as they say, per aspera ad astra.
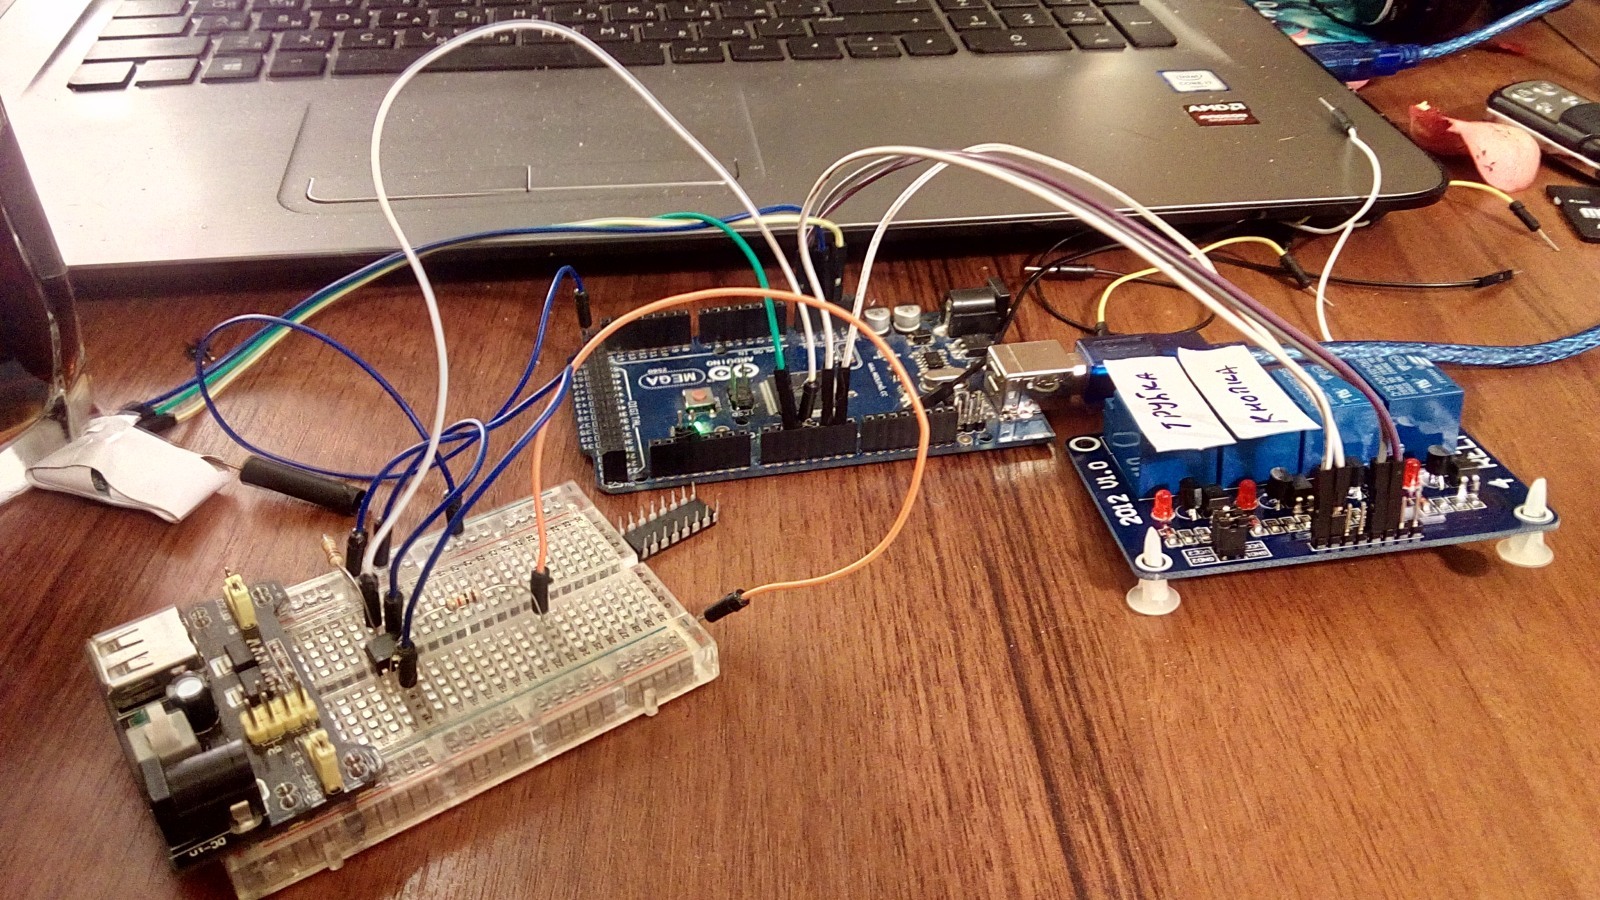
And I really wanted to somehow use a pair of relays that were idle in the central controller from the very beginning of its operation. The situation is, in fact, ridiculous: at that time there was only a block for 4 relays, of which only two were needed. And I didn’t want to wait for another month for the double-block, so I gathered it from what was at hand and immediately began to worry about redundancy.
However, to the intercoms. In general, automatic opening of the intercom is not an exclusive thing. For example, here, on Geektimes, Comrade. Cluster back in 2013 (when the dollar was 30) made not just a remote control, but also an answering machine for guests .
This is by far the coolest thing I've seen in this class.
But much earlier, visitors to RadioKot and many other thematic forums had fun with “opener” devices - unlocking the intercom immediately after the call.
Neither one nor the other, I was not going to repeat. The first is because it is difficult, and because I already had a working controller, which I planned to empower with new powers. The second is for more obvious reasons: too many details and too little sense, I apologize if I hurt the authors.
Sense, of course, for me, and not at all. That is, I absolutely do not like the scheme, which hospitably opens the door to anyone who dials the apartment number.
Hence the basic requirements for my opener:
1) Using the central controller to control via the Internet and by radio
2) Minimal protection against unauthorized access
3) Minimal interference in the interior
Start
I started by familiarizing myself with the principle of the intercom, which I borrowed here :
The tube works very simply: when the tube is packed with a resistance of 50 Ohms, when the tube is removed, the resistance is approx. 400 ohms when the lock button is pressed, the resistance is measured in kilo-ohms ... When there is no call, there is no voltage in the line. When there is a call and the tube is large, the voltage is low 5-7V, when the tube is absent and the resistance is infinite and the maximum voltage is approx. 15V, when the tube is removed, the voltage is approx 10V. When the button is pressed, the maximum voltage is approx. 15V - pressing the button is equal to breaking the line.
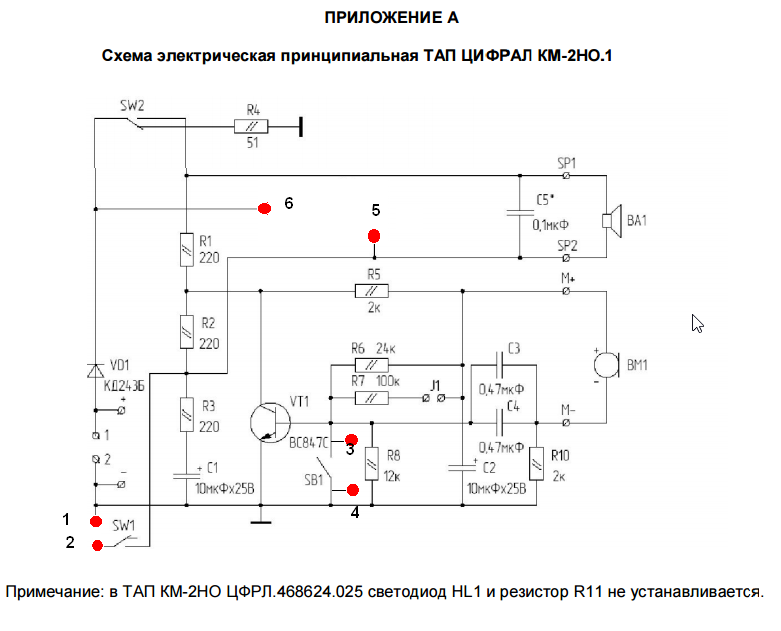
In the case of Numeral, this is a bit wrong, since the documentation for the handset, and I had KM-2NO (by the way, I express my appreciation to Numeral for publishing the scheme) states:
1. The current consumption in the "Conversation" 18-22 mA
2. Line voltage with a tube installed on the case of 1.5-2.5 V
3. Voltage in the line with a lifted tube of 5.8–6.5 V
Therefore, I became more familiar with the concept of my tube:

And I found out that everything is exactly the same in terms of resistance, and, most likely, the rest of Digram’s logic is hardly different from a Visit.
I draw attention to the fact that my modification without LED. But this turned out to be just right, since this fact makes it very easy to transmit call information to the central controller.
Namely: the call sounds, the LED lights up, the optocoupler turns on, on the controller pin we have the level change from high to low.
So instead of the LED, I put the 4N35 optocoupler I already had, which I sent straight to the Arduino. According to the standard scheme from the same Internet:
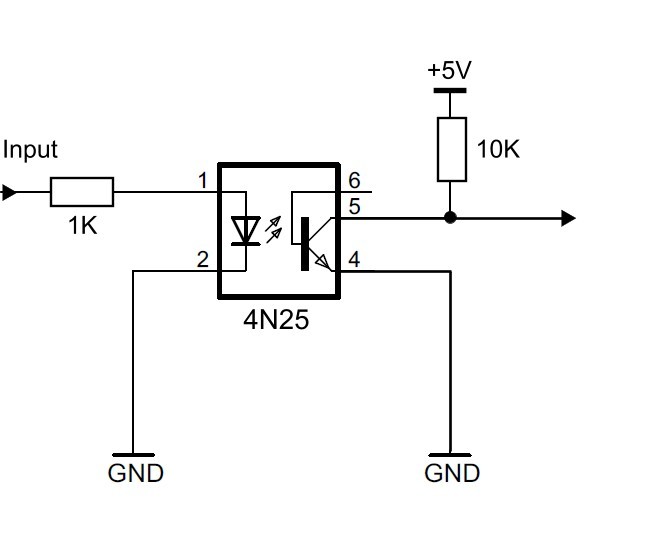
And since I wanted to get by with a minimum of parts and available controller resources, of which the digital pins were the most valuable (they were not enough for Uno), I used the Arduino built-in pull-up resistor instead of a 10K pull-up resistor.
When connected to a digital pin, it looks like this:
#define ringPin _ pinMode(ringPin, INPUT_PULLUP); When connected to analog pinu:
#define ringPin _ pinMode(ringPin, INPUT); digitalWrite(ringPin, HIGH); I decided to place the optocoupler by the microcontroller. I can not justify, but I thought that this is less the risk of false positives from possible interference. It is possible that it is not right, but so far everything is normal with interferences, i.e. they are not.
As for the land in the above example, it should be understood: although the earth seems to be general in the diagram, this is not the case - the optoelectronic isolation actually exists. Well, he is an example.
Get away from me!
The decision to completely get rid of the intercom chains did not come immediately, but inevitably. I very incidentally recalled the case of six years ago, when I observed how an awkward moment with an electromagnetic lock formed during the installation of the ACS.
I do not know how it happened, but it turned out that the castle worked somehow. That "vpolnakala", then nothing at all, and the installers themselves already broke his head. But in the end they assumed that an unexpected short-circuit (or something like that) happened somewhere in the control circuits. Of course, they checked everything, of course, without much success, since they were clearly following the instructions.
Fuel to the fire was added by the fact that the exact same lock of exactly the same configuration, but on the other floor worked just fine.
How long, if short, decided that the matter is in the door itself, on which the lock is mounted. In my opinion, it was assumed that when it was installed, they stuck into the armature, which, in turn, was grounded, which led to unexpected effects on the lock (which may have had a control circuit to the housing).
In general, understood quite a long and tedious. And I did not want a repetition of the same at home.
Therefore, I did not save the wires and connected the relay contacts in the simplest way:
1) Normally closed single relay - in series with the tube lift button SW1 (because this button is normally closed)
2) Normally open another relay - in parallel with the door opener button SB1 (because this button is normally open)
The control contacts of the relay, of course, connected to the free (hooray, they were still) digital pin microcontroller.
In total, as is easy to imagine, it took six wires: two for the optocoupler and another four for the relay.
I apologize for the primitivism of the illustration:
From the intercom
From the Arduino
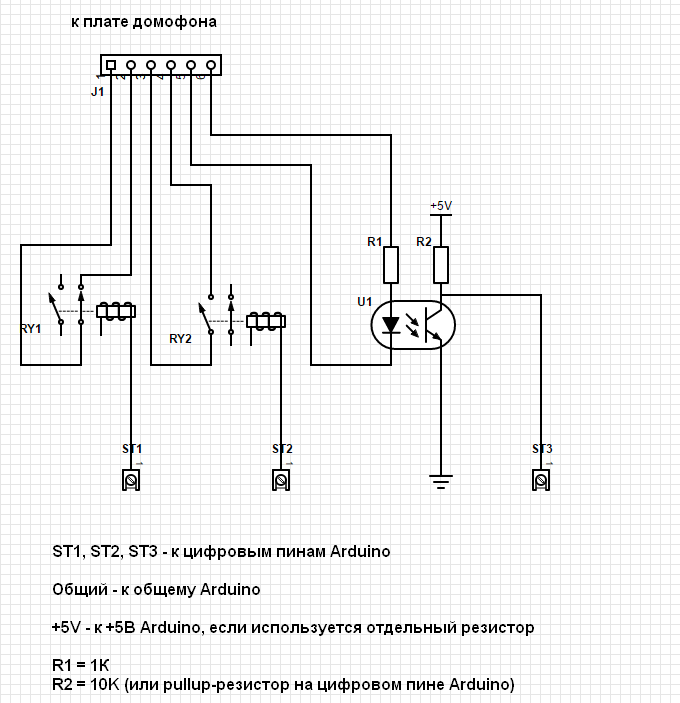
The relays here are extremely schematic. Since, I repeat, I used ready-made relay modules with full stuffing - optocouplers, transistors, diodes, and so on. I strongly recommend not connecting bare relays to Arduino.
... and don't call me anymore!
Already at this stage, I was able to very easily open the intercom via the Internet or a local network from a computer or smartphone according to the following principle:
1) At the time of the doorphone call, the controller for 40 seconds switches to the mode of opening the door. The time is selected on the basis of the documentation on the Cipral doorphone, where it is indicated that the duration of the call signal is exactly 40 seconds.
Those. for a longer time conditionally open there is no point in remaining.
2) When receiving an opening command via the Internet (HTTP POST), the controller sequentially switches the relay. First - opens the relay tube, which imitates its rise. Then, after a short pause, the relay of the opening button closes, thus imitating its pressing. After - "releases" the button and "hangs up".
The test bench was extremely primitive:
One could stop at this if I, as the proud owner of KCDV-12-2, were not aware of how inconvenient it is to run at the console or the phone each time when something needs to be turned on / off.
And, in particular, if I had not recently completed a desktop weather station with a touch screen and it seems that the potential is not fully revealed.

In short, I quickly (in fact, no) added to the weather station the most ordinary and vulgar 433 MHz transmitter with amplitude modulation, which sell tons on Aliexpress for ridiculous money.
As a result, the weather station has become another point of control for the intercom, and therefore, if the bell rings and you sit next to it, then there is no sense in breaking the phone, because you can directly from the screen:
1) Open the lock
2) Pick up the phone and slowly (according to the documentation, the duration of the conversation is 1.5 minutes versus 40 seconds of the call) to reach the intercom, answer and decide whether to open or not
3) “Beat off the bell” (the controller “picks up” and immediately “hangs up” the handset)
To do this, of course, I had to slightly modify the code and interface of the weather station, but on the way I found where there are annoying errors in displaying graphs (as it turned out, I’ve got in DNA, but this is another story).
A new interface, by the way, now does not look like HAL. Now, everything is so colorful and jovial that you just laugh. And you must understand: I didn’t drink a smoothie, the hipsters didn’t bite me, there were no lamberseks in the family, but I’m drawn to the material style like never before in my life:

This screen replaces the climate data when the intercom is ringing: at this moment the central controller issues a radio command, to which the meteodisplay responds.
It may be a little illogical here, but the bell in the center primarily informs about the intercom call. Clicking on it (here illogical) turns off the sound of the intercom in the most barbaric way - imitating the process of raising and lowering the tube.
The castle on the left is the opening of the castle. The tube on the right is a tube lift to simulate the beginning of a conversation.
The screen changes to the main one after 40 seconds from the beginning of the call, and not immediately after pressing the icon button. This allows you to press several times, if the controller suddenly did not “hear” the command, which is not uncommon considering the type of radio channel used.
Algorithms
As I mentioned, at first I was modest and wanted only one thing: to open the intercom on command from the phone, and at the time of the call.
But having played around for a couple of days, I realized that standing in front of an intercom and poking at the screen is a rather boring task, and it is much more interesting to allow a “delayed” opening when you approach the entrance. Then it remains only to dial the apartment number on the panel of the intercom and voila, the door is open.
Finally, I thought that in this situation, it would probably make sense to prohibit opening - in general.
But then he took himself in hand, then let go of himself, picked up a more useful tool, popularly referred to as Occam's razor, and quickly got rid of unnecessary entities. That is: once I did the remote control, it was not to turn it off. Therefore - shutdown is generally not necessary.
Secondly, due to sober (and not as usual) reflection, it turned out that there was no particular difference between opening at the command directly at the time of the call or at the command given in advance.
Finally, returning to the ergonomics of management, I want to say that the more modes there are, the less ordinary people will use them. Why, what a bore, but as I imagined that I had three modes for different occasions, I realized that I would still use one.
Therefore, there is one mode and one command, and two handlers:
1) If the intercom is ringing, the controller allows opening within 40 seconds from the beginning of the call
2) If the opening command comes first, the controller allows opening and waits for a call within N minutes from the moment the command was received (this is to prepare the intercom for opening on the way to the house)
There are two sources for the opening command too:
1) HTTP POST request via a local network or the Internet (for example: myserver.com/?sim-sim-openup ), i.e. you can open at least from Kuala Lumpur
2) Radio command from panels or buttons at home (in my implementation, through the RC-Switch library )
And since the whole structure is connected to the handset without affecting its operation, the intercom can continue to be used in the usual way (bell-hi-hi-button), i.e. home, not able to assess the merits of technological progress, and do not have to delve into the details.
Sudden Bonuses
Even if you do not use the function of opening the door, now it turns out that the controller regularly notifies that someone is scratching at the door of the entrance by means of an intercom. As a curious person, this information is not without interest - and now I receive it regularly.
More importantly, this function continues to work even if you turn off the doorphone tube with its switch. Potentially, this means that there is less chance of leaving the intercom disconnected if it suddenly took a while to eliminate the possibility of his calls.
Unfortunately, the intercom system is such that when it is turned off, it becomes impossible to remotely control the lock (it seems that the central unit considers that in this case the handset is “hung”, regardless of its actual position).
And landscape design
Since I was striving for minimal interference in the interior, I had to decide how to connect to the central controller, assuming that the controller and the intercom are on different sides of the door, and the controller has electricity, but the intercom tube does not.
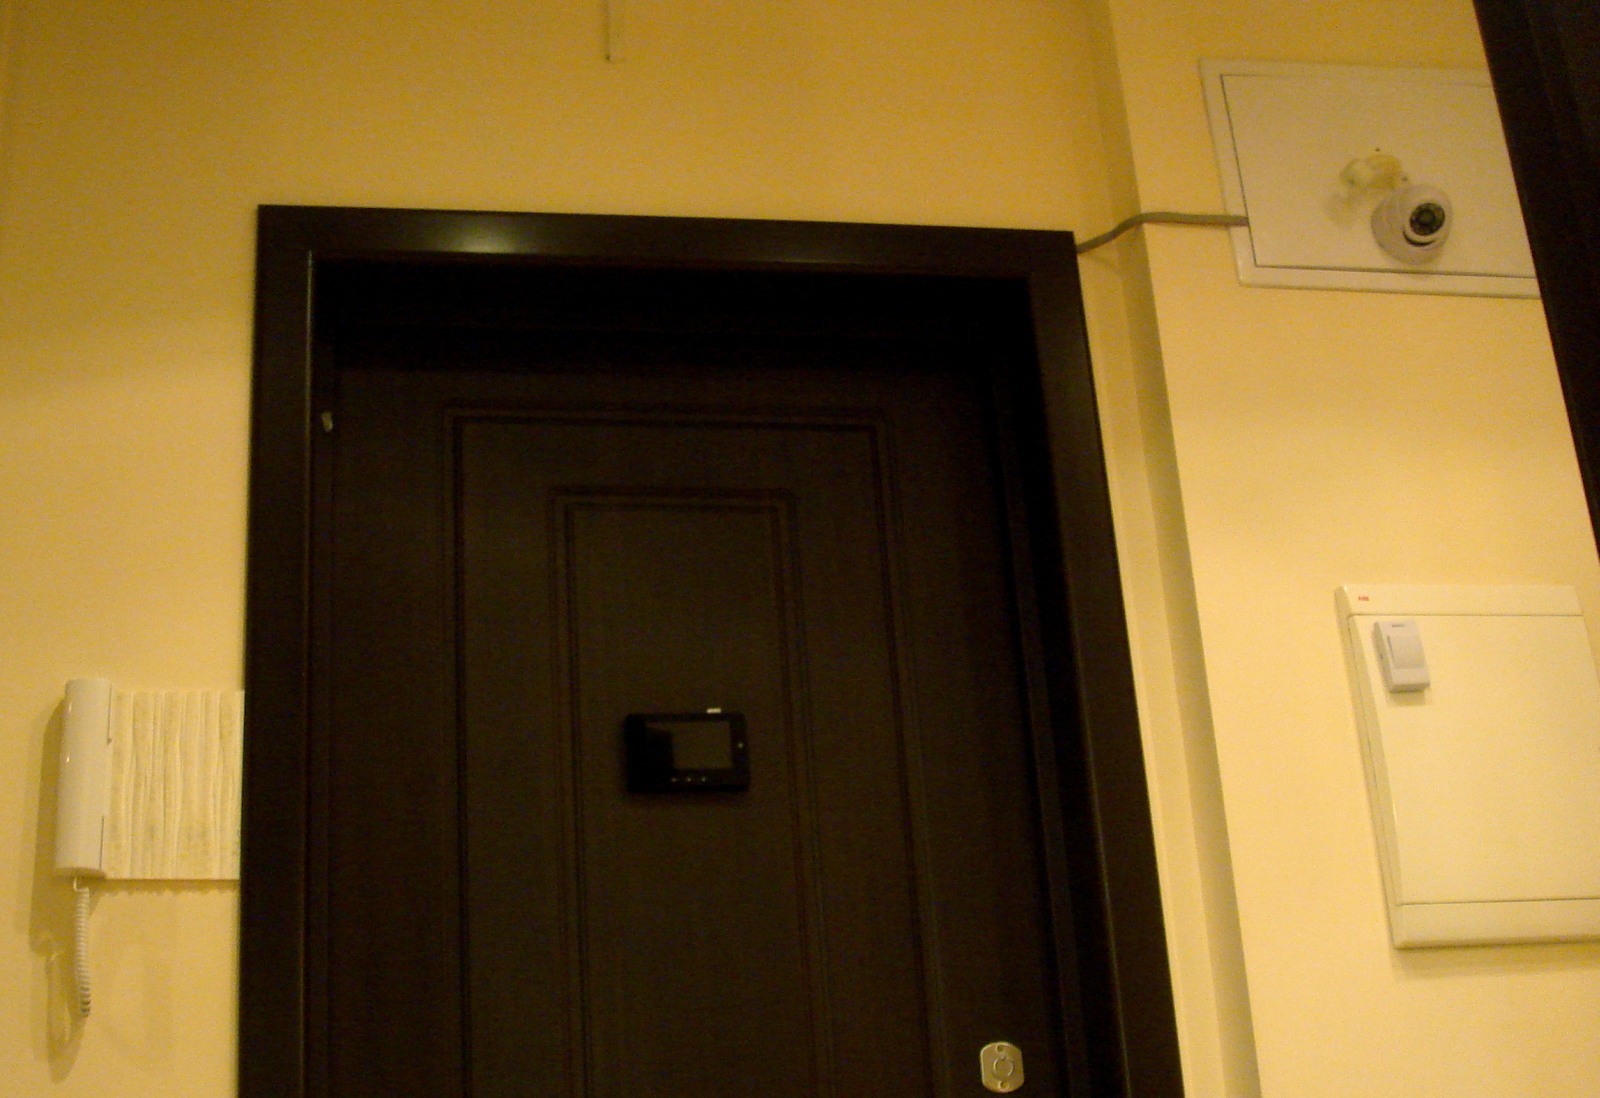
In the end, I decided that stretching the train behind the door frame and closing its fragments with decorative panels printed on a 3D printer would be better than occupying another outlet with a power supply unit, it is not clear how to pull its wire to the doorphone handset and fence the radio channel between the handset and the controller.

And I think that in my conditions this is the best option. Yes, and the relay went into action, but with a radio channel, they would again remain in reserve.
Remapping Nextion
Speaking about the desktop weather display (weather station, if you will), I mentioned that in the process of finishing the case I managed to damage the main component - the Nextion touch screen itself.
The breakdown did not affect the operation of its onboard microcontroller and the display of data, but the touch panel almost failed. However, I found out experimentally that if you don’t even push the Nextion board in a particular place, you can restore the sensitivity of the left (approximately) half of the screen.
This trick is unstable and not always working, but often enough so that I can come to terms with it, thinking about ordering a new screen.
Of course, it made me happy and sad. On the one hand, it was possible to achieve partial performance. On the other hand, I would like to play a little more with the graphs. And then I suddenly realized what a stupid trap I had got: for some reason, I was fixated on using the entire screen area, when I could freely transfer the “non-working” buttons to the work area.
I understand that for many this is a really trite decision. But I would like to share innocent joy with those who, like me, love to go to extremes.
So, I figured in place, slightly changed the size of the buttons, drew a new virtual control scheme in my head and voila! We have almost completely restored functionality of a partially killed display.
It was:

It became:

Along the way, however, I had to kill the perfectionist in myself and redo the original screen for controlling the intercom to the minimum working:

Live
When technical support is "not ale"
It would seem that all these ups and downs could have been completed if it were not for one detail: I suddenly discovered that the intercom (and after all the other automation) stopped being controlled by access from external networks.
That is, all the teams worked flawlessly when connecting to the Internet via the home network and by external addresses (and not by the internal view 192.xxx.xxx.xxx), but just as flawlessly refused to be executed from the networks of other operators (I tried two).
Here we must understand that the commands are transmitted via an HTTP request to a specific external port of the router, and from there they are already being redirected to the necessary internal IP and port.
And this scheme has worked without any problems since its launch in 2013 until something has broken in the current one. And I am still sure that it was not my fault. But I do not know how to check.
Actually, at first I wanted to swear with Beeline, because I initially thought that the problem was in the mobile Internet. But then he took himself in hand, found another provider, tried it and found out that through him the same problem.
Then I called Online and, as I could, explained the essence of the claims. And in response, I was widely explained that:
For the purpose of preventing unauthorized access to subscriber equipment, the operator blocks the following ports in the incoming subscriber traffic:
TCP / 25 - prevention of spam activity;
TCP / 135-139, TCP / 445 and UDP / 135-139 - Securing systems running under MS Windows;
TCP / 23, TCP / 161, UDP / 69 and UDP / 161 - Client protection.
All other ports, including the named ones, are not blocked.
I, in turn, insisted that my port did not fall into this range, b) did not work, as it should be, and c) I did not change anything.
How about a wall of peas.
Well, what to do, then I politely explained that although I understand that my unfortunate 450 rubles a month will not make them, but I’m going to look for such pofigism, let it be the same pofigism, but at least working.
In response, they muttered again that they give me IP, and then all my problems. Well, mine, I decided, it means mine. And with a strong-willed decision, I first checked the performance of the system on another port (shifted by one) - it works. And then I made a flexible configuration of the port number in Tasker, through which, in fact, the steering wheel was automated.
Actually, what I describe my sufferings for: I objectively really wanted to understand who is wrong in such a situation. Because I feel like a complete idiot - and the router rebooted, and checked the settings (moreover, on my own initiative, and not at the prompt of "experts"), and still they sent me far away, hinting at my crooked hands.
Behind the scenes
In conclusion about what I used for the construction of the century:
1) CCVDV-12-2 - 1 pc.
2) Intercom handset Tsifral KM-2NO - 1 pc.
3) Optocoupler 4N35 - 1 pc.
4) Flat cable 10 lived (used six, but put everything - just in case) - 3 m.
5) Cable connectors - 2 pcs. dad and mom
6) Homemade weather display with touch screen Nextion - 1 pc.
7) 433 MHz transmitter ( from a package like this ) to modify the meteodisplay - 1 pc.
8) 1 kΩ resistor for optocoupler - 1 pc.
Options:
Updated interface for Nextion
Test code (before integration with CCVD-12-2 and a full bouquet of service functions, only for understanding the train of thought)
#include <RCSwitch.h> // http://code.google.com/p/rc-switch/ #define ringTimeOut 40000 // 2094 #define openTimeOut 300000 // allowOpen #define handsetPin A3 // 0 #define openPin A4 // (1) #define ringPin 7 // (3) #define ringCode 360500 // #define doorBell 3395840 // #define openCode 255899 // #define openDelay 1500 // #define handsetDelay 2500 // #define txPin 8 unsigned long ringTime, openTime; // boolean ring = false; boolean ringRepeat = false; // boolean allowOpen = false; // RCSwitch mySwitch = RCSwitch(); // void openDoor() { digitalWrite(handsetPin, LOW); delay(handsetDelay); digitalWrite(openPin, LOW); delay(openDelay); digitalWrite(openPin, HIGH); digitalWrite(handsetPin, HIGH); ring = false; // allowOpen = false; // // sendMail(37); // } void setup() { Serial.begin(9600); mySwitch.enableTransmit(txPin); // mySwitch.enableReceive(0); // pinMode(handsetPin, OUTPUT); // pinMode(openPin, OUTPUT); pinMode(ringPin, INPUT_PULLUP ); digitalWrite(handsetPin, HIGH); // digitalWrite(openPin, HIGH); Serial.println("Ready"); } void loop() { if (digitalRead(ringPin) == LOW && ring == false) { // ring = true; // ringTime = millis(); // sendMail(36); // mySwitch.send(ringCode, 24); Serial.println("Sent ringCode"); if (ringRepeat == true) { // mySwitch.send(doorBell, 24); Serial.println("DoorBell repeat"); } Serial.println("Ring-ring!"); } if ((millis() - ringTime) > ringTimeOut && ring == true) { // 40 ( ) ring = false; // Serial.println("Ring reset"); // sendMail(38); // } // if (ring == true && allowOpen == true) { openDoor(); // Serial.println("Door opened via net"); } if (ring == false && allowOpen == true) { // "" if ((millis() - openTime) > openTimeOut) { // allowOpen = false; // sendMail(39); // } } // if (mySwitch.available()) { // int value = mySwitch.getReceivedValue(); if (value != 0) { Serial.println(mySwitch.getReceivedValue()); switch (mySwitch.getReceivedValue()) { case openCode: // if (ring == true) { mySwitch.disableReceive(); openDoor(); // Serial.println("Door opened via radio"); mySwitch.enableReceive(0); // } break; } mySwitch.resetAvailable(); } // } } Pictures for the interface took on the wonderful site Pixabay .
Source: https://habr.com/ru/post/400367/
All Articles