3D printing in radio electronics
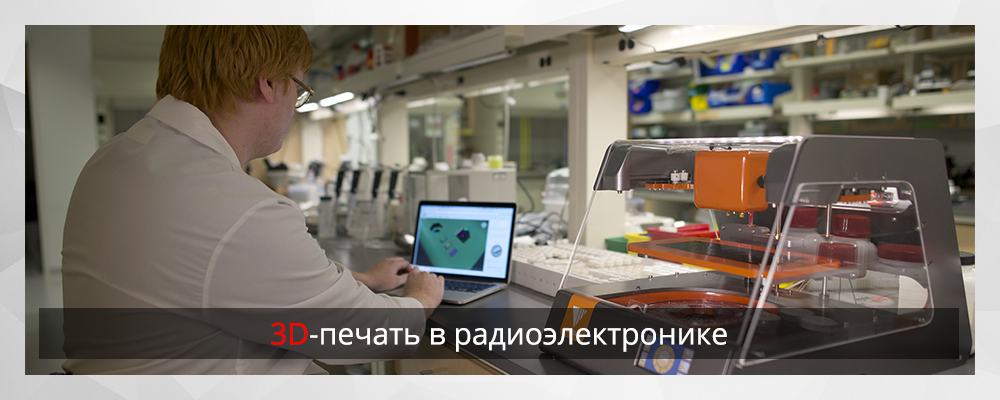
A 3D printer is undoubtedly an excellent device, for many it has become indispensable. But often in search of new uses for 3D printing, people go too far. Let's talk today about the production of printed circuit boards and REA cases using 3D printers.
To begin, consider all the methods for creating printed circuit boards (hereinafter PP).
PP production
Fans of radio electronics often dream of some kind of device for the production of printed circuit boards at home. Of course, there is a great technology “LUT” (laser-iron technology), as well as a classic photoresist. But often laziness with all of this mess, I want someone to do everything for you.
')
And there are several directions for creating PP:
- Remove conductive layer. Milling or scraping the copper fiberglass layer
- Removing the protective layer from the surface of fiberglass
- Photoresist flare
- Applying a protective layer on glass fiber
- Direct printing of conductive and dielectric tracks on the surface of different materials
- Filling cavities with conductive material
Remove conductive layer. Milling or scraping the copper fiberglass layer
This method is the simplest, and even having a very flimsy and cheap mill, is able to cope with this task. Many enthusiasts even put a small engraver on their 3D printers and successfully cut software. (Looking ahead, let's say that a router based on a 3D printer is only capable of milling a PP, nothing more. A milling machine and a 3D printer are different devices, although many manufacturers try to combine them).
» Roland EGX-350
Size of the working field: 305 x 230 x 40 mm; Spindle power: 50 W, 20,000 rpm; Number of axles: 3

The EGX-350 is the most popular of the Roland engraving machines. Due to its compact size, the ability to perform full engraving on non-ferrous metals, a high-speed spindle with a rotation speed of up to 20,000 rpm, and the function of engraving on curved surfaces, the EGX-350 finds applications in various areas from the manufacture of printing clichés, engraving promotional products, creating wax master models in jewelry, as well as applied in mechanical engineering for marking, engraving printed circuit boards and electrodes for electroerrosion and much more.
» Roland EGX-400
Size of the working field: 407 x 305 x 42.5 mm; Spindle power: 72 W, 30,000 rpm; Number of axles: 3

EGX-400 is a professional Roland engraving machine designed specifically for high-speed engraving. Thanks to a high-speed spindle with a rotational speed of up to 30,000 rpm, servo motors across all axes and FFP technology (Feed Forward Processing), the program looks a few steps forward and allows to achieve high speed and smooth movement on curves. Roland EGX-400 is a leader in its class

» Roland EGX-600
Size of the working field: 610 x 407 x 42.5 mm; Spindle power: 70 W, 30,000 rpm; Number of axles: 3
EGX-600 is a powerful and high-precision engraving machine Roland series CAMM-2 PRO with servo drives for professional 2D / 3D engraving and milling at an affordable price. EGX PRO is a series of engraving machines, equipped with advanced industrial technologies with power, table size and speed of professional engraving machines, but at affordable prices. The EGX-600 is equipped with a spindle power of 70 Watts and a rotation speed of 30,000 rpm. EGX-600 machines are ideally suited for the manufacture of high-precision typographic stamping for stamping and stamping. In addition, the machines engrave nameplates, tags, medallions, three-dimensional inscriptions, dashboards, printed circuit boards and much more.
As you can see, the machines are not the cheapest, and few amateur radio operators will be able to afford them. But still the instruction for preparing the scheme for milling in this article is: “ Printed circuit board at home, or how to make a printed circuit board at home using a CNC machine .”
This method is not limited to a single router, you can also use a powerful enough laser to burn tracks, or to scratch tracks with a needle. And also use the method of electro-erosion .
Laser engraving software
The latter method is quite controversial and more suitable for the next method.
Removing the protective layer from the surface of fiberglass
Just the method of removing paint with a needle is demonstrated in this video:
A permanent marker is used as a protective layer, and the machine itself is nothing but a 3D printer.
In the same way, you can use any laser module for burning the upper protective layer, followed by etching.
Photoresist flare
It would seem that this method has been known for a long time and what can you think of a new one? But here, any CNC device comes to the rescue. After all, a laser can not only burn a board or a protective layer, but also illuminate the necessary areas of our board with a photoresist. Here are a few projects for example:

LaserExposer - a laser scan from a printer is used to get the image. if you make quite a bit of it, you can make a good photopolymer 3D printer from this device.

DiyouPCB - in this case, the mechanics and electronics easier. But the same principle is used. The laser diode is taken from the BlueRay drive head.
Applying a protective layer on glass fiber
This method can be called one of the simplest, instead of an engraver, a laser or a printhead, we attach a usual permanent marker and draw our board. Despite the simplicity in this way it is very difficult to dilute the board with thin tracks, all the limitation is in the thickness of the marker rod.
Do not forget about our old friend, the usual inkjet printer for paper, many rework old technique for printing on T-shirts, or printed circuit boards. Read more in the article “ Direct Inkjet Printing of a Printed Circuit Template ”.
Direct printing of conductive and dielectric tracks on the surface of different materials
The closest to the topic of 3D printing is the creation of PP and, in some cases, the shell immediately. Let's start with the most simple devices:
Drawing on the surface of the PCB allows not only to apply a protective layer, but also to “print” conductive.
As you know, graphite is a conductor that allows you to draw a printed circuit board on a sheet of paper. Yes, graphite is not the best conductor and almost certainly such a board will not work, but the pencil can be replaced with a silver ink marker, as it was implemented in Ex1 PCB printer

And coming very close to 3D printers, we want to present you two similar projects:

Voltera : Your Circuit Board Prototyping Machine - a device that is capable of printing with conductive paste or applying solder for baking in the oven.

Voxel8 - this device uses the same principle of applying conductors, but immediately prints the body around them. It turns out some kind of integrated circuit. The company has demonstrated the potential of this technology on the example of printing a small quadcopter. Undoubtedly, this approach may open new horizons for creating complex multidimensional schemes and whole devices, but so far this technique has a number of limitations. For example, a sufficiently large installation and thick, voluminous tracks, you can not use a soldering iron.
By the way, do not discount the conductive plastics, and on a two-saddle printer it is quite possible to print plastic schemes that are quite suitable for training.
Filling cavities with conductive material
And the last method , slightly clumsy, but it has a place to be. It does not allow to receive thin and compact boards, or multilayer. And also completely eliminates the effects of high temperatures, they can not be soldered.
As you can see, a cheap home printer can be quite successfully used to make PP, having converted it into an engraver (laser or milling), or directly print the boards with plastic or paste. It is worth paying your attention to the fact that all of the above methods do not allow to fully produce multi-layer PP, which is a stumbling block for many radio amateurs. We hope that soon this problem will be successfully solved.
Well, this application of 3D printers does not end there.
REA enclosures
If everything is more or less clear with the software, and even without having a fancy device for the automatic creation of boards, you can always return to LUT. That with cases for devices often have problems. Of course, there are standard REA housings, but they are far from always suitable for home-made projects; they need to strictly observe the size of the board and the elements, which is not always convenient. Also, do not forget about the aesthetic side of the issue. In this case, the usual FDM 3D printer perfectly helps us. The only question is whether any printer is suitable for these tasks.
During the preparation of the article, tiger kindly shared his experience. further from his words:
“Once I had the experience to thoroughly get acquainted with this issue. The company was given the task of developing a REA case in the form of a ladybug with the further manufacture of a mold for TPA. As you understand, the task is still, this case should have been similar to a cow, while it was necessary to fit a standard square board inside the case. The modeling process did not take long, but at the stage of creating a prototype, an unexpected problem arose. At that moment, our stratasys dimension broke and had to order a seal on the side. We printed this plastic PLA case with insoluble supports, and a thick layer. I had to put putty and long bring the model by hand.
Then, of course, we printed the rest of the models on the repaired stratasys, and completely finished with the design of the case. In the future, the 3D model went to the factory. where already made the mold.
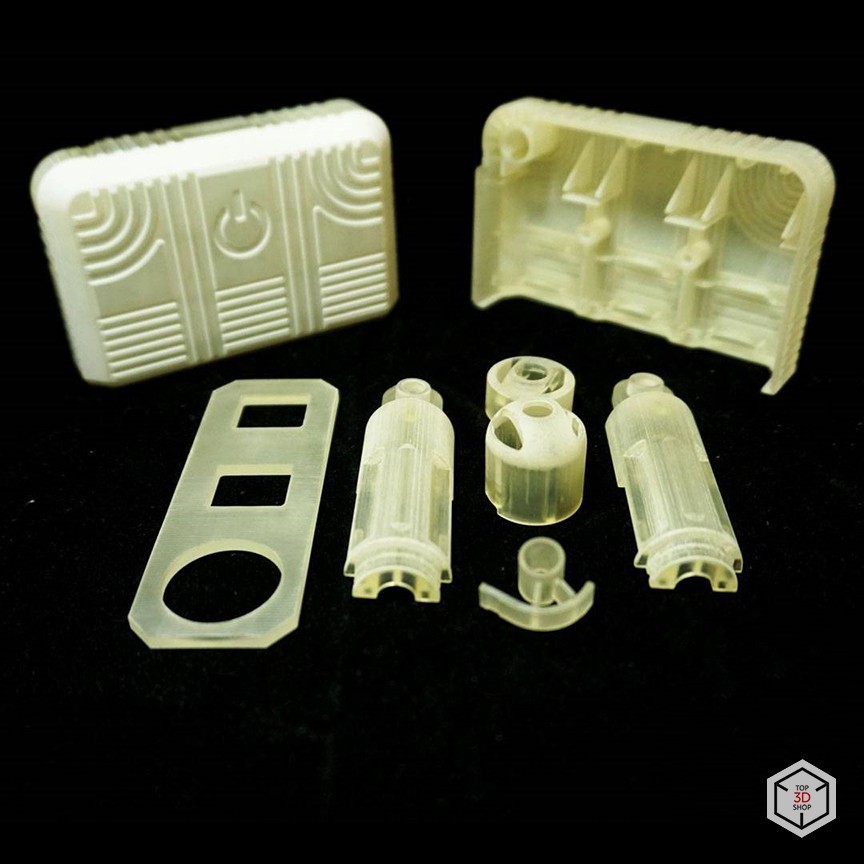
From this story it is clear that not all models of cases are printed without problems, and often printing with soluble supports is simply necessary. For such products, Picaso Designer PRO 250 is ideal.
So for example, this copy of the case is printed on Picaso Designer Pro250 with two materials ABS + HIPS .

You must admit that high-quality printing of such complex engineering parts is practically impossible without soluble support.

A large batch of business card holders, which can also be successfully used as a “third hand” for wires. As you can see, 3D printers are not limited to only cases for REA.

For fans of vaping, a 3d printer can also come in handy when designing self-made boxing mods.

Also you should not forget about such elements of cases as latches, thin partitions, etc. These elements even perfect FDM printers print is not perfect, and they can not withstand the loads that can withstand cast parts. In this case, the situation is saved by SLA printers, for example, the well-known Form 2. And using burnable photopolymers, you can cast the case of your metal product (even precious).

In this picture on the right, the original part from the ligitech headphones, as if we see broken just thin latches. This done was scanned and printed on Formlabs Form2 3D printer.
Do not forget also that the products printed on Formlabs Form2 photopolymer printer practically do not require post-processing, you immediately get a product of unsurpassed quality. This printer allows you to create master models for casting cases without additional processing, as an example the case printed by us in maximum detail:

With subsequent casting in silicone:

And a few more buildings. Not knowing in advance, few people will distinguish these products from the factory.


It is also worth noting that there are different polymers that differ in physical, chemical and optical properties. So we can immediately print some parts of the device transparent.
Want more interesting news from the world of 3D technology?
Subscribe to us in the social. networks:


Source: https://habr.com/ru/post/399179/
All Articles