How to build a racing copter and not get tired
Many are interested in the topic of building multirotor racing quadcopters on the ZMR250 frame, but as soon as you start exploring the topic, you’ll find out just a ton of specific information that can only frighten off newbies, but can’t help.
In this article I would like to share what in my opinion would be the most correct and simplest step to start flying these wild vehicles.
This is a completely separate class of flying vehicles. Their main features include:
')
From an engineering point of view, it is quite simple and provides maximum control to the pilot. It is poorly suited to set records for the range, duration, or altitude of flights. Taking a good bird's eye view from him is very difficult. But you will get a lot of pleasure from the process of piloting and be able to shoot dizzying videos!
On the set of specific iron each experienced pilot will have his own opinion. Ram, speed controllers, engines, flight controllers, radio control equipment, batteries, etc. a great many and everyone will advise you something of their own.
I sincerely believe that than to understand all these opinions, it is easier to buy a ready-made set and you will get 80% of what advanced pilots have! Reflecting this way, I climbed on aliexpress and purchased the cheapest set of accessories I could find.
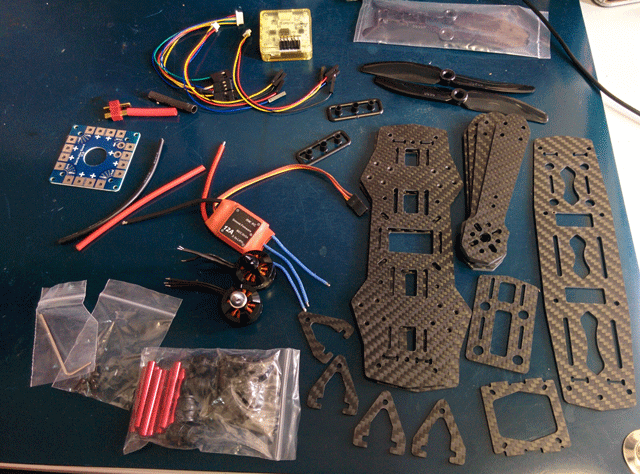
Essentially, it has everything that is needed for construction, with the exception of batteries and radio control equipment. That is, for the money you get a frame, a set of engine controllers, the engines themselves, the flight controller and some more trivia.
Total $ 70.
For the copter will require LiPo-batteries. The engines from my set do not consume much and I decided to fly those that I already had - 2200mAh, 3S, 20-30C. If you already have these batteries, you can not buy others. If you do not have any, then on aliexpress it will be difficult to buy them, but you can. I would recommend purchasing batteries from trusted suppliers. For example, such . They are better to take two.
They need a specialized charger. The most popular - iMAX B6 . Please note that it is not powered from the network, but from a 12V power supply. You will also need an inexpensive tester to monitor the condition of the batteries.
Total $ 54. Once again I remind you that the batteries can be used for other purposes.
Again, if you have no suitable equipment, then it makes sense to take the kit, which immediately includes the transmitter. For example, like this for $ 109.
If you still want to buy the RU system separately, then the most minimal option is probably FlySky for $ 44. We use one of the most common, but more expensive Turnigy 9x remotes, which costs about $ 70 + shipping.
Very short, but important point. They will break all the time, almost every beautiful, which will be many. For the first flights, I would buy just five sets of the cheapest screws for $ 2.2.
In the end, if you had nothing before, the minimum investment, about $ 175. I am sure that this is a great start to start mastering the subject of racing Copters as a whole.
There is nothing difficult in this and even a person with minimal soldering skills will be able to cope.
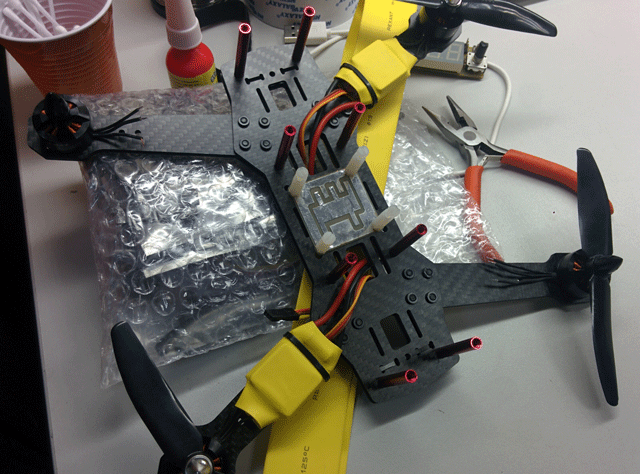
At the first stage, the frame is assembled, engines and speed controllers are installed. This is how it should end up:

The most important thing that can be seen in this photo is that the left front and right rear engine must rotate clockwise (they will be marked with black screws for clamping screws). The right front and left rear engines should rotate counterclockwise and they will have a silver nut. In these nuts, by the way, the thread direction prevents them from unwinding.
Now let's talk more about connecting engines.
You can do all this in a simple way, by joining the wires of the motors and the course controllers (ESC), but we decided to shorten them. To do this, first remove the heat shrinkage from all regulators.
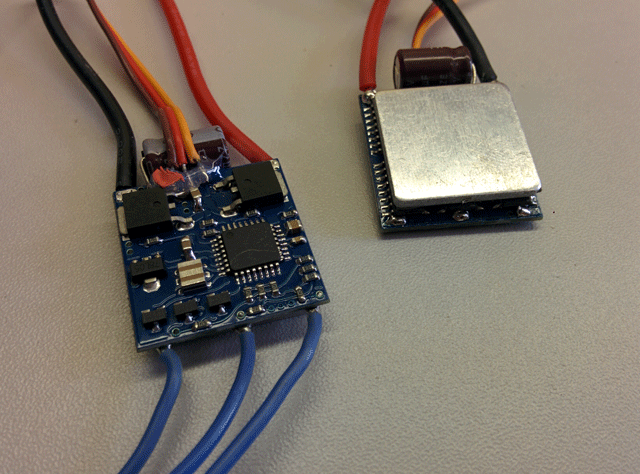
On one side is the controller itself, and on the other side are keys with a radiator. We soldered the standard wires, cut off the wires of the engines to the desired length and then soldered them to the board.

At this point, you need to check that the connected engine is really spinning in the right direction. Here's how to do it:
After the engine is tested, you can put a shrink tube on the speed controller.
Please note that we did not use the included power distribution board. We had a thin foil fiberglass laminate in stock, from which we etched a simple switching board.

On this board, all positive and negative wires of the speed controller should be connected to the positive and negative wires of the battery connector, respectively. This fee must be isolated and we did it with ordinary nail polish:

The receiver of our equipment is quite large:

We decided to remove the case from it, unsolder old wires from it and solder the wires from the engine directly to the board. In the first steps it is easier not to do this in order to prevent unnecessary mistakes. Now we are ready to install a flight controller and connect speed controllers with receivers to it. When installing it, pay attention to the arrow indicating the direction "forward".

The order of connecting channels to the receiver does not matter, it can (and should) be specified later, when setting up. It is only important to properly connect the power to the receiver. Complete with flight controllers attached cable with a connector for the receiver. In this cable, the first wire should be black and should be connected to the receiver's power supply minus. The second cable is red and must be connected with the receiver's power supply. The remaining wires simply connect in order to all channels of the receiver (at least the first four).
Before connecting the regulators it is necessary to do one more. These regulators are equipped with stabilizers for powering the flight controller and do not need to connect all of them at once. It is necessary to choose one and leave its connector to the controller unchanged, and on all others remove the middle wire and isolate it. See how it is done in the photo above.
Speed controllers are very easy to connect. Left front to the first channel (the leftmost connector in the photo), and then clockwise: right front to the second, right rear to the third and left rear to the fourth.
Now all the necessary elements are collected together:

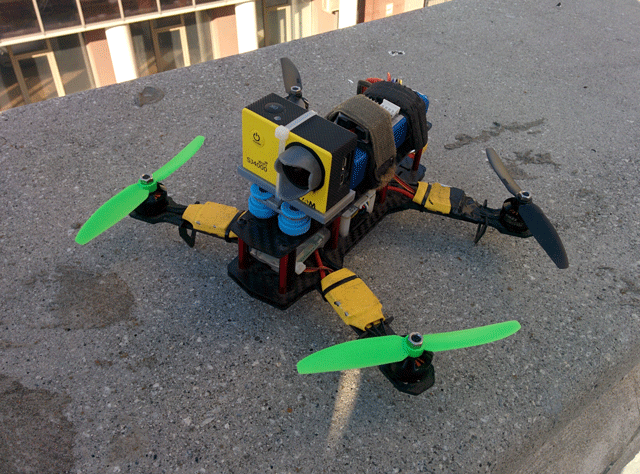
It remains only to put on the top cover. We immediately printed out the camera holder for our SJ4000. Silicone dampers should definitely be duplicated with clamps, otherwise the camera will fly off the copter if it falls.

To configure CC3D, use Libre Pilot ( download ). In general, setting up a truly complex and lengthy process, which in the future will take a very long time and this will continue with the growth of your skills.
On the other hand, at the initial stage, when you do not have any skills, it is enough to go through the steps of the Setup Wizard and you can already fly! I will not give here the whole comic with windows, but if you want you can find it here .
I must say that it is very difficult to fly and it will take many hours of training. The flight time is very small, it is very difficult to keep it in place, but this does not spoil the sensation of control! Even such an inexpensive copter is very fast and sharp. In addition, it is much easier to take with you, for example, to nature.
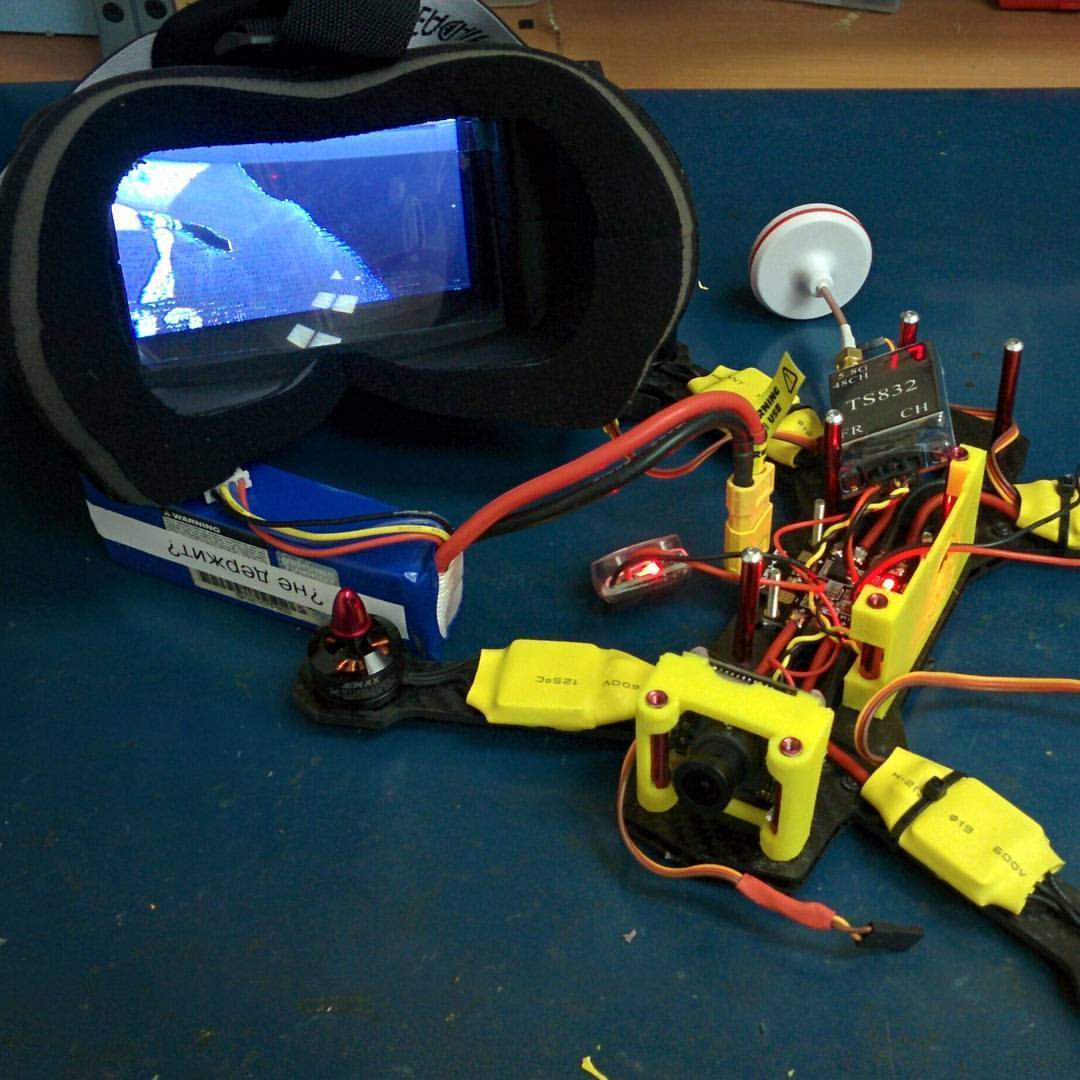
I must admit that after the first few flights it becomes clear that it is best suited for flying in the first person. The FPV system will not only be limited to the zone of visibility and will greatly add sharpness to your flights. But the pleasure is expensive.
It is required to transfer a decent distance with minimal delays. At the same time, the resolution is not so important, because the copter can easily carry the main recording camera as well. Such a system consists of a camera, OSD (a module that mixes telemetry with a video signal), a transmitter, a receiver and a monitor. Which of these blocks can, of course, be combined. I bought a kit that cost me about $ 100. But I think that you should not immediately buy an FPV system at the first stage.
Copters of this class are generally very exciting, both in terms of flights and in terms of construction. Constantly we have to solve small simple tasks related to the selection of components, weight reduction, tuning, etc. A great way to while away the long home evenings and a great reason to get out into nature!
PS: as far as I know, in my city of Yekaterinburg, only I and another person have a similar apparatus. I would be very interested to find like-minded people for joint trips!)
In this article I would like to share what in my opinion would be the most correct and simplest step to start flying these wild vehicles.
What is racing quadrocopters
This is a completely separate class of flying vehicles. Their main features include:
')
- Small sizes. The name ZMR250 means that the diagonal size of the device is 250mm. Weight without battery and cameras usually does not exceed 400 grams
- Minimum active stabilization
- Aiming at aggressive management and constant movement, not hovering in place
- Can carry FPV equipment and a writing action camera.
- Robust multi-drop design
From an engineering point of view, it is quite simple and provides maximum control to the pilot. It is poorly suited to set records for the range, duration, or altitude of flights. Taking a good bird's eye view from him is very difficult. But you will get a lot of pleasure from the process of piloting and be able to shoot dizzying videos!
What is required for construction
Ready set
On the set of specific iron each experienced pilot will have his own opinion. Ram, speed controllers, engines, flight controllers, radio control equipment, batteries, etc. a great many and everyone will advise you something of their own.
I sincerely believe that than to understand all these opinions, it is easier to buy a ready-made set and you will get 80% of what advanced pilots have! Reflecting this way, I climbed on aliexpress and purchased the cheapest set of accessories I could find.
Essentially, it has everything that is needed for construction, with the exception of batteries and radio control equipment. That is, for the money you get a frame, a set of engine controllers, the engines themselves, the flight controller and some more trivia.
Total $ 70.
Battery Farm
For the copter will require LiPo-batteries. The engines from my set do not consume much and I decided to fly those that I already had - 2200mAh, 3S, 20-30C. If you already have these batteries, you can not buy others. If you do not have any, then on aliexpress it will be difficult to buy them, but you can. I would recommend purchasing batteries from trusted suppliers. For example, such . They are better to take two.
They need a specialized charger. The most popular - iMAX B6 . Please note that it is not powered from the network, but from a 12V power supply. You will also need an inexpensive tester to monitor the condition of the batteries.
Total $ 54. Once again I remind you that the batteries can be used for other purposes.
Radio control equipment
Again, if you have no suitable equipment, then it makes sense to take the kit, which immediately includes the transmitter. For example, like this for $ 109.
If you still want to buy the RU system separately, then the most minimal option is probably FlySky for $ 44. We use one of the most common, but more expensive Turnigy 9x remotes, which costs about $ 70 + shipping.
Screws
Very short, but important point. They will break all the time, almost every beautiful, which will be many. For the first flights, I would buy just five sets of the cheapest screws for $ 2.2.
Total
In the end, if you had nothing before, the minimum investment, about $ 175. I am sure that this is a great start to start mastering the subject of racing Copters as a whole.
Copter assembly
There is nothing difficult in this and even a person with minimal soldering skills will be able to cope.
At the first stage, the frame is assembled, engines and speed controllers are installed. This is how it should end up:
The most important thing that can be seen in this photo is that the left front and right rear engine must rotate clockwise (they will be marked with black screws for clamping screws). The right front and left rear engines should rotate counterclockwise and they will have a silver nut. In these nuts, by the way, the thread direction prevents them from unwinding.
Now let's talk more about connecting engines.
You can do all this in a simple way, by joining the wires of the motors and the course controllers (ESC), but we decided to shorten them. To do this, first remove the heat shrinkage from all regulators.
On one side is the controller itself, and on the other side are keys with a radiator. We soldered the standard wires, cut off the wires of the engines to the desired length and then soldered them to the board.
At this point, you need to check that the connected engine is really spinning in the right direction. Here's how to do it:
- Remove the screw from the engine if it has been installed!
- The frame conducts current, so insulate ESC from the frame.
- Connect the speed regulator to the gas channel of the receiver of the RU system and turn on the remote control
Lower the gas stick to the bottom position. - Connect the power ESC, observing the polarity
- Gradually add gas until the engine starts spinning.
- If the engine turns in the wrong direction, then you need to swap any two wires of the engine
After the engine is tested, you can put a shrink tube on the speed controller.
Please note that we did not use the included power distribution board. We had a thin foil fiberglass laminate in stock, from which we etched a simple switching board.
On this board, all positive and negative wires of the speed controller should be connected to the positive and negative wires of the battery connector, respectively. This fee must be isolated and we did it with ordinary nail polish:
The receiver of our equipment is quite large:
We decided to remove the case from it, unsolder old wires from it and solder the wires from the engine directly to the board. In the first steps it is easier not to do this in order to prevent unnecessary mistakes. Now we are ready to install a flight controller and connect speed controllers with receivers to it. When installing it, pay attention to the arrow indicating the direction "forward".
The order of connecting channels to the receiver does not matter, it can (and should) be specified later, when setting up. It is only important to properly connect the power to the receiver. Complete with flight controllers attached cable with a connector for the receiver. In this cable, the first wire should be black and should be connected to the receiver's power supply minus. The second cable is red and must be connected with the receiver's power supply. The remaining wires simply connect in order to all channels of the receiver (at least the first four).
Before connecting the regulators it is necessary to do one more. These regulators are equipped with stabilizers for powering the flight controller and do not need to connect all of them at once. It is necessary to choose one and leave its connector to the controller unchanged, and on all others remove the middle wire and isolate it. See how it is done in the photo above.
Speed controllers are very easy to connect. Left front to the first channel (the leftmost connector in the photo), and then clockwise: right front to the second, right rear to the third and left rear to the fourth.
Now all the necessary elements are collected together:
It remains only to put on the top cover. We immediately printed out the camera holder for our SJ4000. Silicone dampers should definitely be duplicated with clamps, otherwise the camera will fly off the copter if it falls.
Customization
To configure CC3D, use Libre Pilot ( download ). In general, setting up a truly complex and lengthy process, which in the future will take a very long time and this will continue with the growth of your skills.
On the other hand, at the initial stage, when you do not have any skills, it is enough to go through the steps of the Setup Wizard and you can already fly! I will not give here the whole comic with windows, but if you want you can find it here .
Flying
I must say that it is very difficult to fly and it will take many hours of training. The flight time is very small, it is very difficult to keep it in place, but this does not spoil the sensation of control! Even such an inexpensive copter is very fast and sharp. In addition, it is much easier to take with you, for example, to nature.
FPV and improvements
I must admit that after the first few flights it becomes clear that it is best suited for flying in the first person. The FPV system will not only be limited to the zone of visibility and will greatly add sharpness to your flights. But the pleasure is expensive.
It is required to transfer a decent distance with minimal delays. At the same time, the resolution is not so important, because the copter can easily carry the main recording camera as well. Such a system consists of a camera, OSD (a module that mixes telemetry with a video signal), a transmitter, a receiver and a monitor. Which of these blocks can, of course, be combined. I bought a kit that cost me about $ 100. But I think that you should not immediately buy an FPV system at the first stage.
Copters of this class are generally very exciting, both in terms of flights and in terms of construction. Constantly we have to solve small simple tasks related to the selection of components, weight reduction, tuning, etc. A great way to while away the long home evenings and a great reason to get out into nature!
PS: as far as I know, in my city of Yekaterinburg, only I and another person have a similar apparatus. I would be very interested to find like-minded people for joint trips!)
Source: https://habr.com/ru/post/398997/
All Articles