Tiny, productive and roomy - we assemble a PC with our own hands
Hello, dear friends! It has long dreamed of two things - a miniature, quiet PC and do something with your own hands. This publication focuses on the process and the result of combining these two wishes.
Render to attract attention
Attention! Under the cut a lot of pictures!
It all started with the search for miniature PCs, which would provide quite ample opportunities for upgrading and replacing failed components, supported the installation of 3 or more drives. Such an approach to the issue immediately swept away virtually the entire range of nettops.
Great hopes were given to the development of the form factor Thin Mini ITX (STX was not yet announced at that time, and even now it has not gained much popularity). Very impressed with the project DNK-H from LUNA Design. I even almost turned from the chosen path, discarding all the requirements, thinking about "buy or not buy." But in the end, the history of the development of the DNK-H even served as an inspiration to design and implement such a PC on your own.
')
To get started, I purchased the components:
It remains to solve the issue with the cooling system. There was no particular desire to use very tiny models with non-standard fans, which you can not replace in case of anything. More versatile options have already grown in size and significantly pressed on my perception of miniature. And all of them, one way or another, left quite a lot of empty space around them, which was also not pleasant. So you need to improvise and experiment!
My research and reflections on the compact CO prompted me to think that the radiator using flat heat pipes (hereinafter TT) would be taken out beyond the front edge of the board. A low-profile 120mm fan should be placed above the board itself - for this, ID-COOLING 12015 was ordered, the role of which is to inject air into the case while blowing most of the components on the board. The hull should structurally ensure the removal of air mainly through the radiator plates.
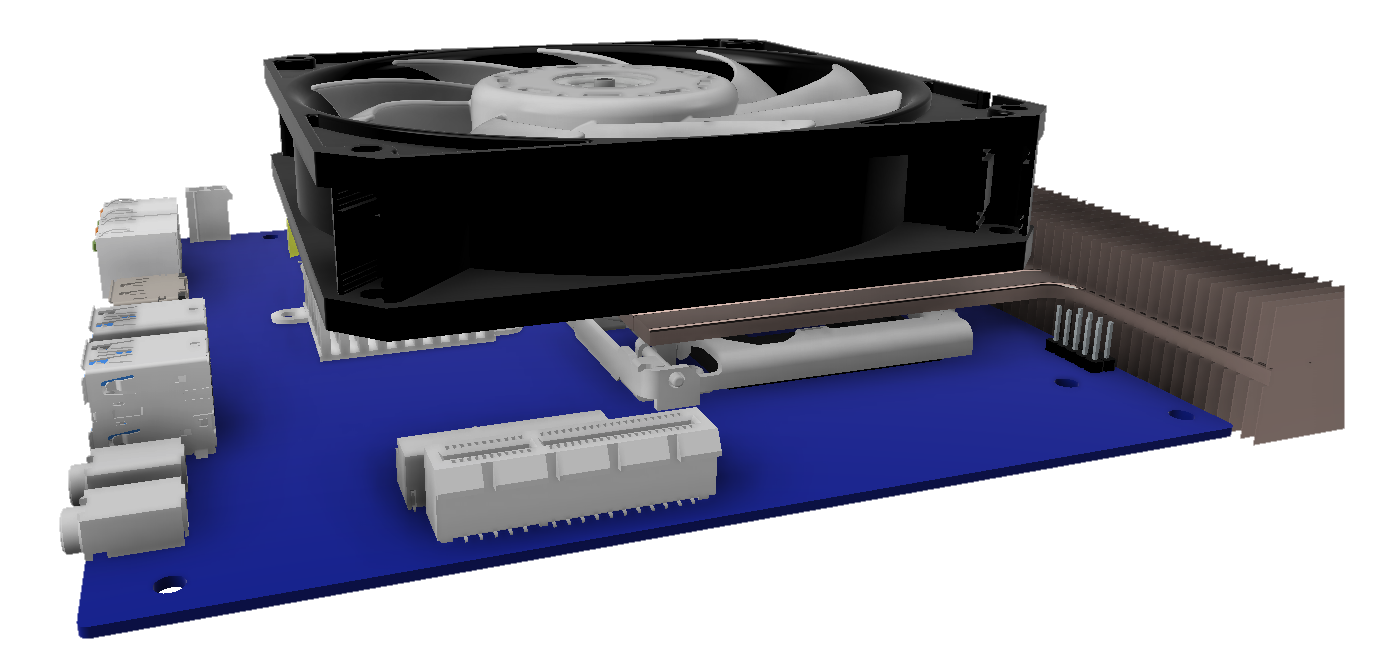
Sketch of the cooling system
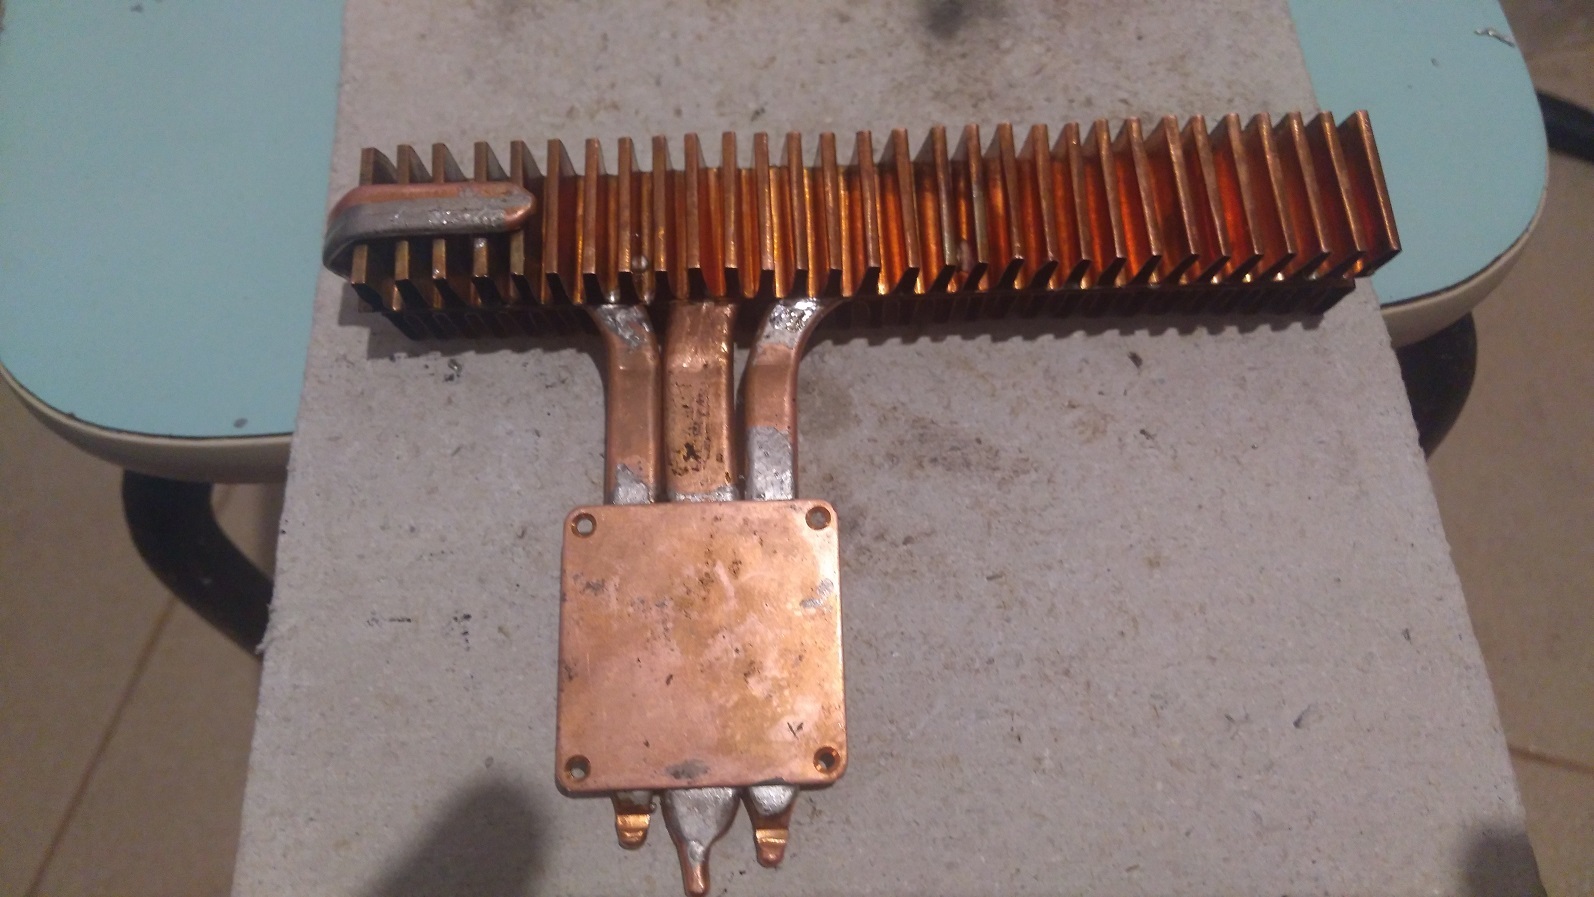
The end result of torment
For the clamp to the processor, the backplane, which was so well placed in the bins, and the brass racks fit perfectly.
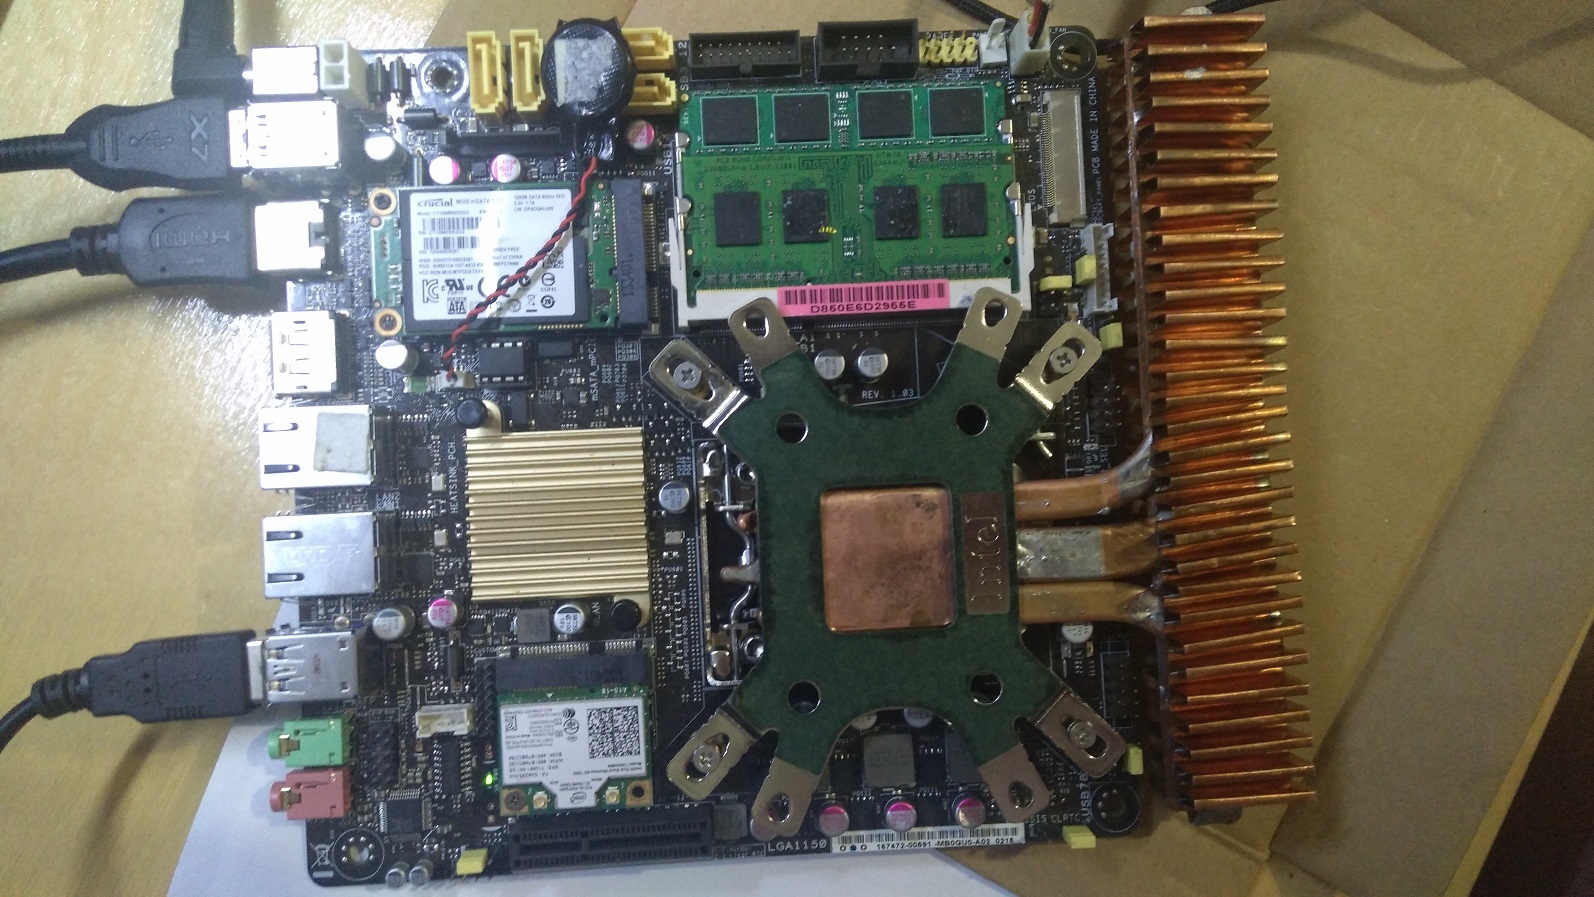
Radiator mount
Run tests LinX showed a temperature of 60 degrees while blowing the usual “hundred twelve” at maximum speed.
Not the ultimate dream for such a low-power pebble, but with this you can continue to work and begin designing a housing to accommodate components. When developing, I took into account a set of cutters with the help of which parts will be cut from a sheet of fiberglass plastic on a CNC machine - 1.5mm, 2mm and 3.125mm.
The result was a box with dimensions of 185mm (W) * 201mm (D) * 55mm (H). Anyone can view and download the 3D-model according to the LINK .
3D model of the case
Parts were made according to the drawing. After that there was a minimum file completion, gluing them, gluing nuts and magnets, puttying and coating with aerosol acrylic paint and varnish.
And finally, the final chapter of my story - the installation of components inside the case!
Kid at work. Looks like a picture from a hat?
Short video review by numerous requests
I am quite satisfied with the result - especially the silence of the work pleased me. Even at night you have to listen to distinguish any signs of work (only HDD is heard). But not without a pair of spoons of tar:
I was glad to share with the readers the results of my work. I am pleased to answer questions, listen to suggestions and criticism!
Update: Added a short video review and test results when the fan is reversed as well as when installing a dust filter.
Render to attract attention
Attention! Under the cut a lot of pictures!
It all started with the search for miniature PCs, which would provide quite ample opportunities for upgrading and replacing failed components, supported the installation of 3 or more drives. Such an approach to the issue immediately swept away virtually the entire range of nettops.
Great hopes were given to the development of the form factor Thin Mini ITX (STX was not yet announced at that time, and even now it has not gained much popularity). Very impressed with the project DNK-H from LUNA Design. I even almost turned from the chosen path, discarding all the requirements, thinking about "buy or not buy." But in the end, the history of the development of the DNK-H even served as an inspiration to design and implement such a PC on your own.
')
To get started, I purchased the components:
- MP Asus Q87T
- CPU Core I3 4150T
- RAM 2 * 4GB Crucial DDR3L SO-DIMM PC-12800
- Intel Dual-Band Wireless-AC 7260 Wi-Fi / BT Module
- SSD mSATA 120GB Crucial M500
- HDD 2.5` Seagate Momentus 500GB
It remains to solve the issue with the cooling system. There was no particular desire to use very tiny models with non-standard fans, which you can not replace in case of anything. More versatile options have already grown in size and significantly pressed on my perception of miniature. And all of them, one way or another, left quite a lot of empty space around them, which was also not pleasant. So you need to improvise and experiment!
My research and reflections on the compact CO prompted me to think that the radiator using flat heat pipes (hereinafter TT) would be taken out beyond the front edge of the board. A low-profile 120mm fan should be placed above the board itself - for this, ID-COOLING 12015 was ordered, the role of which is to inject air into the case while blowing most of the components on the board. The hull should structurally ensure the removal of air mainly through the radiator plates.
Sketch of the cooling system
Making a radiator
For the manufacture of the radiator I needed:
The process in pictures:
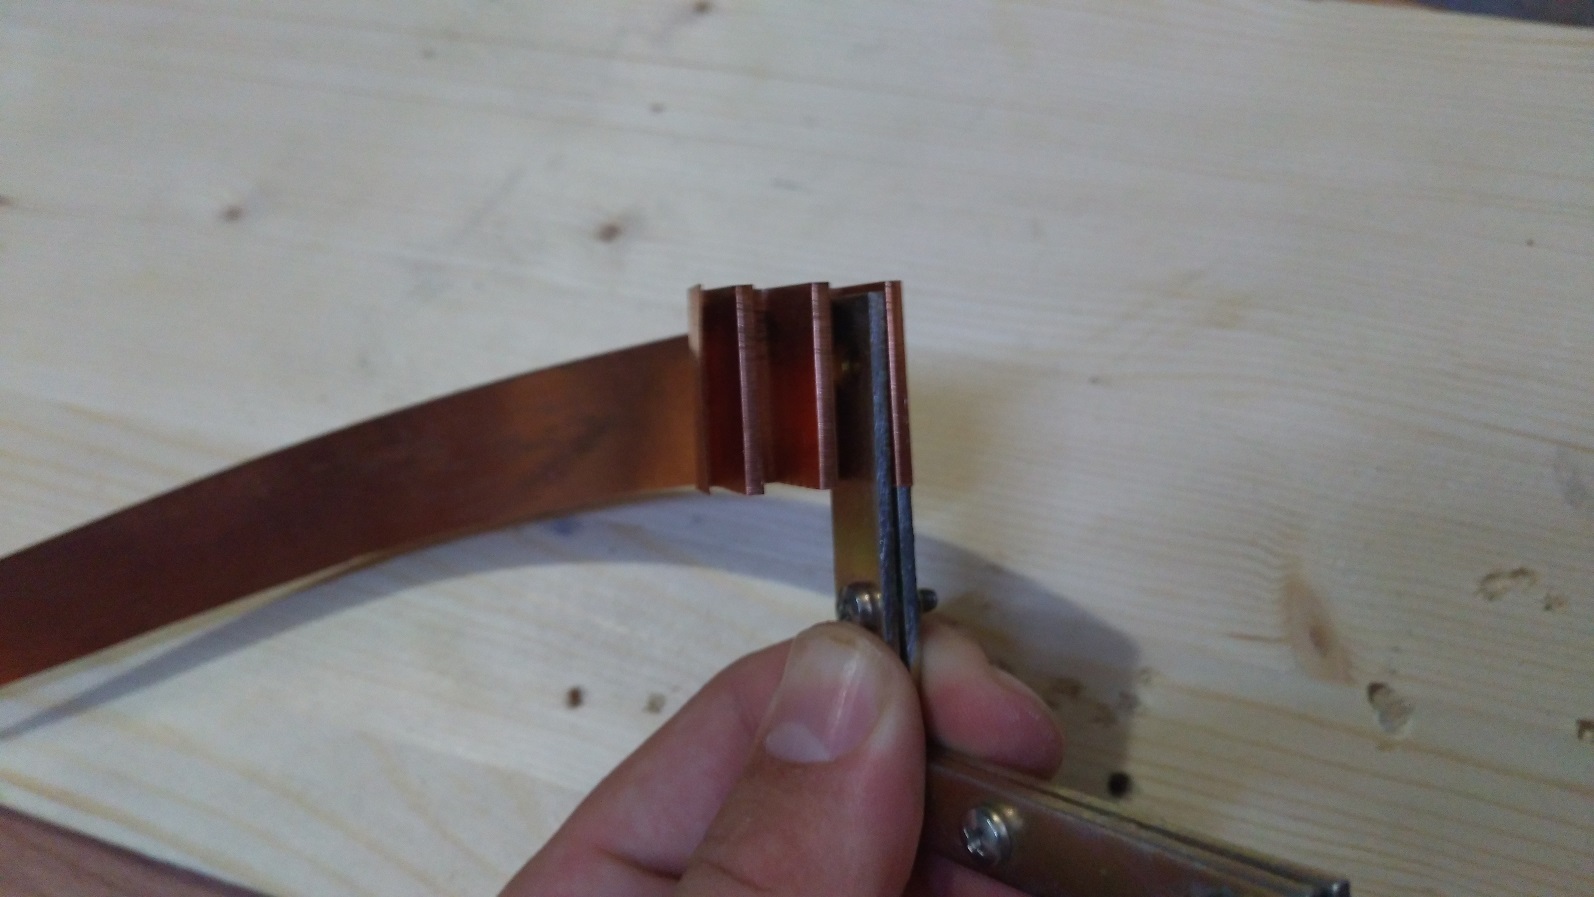
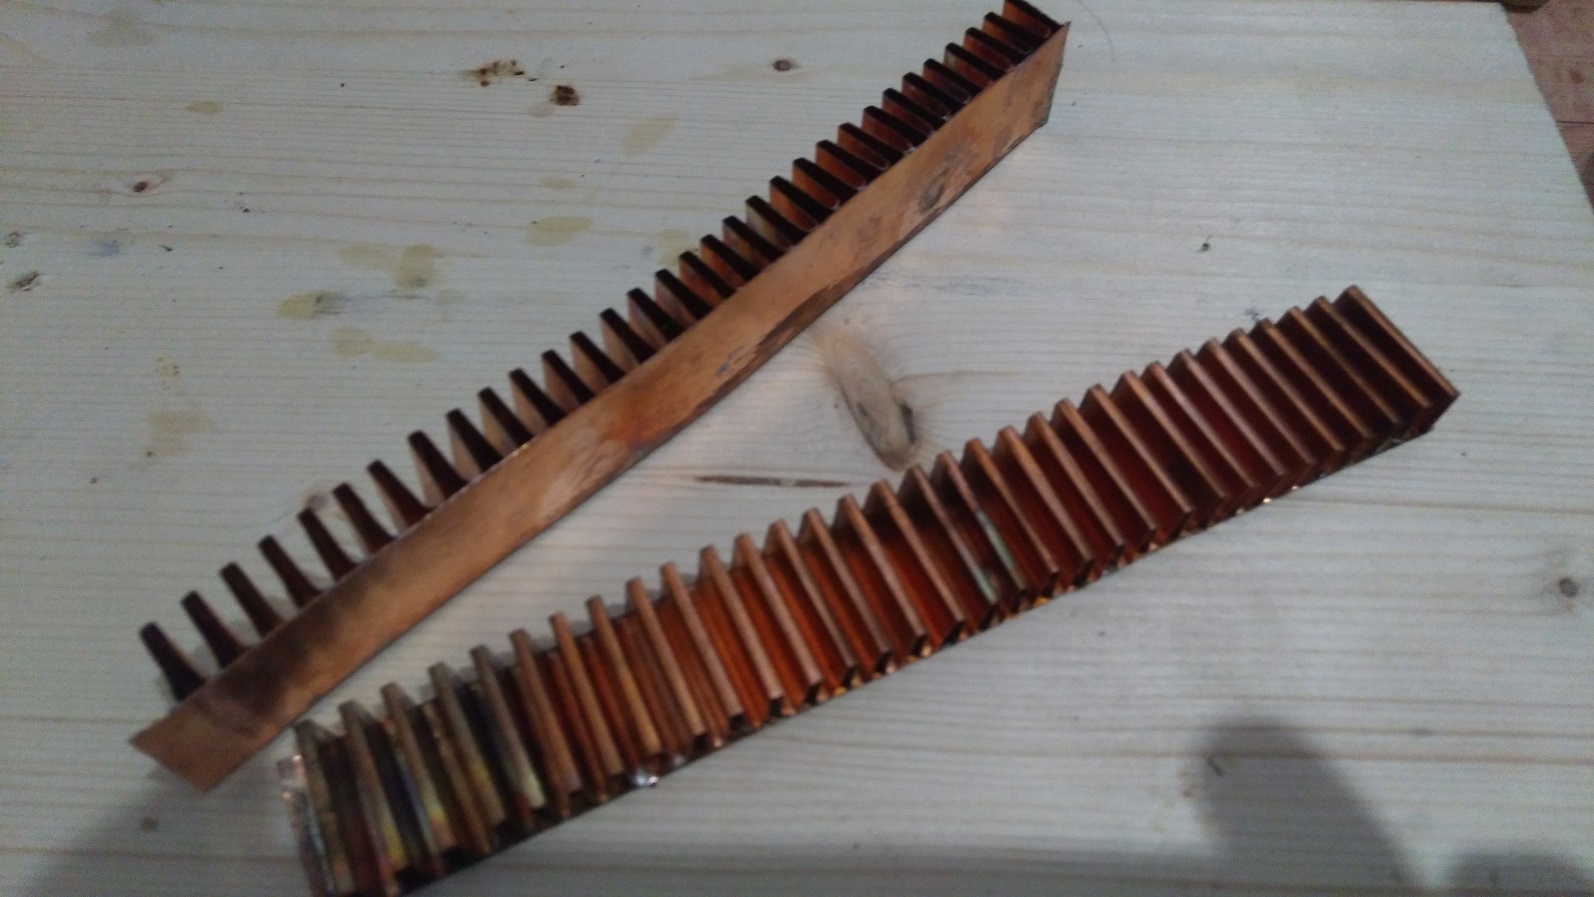
With the help of furniture corners joined together from a copper tape, he made a kind of accordion - future radiator fins
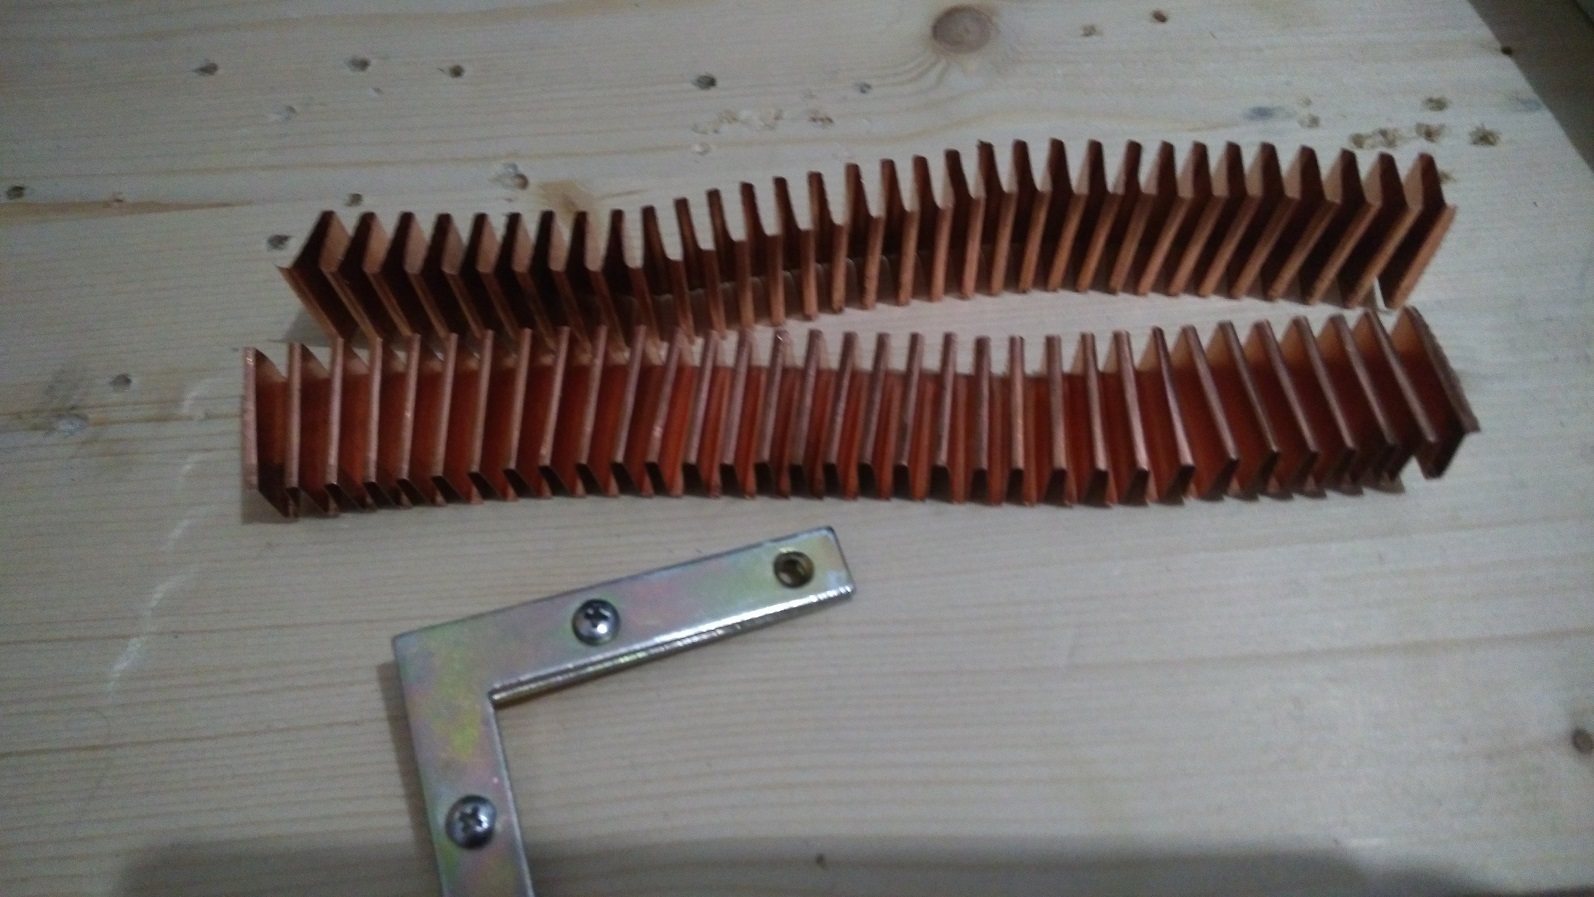
Ready harmonicas
For fixation, segments of copper tape were soldered to the obtained accordions from the tape with POS-61 solder. In the future, it simplified the soldering with the TT
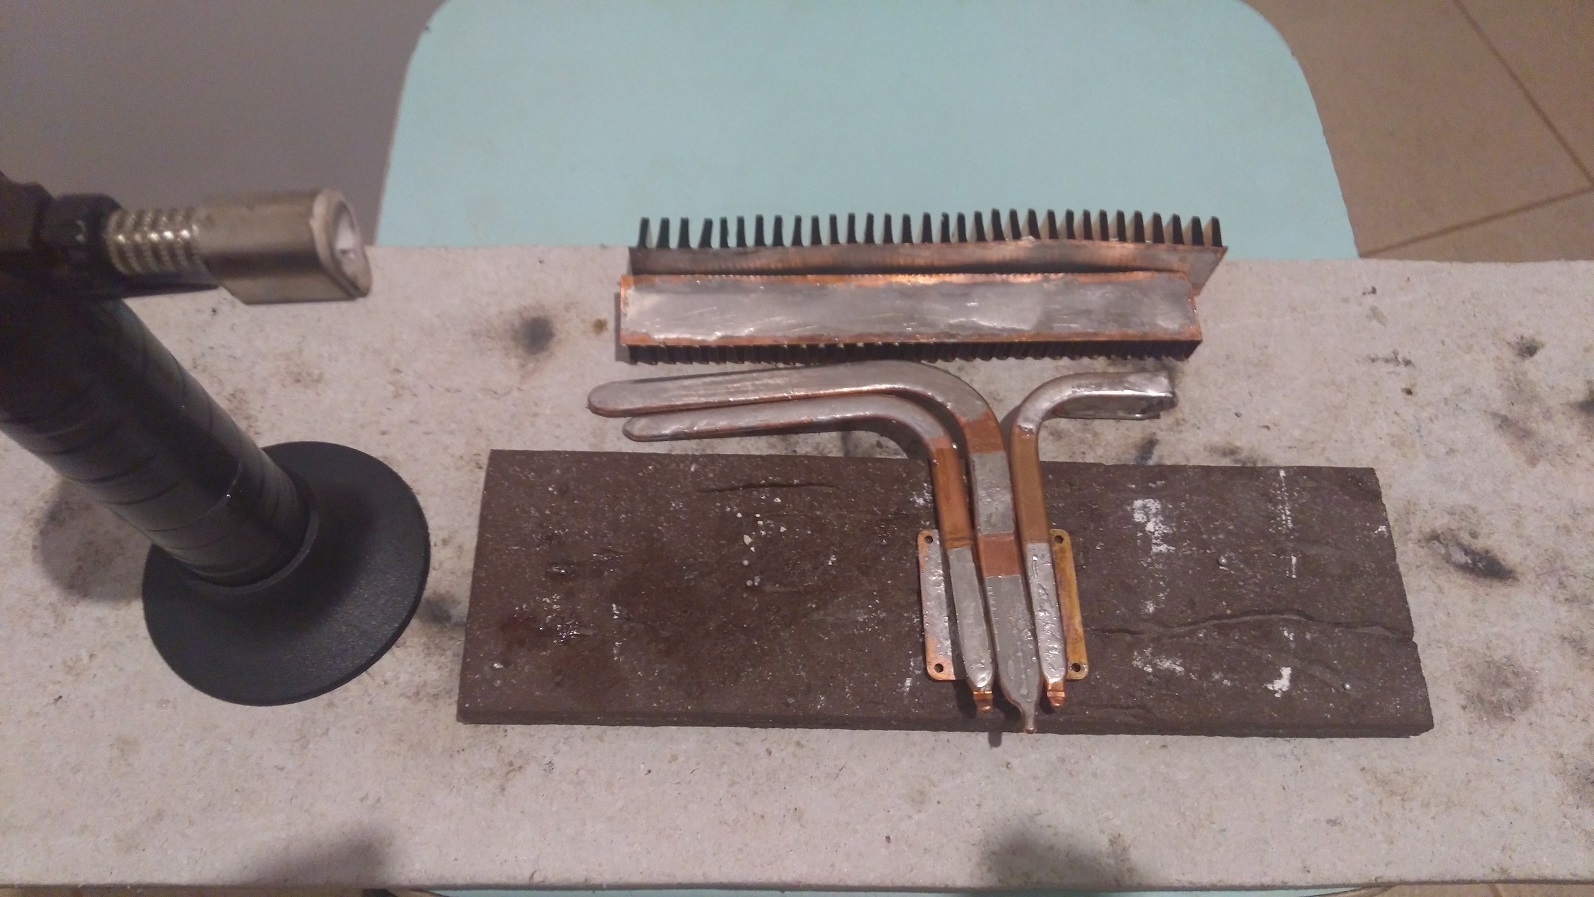
Abundant tinning of all components of the radiator with Rosa solder. And the photo shows that one of the TT had to bend
Fixing TT and soldering the heat sink

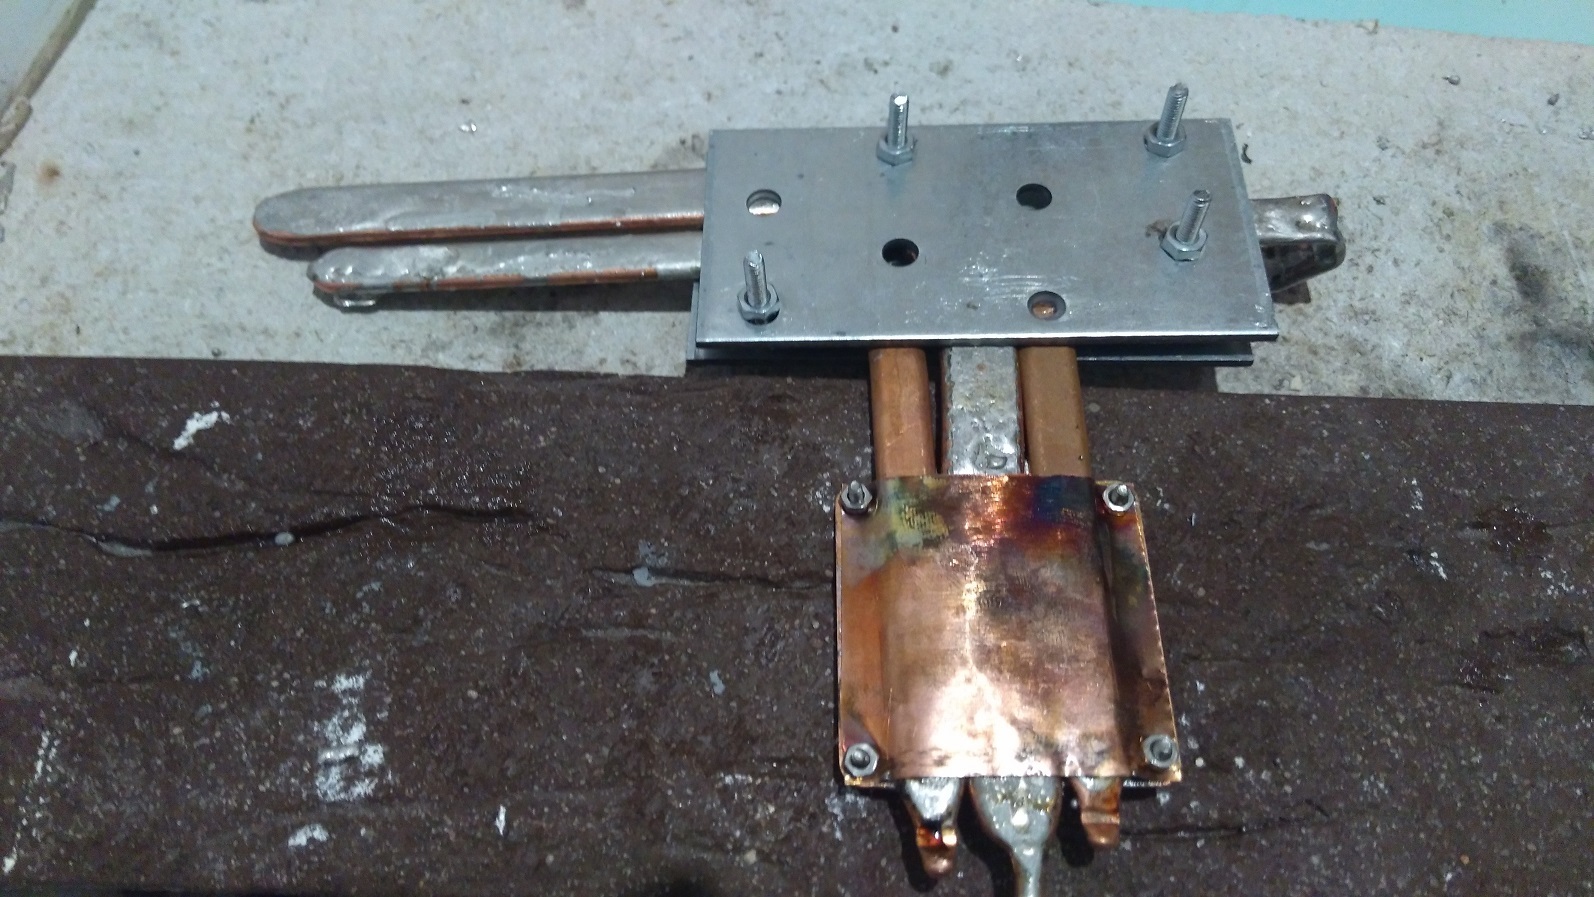
The soldering of the ribs to the TT on both sides in several passes of the following actions: steel plates are twisted with screws, and then everything is heated by a torch until the solder melts
- Copper tape 0.25mm thick and 25mm wide
- TT from laptop cooling systems - having made a series of raids on thrift shops and repair shops, assembled a small collection of radiators, from which I needed to drop the tubes
- Solders POS-61 and Rosa
- Copper plate for the heat sink - used one of the plates from the extracted laptop radiators
- Tools and auxiliary materials: gas burner, furniture corners 1 cm wide, connecting steel plates from the building shop, a strip of silicone
The process in pictures:
With the help of furniture corners joined together from a copper tape, he made a kind of accordion - future radiator fins
Ready harmonicas
For fixation, segments of copper tape were soldered to the obtained accordions from the tape with POS-61 solder. In the future, it simplified the soldering with the TT
Abundant tinning of all components of the radiator with Rosa solder. And the photo shows that one of the TT had to bend
Fixing TT and soldering the heat sink
The soldering of the ribs to the TT on both sides in several passes of the following actions: steel plates are twisted with screws, and then everything is heated by a torch until the solder melts
The end result of torment
For the clamp to the processor, the backplane, which was so well placed in the bins, and the brass racks fit perfectly.
Radiator mount
Run tests LinX showed a temperature of 60 degrees while blowing the usual “hundred twelve” at maximum speed.
Not the ultimate dream for such a low-power pebble, but with this you can continue to work and begin designing a housing to accommodate components. When developing, I took into account a set of cutters with the help of which parts will be cut from a sheet of fiberglass plastic on a CNC machine - 1.5mm, 2mm and 3.125mm.
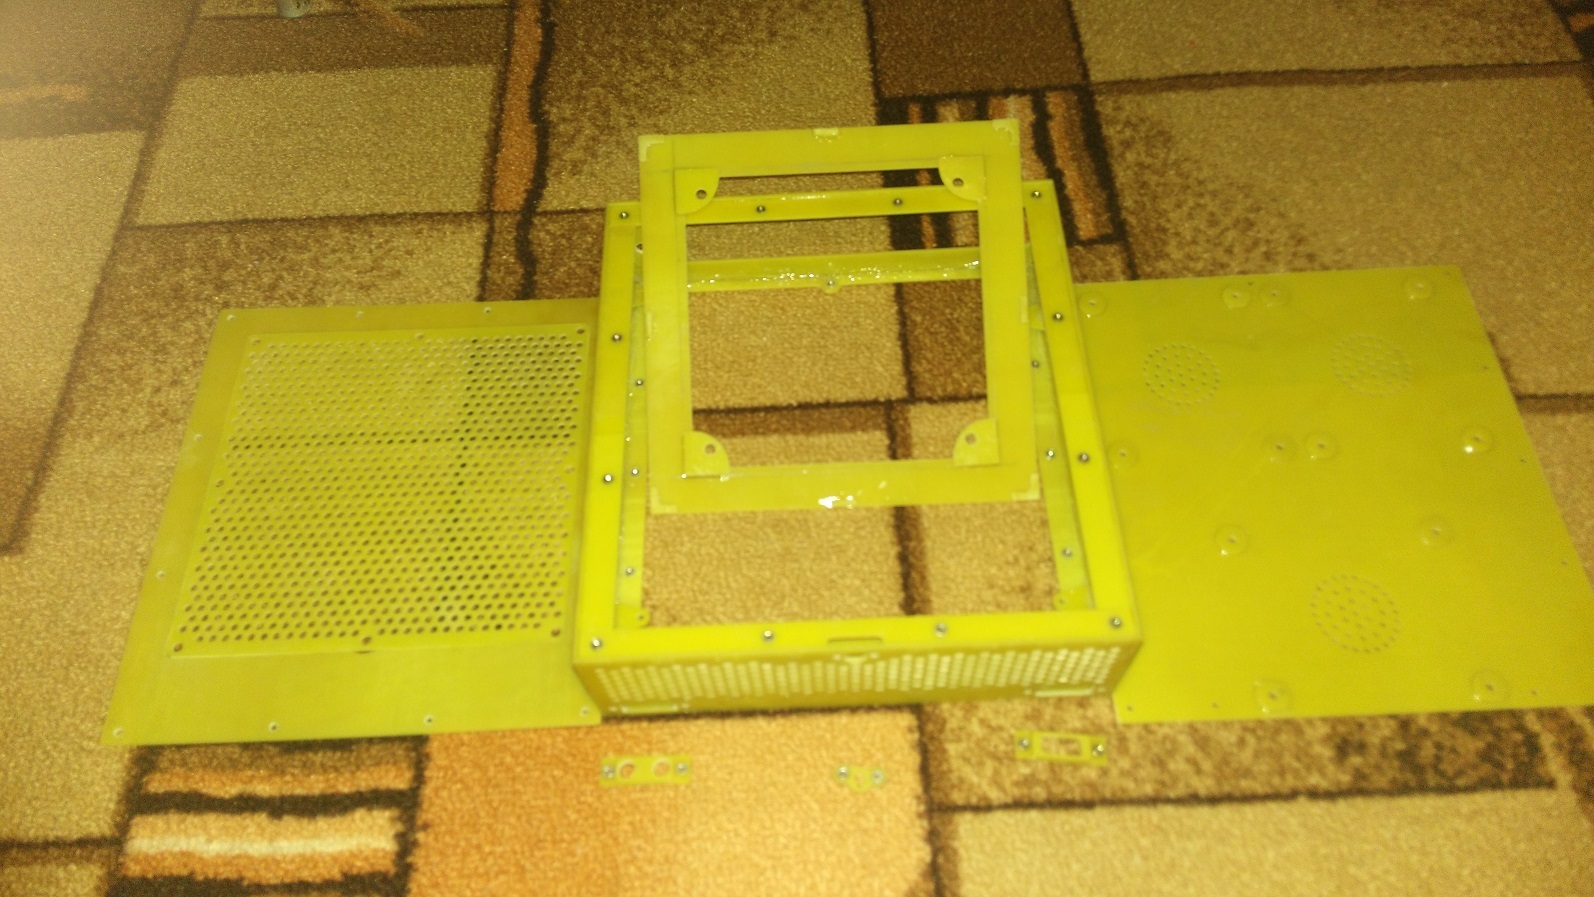
Brief description of hull elements
Bottom cover - visible holes on the sides for attachment to the body. Washers - for mounting 3x HDD, as well as holes for ventilation

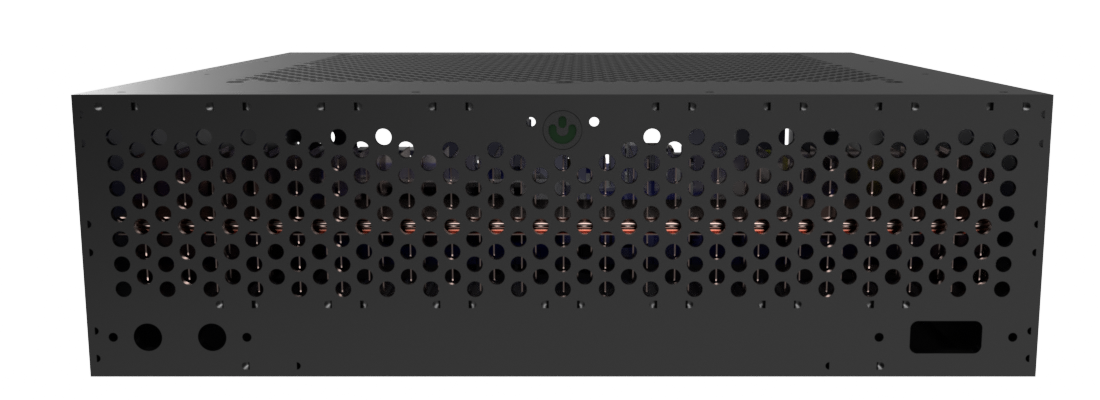
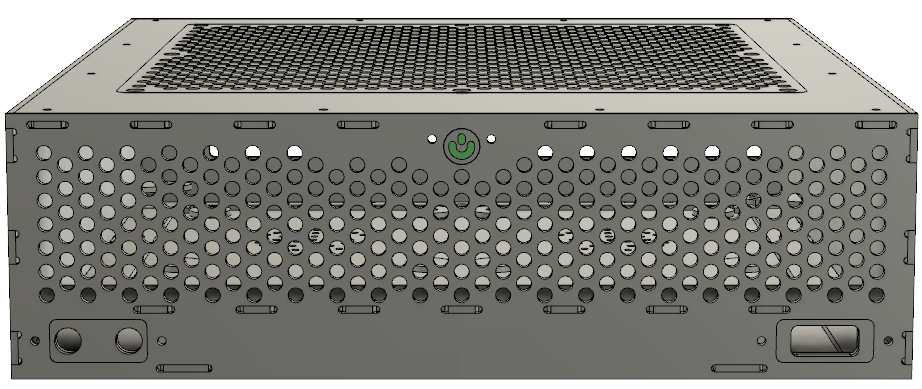
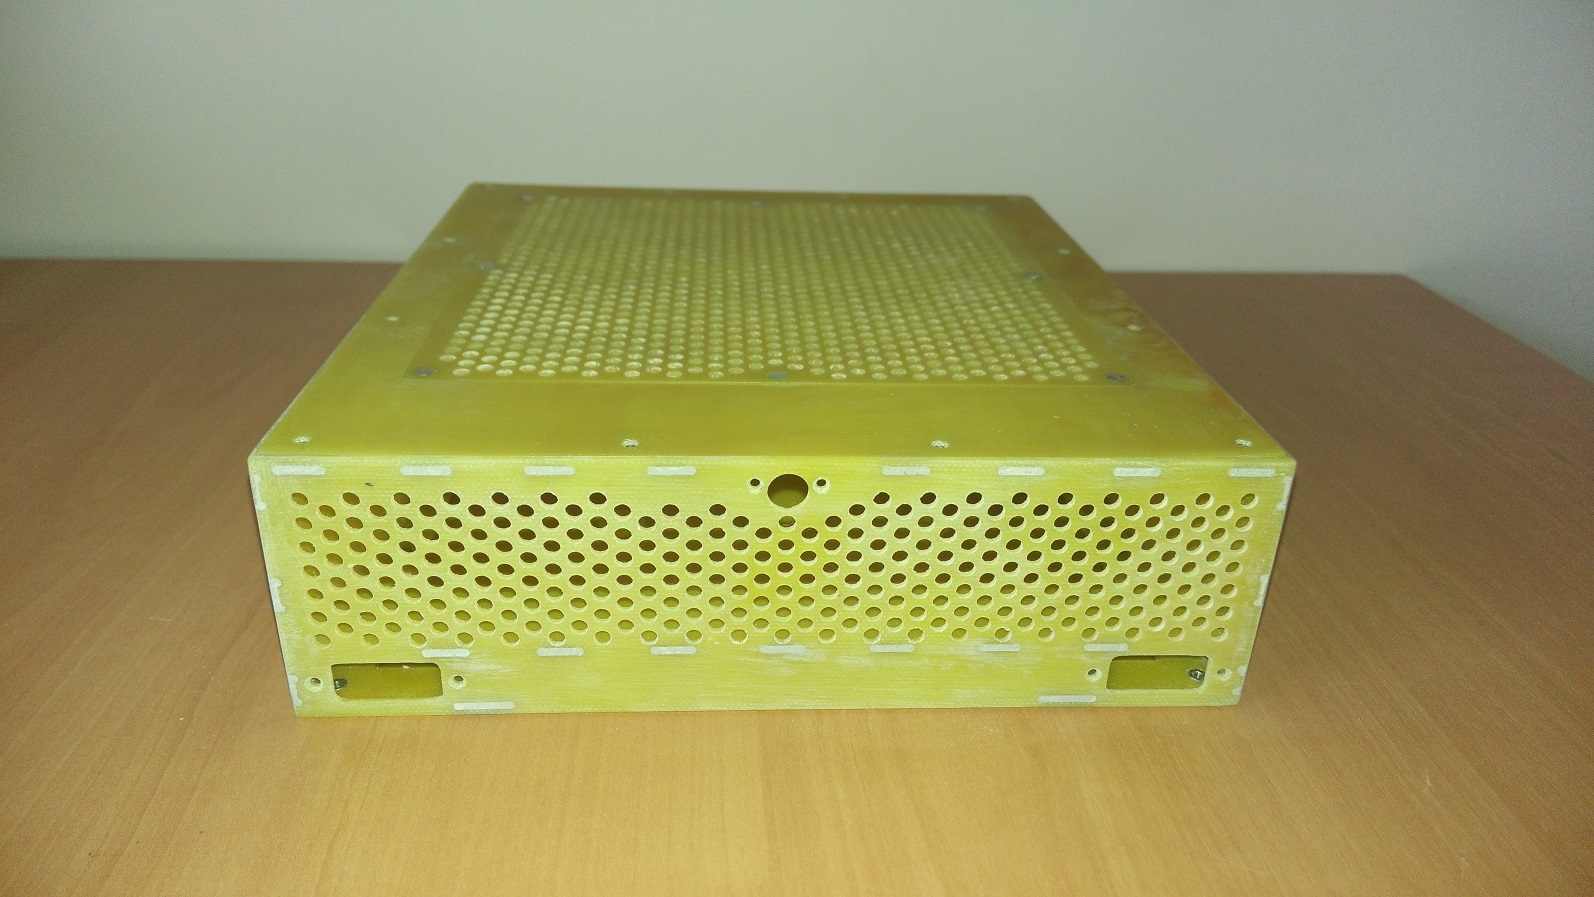
The front of the case. Air perforation, power button, removable front panel connectors - usb and audio. On the reverse side, there are visible the fastening plates of the lower and upper covers and the strip separating the compartment with the radiator

The back of the case. Cut under the stub ports on the MP. Holes for connecting Wi-Fi antennas, top and bottom cover mounting strips

Side walls. Mounts for MP, top and bottom cover mounting bars

Top cover. Holes on the sides for attachment to the body. Top removable filter (mounted on magnets). Bottom frame for mounting the fan
Bottom cover - visible holes on the sides for attachment to the body. Washers - for mounting 3x HDD, as well as holes for ventilation
The front of the case. Air perforation, power button, removable front panel connectors - usb and audio. On the reverse side, there are visible the fastening plates of the lower and upper covers and the strip separating the compartment with the radiator
The back of the case. Cut under the stub ports on the MP. Holes for connecting Wi-Fi antennas, top and bottom cover mounting strips
Side walls. Mounts for MP, top and bottom cover mounting bars
Top cover. Holes on the sides for attachment to the body. Top removable filter (mounted on magnets). Bottom frame for mounting the fan
The result was a box with dimensions of 185mm (W) * 201mm (D) * 55mm (H). Anyone can view and download the 3D-model according to the LINK .
3D model of the case
Parts were made according to the drawing. After that there was a minimum file completion, gluing them, gluing nuts and magnets, puttying and coating with aerosol acrylic paint and varnish.
Several photos of the assembly process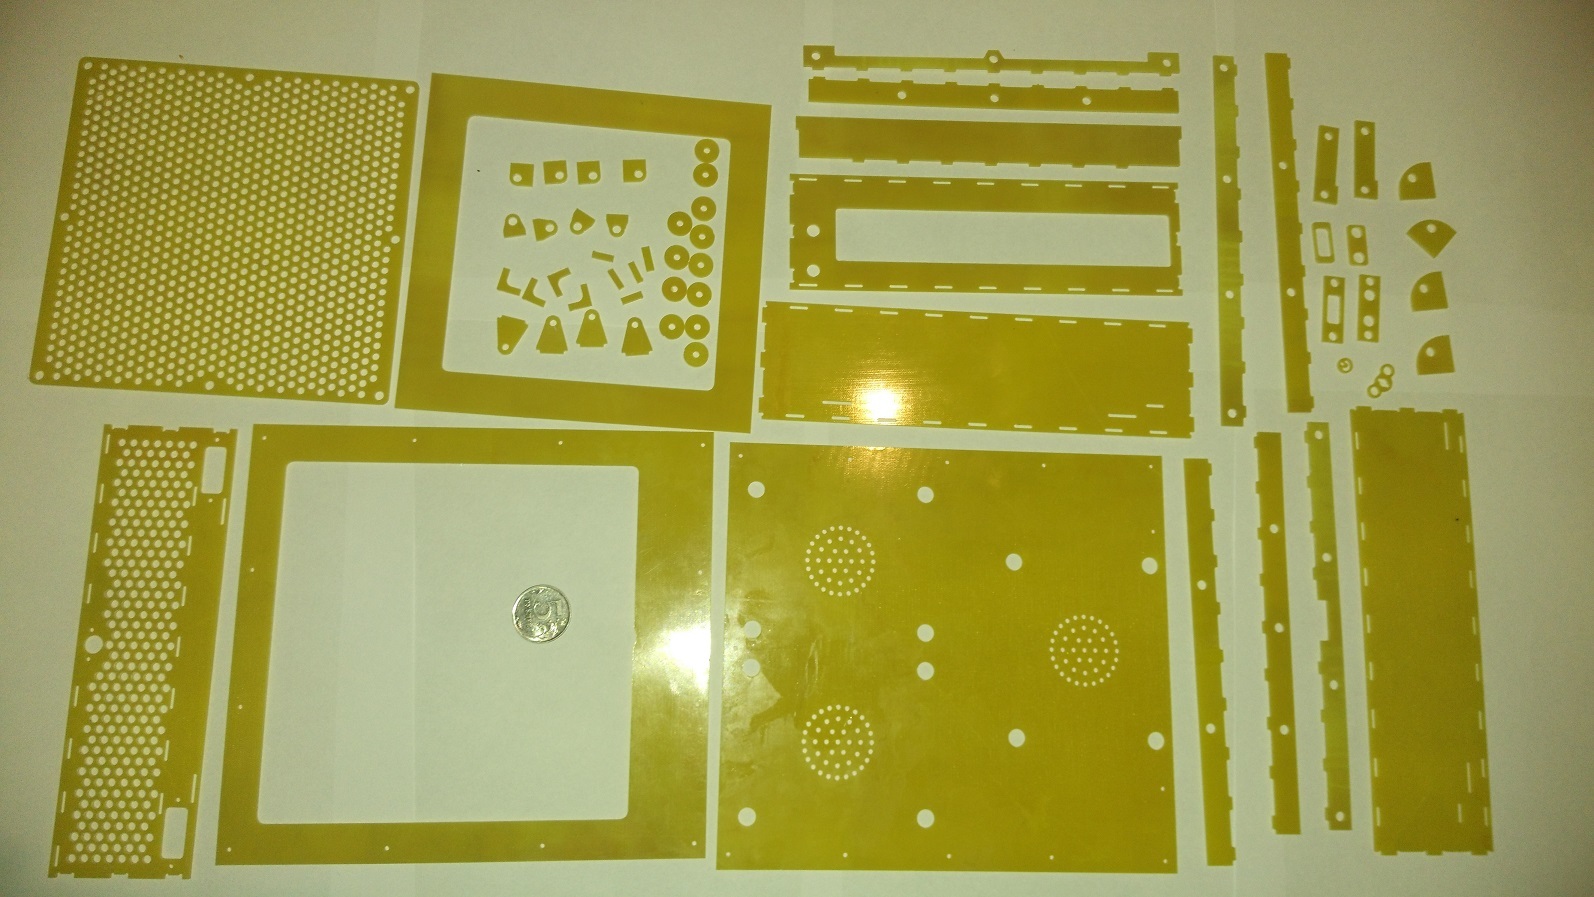
Manufactured parts. What is not a puzzle for the geek?
The puzzle in the assembly process
Before painting and varnishing

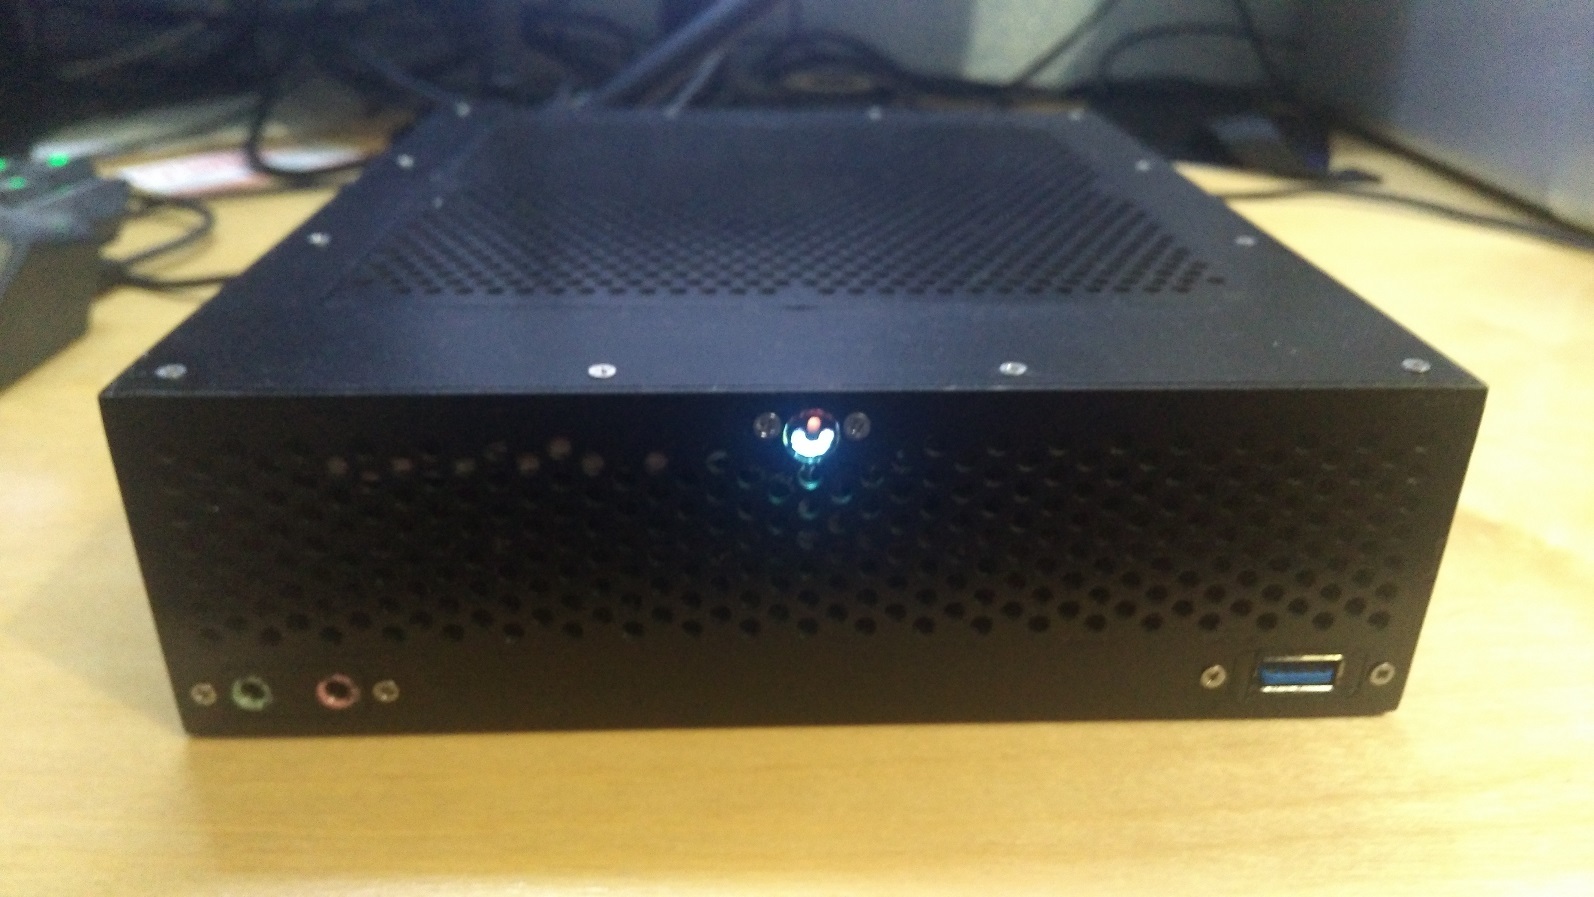
After painting. The color is called "Aventurine" - very suitable for this project in every sense
Manufactured parts. What is not a puzzle for the geek?
The puzzle in the assembly process
Before painting and varnishing
After painting. The color is called "Aventurine" - very suitable for this project in every sense
And finally, the final chapter of my story - the installation of components inside the case!
Installation of components inside the case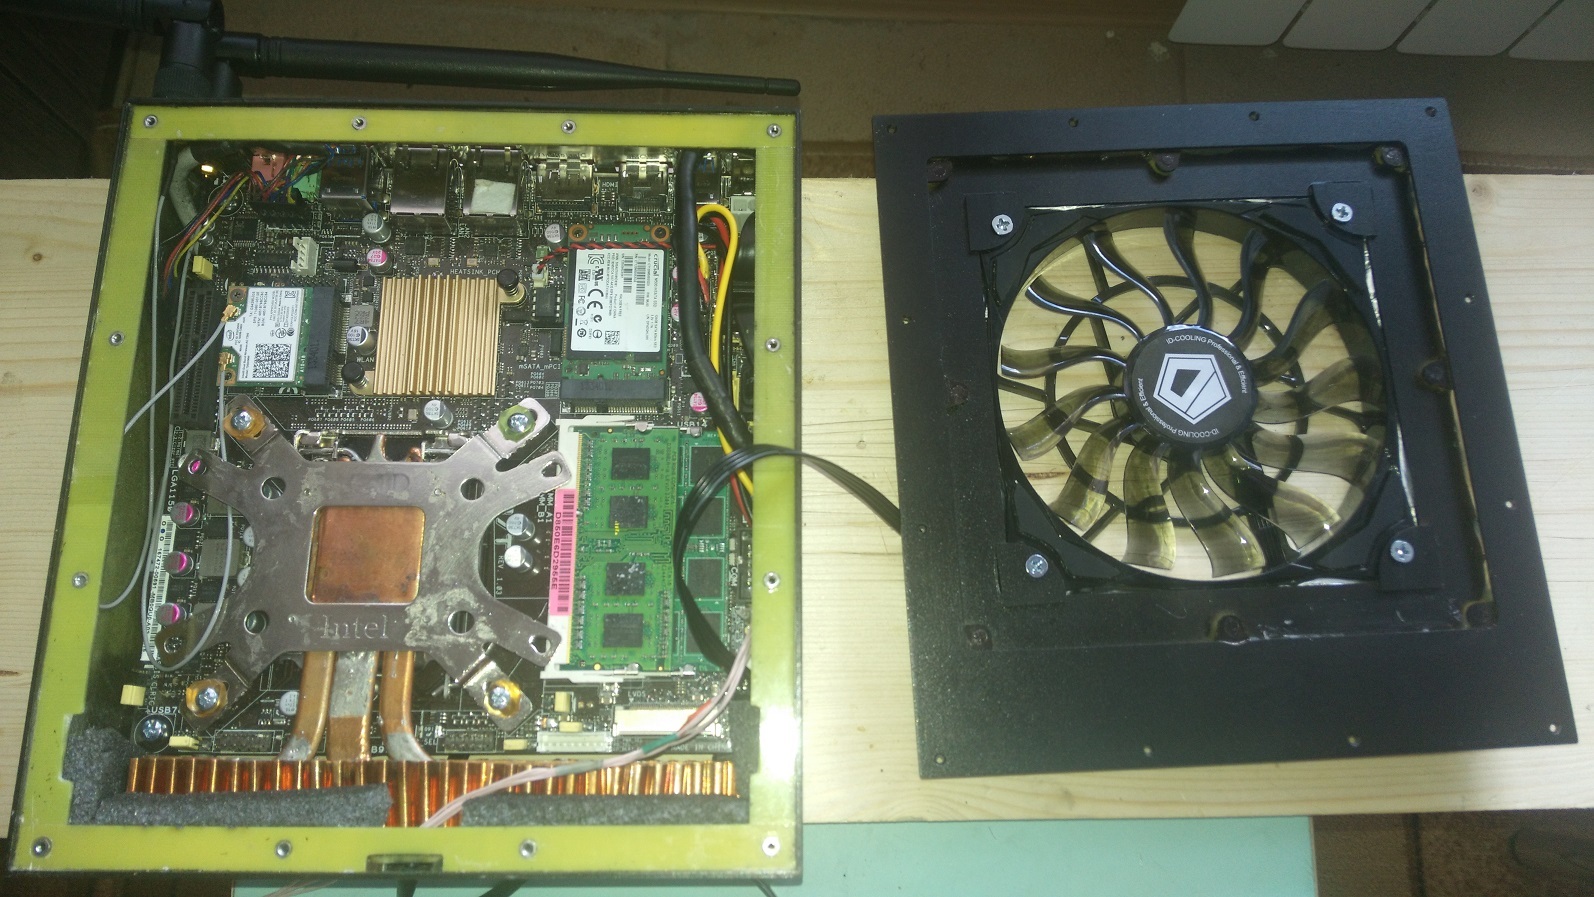
With the placement of the MP and the radiator, it took a long time to tinker - the savings in millimeters had an effect. Without installing brass racks for mounting the board, the board itself is placed, then the radiator is installed and mounted. Then only brass are fastened to the body and the MP. Foam rubber laid gaps between the housing and the radiator.
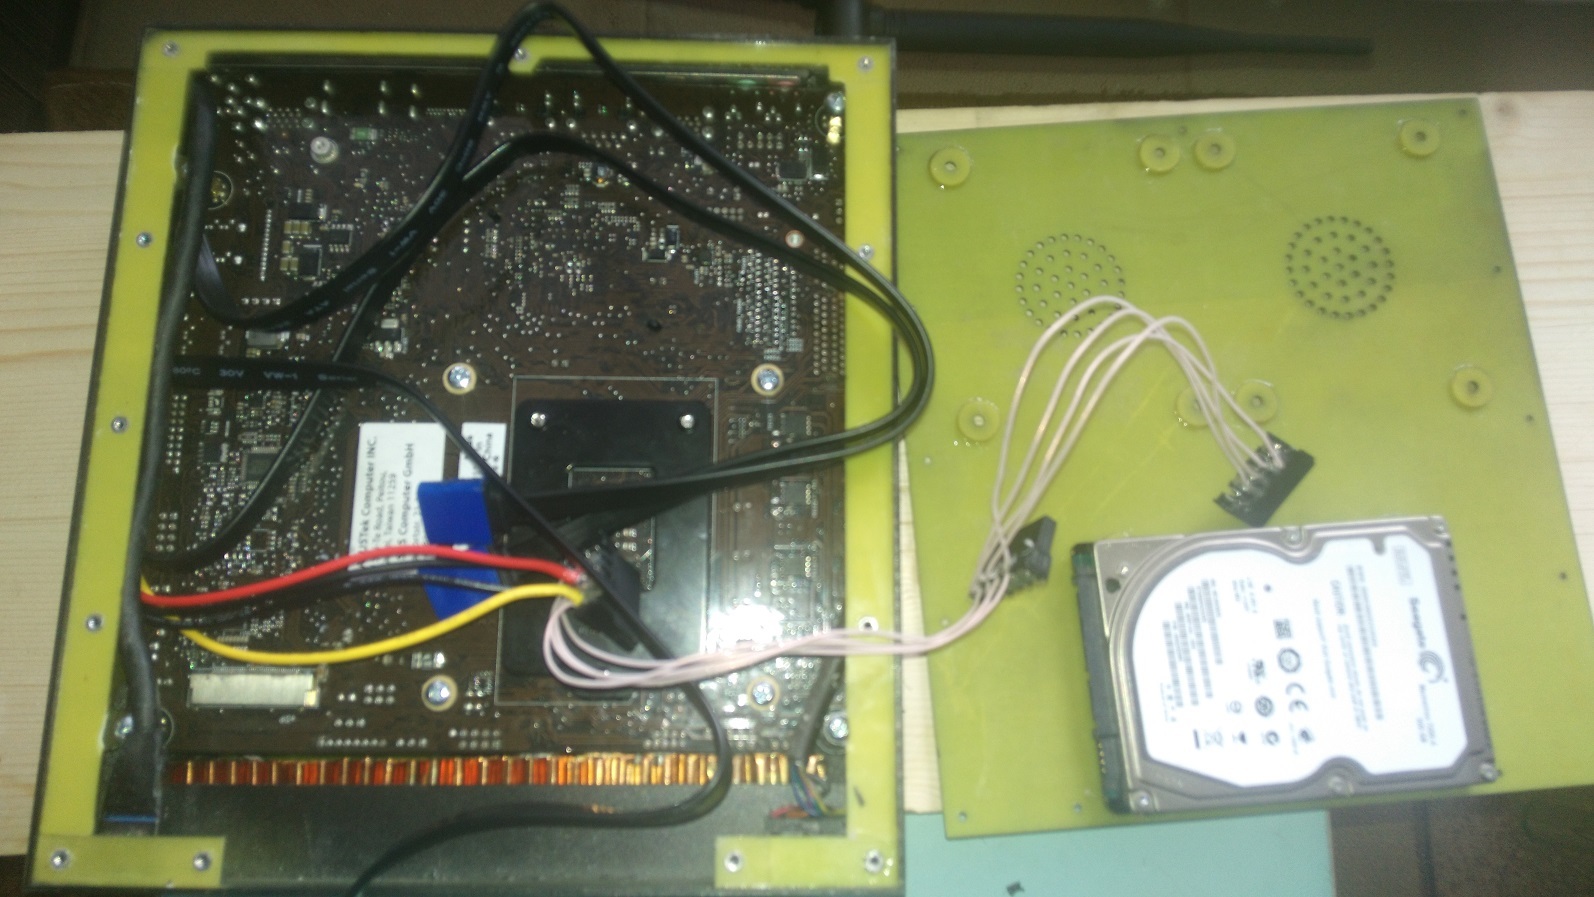
With conventional SATA cables, only 2 HDDs can be placed. Place the third and take the cable. But the problem can be solved by purchasing for example SilverStone CP11
With the placement of the MP and the radiator, it took a long time to tinker - the savings in millimeters had an effect. Without installing brass racks for mounting the board, the board itself is placed, then the radiator is installed and mounted. Then only brass are fastened to the body and the MP. Foam rubber laid gaps between the housing and the radiator.
With conventional SATA cables, only 2 HDDs can be placed. Place the third and take the cable. But the problem can be solved by purchasing for example SilverStone CP11
Kid at work. Looks like a picture from a hat?
Short video review by numerous requests
I am quite satisfied with the result - especially the silence of the work pleased me. Even at night you have to listen to distinguish any signs of work (only HDD is heard). But not without a pair of spoons of tar:
- The case turned out to be "butt" for its filling. At least a couple of millimeters should increase the size in all directions.
- The cooling system, though quiet, did not achieve much from it. In the assembly, the measly 35W of my processor under load with tests heated up to 70 degrees. The maximum that can be expected is the middle segment and TDP not more than 60W, although motherboards support more productive and hot processors.Test results
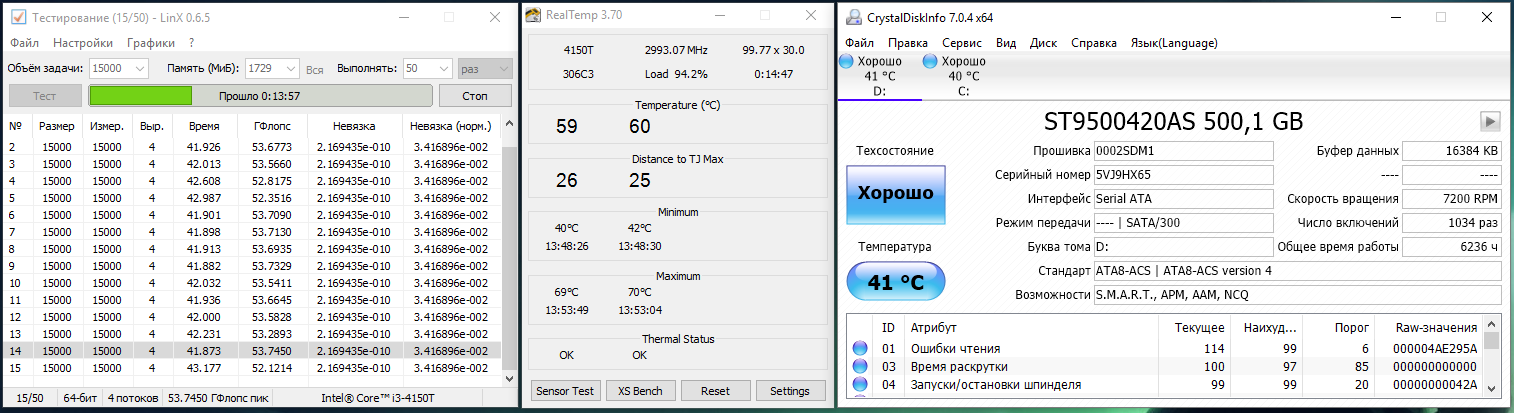
Test with a standard fan arrangement - air is taken from above (installation of a dust filter added 2 degrees during tests). Clickable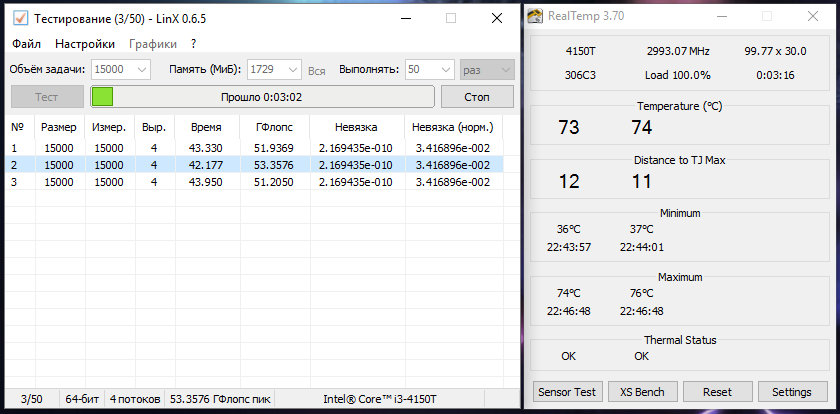
The test with the reverse arrangement of the fan - the air is taken in front. Clickable
I was glad to share with the readers the results of my work. I am pleased to answer questions, listen to suggestions and criticism!
Update: Added a short video review and test results when the fan is reversed as well as when installing a dust filter.
Source: https://habr.com/ru/post/398875/
All Articles