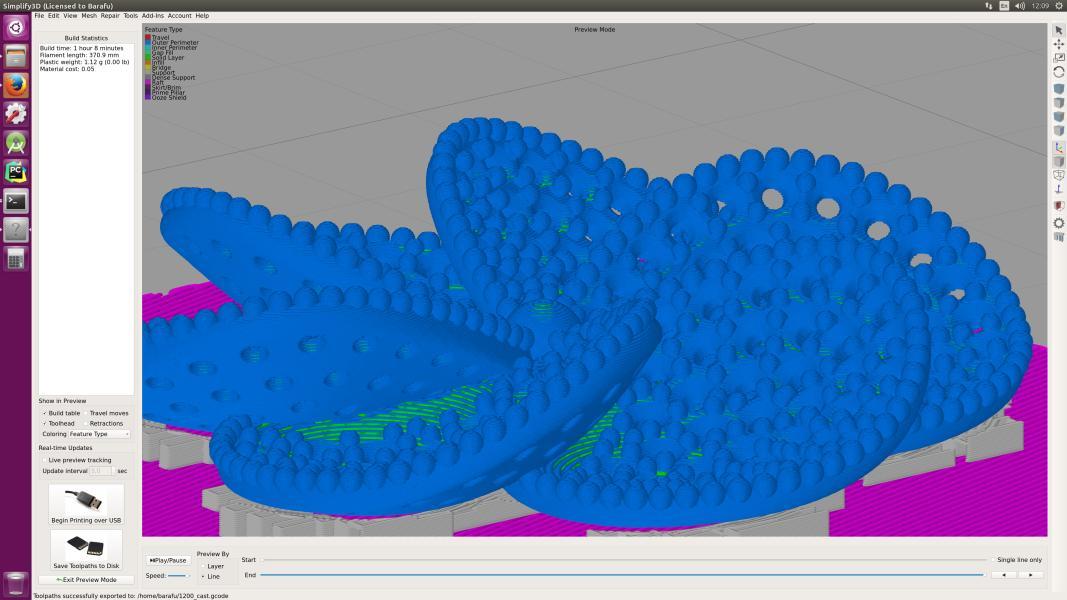
3D print thumbnails
This article focuses on the fact that you can squeeze out of a home desktop printer in the field of printing miniature complex objects. Two weeks ago, I decided to make this little thing on my home FDM printer.
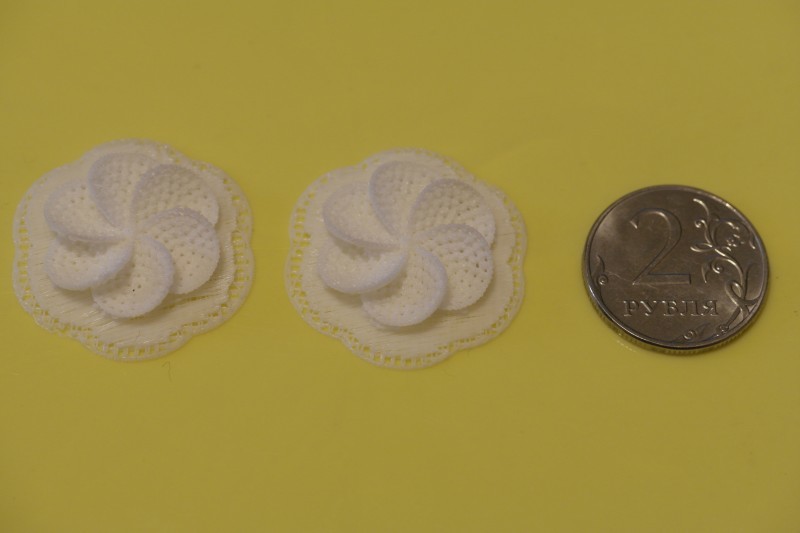
Here are the results:
')
And larger:
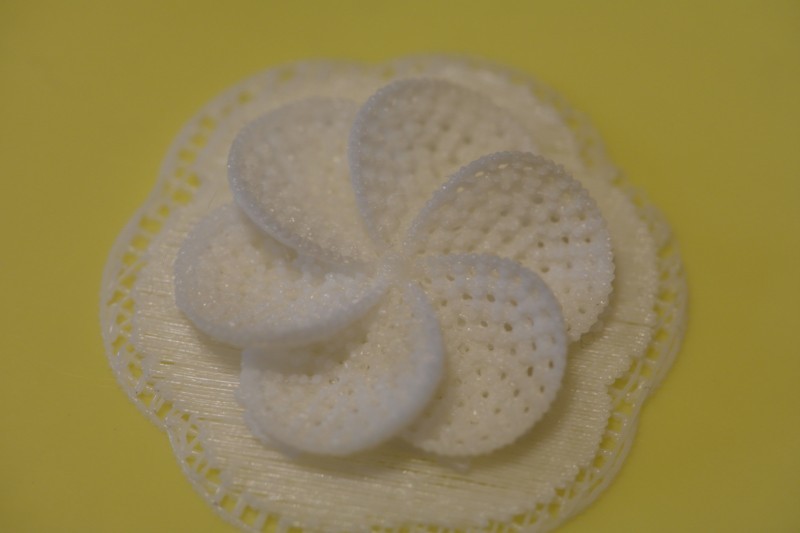
The balls on the surface do not shine with sphericity, but in general all the elements are in place and recognizable. Whether such quality is acceptable depends on the purpose of use. And remember, the size of the balls is less than a millimeter.
Both samples are made from the first attempt, without fitting the parameters. That is, if you tinker, and even take a 0.1mm nozzle (I don't have it), then the spherical shape of the balls will still increase. Here is an article more suitable for my printer:
Miniature "Pirate", 54 mm:
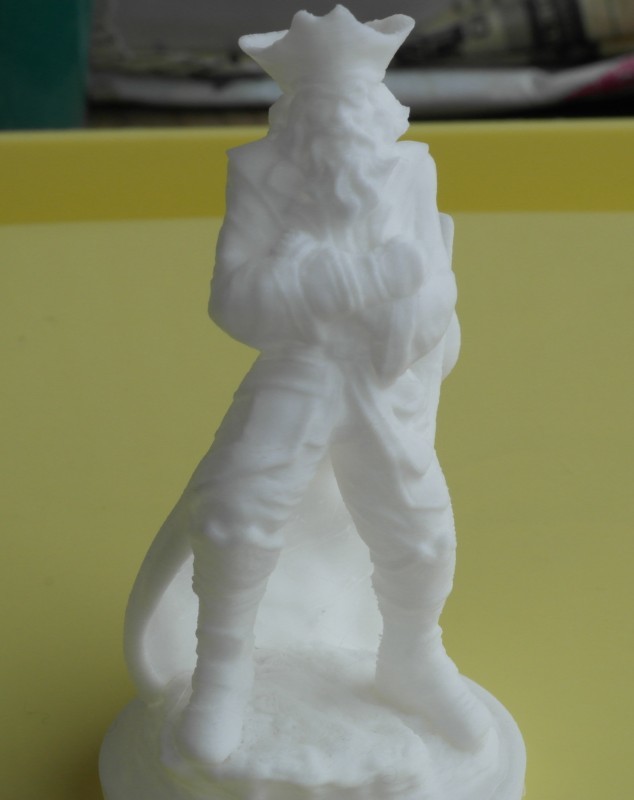
And larger:

These results are obtained on a printer for $ 700. I will now list what to look for when choosing.
The rigidity of the entire printer design is an extremely important parameter, and at the same time you cannot write anything useful about it in one paragraph of the text. We'll have limited to general tips without explanation.
The most popular layouts are the portal (Reprap, Prusa), console (for example, the MasterKit creations), and with independent axes (Ultimaker and clones). All good, if properly done. More important materials. The body must be metal. Pressed steel or aluminum profiles are no longer important. Plywood works well when assembled with glue. Over time, it can lead, if poorly processed, but the brains of the printer are able to compensate for this. The assembly of a case of several sheets of plexiglass or plywood is unacceptable, because the steel fasteners in these materials are instantly loosened and the whole unit shakes like brawn. Hi Wanhao. The case in the form of a frame of shafts or studs is also bad, unless they are self-tensioning. Self-slack construction (old reprap) means about 20 nuts, which must be tightened before each seal.
The springs, dearly loved by all manufacturers, do not give a normal belt tension. All belts must have a tension screw or pulley. Shafts 6mm - this is not serious. Okay, they would bend (brains compensate) so they also swing at work. Only 8 mm and only hardened. Unfinished shafts bearing simply eats for six months.
When printing miniatures, poor-quality mechanics manifest themselves not so much by deformation of parts as by cracks, non-adhesion of layers, the disappearance of small details.
An even more immense topic, in which each rule has more exceptions than confirmations. In the context of thumbnail printing, we need a hot-cooled hot-end. In order to estimate the hot end, look at the manufacturer’s recommended retract step. If the manufacturer or users of the red caps yell “by no means more than a millimeter!”, Then this is a good sign. Such a hot-end has a miniature melt chamber, which provides greater surface accuracy, but at the same time catches a wedge with a retract greater than that. Bowdens have their own rules, I don’t understand them.
Suddenly for beginners, the minimum layer of a printer is determined not by the mechanics, but by the design of the extruder. I did not see the mechanics, not able to work out a layer of 0.05mm. The extruder is made on a stepper motor, which can be rotated only at a given position. Therefore, the extruder can supply plastic only in fixed portions. With normal printing, this is not important, but with a miniature serving size, it may be too large. Therefore, only direct-drive extruder and only with micro-step support. (Microstep support is more often in the form of a “people's” patch for the firmware. But the main thing is to have it.) On my printer with a layer of 0.05 and a nozzle of 0.2, the lack of steps begins to appear even at a speed of 40 mm / sec. What is sad - the speed of the outer surface should be 10-20.
The nozzles should be wide-edged in order to smear, rather than shave, a fresh melt. This applies to all sizes and speeds.
Now list the functions of the printer in the order they need to print thumbnails. The list is hierarchical, that is, if you do not have point 1, then points 2-5 also lose their value.
Calibration of the table is that the position of the table is adjusted so that the gap between the extruder nozzle and the surface under it is always the same. As with everything in 3D printing, there are two ways to do calibration — popular and correct. Popular is to slip under the nozzle of various bills, cards and other advantages. Normal accuracy is not achieved, but the table bend is elementary. The correct one is to use a measuring tool.
The smartest option is automatic calibration using sensors connected to the printer. It allows not only to calibrate only 1 time after changing the nozzle, but also to compensate for the distortions in mechanics and the unevenness of the table. The printer simply modifies the program in memory to fit the actual table. Personally, I don’t even consider printers without this option, although it can be prikolkhozit to many.
If there is no auto calibration, then it is best to act like this. Approximately, “by eye”, set the values and start printing a cube the size of almost the entire table. When the printer draws an outer square on the table, stop printing and measure the line width with a caliper in all places. Adjust the table so as to achieve the same line width throughout. Tear off the old line and repeat. And so on until the result is achieved. The total width must be equal to the extrusion width specified in the slicer.
And yet, for manual calibration, the table must always be mounted on three screws. If there are four of them, then, in order not to bend the table, you need to completely unscrew the 2 neighboring ones before turning the screw. In short, it is impossible to properly calibrate the table with four screws. It is impossible to manually calibrate even a slightly bent table. But automatically - you can.
The thing is necessary, the main thing is not to overestimate it. If you read the forums, it is clear that people are constantly struggling with the problem of sticking. They smear the tables with any filth - they print on hairspray, PVA glue, ABC solution, beer and soup. These are all unnecessary crutches. If the plastic does not stick to the Kapton, then the table calibration is wrong. Or a bar of water. There are no other reasons. I have been printing materials that are far more fastidious than ABC for a long time, on a table that barely heats up to 80 degrees, on a clean Kapton, and I don’t see any problems. Calibration table. So the heating should be, but what, to how many - it does not matter.
To print not only PLA, it is necessary to protect the work area from drafts. Some printers are protected on their own, some may have a rag or a large box on them during work. If you buy a printer in assembled form, then its own box may come up. You can simply put the printer in the closet and close the door.
If all this is not available, then there is a half measure. Good slicers allow you to print an in-shell part, with an additional outer contour around the part. In my slicer, it is called Ooze Shield. Although its main purpose is for two-color printing, nevertheless it also helps with drafts.
Also an important thing. Take a micrometer and measure the diameter of the rod in 5-6 places at different angles, calculate the average and enter in the settings of the slicer. If the diameter walks by as much as 0.1 mm, such a bar is not good for miniatures.
For printing thumbnails, I picked up the following rules.
So like this. Someone who was surprised - ask questions. This text was written in September 2016. Why is it important? Because 3D printing is developing so fast that most of the materials on the network for it are already outdated. After three years, we will look at this article and smile nostalgically.
Here are the results:
')
And larger:
The balls on the surface do not shine with sphericity, but in general all the elements are in place and recognizable. Whether such quality is acceptable depends on the purpose of use. And remember, the size of the balls is less than a millimeter.
- The height of the layer is 0.1 mm for the sample on the left and 0.05 mm for the sample on the right.
- The total printing time is about 30 minutes for the sample on the left, about an hour for the sample on the right.
- A 0.2 mm nozzle was used.
- Filling 100%.
Both samples are made from the first attempt, without fitting the parameters. That is, if you tinker, and even take a 0.1mm nozzle (I don't have it), then the spherical shape of the balls will still increase. Here is an article more suitable for my printer:
Miniature "Pirate", 54 mm:
And larger:
- Height of a layer is 0.1 mm.
- Print time 3 hours.
- Base speed 50 mm / s.
- 4 outer layers, 0% filling.
Printer selection
These results are obtained on a printer for $ 700. I will now list what to look for when choosing.
Rigidity
The rigidity of the entire printer design is an extremely important parameter, and at the same time you cannot write anything useful about it in one paragraph of the text. We'll have limited to general tips without explanation.
Layout
The most popular layouts are the portal (Reprap, Prusa), console (for example, the MasterKit creations), and with independent axes (Ultimaker and clones). All good, if properly done. More important materials. The body must be metal. Pressed steel or aluminum profiles are no longer important. Plywood works well when assembled with glue. Over time, it can lead, if poorly processed, but the brains of the printer are able to compensate for this. The assembly of a case of several sheets of plexiglass or plywood is unacceptable, because the steel fasteners in these materials are instantly loosened and the whole unit shakes like brawn. Hi Wanhao. The case in the form of a frame of shafts or studs is also bad, unless they are self-tensioning. Self-slack construction (old reprap) means about 20 nuts, which must be tightened before each seal.
Mechanics
The springs, dearly loved by all manufacturers, do not give a normal belt tension. All belts must have a tension screw or pulley. Shafts 6mm - this is not serious. Okay, they would bend (brains compensate) so they also swing at work. Only 8 mm and only hardened. Unfinished shafts bearing simply eats for six months.
When printing miniatures, poor-quality mechanics manifest themselves not so much by deformation of parts as by cracks, non-adhesion of layers, the disappearance of small details.
Working part
An even more immense topic, in which each rule has more exceptions than confirmations. In the context of thumbnail printing, we need a hot-cooled hot-end. In order to estimate the hot end, look at the manufacturer’s recommended retract step. If the manufacturer or users of the red caps yell “by no means more than a millimeter!”, Then this is a good sign. Such a hot-end has a miniature melt chamber, which provides greater surface accuracy, but at the same time catches a wedge with a retract greater than that. Bowdens have their own rules, I don’t understand them.
Suddenly for beginners, the minimum layer of a printer is determined not by the mechanics, but by the design of the extruder. I did not see the mechanics, not able to work out a layer of 0.05mm. The extruder is made on a stepper motor, which can be rotated only at a given position. Therefore, the extruder can supply plastic only in fixed portions. With normal printing, this is not important, but with a miniature serving size, it may be too large. Therefore, only direct-drive extruder and only with micro-step support. (Microstep support is more often in the form of a “people's” patch for the firmware. But the main thing is to have it.) On my printer with a layer of 0.05 and a nozzle of 0.2, the lack of steps begins to appear even at a speed of 40 mm / sec. What is sad - the speed of the outer surface should be 10-20.
The nozzles should be wide-edged in order to smear, rather than shave, a fresh melt. This applies to all sizes and speeds.
Functional
Now list the functions of the printer in the order they need to print thumbnails. The list is hierarchical, that is, if you do not have point 1, then points 2-5 also lose their value.
- Instrumental desktop calibration.
- Heated desktop.
- Point blower directly under the nozzle (only for PLA).
- Closed camera.
- Any solution that allows you to control the printer directly while standing near it. The screen on the printer, WebUI in the mobile phone, just a printer near the computer is not important.
Desktop Calibration
Calibration of the table is that the position of the table is adjusted so that the gap between the extruder nozzle and the surface under it is always the same. As with everything in 3D printing, there are two ways to do calibration — popular and correct. Popular is to slip under the nozzle of various bills, cards and other advantages. Normal accuracy is not achieved, but the table bend is elementary. The correct one is to use a measuring tool.
The smartest option is automatic calibration using sensors connected to the printer. It allows not only to calibrate only 1 time after changing the nozzle, but also to compensate for the distortions in mechanics and the unevenness of the table. The printer simply modifies the program in memory to fit the actual table. Personally, I don’t even consider printers without this option, although it can be prikolkhozit to many.
If there is no auto calibration, then it is best to act like this. Approximately, “by eye”, set the values and start printing a cube the size of almost the entire table. When the printer draws an outer square on the table, stop printing and measure the line width with a caliper in all places. Adjust the table so as to achieve the same line width throughout. Tear off the old line and repeat. And so on until the result is achieved. The total width must be equal to the extrusion width specified in the slicer.
And yet, for manual calibration, the table must always be mounted on three screws. If there are four of them, then, in order not to bend the table, you need to completely unscrew the 2 neighboring ones before turning the screw. In short, it is impossible to properly calibrate the table with four screws. It is impossible to manually calibrate even a slightly bent table. But automatically - you can.
Heated table
The thing is necessary, the main thing is not to overestimate it. If you read the forums, it is clear that people are constantly struggling with the problem of sticking. They smear the tables with any filth - they print on hairspray, PVA glue, ABC solution, beer and soup. These are all unnecessary crutches. If the plastic does not stick to the Kapton, then the table calibration is wrong. Or a bar of water. There are no other reasons. I have been printing materials that are far more fastidious than ABC for a long time, on a table that barely heats up to 80 degrees, on a clean Kapton, and I don’t see any problems. Calibration table. So the heating should be, but what, to how many - it does not matter.
Closed camera
To print not only PLA, it is necessary to protect the work area from drafts. Some printers are protected on their own, some may have a rag or a large box on them during work. If you buy a printer in assembled form, then its own box may come up. You can simply put the printer in the closet and close the door.
If all this is not available, then there is a half measure. Good slicers allow you to print an in-shell part, with an additional outer contour around the part. In my slicer, it is called Ooze Shield. Although its main purpose is for two-color printing, nevertheless it also helps with drafts.
Bar Calibration
Also an important thing. Take a micrometer and measure the diameter of the rod in 5-6 places at different angles, calculate the average and enter in the settings of the slicer. If the diameter walks by as much as 0.1 mm, such a bar is not good for miniatures.
Thumbnail print
For printing thumbnails, I picked up the following rules.
- The print speed of the outer ring should be 20mm / s, the rest - 40mm / s.
- Layer 0.1 mm. Smaller size in practice gives little, and even at the minimum speed of the extruder can be rested.
- Filling - or 0 or 80-100%. Typical values of 15-30% in miniatures are meaningless, because many elements will be without a single strut, while the most durable parts will receive additional reinforcement. To create a solid piece, it is better not to put infill = 100%, but bottom layers = 100500.
- For figures with a height much higher than the base, use rafts.
- It would be nice to reduce the acceleration limit. This is the printer firmware setting, not the slicer, each printer is done differently. Reduce by 20% from the factory value - get a more stable print. And, by the way, more silent.
- If you print a decorative miniature without smooth parts, you can add an extrusion multiplier 10% above the norm. In some places, on the miniature, there will appear extra hillocks, but the strength will grow, according to the sensations, by 2 times.
- If the table is manually calibrated, place the thumbnail not in the middle, but above the calibration screw. If automatically - then where the printer measures the table (usually - in the middle).
So like this. Someone who was surprised - ask questions. This text was written in September 2016. Why is it important? Because 3D printing is developing so fast that most of the materials on the network for it are already outdated. After three years, we will look at this article and smile nostalgically.
Source: https://habr.com/ru/post/398415/
All Articles