Ultra-budget spot welding of lithium batteries at home
In the life of each “radio hub”, a moment arises when you need to weld several lithium batteries together — either when repairing a laptop's battery that is dead from the age, or when assembling power for another craft. Soldering the "lithium" 60-watt soldering iron is uncomfortable and scary - you overhear a little - and you have a smoke grenade in your hands, which is useless to extinguish with water.
Collective experience offers two options - either go to the garbage in search of an old microwave, peel it and get a transformer, or spend a lot of money .
For the sake of several welds a year, I didn’t want to look for a transformer, cut it and rewind it. I wanted to find an ultra-cheap and ultra-simple way to weld batteries with electric current.
')
A powerful low-voltage DC source available to everyone is the usual second-hand. Battery from the car. I bet that you already have it somewhere in the closet or you can find it from your neighbor.
In order to weld batteries with current from the battery, we will need to give out current in short pulses in a matter of milliseconds - otherwise we will get not welding, but burning holes in the metal. The cheapest and most affordable way to switch the current of a 12-volt battery is an electromechanical relay (solenoid).
The problem is that conventional automotive relays at 12 volts are designed for a maximum of 100 amps, and short circuit currents during welding are many times more. There is a risk that the anchor of the relay will simply be welded. And then in the open spaces of Aliexpress I came across a motorcycle starter relay. It was thought that if these relays withstand the current of the starter, and many thousands of times, then for my purposes it will fit. Finally convinced this video, where the author is experiencing a similar relay:
My relay was purchased for 253 rubles and reached Moscow in less than 20 days. Characteristics of the relay from the seller's site:
The relay arrived in a neat cardboard box and when unpacked it gave off a wild stench of Chinese rubber. The culprit - a rubber casing on top of the metal case, the smell does not erode for a day.
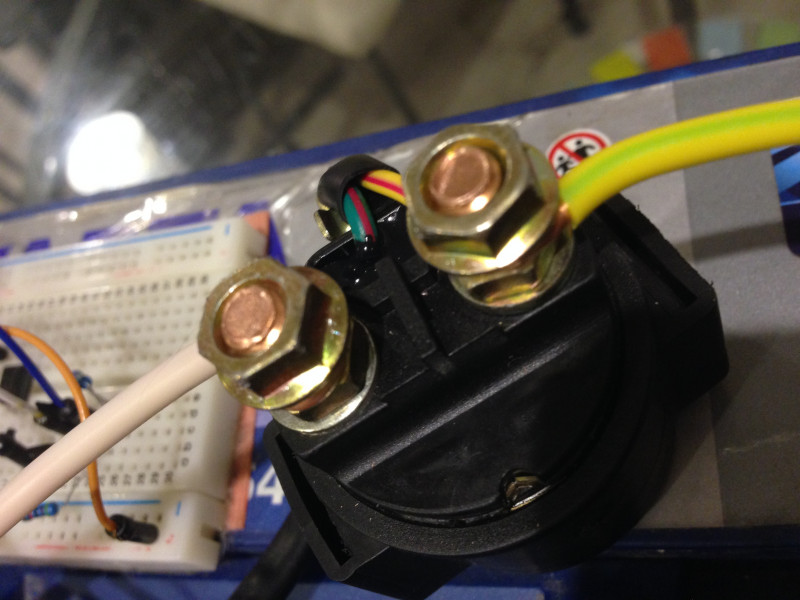
The unit was pleased with the quality - two copper threaded connections were removed under the contacts, all the wires were filled with compound for waterproofing.
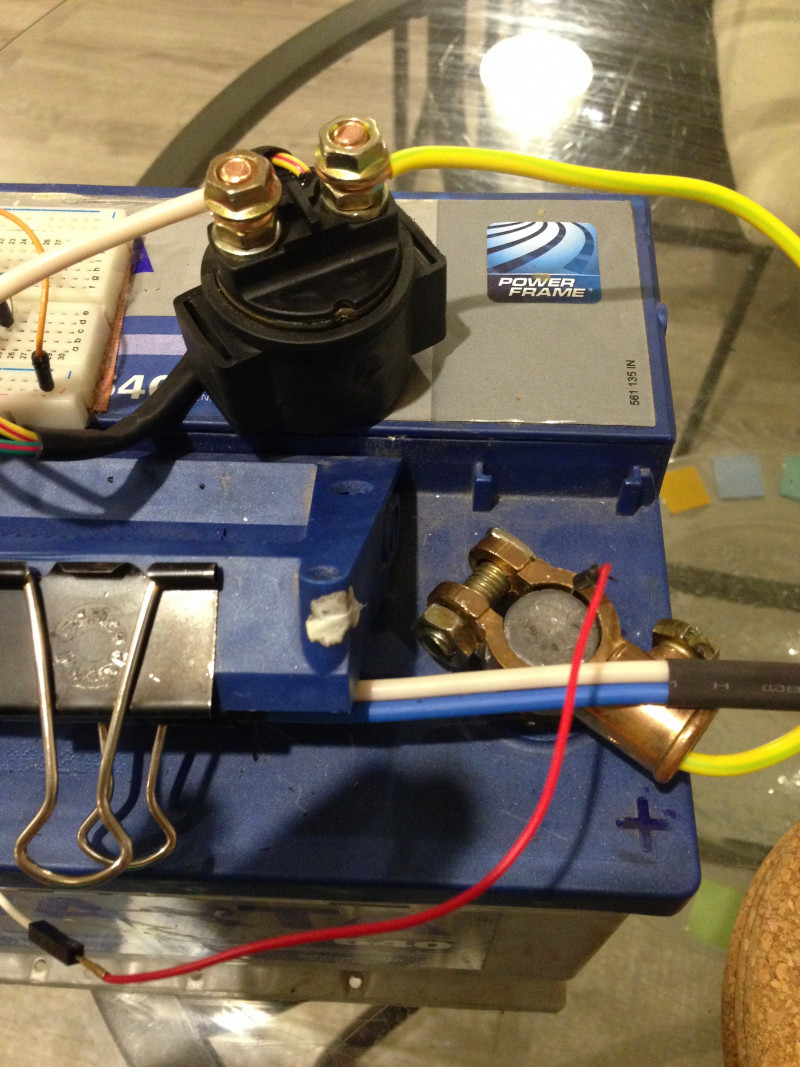
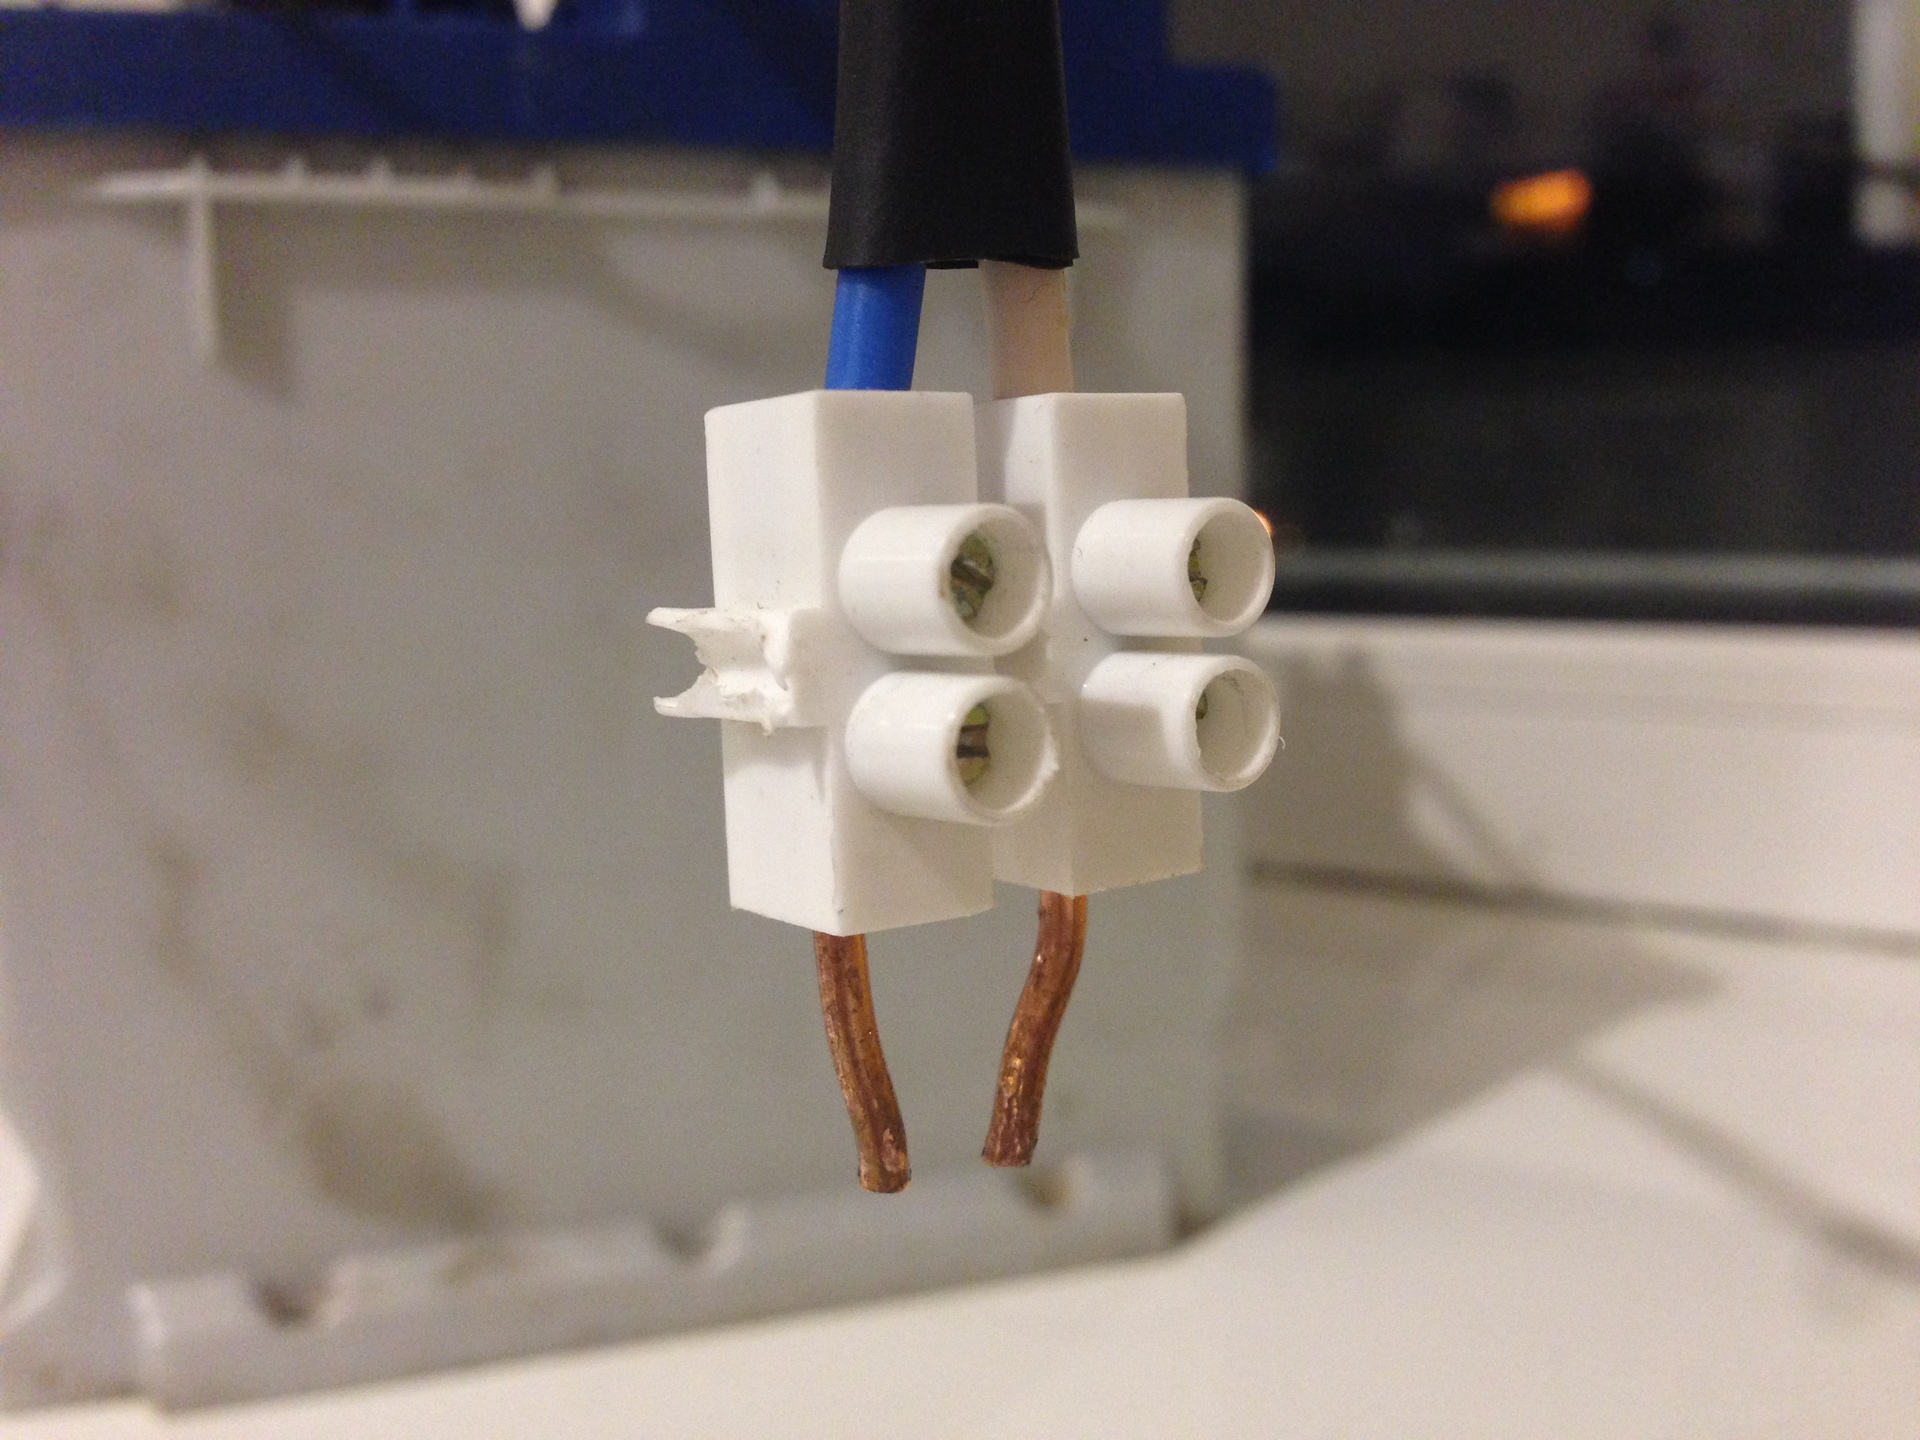
He quickly assembled a “test bench”, the relay contacts were closed manually. The wire used is single-core, with a cross section of 4 squares, and the stripped lugs were fixed with a terminal block. For safety, I provided one of the terminals to the battery with a "safety loop" - if the anchor of the relay would decide to burn and short circuit, I would manage to pull the terminal off the battery for this rope:
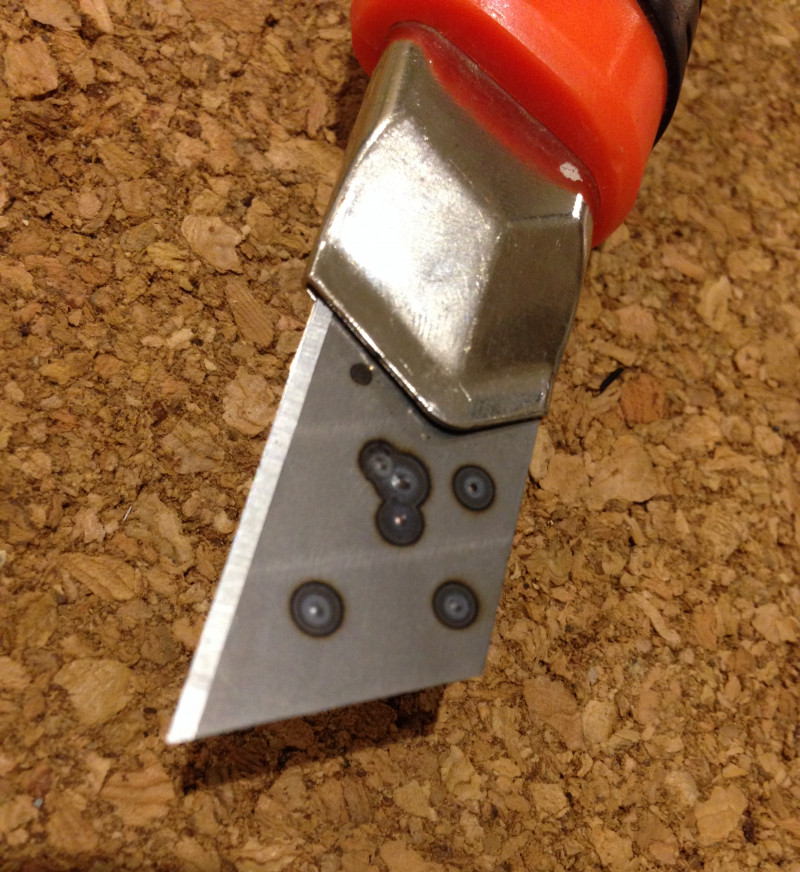
Tests have shown that the machine works on a solid top five. The anchor knocks very loudly, and the electrodes give clear flashes; the relay does not burn. In order not to waste the nickel strip and not to practice on dangerous lithium, the blade of a clerical knife tormented. In the photo you see several quality points and several overexposed:

Overexposed dots are visible on the inside of the blade:
We go further. As the experiment on the blade has shown, it is impossible to withstand the required length of the pulse for welding by hand;
At first he built a simple circuit on a powerful transistor, but he quickly remembered that the solenoid in the relay wanted to eat as much as 3 amps. I rummaged in the box and found in return the MOSFET IRF3205 transistor and sketched a simple circuit with it:
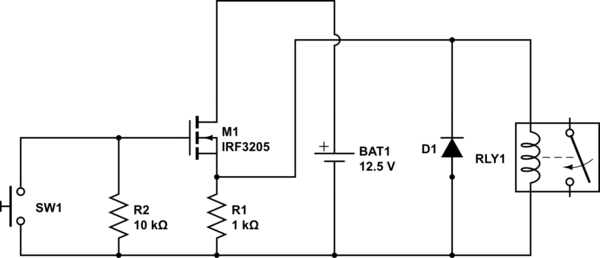
The circuit is rather simple - in fact, a MOSFET, two resistors - on 1K and 10K, and a diode that protects the circuit from the current induced by the solenoid at the moment of de-energizing the relay.
First we try the circuit on the foil (with joyful clicks, it burns holes through several layers), then we take out the nickel tape from the zagashnik to connect the battery assemblies. Briefly press the button, get a loud flash, and consider the burned hole. Notebook also got - not only nickel burned, but a couple of sheets under it :)

Even the tape, welded by two points, is not split by hand.
Obviously, the scheme works, it is a matter of fine tuning “shutter speed and exposure”. If you believe the experiments with the oscilloscope of the same comrade from YouTube, from whom I peeped the idea from the starter relay, then it takes about 21ms to break the anchor - from this time we will dance.
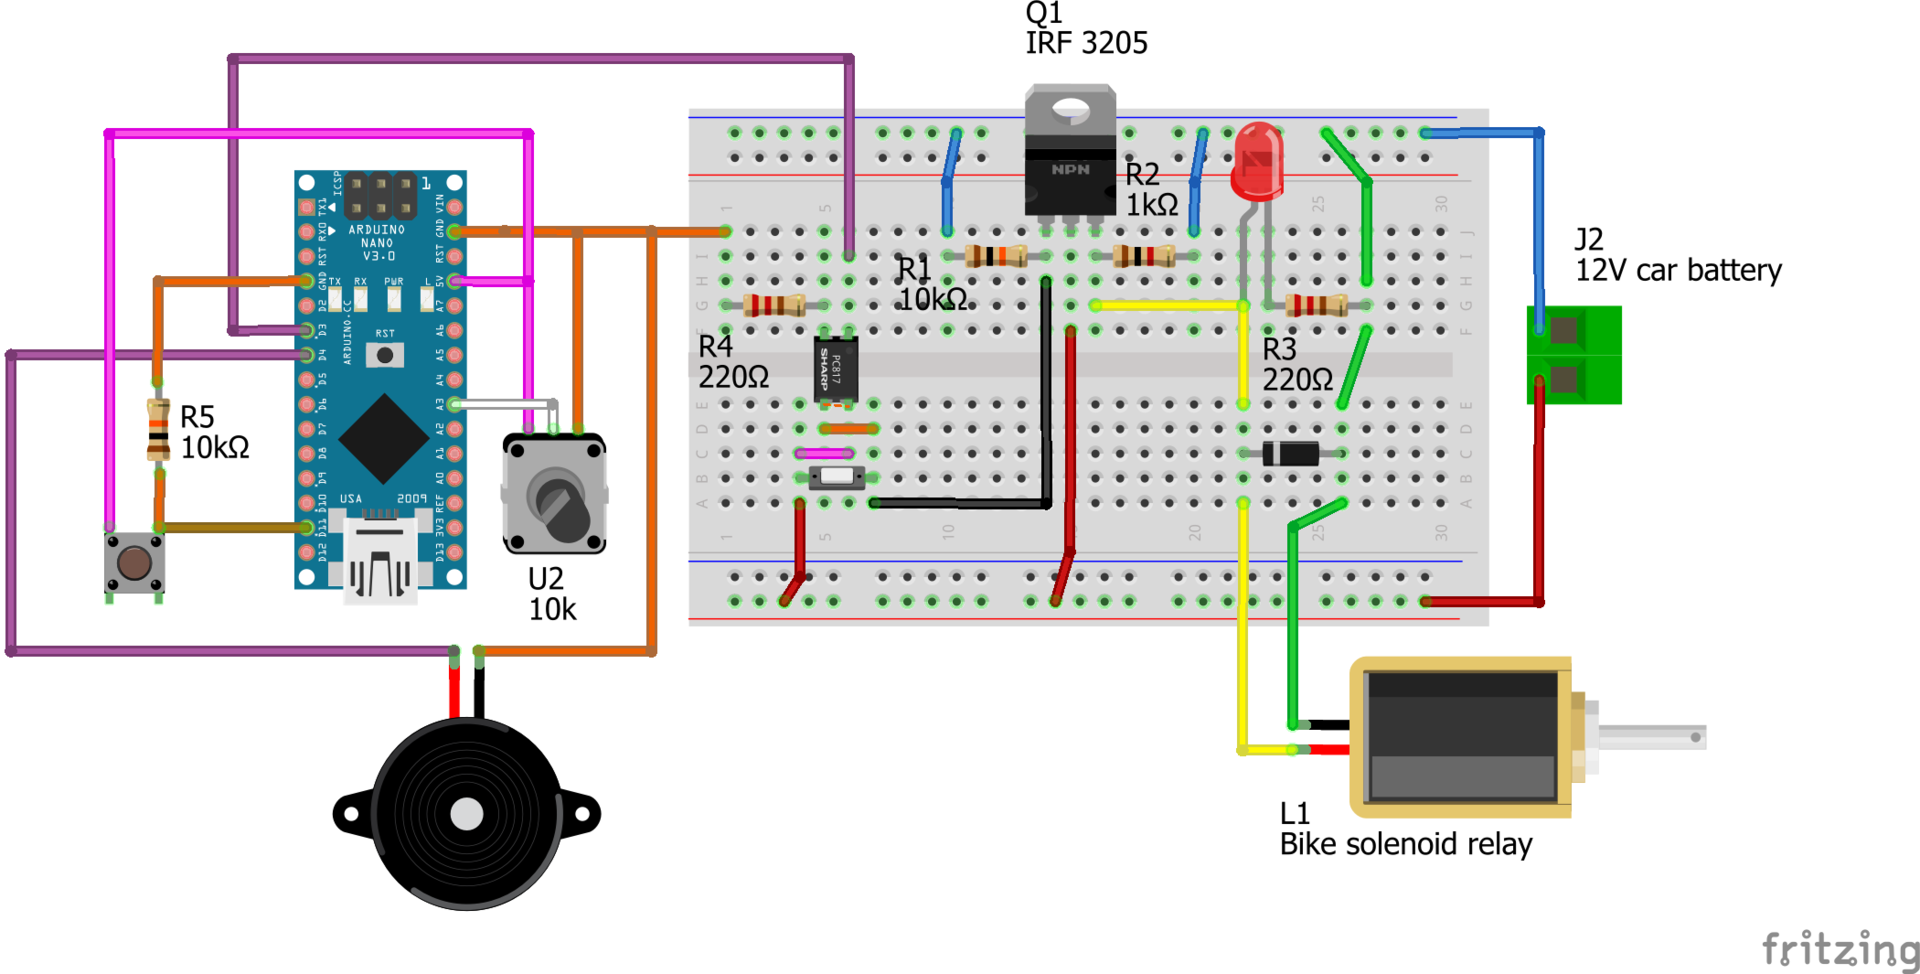
We supplement the scheme - instead of pressing the button, we manually entrust the countdown to milliseconds to Arduine. We will need:
We collect our simple scheme. The shutter button is connected to the pin Arduino D11, pulling it to the “ground” through a 10K resistor. MOSFET - to pin D10, "beeper" - to D9. The potentiometer connected the extreme contacts to the pins VCC and GND, and the middle - to pin A3 Arduino. If desired, you can connect a bright signal LED to the D12 pin.
Fill in the Arduino unenupable code:
Then we connect to Arduine using the Serial monitor and turn the potentiometer to set the length of the welding pulse. I empirically picked up a length of 25 milliseconds, but in your case the delay may be different.
By pressing the shutter release button, Arduino beeps several times, then turns on the relay for a moment. You will need to lime a small amount of tape before you select the optimal pulse length - so that both weld and do not burn holes through.
As a result, we have a simple, artless welding machine that is easy to disassemble:
A few important words about safety :
Collective experience offers two options - either go to the garbage in search of an old microwave, peel it and get a transformer, or spend a lot of money .
For the sake of several welds a year, I didn’t want to look for a transformer, cut it and rewind it. I wanted to find an ultra-cheap and ultra-simple way to weld batteries with electric current.
')
A powerful low-voltage DC source available to everyone is the usual second-hand. Battery from the car. I bet that you already have it somewhere in the closet or you can find it from your neighbor.
I advise - the best way to get an old battery for nothing is
wait for the frosts. Go to the poor fellow who does not start the car - he will soon run for a new fresh battery to the store, and the old one will give you just like that. In the cold, an old lead battery can work poorly, but after a charge at home it will be warm at full capacity.
In order to weld batteries with current from the battery, we will need to give out current in short pulses in a matter of milliseconds - otherwise we will get not welding, but burning holes in the metal. The cheapest and most affordable way to switch the current of a 12-volt battery is an electromechanical relay (solenoid).
The problem is that conventional automotive relays at 12 volts are designed for a maximum of 100 amps, and short circuit currents during welding are many times more. There is a risk that the anchor of the relay will simply be welded. And then in the open spaces of Aliexpress I came across a motorcycle starter relay. It was thought that if these relays withstand the current of the starter, and many thousands of times, then for my purposes it will fit. Finally convinced this video, where the author is experiencing a similar relay:
My relay was purchased for 253 rubles and reached Moscow in less than 20 days. Characteristics of the relay from the seller's site:
- Designed for motorcycles with a 110 or 125 cubic engine
- Rated current - 100 amps for up to 30 seconds
- Winding Field Current - 3 Amps
- Designed for 50 thousand cycles
- Weight - 156 grams
The relay arrived in a neat cardboard box and when unpacked it gave off a wild stench of Chinese rubber. The culprit - a rubber casing on top of the metal case, the smell does not erode for a day.
The unit was pleased with the quality - two copper threaded connections were removed under the contacts, all the wires were filled with compound for waterproofing.
He quickly assembled a “test bench”, the relay contacts were closed manually. The wire used is single-core, with a cross section of 4 squares, and the stripped lugs were fixed with a terminal block. For safety, I provided one of the terminals to the battery with a "safety loop" - if the anchor of the relay would decide to burn and short circuit, I would manage to pull the terminal off the battery for this rope:
Tests have shown that the machine works on a solid top five. The anchor knocks very loudly, and the electrodes give clear flashes; the relay does not burn. In order not to waste the nickel strip and not to practice on dangerous lithium, the blade of a clerical knife tormented. In the photo you see several quality points and several overexposed:
Overexposed dots are visible on the inside of the blade:
We go further. As the experiment on the blade has shown, it is impossible to withstand the required length of the pulse for welding by hand;
At first he built a simple circuit on a powerful transistor, but he quickly remembered that the solenoid in the relay wanted to eat as much as 3 amps. I rummaged in the box and found in return the MOSFET IRF3205 transistor and sketched a simple circuit with it:
The circuit is rather simple - in fact, a MOSFET, two resistors - on 1K and 10K, and a diode that protects the circuit from the current induced by the solenoid at the moment of de-energizing the relay.
First we try the circuit on the foil (with joyful clicks, it burns holes through several layers), then we take out the nickel tape from the zagashnik to connect the battery assemblies. Briefly press the button, get a loud flash, and consider the burned hole. Notebook also got - not only nickel burned, but a couple of sheets under it :)
Even the tape, welded by two points, is not split by hand.
Obviously, the scheme works, it is a matter of fine tuning “shutter speed and exposure”. If you believe the experiments with the oscilloscope of the same comrade from YouTube, from whom I peeped the idea from the starter relay, then it takes about 21ms to break the anchor - from this time we will dance.
Yutuba AvE user tests starter relay firing rate versus SSR Fotek on oscilloscope
We supplement the scheme - instead of pressing the button, we manually entrust the countdown to milliseconds to Arduine. We will need:
- actually Arduino - will come down Nano, ProMini or Pro Micro,
- Sharp PC817 Optocoupler with a 220 Ohm current-limiting resistor - to electrically untie the Arduino and the relay,
- Voltage-reducing module, for example XM1584 , to turn 12 volts from battery to 5 volts safe for Arduina
- we will also need resistors for 1K and 10K, a potentiometer for 10K, some kind of diode and any buzzer.
- And finally, we will need a nickel tape , which is welded batteries.
We collect our simple scheme. The shutter button is connected to the pin Arduino D11, pulling it to the “ground” through a 10K resistor. MOSFET - to pin D10, "beeper" - to D9. The potentiometer connected the extreme contacts to the pins VCC and GND, and the middle - to pin A3 Arduino. If desired, you can connect a bright signal LED to the D12 pin.
Fill in the Arduino unenupable code:
const int buttonPin = 11; // const int ledPin = 12; // const int triggerPin = 10; // MOSFET const int buzzerPin = 9; // const int analogPin = A3; // 10 // : int WeldingNow = LOW; int buttonState; int lastButtonState = LOW; unsigned long lastDebounceTime = 0; unsigned long debounceDelay = 50; // , . int sensorValue = 0; // , ... int weldingTime = 0; // ... void setup() { pinMode(analogPin, INPUT); pinMode(buttonPin, INPUT); pinMode(ledPin, OUTPUT); pinMode(triggerPin, OUTPUT); pinMode(buzzerPin, OUTPUT); digitalWrite(ledPin, LOW); digitalWrite(triggerPin, LOW); digitalWrite(buzzerPin, LOW); Serial.begin(9600); } void loop() { sensorValue = analogRead(analogPin); // , weldingTime = map(sensorValue, 0, 1023, 15, 255); // 15 255 Serial.print("Analog pot reads = "); Serial.print(sensorValue); Serial.print("\t so we will weld for = "); Serial.print(weldingTime); Serial.println("ms. "); // , 50, : int reading = digitalRead(buttonPin); if (reading != lastButtonState) { lastDebounceTime = millis(); } if ((millis() - lastDebounceTime) > debounceDelay) { if (reading != buttonState) { buttonState = reading; if (buttonState == HIGH) { WeldingNow = !WeldingNow; } } } // , : if (WeldingNow == HIGH) { Serial.println("== Welding starts now! =="); delay(1000); // : int cnt = 1; while (cnt <= 3) { playTone(1915, 150); // : 1915, 1700, 1519, 1432, 1275, 1136, 1014, 956 delay(500); cnt++; } playTone(956, 300); delay(1); // MOSFET : digitalWrite(ledPin, HIGH); digitalWrite(triggerPin, HIGH); delay(weldingTime); digitalWrite(triggerPin, LOW); digitalWrite(ledPin, LOW); Serial.println("== Welding ended! =="); delay(1000); // -: WeldingNow = LOW; } else { digitalWrite(ledPin, LOW); digitalWrite(triggerPin, LOW); digitalWrite(buzzerPin, LOW); } lastButtonState = reading; } // , : void playTone(int tone, int duration) { digitalWrite(ledPin, HIGH); for (long i = 0; i < duration * 1000L; i += tone * 2) { digitalWrite(buzzerPin, HIGH); delayMicroseconds(tone); digitalWrite(buzzerPin, LOW); delayMicroseconds(tone); } digitalWrite(ledPin, LOW); } Then we connect to Arduine using the Serial monitor and turn the potentiometer to set the length of the welding pulse. I empirically picked up a length of 25 milliseconds, but in your case the delay may be different.
By pressing the shutter release button, Arduino beeps several times, then turns on the relay for a moment. You will need to lime a small amount of tape before you select the optimal pulse length - so that both weld and do not burn holes through.
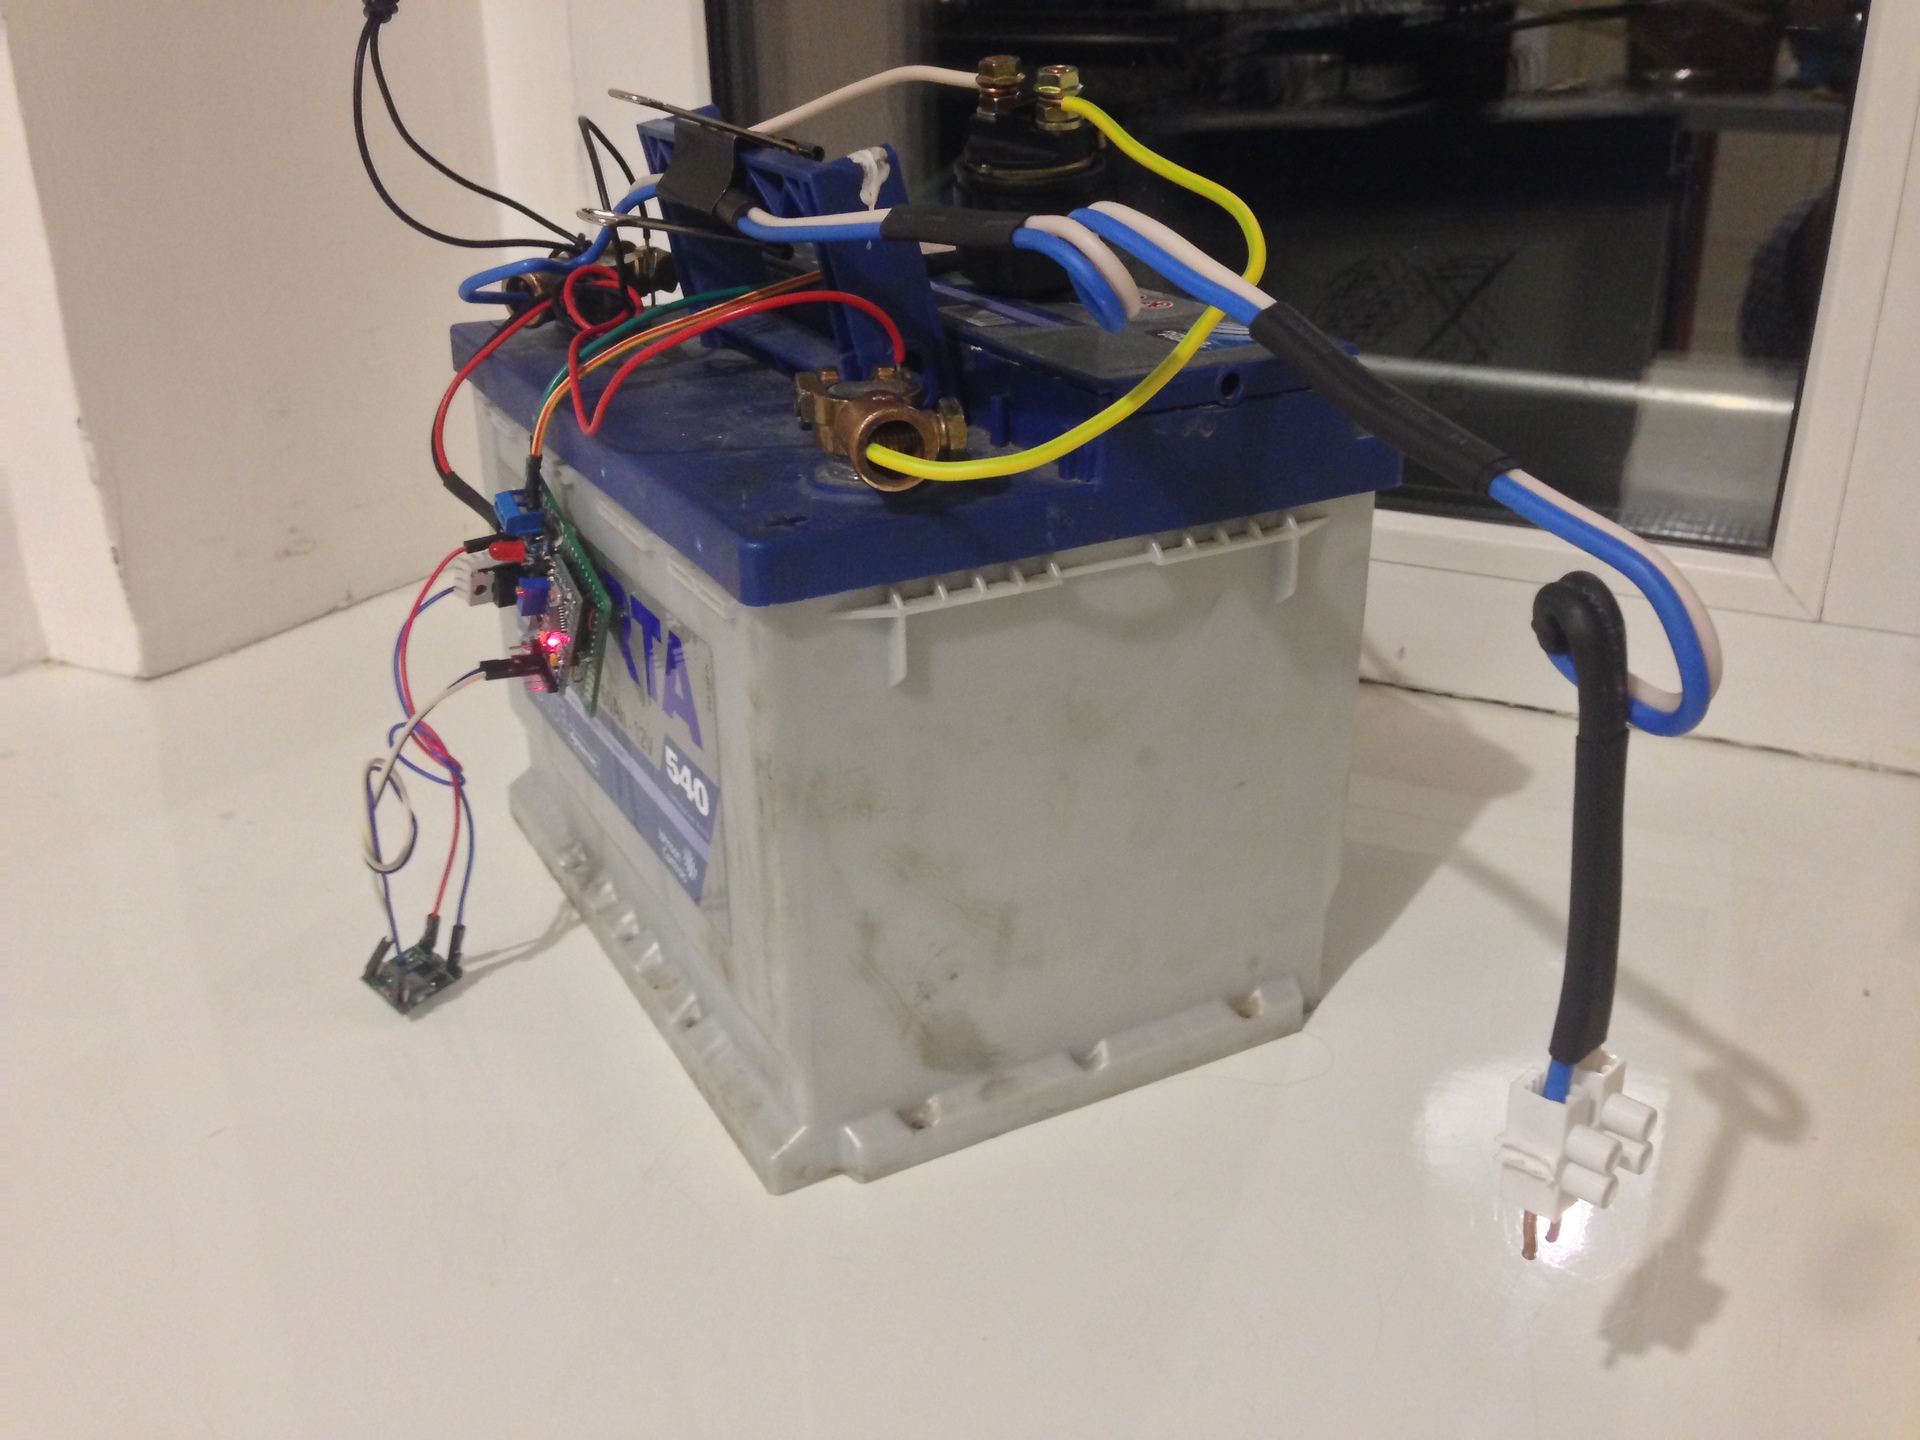
As a result, we have a simple, artless welding machine that is easy to disassemble:
A few important words about safety :
- When welding to the sides can be scattered microscopic splashes of metal. Do not show off, wear safety glasses, they cost three pennies.
- Despite the power, the relay can theoretically "burn" - the anchor of the relay will melt to the point of contact and will not be able to return back. You will get a short circuit and fast warming up the wires. Consider in advance how you will jerk the terminal off the battery in such a situation.
- You can get different degrees of welding depending on the battery charge. To avoid surprises, adjust the length of the welding pulse on a fully charged battery.
- Think in advance about what you will do if you perforate a lithium 18650 battery - how will you grab a red-hot cell and where you will throw it to burn. Most likely, this will not happen to you, but it is better to read the video of the consequences of spontaneous combustion 18650 in advance. At the very least, prepare a metal bucket with a lid.
- Control the charge of your car battery, do not allow it to discharge strongly (below 11 volts). This is not useful to the battery, and the neighbor, who urgently needs to "light" the car in the winter, does not help out.
Source: https://habr.com/ru/post/397975/
All Articles