Black box for home: do-it-yourself NAS collection, part 2 - magnificent NAS4Free
The publication is designed for people far from system administration. This post demonstrates the basic features of NAS4Free's excellent operating system, which allows you to deploy a home NAS even on low-power hardware, with a complete lack of FreeBSD knowledge and command line. The first part of the publication is located here .
So, we have a box with the following characteristics:
It is time to turn it into a home NAS, as reliable as it is possible under these conditions. And this will help us Zettabyte File System - perhaps the best solution for the organization of fault-tolerant and, at the same time, productive file storage. Developed by Sun Microsistems under Solaris, ZFS was later ported to Linux and FreeBSD. Among its many merits, we will be interested in the following:
Among the specialized solutions that can work with ZFS, two competitors are clearly distinguished - FreeNAS and NAS4Free . Such “mirror” names are by no means accidental - both builds are based on FreeBSD, and NAS4Free itself is a fork of FreeNAS 0.7, born when the original operating system went under iXsystems wing and got onto commercial rails. NAS4Free is my personal favorite. Why? Let's figure it out.
')
I think these arguments are quite enough to make an unequivocal choice. Now let's deal with the installation and initial setup of the system.
Since there are only two disks in the system, we will use a USB flash drive as the boot drive. What exactly - absolutely does not matter, any antiquity from 2 GB will be quite enough. If there are doubts about the health of the device, you can use the same Rufus , having banished a few tests. Then everything is simple - download the LiveCD and proceed with the installation. First you will see the following screen:

After some time, the text menu appears on the display:
We are interested in the 9th item - we choose it. The installation process starts:
We don’t touch the expert mode, but the choice between GPT and MBR depends on the age of your motherboard. If you are an adherent of “classics” in the face of BIOS, choose the second item. Worth UEFI - choose the first. After confirming, NAS4Free will kindly inform you what operations it is going to do - we agree to everything:
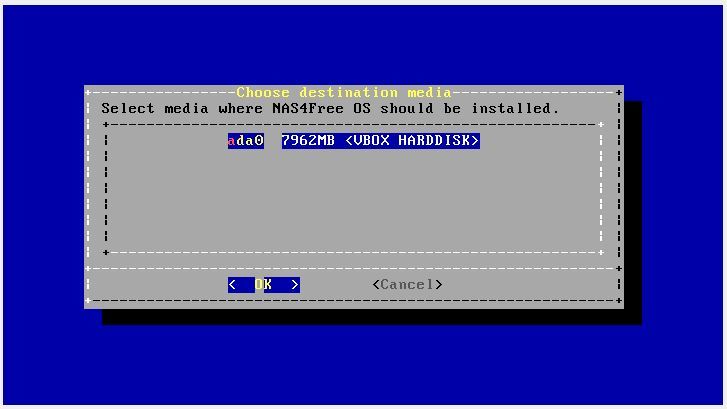
Next, select the drive with the installation disk (in our example it is the only one):
Then you should specify the USB flash drive on which the installation will be made. It is easy to distinguish it from the system drive in size and name:
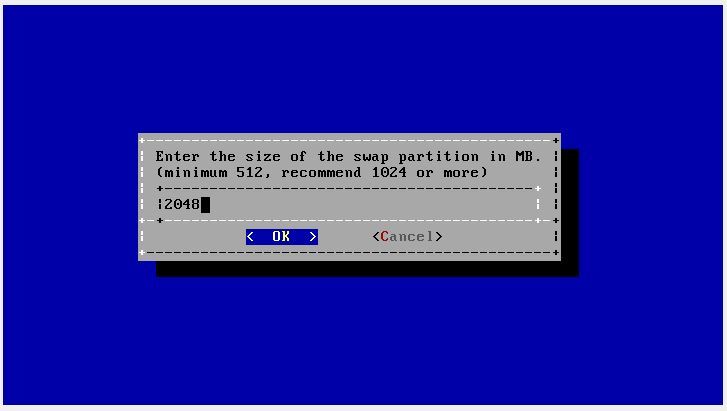
In the next step, we set the size of the paging file. The rule is simple: if you use a 2 GB drive - put 512 MB, 4 GB - put 1024 MB, if 8 - 2. Many people have a fair question in the comments, and how reliable is it to install the operating system on a USB flash drive, especially to make it swap ? I consider it necessary to clarify this point. First, the feature of the embedded version is that a disk image of the system is created in RAM, that is, the flash drive is accessed only when the NAS is booted, and also when the settings are saved. Secondly, the installer requires you to create a paging file on a mandatory basis, while determining its size incorrectly. Make an 8-gig swap on a 4-gig device? Easy! In any case, according to the program, it is worth trying. To avoid errors, the easiest way is to set one of the correct values given above. And finally, the connection of the paging file is carried out manually in the settings - it will not be used, which means that the flash drive will not be killed.
The installation process begins, after which you will see the following screen:
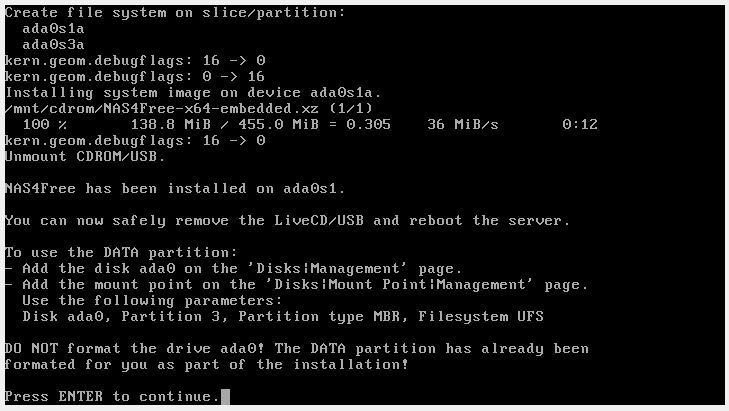
You can turn off the flash drive and reboot - the installation was successful.
Now let's work with the NAS itself. Since we chose a budget option for a thin client as a motherboard, we will have to start by setting boot parameters, connecting not only a USB stick, but also a monitor with a keyboard to the device. D-Sub and HDMI are present as video outputs, so there should be no problems. After turning on the machine, we press “Delete”, and in the “Boot” menu we set our flash drive as the main boot device (by default, the UEFI Shell will be loaded, but we do not need it). Save the changes, reboot the NAS, and if everything is done correctly, we see the familiar menu:
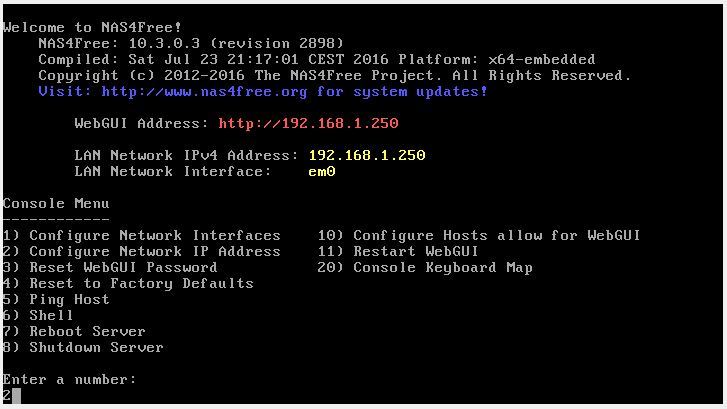
It is possible to connect the NAS to the working environment by any means: through a router, a switch, a null hub - it all depends on your personal needs. Since you probably want to bring the machine to the home network, the best option is a router, so let's set up a static IP address in step 2. Answer the questions asked by the system:
The successful completion of the configuration will be indicated by this screen:
This completes the preparation of the NAS - now you can connect the storage to the network and start configuring.
All operations are carried out through convenient WebGUI - just type in the previously installed IP in the browser (in our case - 192.168.1.250) and immediately get to the authorization form:
The default login is admin, the password (who would have thought) is nas4free. Log in and see the system monitor:
Let's go straight to the great and mighty: go to “System” -> “General”, and change the language to Russian:
Here you can also set a new username and password for the web interface.
Now we will start setup of disks. Go to the section “Disks” -> “Management”, and ... we do not find anything:
Only without panic - in NAS4Free everything needs to be done by hand. The simplest option is to click on “Clear configuration and import disks”, but I recommend clicking on the blue plus sign on the right and adding drives one by one. The menu looks like this:

Go through the options:
Now press the “Add” button and repeat the procedure for the remaining disks. You do not need to add a flash drive to avoid any misunderstandings (format it in a spur of the moment, and you have to start everything from scratch).
After all the manipulations, we see the following in the disc setup menu:
Read the warning in the screenshot. Yes, this is a feature of NAS4Free: first make the settings, then confirm the choice by clicking “Apply changes” - you will have to get used to it. After this we observe the result of our actions:
If you want to receive SMART data, monitoring the status of disks, go to the tab of the same name.
Check the “Enable” checkbox, select the Standby power supply mode (so as not to disturb the hard drives in standby mode) and save the changes. It is also possible to configure alerts. Now you can view detailed data on each drive in the “Diagnostics” -> “Information” -> “SMART” section
So, both online discs, all systems work fine. But this is only the beginning. Let's go to the “Format HDD” tab. As we agreed at the beginning of the article, we will use ZFS. Select both drives and click “Next”:

In the next step, we set the volume label - I selected WDREZFS% 1. The construction of "% 1" means that the disks that we format will receive sequence numbers starting from one. That is, the first one will be named WDREZFS1, the second one - WDREZFS2, etc. If you do not specify the starting point by putting a “%” sign without a digit, the system will number the HDD itself. You can also give names by serial numbers. For example, “[4” means that the last four digits of the serial number will be used as the label.
Further, I highly recommend checking the “Creating ZFS on GPT partition” checkbox if you are building a complex multi-disk pool, planning to add new drives in the future.
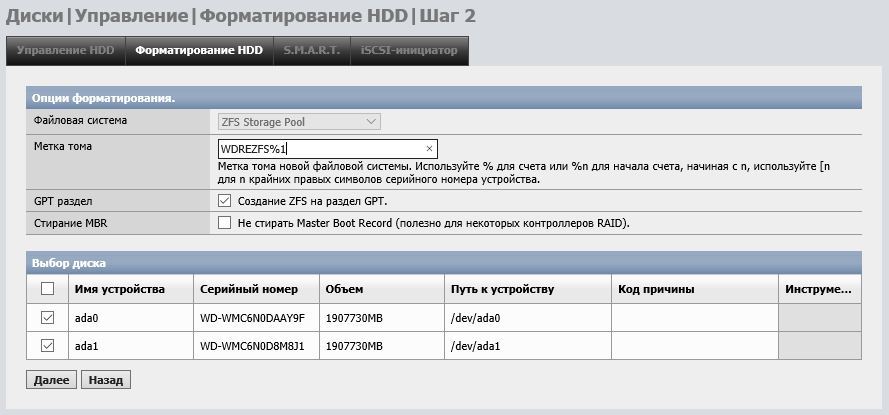
Format the disks, wait for the end of the operation and click on the “OK” button.
Now we need to build a virtual device. Go to “Disks” -> “ZFS” -> “Pools” -> “Virtual device”, click on the blue plus and see the following picture:

Here we can collect disks into an array. I need an analog RAID-1, so I chose “Mirror” (for reference, “Stripe” is essentially the same RAID-0). After confirming the selection, do not forget to apply the changes:

Now go to the “Pools” tab and add a new one using the newly created virtual device:
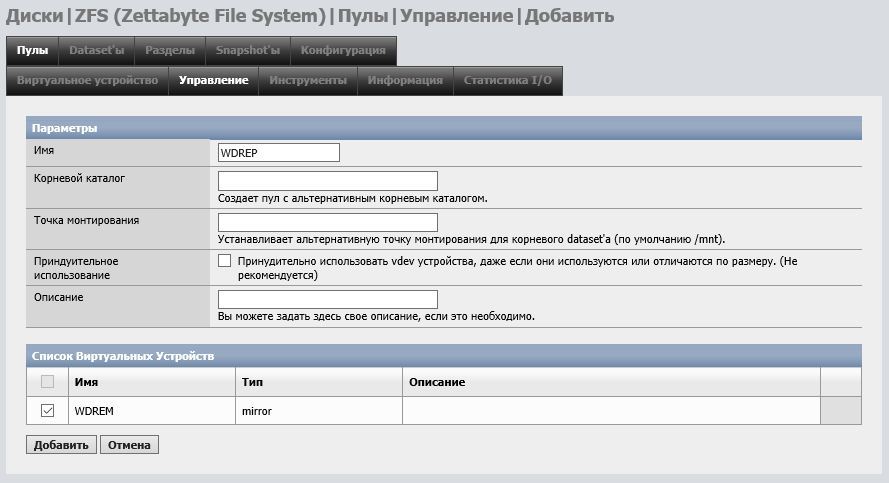
All that is required is to come up with a name, nothing more is needed.
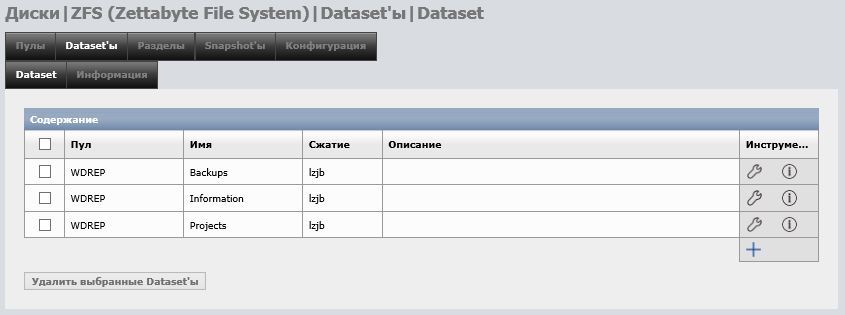
In principle, you can already start uploading files, but the best thing to do is take advantage of the main advantage of ZFS - the ability to create datasets. In fact, they are child file systems, so we have the opportunity to choose a compression method for each dataset, set access rights and disk quotas (which will eliminate the situation when your video collection safely eats all the free space for documents), and most importantly - create snapshots, allowing almost instantly recover lost information. So let's go to “Datasets” and create a few:

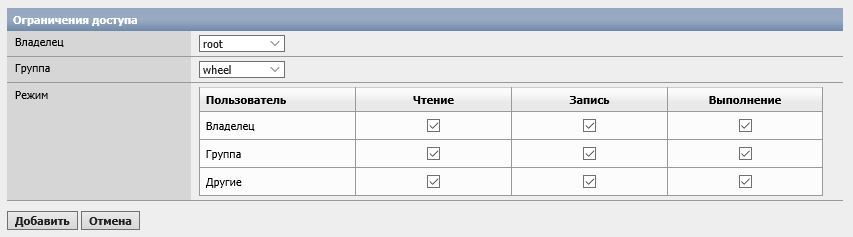
In the screenshot above, the only pool selected is WDREP and the lzjb compression method (a compromise between efficiency and performance). Data deduplication is left turned off, since its adequate functioning requires a minimum of 16 gigabytes of RAM. The term itself refers to a method of compressing a data file by eliminating duplicate copies. It is useful, for example, if you regularly make backup copies of large amounts of information, and the difference between them is minimal. If NAS only plays the role of storage for cinema, music, photos and other media content, you simply won't notice the benefit of duplication, which means that you shouldn't spend extra money on iron. The remaining settings are left as default. The only thing in order to demonstrate, I put a tick in front of the “Visibility of Snapshots” - now the pictures will be visible from other devices. In the “Reserved space” field, you can specify the minimum guaranteed dataset volume, and “Quota” allows you to specify the upper bar. Below you can select users and set permissions:
Similarly, you can add as many datasets as you want:
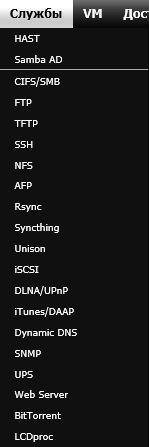
NAS is fully operational, it remains to teach him to communicate with the outside world. To do this, the operating system offers a very impressive set of tools for every taste, located in the “Services” menu. What you need - decide for yourself, now I will limit myself to the basic FTP settings:
Do not forget to check the box "Enable" (by default, all services are disabled). The number of clients is set by the number of devices that will simultaneously contact the repository (for me, 3 is relevant). The number of connections I recommend leaving 2. Then the upload / download of files will be carried out in one stream, which will avoid fragmentation and achieve maximum speed. Save the settings and try to connect to the NAS:
As you can see, the pool and datasets are presented in the form of directories, and the .zfs directories are displayed, in which the snapshots will be saved. And, as it seems to me, it is time to talk about them in more detail.
Snapshots - snapshots of the entire pool, or the selected dataset. If you do not go into details, snapshot is the fastest and “cheapest” in terms of space occupied by the way to create a backup. At the moment, the image management functionality implemented in WebGUI is somewhat limited, however, it is able to fully meet the needs of an ordinary user. Want more - have to use the console.
NAS4Free supports manual and automatic snapshot creation. To take a snapshot manually, go to the “ZFS” -> “Snapshot” tab -> “Snapshot” tab, click the plus sign, specify the path (for example below I created Music) and create a name for the future snapshot:
A check mark in the “Recursive” column means that images of all child datasets located in Music, if any, will be created. The result will be as follows:

Yes, this is not a mistake - the snapshot does not occupy free space until the data in the dataset is changed. For example, it will grow as you remove mp3 files from Music. The process of creating snapshots can be automated in the “Automatic Snapshot” tab.
Here, in addition to the above settings, you can select the time of the snapshot and its storage period. Set a different type, except the daily can not be here (this is only possible through the console).
Well, let's say you inadvertently deleted important files. How can they be restored? This is done by creating clones. Let's go back to the “Snapshot” tab and click on the wrench-shaped icon opposite the snapshot. The following window will appear:
Here you need to choose the path along which the clone will be located. Of course, it must be unique, and not repeat the names of datasets. Click on “Run” and check the result via FTP:
As you can see, the clone of MusicSnap completely repeats the contents of the original dataset. Now you can extract the lost files from the clone and copy it back to Music. After the clone can be removed in the same tab:
So, ZFS Mirror on the basis of the virtually unkillable Western Digital Re allows you to create a home NAS with acceptable reliability even though there is no support for the ECC system board. However, in the described system there is one weak point - a flash drive. Flash memory cannot be called reliable unless you use industrial chips , however NAS4Free has a very convenient mechanism for raising a server from scratch. In the “System” - “Save / Restore” section, you can get an XML file with settings with just one click:
Optionally available password encryption. If the flash drive fails, all that is required of you is to install the system clean and restore the configuration from the file. All previously created pools and datasets, as well as saved information, will be available again.
Actually, that's all - the home NAS is ready for work. At the moment, the assembly described above costs me about a month, digesting about 500 gigabytes during this time. Of course, this is far from work for wear, however, the storage is functioning flawlessly, no problems were observed during this time. And now I’ll arrange a small interactive: write in the comments which NAS4Free functions would you like to see, or which non-standard solutions would you like to implement on its basis. So, for example, Dispi was interested in the possibility of raising a full-fledged LAMP - the application was accepted, although I do not promise publication in the near future.
So, we have a box with the following characteristics:
- Case: Thermaltake Core V1;
- Power supply: Chieftec HPS-350NS;
- Motherboard: GIGABYTE GA-J1800N-D2H;
- RAM: Transcend SO-DIMM 2Gb DDR-III 1333Mhz x 2;
- HDD: WD Re 2004FBYZ x 2 (before making round eyes, read the first part );
- Cooling: TITAN DC FAN (80 mm, 2000 rpm) x 2.
It is time to turn it into a home NAS, as reliable as it is possible under these conditions. And this will help us Zettabyte File System - perhaps the best solution for the organization of fault-tolerant and, at the same time, productive file storage. Developed by Sun Microsistems under Solaris, ZFS was later ported to Linux and FreeBSD. Among its many merits, we will be interested in the following:
- Creation of datasets, thanks to which there is the possibility of selectively managing file compression and deduplication, setting disk quotas, and all this without the participation of managers like LVM;
- Check data integrity using 256-bit checksums;
- Automated backup creation based on snapshots;
- The ability to combine disks in RAID-like arrays at the software level.
Among the specialized solutions that can work with ZFS, two competitors are clearly distinguished - FreeNAS and NAS4Free . Such “mirror” names are by no means accidental - both builds are based on FreeBSD, and NAS4Free itself is a fork of FreeNAS 0.7, born when the original operating system went under iXsystems wing and got onto commercial rails. NAS4Free is my personal favorite. Why? Let's figure it out.
')
- Performance. Given the fact that we are dealing with a budget NAS, one of the most important points, and here NAS4Free is the undisputed leader. Want to get all the buns and adequate performance? A dual-core processor, 4 gigs of RAM, and a 4-gig flash drive, which will be used as a system drive, are enough. However, you can get by with 512 megabytes of operatives with 2 gigabytes of space for the system. In FreeNAS, everything is much sadder: the minimum requirements indicate as much as 8 GB of RAM and 8-gigabytes of space, however, for comfortable work, the OS developers recommend sticking to the 16x16 formula (and four cores in addition).
- Functionality. The undoubted advantage of NAS4Free is a decent set of services and services “out of the box” - in most cases you will not have to install anything:
- Convenience. In NAS4Free, almost everything can be managed through a truly intuitive web-based interface, moreover, containing a lot of prompts and well translated into Russian compared to a competitor. You can work with disks and services, manage the file system, make snapshots and mount clones, without launching the console in principle, which will appeal to novice users and people who are not at all familiar with the administration of * nix'ov.
I think these arguments are quite enough to make an unequivocal choice. Now let's deal with the installation and initial setup of the system.
Installing NAS4Free
Since there are only two disks in the system, we will use a USB flash drive as the boot drive. What exactly - absolutely does not matter, any antiquity from 2 GB will be quite enough. If there are doubts about the health of the device, you can use the same Rufus , having banished a few tests. Then everything is simple - download the LiveCD and proceed with the installation. First you will see the following screen:
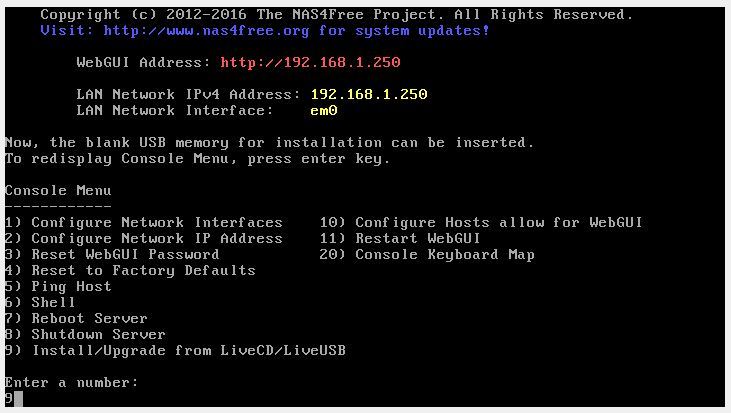
After some time, the text menu appears on the display:
We are interested in the 9th item - we choose it. The installation process starts:
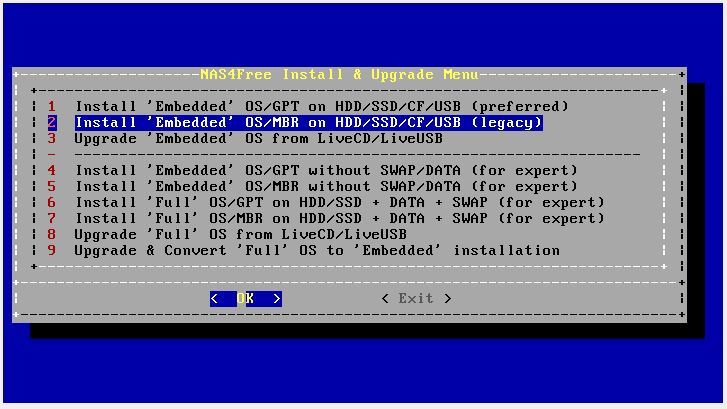
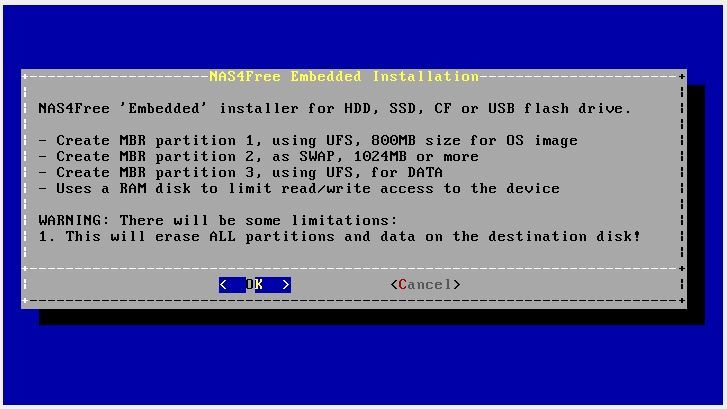
We don’t touch the expert mode, but the choice between GPT and MBR depends on the age of your motherboard. If you are an adherent of “classics” in the face of BIOS, choose the second item. Worth UEFI - choose the first. After confirming, NAS4Free will kindly inform you what operations it is going to do - we agree to everything:
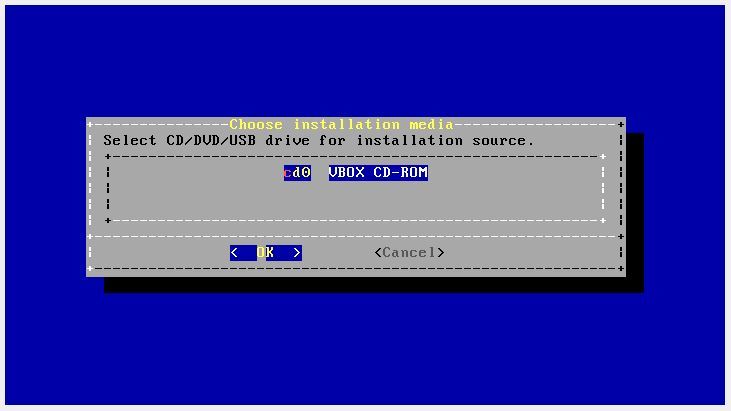
Next, select the drive with the installation disk (in our example it is the only one):
Then you should specify the USB flash drive on which the installation will be made. It is easy to distinguish it from the system drive in size and name:
In the next step, we set the size of the paging file. The rule is simple: if you use a 2 GB drive - put 512 MB, 4 GB - put 1024 MB, if 8 - 2. Many people have a fair question in the comments, and how reliable is it to install the operating system on a USB flash drive, especially to make it swap ? I consider it necessary to clarify this point. First, the feature of the embedded version is that a disk image of the system is created in RAM, that is, the flash drive is accessed only when the NAS is booted, and also when the settings are saved. Secondly, the installer requires you to create a paging file on a mandatory basis, while determining its size incorrectly. Make an 8-gig swap on a 4-gig device? Easy! In any case, according to the program, it is worth trying. To avoid errors, the easiest way is to set one of the correct values given above. And finally, the connection of the paging file is carried out manually in the settings - it will not be used, which means that the flash drive will not be killed.
The installation process begins, after which you will see the following screen:
You can turn off the flash drive and reboot - the installation was successful.
Now let's work with the NAS itself. Since we chose a budget option for a thin client as a motherboard, we will have to start by setting boot parameters, connecting not only a USB stick, but also a monitor with a keyboard to the device. D-Sub and HDMI are present as video outputs, so there should be no problems. After turning on the machine, we press “Delete”, and in the “Boot” menu we set our flash drive as the main boot device (by default, the UEFI Shell will be loaded, but we do not need it). Save the changes, reboot the NAS, and if everything is done correctly, we see the familiar menu:
It is possible to connect the NAS to the working environment by any means: through a router, a switch, a null hub - it all depends on your personal needs. Since you probably want to bring the machine to the home network, the best option is a router, so let's set up a static IP address in step 2. Answer the questions asked by the system:
- Do you want to use DHCP for this interface? - No (we want to set static IP)
- Enter new LAN IPv4 address - 192.168.1.250 (installed by default, if it is already used in your network - enter any free)
- Enter new LAN subnet mask - 24 (subnet mask 255.255.255.0)
- Enter IPv4 default gateway - 192.168.1.1 (we specify the address of the router)
- Enter DNS IPv4 address - 192.168.1.1 (also specify the address of the router)
- Do you want to configure IPv6 for this interface? - No (in the home IPv6 network, we simply do not need)
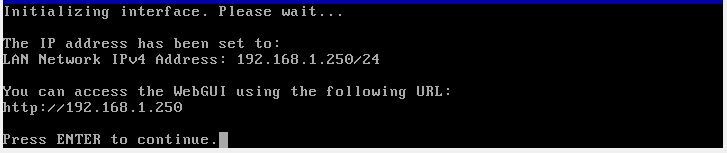
The successful completion of the configuration will be indicated by this screen:
This completes the preparation of the NAS - now you can connect the storage to the network and start configuring.
Customize drives
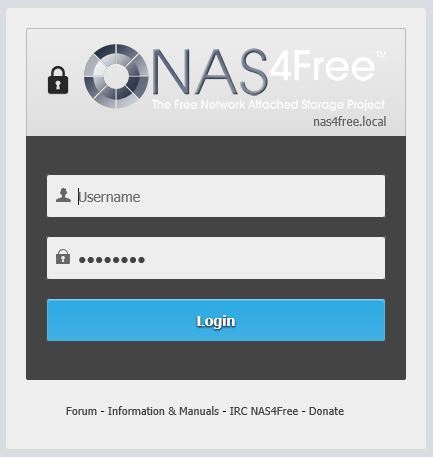
All operations are carried out through convenient WebGUI - just type in the previously installed IP in the browser (in our case - 192.168.1.250) and immediately get to the authorization form:
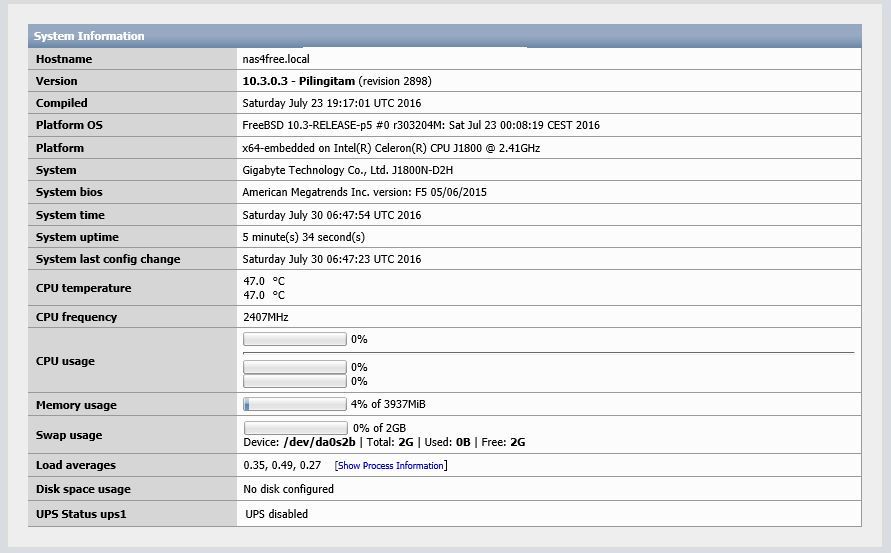
The default login is admin, the password (who would have thought) is nas4free. Log in and see the system monitor:
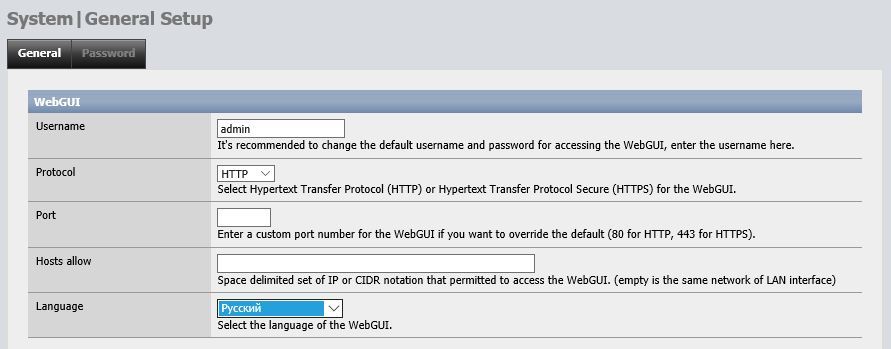
Let's go straight to the great and mighty: go to “System” -> “General”, and change the language to Russian:
Here you can also set a new username and password for the web interface.
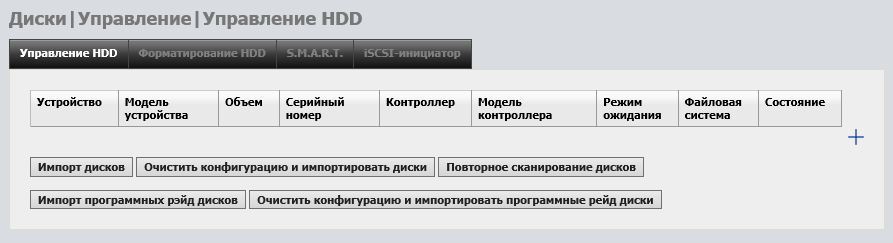
Now we will start setup of disks. Go to the section “Disks” -> “Management”, and ... we do not find anything:
Only without panic - in NAS4Free everything needs to be done by hand. The simplest option is to click on “Clear configuration and import disks”, but I recommend clicking on the blue plus sign on the right and adding drives one by one. The menu looks like this:
Go through the options:
- The description can not be filled at all, I have entered the abbreviated name of the disk;
- The transfer mode is set to Auto;
- The period of transferring the drives to the standby mode is specified depending on your personal needs. However, it should be taken into account: frequent restarting does not benefit even reliable WD Re, so it makes no sense to set up 5-10 minutes - this will only accelerate the wear of the HDD;
- Power management - I set Level 127 - a trade-off between performance and power consumption;
- Noise level - I do not consider it necessary to use it, since WD is already working very quietly;
- If you want to enable SMART monitoring, check the box;
- Since the discs are new, we leave Unformated in the last line.
Now press the “Add” button and repeat the procedure for the remaining disks. You do not need to add a flash drive to avoid any misunderstandings (format it in a spur of the moment, and you have to start everything from scratch).
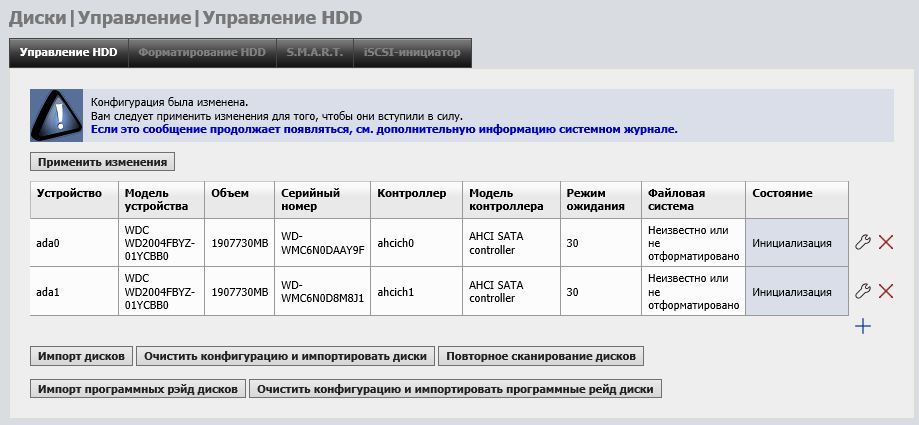
After all the manipulations, we see the following in the disc setup menu:
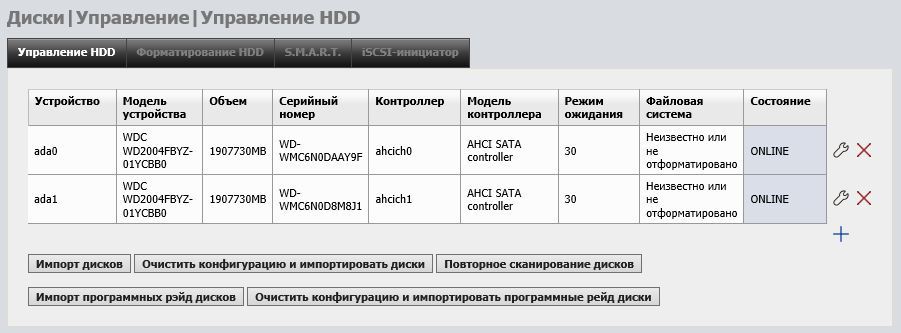
Read the warning in the screenshot. Yes, this is a feature of NAS4Free: first make the settings, then confirm the choice by clicking “Apply changes” - you will have to get used to it. After this we observe the result of our actions:
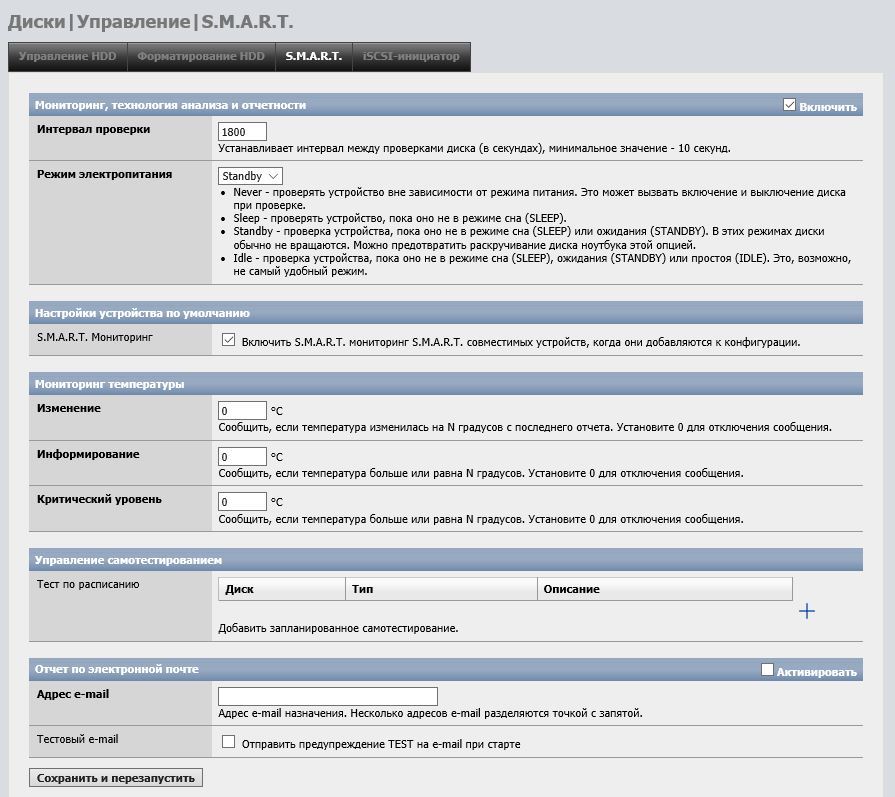
If you want to receive SMART data, monitoring the status of disks, go to the tab of the same name.
Check the “Enable” checkbox, select the Standby power supply mode (so as not to disturb the hard drives in standby mode) and save the changes. It is also possible to configure alerts. Now you can view detailed data on each drive in the “Diagnostics” -> “Information” -> “SMART” section
So, both online discs, all systems work fine. But this is only the beginning. Let's go to the “Format HDD” tab. As we agreed at the beginning of the article, we will use ZFS. Select both drives and click “Next”:
In the next step, we set the volume label - I selected WDREZFS% 1. The construction of "% 1" means that the disks that we format will receive sequence numbers starting from one. That is, the first one will be named WDREZFS1, the second one - WDREZFS2, etc. If you do not specify the starting point by putting a “%” sign without a digit, the system will number the HDD itself. You can also give names by serial numbers. For example, “[4” means that the last four digits of the serial number will be used as the label.
Further, I highly recommend checking the “Creating ZFS on GPT partition” checkbox if you are building a complex multi-disk pool, planning to add new drives in the future.
Format the disks, wait for the end of the operation and click on the “OK” button.
Now we need to build a virtual device. Go to “Disks” -> “ZFS” -> “Pools” -> “Virtual device”, click on the blue plus and see the following picture:
Here we can collect disks into an array. I need an analog RAID-1, so I chose “Mirror” (for reference, “Stripe” is essentially the same RAID-0). After confirming the selection, do not forget to apply the changes:
Now go to the “Pools” tab and add a new one using the newly created virtual device:
All that is required is to come up with a name, nothing more is needed.
In principle, you can already start uploading files, but the best thing to do is take advantage of the main advantage of ZFS - the ability to create datasets. In fact, they are child file systems, so we have the opportunity to choose a compression method for each dataset, set access rights and disk quotas (which will eliminate the situation when your video collection safely eats all the free space for documents), and most importantly - create snapshots, allowing almost instantly recover lost information. So let's go to “Datasets” and create a few:
In the screenshot above, the only pool selected is WDREP and the lzjb compression method (a compromise between efficiency and performance). Data deduplication is left turned off, since its adequate functioning requires a minimum of 16 gigabytes of RAM. The term itself refers to a method of compressing a data file by eliminating duplicate copies. It is useful, for example, if you regularly make backup copies of large amounts of information, and the difference between them is minimal. If NAS only plays the role of storage for cinema, music, photos and other media content, you simply won't notice the benefit of duplication, which means that you shouldn't spend extra money on iron. The remaining settings are left as default. The only thing in order to demonstrate, I put a tick in front of the “Visibility of Snapshots” - now the pictures will be visible from other devices. In the “Reserved space” field, you can specify the minimum guaranteed dataset volume, and “Quota” allows you to specify the upper bar. Below you can select users and set permissions:
Similarly, you can add as many datasets as you want:
Time to upload files
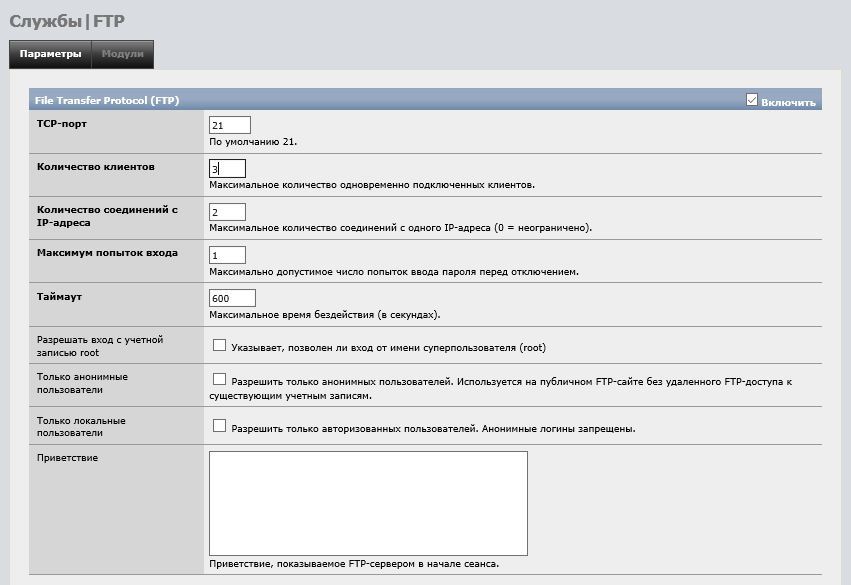
NAS is fully operational, it remains to teach him to communicate with the outside world. To do this, the operating system offers a very impressive set of tools for every taste, located in the “Services” menu. What you need - decide for yourself, now I will limit myself to the basic FTP settings:
Do not forget to check the box "Enable" (by default, all services are disabled). The number of clients is set by the number of devices that will simultaneously contact the repository (for me, 3 is relevant). The number of connections I recommend leaving 2. Then the upload / download of files will be carried out in one stream, which will avoid fragmentation and achieve maximum speed. Save the settings and try to connect to the NAS:
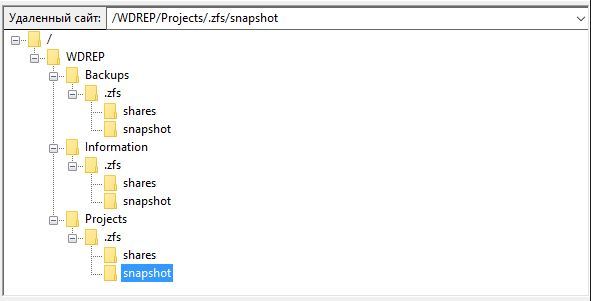
As you can see, the pool and datasets are presented in the form of directories, and the .zfs directories are displayed, in which the snapshots will be saved. And, as it seems to me, it is time to talk about them in more detail.
Snapshots - snapshots of the entire pool, or the selected dataset. If you do not go into details, snapshot is the fastest and “cheapest” in terms of space occupied by the way to create a backup. At the moment, the image management functionality implemented in WebGUI is somewhat limited, however, it is able to fully meet the needs of an ordinary user. Want more - have to use the console.
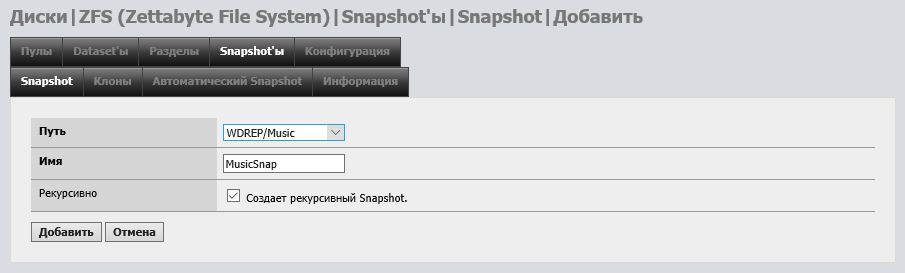
NAS4Free supports manual and automatic snapshot creation. To take a snapshot manually, go to the “ZFS” -> “Snapshot” tab -> “Snapshot” tab, click the plus sign, specify the path (for example below I created Music) and create a name for the future snapshot:
A check mark in the “Recursive” column means that images of all child datasets located in Music, if any, will be created. The result will be as follows:
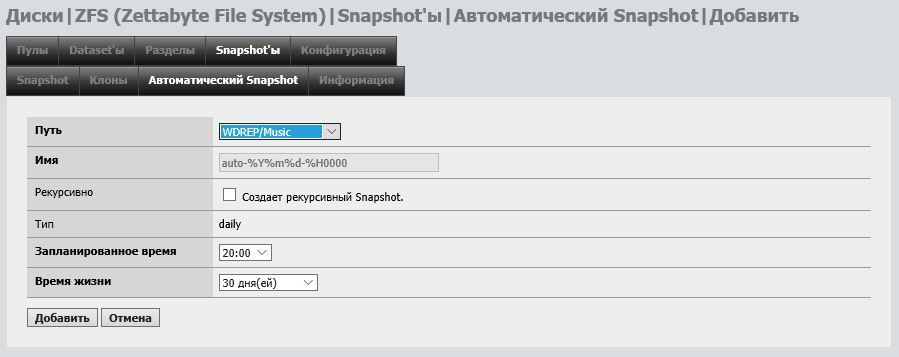
Yes, this is not a mistake - the snapshot does not occupy free space until the data in the dataset is changed. For example, it will grow as you remove mp3 files from Music. The process of creating snapshots can be automated in the “Automatic Snapshot” tab.
Here, in addition to the above settings, you can select the time of the snapshot and its storage period. Set a different type, except the daily can not be here (this is only possible through the console).
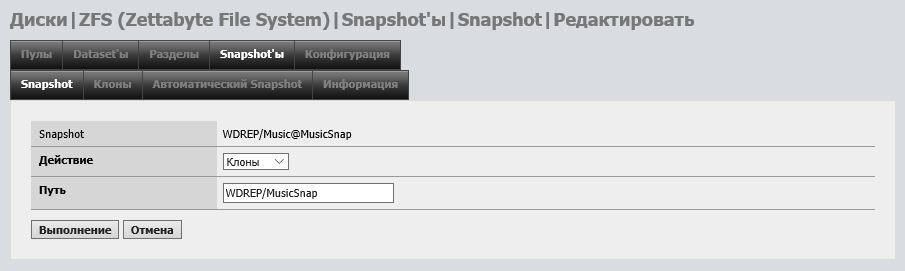
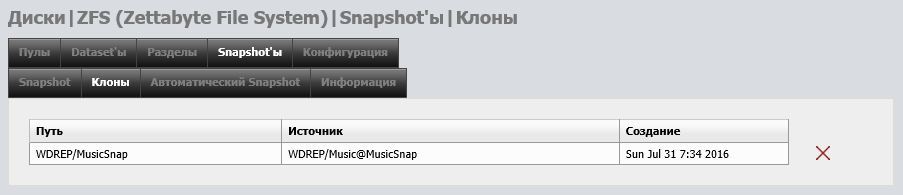
Well, let's say you inadvertently deleted important files. How can they be restored? This is done by creating clones. Let's go back to the “Snapshot” tab and click on the wrench-shaped icon opposite the snapshot. The following window will appear:
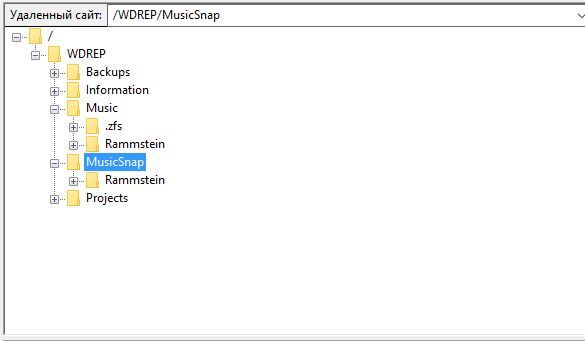
Here you need to choose the path along which the clone will be located. Of course, it must be unique, and not repeat the names of datasets. Click on “Run” and check the result via FTP:
As you can see, the clone of MusicSnap completely repeats the contents of the original dataset. Now you can extract the lost files from the clone and copy it back to Music. After the clone can be removed in the same tab:
Final touch
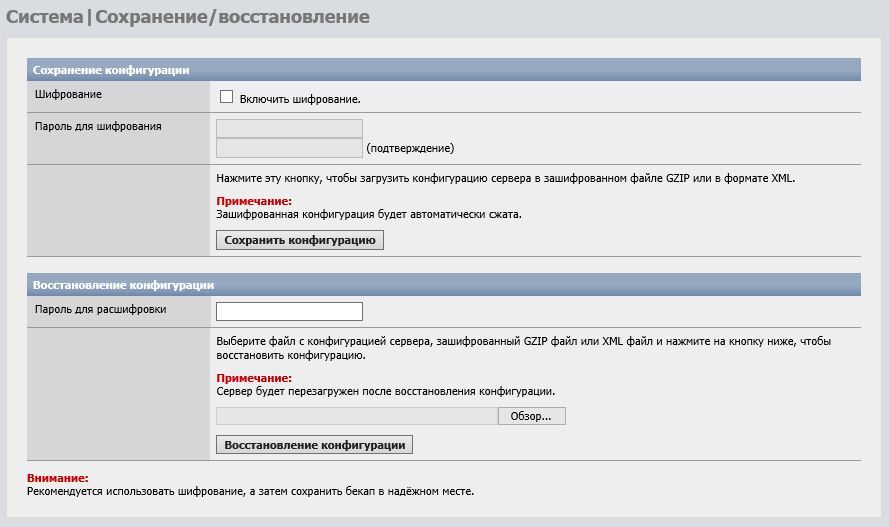
So, ZFS Mirror on the basis of the virtually unkillable Western Digital Re allows you to create a home NAS with acceptable reliability even though there is no support for the ECC system board. However, in the described system there is one weak point - a flash drive. Flash memory cannot be called reliable unless you use industrial chips , however NAS4Free has a very convenient mechanism for raising a server from scratch. In the “System” - “Save / Restore” section, you can get an XML file with settings with just one click:
Optionally available password encryption. If the flash drive fails, all that is required of you is to install the system clean and restore the configuration from the file. All previously created pools and datasets, as well as saved information, will be available again.
Actually, that's all - the home NAS is ready for work. At the moment, the assembly described above costs me about a month, digesting about 500 gigabytes during this time. Of course, this is far from work for wear, however, the storage is functioning flawlessly, no problems were observed during this time. And now I’ll arrange a small interactive: write in the comments which NAS4Free functions would you like to see, or which non-standard solutions would you like to implement on its basis. So, for example, Dispi was interested in the possibility of raising a full-fledged LAMP - the application was accepted, although I do not promise publication in the near future.
Source: https://habr.com/ru/post/397575/
All Articles