We pump VoIP GSM gateway Yeastar TG100 to a mini-PBX
The vast majority of ready IP-PBX are designed for companies with a staff of ten or more people. In fact, in Russia there are a lot of companies with two to five employees, and they also somehow need to organize telephone communications. The functionality of ready IP PBX for them is redundant, and the cost is too high. You can build your own telephone exchange with a regular computer and Asterisk. You can connect to a VoIP service provider and use the “cloud PBX” service. And you can go the other way - take an inexpensive device with the Asterisk already pre-installed, such as the Yeastar TG100 , and pump in a bit of its functionality. That who does not search for easy ways - welcome under kat.
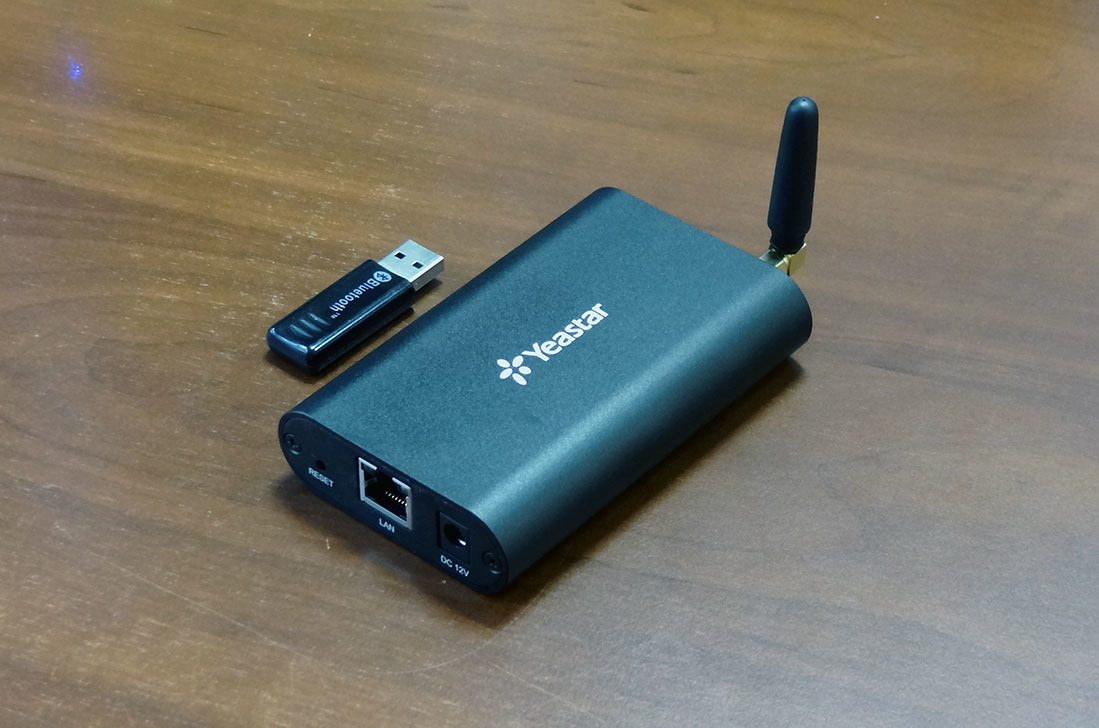
Yeastar TG100 is a VoIP GSM gateway for one SIM card and is used, as a rule, to connect a cellular line to an IP-PBX via SIP protocol. We will try to use the Yeastar TG100 not with the IP PBX, but instead. Why did we choose GSM gateway as the test subject? It is no secret that many companies at the beginning of their activities use a regular mobile number to communicate with the world. In the process of growth, the need for communication increases, but I also want to keep the old number - in this sense, the variant using the VoIP GSM gateway looks more advantageous than Asterisk on a computer or a virtual IP PBX.
Why Yeastar? Firstly, these are, in our opinion, the highest quality VoIP GSM gateways represented in our market. Secondly, these gateways provide the ability to gain access to the Asterisk installed on it and modify the configuration files (for which engineers should say a special thank you). Thirdly, the manufacturer itself claims that Yeastar VoIP GSM gateways support the “SIP server for registering IP phones”, which often misleads end users who think they can use the gateway as a full IP PBX. This article may be of interest to just such users.
')
Finally, why did we choose the youngest model of the Yeastar TG100? Everything is simple - since we are talking about PBX for the youngest, then we chose the most inexpensive gateway. If desired, instead of the TG100, you can take the TG200 (for two SIM cards), the TG400 (for four) and even the TG800 (for eight) - there will be no fundamental changes in their configuration.
First, we define what the minimum set of functions our future IP PBX should have.
We will try to reduce the configuration of the gateway through the configuration files to a minimum, using a maximum of standard configuration tools, that is, a web interface. For example, with its help we can create the number of SIP accounts we need to connect users to the IP gateway. Go to the section Gateway - VoIP lines and click Add VoIP line .
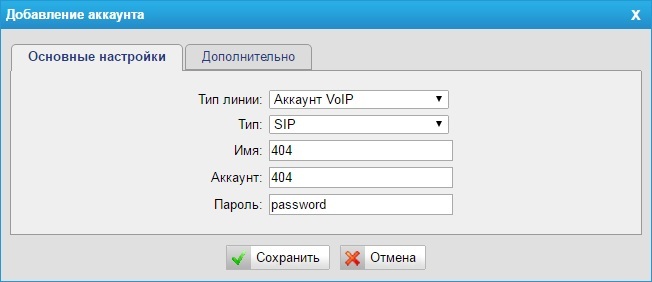
Line Type: VoIP Account
Type: SIP
Name: Arbitrary Name
Account: internal phone number
Password: complex password
We repeat this operation as many times as we need to have telephones. Unfortunately, even after the creation of all SIP accounts, the internal communication will not work, we need to work with configuration files to enable it.
Let's connect our Yeastar TG100 to a VoIP communication provider, since the Web interface provides all the possibilities for this. In the same section Gateway - VoIP lines , click Add VoIP line again and in the Line type field select “VoIP line”. Each telecom operator has its own requirements for registration, however, the available fields are enough for a successful connection to most of them.
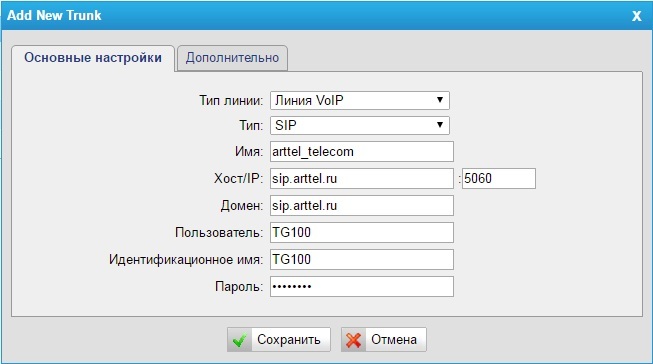
Line Type: VoIP Line
Type: SIP
Name: Arbitrary Name
Host / IP: SIP server IP address or domain name, as well as its port.
Domain: IP address or domain name of the SIP server
User : SIP ID issued by the operator
Identification Name: SIP ID issued by the operator
Password: password issued by the operator
From (Advanced tab): Operator SIP ID
Of course, we will not be able to create an interactive voice menu via a web interface. But for him, in any case, you will need a voice greeting, which we can use to download the web interface. In the System - Audio Files section , click Upload File . The file must be in a wav-format and its size should not exceed 1.8 MB. The following coding is allowed:
gsm 6.10 8kHz, Mono, 1Kb / s
alaw / ulaw 8kHz, Mono, 1Kb / s
pcm 8kHz, Mono, 16Kb / s
This is where web-interface capabilities end. We will configure the internal, outgoing and inbound routing by ourselves.
To connect, we will use the SSH protocol, which must first be activated on the gateway. In the System - Network Settings - LAN Settings section, we activate the Enable SSH option, save and apply the changes.
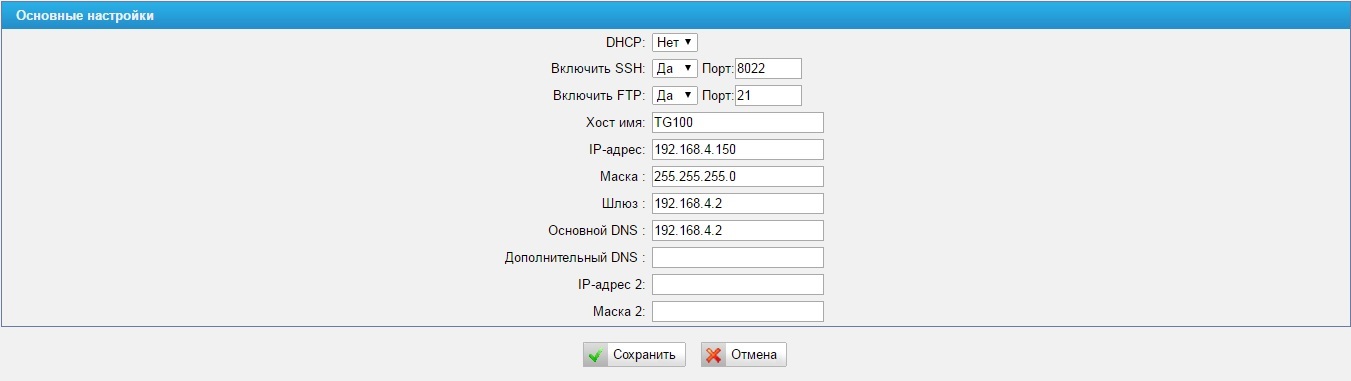
Connect to your gateway using your favorite SSH client. The default port for connection is 8022, login is root, password is ys123456. Once connected, you will be taken to the Linux environment.
The Asterisk configuration files are in the usual place - / etc / asterisk, but you cannot change anything directly in them, otherwise after any settings applied in the Web interface, all your settings in the configuration files will be lost. To add or change the settings of the Asterisk configuration files, a special directory - / persistent / custom-cfg. It contains the gncustom.conf file containing the names of all the asterisk configuration files that you can modify or add something new to them.
Accordingly, the files in the [modifyfile] section are files in which changes or additions to existing settings are allowed; files in the [replacefile] section - files that are completely replaced by your settings.
In order to change any settings in the asterisk configuration file, you need to know three parameters:
Next, in the / persistent / custom-cfg directory, a file is created with the format name <name> _custom.conf. Where <name> is the name of the configuration file in the / etc / asterisk directory without ending “.conf”. For example, if you want to make changes in the /etc/asterisk/users.conf file, then the file with the changes will be called users_custom.conf. In the file with changes, the section in square brackets is indicated, as well as in the original file, in which you want to make a change and the line below is a modified option with a new value after the equal sign. Example:
If there is a section in the settings file that is not in the original configuration file, it will simply be added. After making changes to the configuration files, you need to apply them. The easiest way to do this is in the Web interface — click Save in any section of the settings, and then click Apply .
A little earlier, using the Web interface, we created SIP accounts, let it be 401, 402 and 403. The configuration of these SIP devices is located in the /etc/asterisk/users.conf file. For each device, its own dial plan context is used - the context parameter. For 401 - this is Voip-Account-401, for 402 - Voip-Account-402, for 403 - Voip-Account-403.
In the set plan file /etc/asterisk/extensions.conf we can see the following entry:
In essence, this means that each device we create is in its own and absolutely empty context of the dial plan. This explains the fact that the default internal calls in the gateway do not work, and this should be corrected.
We will send all incoming calls, both via the GSM line and through the SIP trunk, to the interactive voice menu with the following structure:
To implement this functionality, add the following to extensions_custom.conf file:
Our context with voice greeting has been created; now it is necessary to send all incoming calls to it, both from the GSM channel and from the SIP trunk. To do this, create a file users_custom.conf in the / persistent / custom-cfg folder with the following content:
We save and accept the changes through the Web-interface.
The last thing left for us to do is configure the logic for outgoing calls. She will be next:
To do this, in the already created file extensions_custom.conf we will add the following to the [from-internal] section:
What rules are responsible for which directions are not difficult to understand by the extension number pattern: _89XX. - Mobile numbers, _8 [348] XXXXXXXXX - Calls in Russia, _810XX. - calls to international destinations. For sending calls through a specific trunk, the trunkdial-failover-0.4 macro is responsible. The first argument indicates the number of lines used for the outgoing call. The last argument lists the trunks through which an outgoing call can be made. For example, if we worked with the four-port Yeastar TG400 gateway instead of the single-port Yeastar TG100, then the line:
should be replaced by:
We save and apply the changes we made.
As a result of the changes made, we received a completely workable solution, which was ready to quietly serve the office of 2-10 people. Yes, it does not support such additional functions as recording and listening to conversations, call parking, conference calls, voice mail, and others. But, to tell the truth, for the smallest companies, all these functions are of little demand. But this solution is compact, low power consumption and GSM-line support. And given the availability of time, desire and imagination, the Yeastar TG100 VoIP GSM Gateway can be supplemented with many more interesting features.
Yeastar TG100 is a VoIP GSM gateway for one SIM card and is used, as a rule, to connect a cellular line to an IP-PBX via SIP protocol. We will try to use the Yeastar TG100 not with the IP PBX, but instead. Why did we choose GSM gateway as the test subject? It is no secret that many companies at the beginning of their activities use a regular mobile number to communicate with the world. In the process of growth, the need for communication increases, but I also want to keep the old number - in this sense, the variant using the VoIP GSM gateway looks more advantageous than Asterisk on a computer or a virtual IP PBX.
Why Yeastar? Firstly, these are, in our opinion, the highest quality VoIP GSM gateways represented in our market. Secondly, these gateways provide the ability to gain access to the Asterisk installed on it and modify the configuration files (for which engineers should say a special thank you). Thirdly, the manufacturer itself claims that Yeastar VoIP GSM gateways support the “SIP server for registering IP phones”, which often misleads end users who think they can use the gateway as a full IP PBX. This article may be of interest to just such users.
')
Finally, why did we choose the youngest model of the Yeastar TG100? Everything is simple - since we are talking about PBX for the youngest, then we chose the most inexpensive gateway. If desired, instead of the TG100, you can take the TG200 (for two SIM cards), the TG400 (for four) and even the TG800 (for eight) - there will be no fundamental changes in their configuration.
What do we want to get?
First, we define what the minimum set of functions our future IP PBX should have.
- Intercom IP phones or softphones of users registered at the gateway should be able to make calls between themselves and transfer calls
- Incoming calls. The incoming call should go to the interactive voice menu, which will offer the caller several options for connecting with company employees
- SIP provider. The presence of a GSM line is good, but for a full-fledged office telephone installation, you cannot do without a city number, which is easiest to get by registering a gateway on the server of a VoIP telecom operator
- Outgoing calls. Since we will have two communication channels with the world - SIP and GSM, the gateway should automatically determine through which channel it should make an outgoing call. We will use a simple principle - the gateway should make calls to mobile numbers via GSM-line, to city numbers through SIP
What can we do by regular means?
We will try to reduce the configuration of the gateway through the configuration files to a minimum, using a maximum of standard configuration tools, that is, a web interface. For example, with its help we can create the number of SIP accounts we need to connect users to the IP gateway. Go to the section Gateway - VoIP lines and click Add VoIP line .
Line Type: VoIP Account
Type: SIP
Name: Arbitrary Name
Account: internal phone number
Password: complex password
We repeat this operation as many times as we need to have telephones. Unfortunately, even after the creation of all SIP accounts, the internal communication will not work, we need to work with configuration files to enable it.
Let's connect our Yeastar TG100 to a VoIP communication provider, since the Web interface provides all the possibilities for this. In the same section Gateway - VoIP lines , click Add VoIP line again and in the Line type field select “VoIP line”. Each telecom operator has its own requirements for registration, however, the available fields are enough for a successful connection to most of them.
Line Type: VoIP Line
Type: SIP
Name: Arbitrary Name
Host / IP: SIP server IP address or domain name, as well as its port.
Domain: IP address or domain name of the SIP server
User : SIP ID issued by the operator
Identification Name: SIP ID issued by the operator
Password: password issued by the operator
From (Advanced tab): Operator SIP ID
Of course, we will not be able to create an interactive voice menu via a web interface. But for him, in any case, you will need a voice greeting, which we can use to download the web interface. In the System - Audio Files section , click Upload File . The file must be in a wav-format and its size should not exceed 1.8 MB. The following coding is allowed:
gsm 6.10 8kHz, Mono, 1Kb / s
alaw / ulaw 8kHz, Mono, 1Kb / s
pcm 8kHz, Mono, 16Kb / s
This is where web-interface capabilities end. We will configure the internal, outgoing and inbound routing by ourselves.
Connect to Yeastar TG100
To connect, we will use the SSH protocol, which must first be activated on the gateway. In the System - Network Settings - LAN Settings section, we activate the Enable SSH option, save and apply the changes.
Connect to your gateway using your favorite SSH client. The default port for connection is 8022, login is root, password is ys123456. Once connected, you will be taken to the Linux environment.
The Asterisk configuration files are in the usual place - / etc / asterisk, but you cannot change anything directly in them, otherwise after any settings applied in the Web interface, all your settings in the configuration files will be lost. To add or change the settings of the Asterisk configuration files, a special directory - / persistent / custom-cfg. It contains the gncustom.conf file containing the names of all the asterisk configuration files that you can modify or add something new to them.
cat /persistent/custom-cfg/gncustom.conf : [modifyfile] /etc/asterisk/extensions.conf /etc/asterisk/sip.conf /etc/asterisk/users.conf /etc/asterisk/iax.conf /etc/asterisk/queues.conf /etc/asterisk/features.conf /etc/asterisk/voicemail.conf /etc/asterisk/meetme.conf /etc/asterisk/rc_org.conf /etc/asterisk/rtp.conf /etc/asterisk/http.conf /etc/asterisk/musiconhold.conf /etc/asterisk/followme.conf /etc/asterisk/logger.conf /etc/asterisk/manager.conf /etc/asterisk/chan_dahdi.conf /etc/asterisk/digital-channel.conf [replacefile] /etc/asterisk/dahdi-channels.conf Accordingly, the files in the [modifyfile] section are files in which changes or additions to existing settings are allowed; files in the [replacefile] section - files that are completely replaced by your settings.
In order to change any settings in the asterisk configuration file, you need to know three parameters:
- Name of the Asterisk configuration file located in the / etc / asterisk folder
- Section name indicated in square brackets [section] in which the corresponding option will be changed
- Name of the option itself
Next, in the / persistent / custom-cfg directory, a file is created with the format name <name> _custom.conf. Where <name> is the name of the configuration file in the / etc / asterisk directory without ending “.conf”. For example, if you want to make changes in the /etc/asterisk/users.conf file, then the file with the changes will be called users_custom.conf. In the file with changes, the section in square brackets is indicated, as well as in the original file, in which you want to make a change and the line below is a modified option with a new value after the equal sign. Example:
[new-context] parameter1=value1 parameter2=value2 If there is a section in the settings file that is not in the original configuration file, it will simply be added. After making changes to the configuration files, you need to apply them. The easiest way to do this is in the Web interface — click Save in any section of the settings, and then click Apply .
Internal calls
A little earlier, using the Web interface, we created SIP accounts, let it be 401, 402 and 403. The configuration of these SIP devices is located in the /etc/asterisk/users.conf file. For each device, its own dial plan context is used - the context parameter. For 401 - this is Voip-Account-401, for 402 - Voip-Account-402, for 403 - Voip-Account-403.
In the set plan file /etc/asterisk/extensions.conf we can see the following entry:
[Voip-Account-401] [Voip-Account-402] [Voip-Account-403] In essence, this means that each device we create is in its own and absolutely empty context of the dial plan. This explains the fact that the default internal calls in the gateway do not work, and this should be corrected.
- Let's create a special dial plan context where we will handle outgoing calls from our SIP phones. The original set-up file is called extensions.conf — accordingly, we create in the / persistent / custom-cfg directory a file called extensions_custom.conf with the following content:
[from-internal] ;internal routes exten => _4XX,1,NoOp(Internal Call) exten => _4XX,n,Dial(${trunk-${EXTEN}},30,Ttr) exten => _4XX,n,Hangup()
The essence of this record is that any call to a three-digit number starting with the number 4 will call the device with the corresponding number created earlier in the gateway's web interface. - You also need to allow our phones to use this dial plan context when making calls. To do this, in the same file extensions_custom.conf below we add the lines:
[Voip-Account-401] include => from-internal [Voip-Account-402] include => from-internal [Voip-Account-403] include => from-internal - Apply the changes made using the Web interface
- We look at the file /etc/asterisk/extensions.conf and make sure that the changes we made in it appeared
- We check in practice - we try to make a call from one internal phone to another
Incoming calls
We will send all incoming calls, both via the GSM line and through the SIP trunk, to the interactive voice menu with the following structure:
- A previously downloaded audio file with a voice greeting is played. The file we downloaded is located in the / var / lib / asterisk / sounds / record folder
- Waiting for a subscriber from the extension. When you enter the digit “1”, the subscriber with the number 401 is called. When you enter the digit “2”, the call is sent to the call group, in which phones 401, 402, 403 call in turn
- If the subscriber does not dial anything, the call also goes to the same dial-in group, but the phones in it ring no longer in turns, but simultaneously
To implement this functionality, add the following to extensions_custom.conf file:
[arttel-ivr] exten => _.,1,NoOp(Custom IVR by ArtTel) exten => _.,n,Set(CDR(userfield)=SIP_TRUNK->IP) exten => _.,n,Answer() exten => _.,n,Set(TIMEOUT(digit)=2) exten => _.,n,Background(record/arttel_ivr_alaw) ; exten => _.,n,WaitExten(3) ; 3 exten => t,1,NoOp(Goto by Timeout) ; , exten => t,n,Macro(arttel-ringgroup,ringall,402-403-401,15,2) ; exten => t,n,Hangup() exten => 1,1,NoOp(Goto by pressed 1) exten => 1,n,Dial(${trunk-401},30,T) ; «1», 401 exten => 1,n,Hangup() exten => 2,1,NoOp(Goto by pressed 2) exten => 2,n,Macro(arttel-ringgroup,linear,402-403-401,15,2) ; «2», 402, 403 404 exten => 2,n,Hangup() [macro-arttel-ringgroup] ;ARG1 - Type: linear, ringall ;ARG2 - Numbers separated dash: 401-402-403 ;ARG3 - Time Dial for Dial app ;ARG4 - Repeat Count for linear exten => s,1,Set(RG_Type=${ARG1}) exten => s,n,Set(RG_Nums=${ARG2}) exten => s,n,NoOp(Macro RingGroup type: ${RG_Type} for numbers: $RG_Nums) exten => s,n,GotoIf($[ "${RG_Type}" = "linear" ]?linear,1:ringall,1) exten => s,n,Hangup() exten => ringall,1,Set(COUNT=1) exten => ringall,n,Set(REPEAT_COUNT=1) exten => ringall,n,Set(Repeat=${ARG4}) exten => ringall,n,Set(TimeDial=${ARG3}) exten => ringall,n(loop),Set(RG_Dial=${RG_Dial}&${trunk-${CUT(RG_Nums,-,${COUNT})}}) exten => ringall,n,NoOp(RG_Dial=${RG_Dial}) exten => ringall,n,Set(COUNT=$[${COUNT} + 1]) exten => ringall,n,GotoIf(${CUT(RG_Nums,-,${COUNT})}?loop) exten => ringall,n(repeat),Dial(${RG_Dial:1},${TimeDial},T) exten => ringall,n,Set(REPEAT_COUNT=$[${REPEAT_COUNT} + 1]) exten => ringall,n,GotoIf($[ ${REPEAT_COUNT} <= ${Repeat} ]?repeat) exten => ringall,n,Hangup() exten => linear,1,Set(COUNT=1) exten => linear,n,Set(REPEAT_COUNT=1) exten => linear,n,Set(Repeat=${ARG4}) exten => linear,n,Set(TimeDial=${ARG3}) exten => linear,n(loop),Dial(${trunk-${CUT(RG_Nums,-,${COUNT})}},${TimeDial},T) exten => linear,n,Set(COUNT=$[${COUNT} + 1]) exten => linear,n,GotoIf(${CUT(RG_Nums,-,${COUNT})}?loop) exten => linear,n,Set(COUNT=1) exten => linear,n,Set(REPEAT_COUNT=$[${REPEAT_COUNT} + 1]) exten => linear,n,GotoIf($[ ${REPEAT_COUNT} <= ${Repeat} ]?loop) exten => linear,n,Hangup() Our context with voice greeting has been created; now it is necessary to send all incoming calls to it, both from the GSM channel and from the SIP trunk. To do this, create a file users_custom.conf in the / persistent / custom-cfg folder with the following content:
[gsm_1] context=arttel-ivr [trunk-arttel_telecom] context=arttel-ivr We save and accept the changes through the Web-interface.
Outgoing calls
The last thing left for us to do is configure the logic for outgoing calls. She will be next:
- Calls to all mobile numbers starting at 89 ... will be released via the GSM channel
- Calls to Russia, the numbers of which consist of 10 characters, and begin with 83 ..., 84 ... or 88 ... will be issued through the SIP provider
- Calls to international numbers starting at 810 ... will also be released via GSM channel
To do this, in the already created file extensions_custom.conf we will add the following to the [from-internal] section:
;outbound routes ;STRATEGY: 0 - default(first free), 1 - linear(linear with memories), 2- balance exten => _89XX.,1,NoOp(Outbound dial to Mobile) exten => _89XX.,n,Set(CDR(userfield)=IP->MOBILE) exten => _89XX.,n,Set(STRATEGY=0) exten => _89XX.,n,Macro(trunkdial-failover-0.4,1,,${EXTEN:0},trunk-GSM1,) exten => _89XX.,n,Hangup() exten => _8[348]XXXXXXXXX,1,NoOp(Outbound dial to Russia) exten => _8[348]XXXXXXXXX,n,Set(CDR(userfield)=IP->SIP_TRUNK) exten => _8[348]XXXXXXXXX,n,Set(STRATEGY=0) exten => _8[348]XXXXXXXXX,n,Macro(trunkdial-failover-0.4,1,,${EXTEN:0},trunk-arttel_telecom,) exten => _8[348]XXXXXXXXX,n,Hangup() exten => _810XX.,1,NoOp(Outbound dial to International) exten => _810XX.,n,Set(CDR(userfield)=IP->MOBILE) exten => _810XX.,n,Set(STRATEGY=0) exten => _810XX.,n,Macro(trunkdial-failover-0.4,1,,${EXTEN:0},trunk-GSM1,) ; 1 trunk exten => _810XX.,n,Hangup() What rules are responsible for which directions are not difficult to understand by the extension number pattern: _89XX. - Mobile numbers, _8 [348] XXXXXXXXX - Calls in Russia, _810XX. - calls to international destinations. For sending calls through a specific trunk, the trunkdial-failover-0.4 macro is responsible. The first argument indicates the number of lines used for the outgoing call. The last argument lists the trunks through which an outgoing call can be made. For example, if we worked with the four-port Yeastar TG400 gateway instead of the single-port Yeastar TG100, then the line:
exten => _89XX.,n,Macro(trunkdial-failover-0.4,1,,${EXTEN:0},trunk-GSM1,) should be replaced by:
exten => _89XX.,n,Macro(trunkdial-failover-0.4,4,,${EXTEN:0},trunk-GSM1,trunk-GSM2,trunk-GSM3,trunk-GSM4,) We save and apply the changes we made.
Conclusion
As a result of the changes made, we received a completely workable solution, which was ready to quietly serve the office of 2-10 people. Yes, it does not support such additional functions as recording and listening to conversations, call parking, conference calls, voice mail, and others. But, to tell the truth, for the smallest companies, all these functions are of little demand. But this solution is compact, low power consumption and GSM-line support. And given the availability of time, desire and imagination, the Yeastar TG100 VoIP GSM Gateway can be supplemented with many more interesting features.
Source: https://habr.com/ru/post/396481/
All Articles