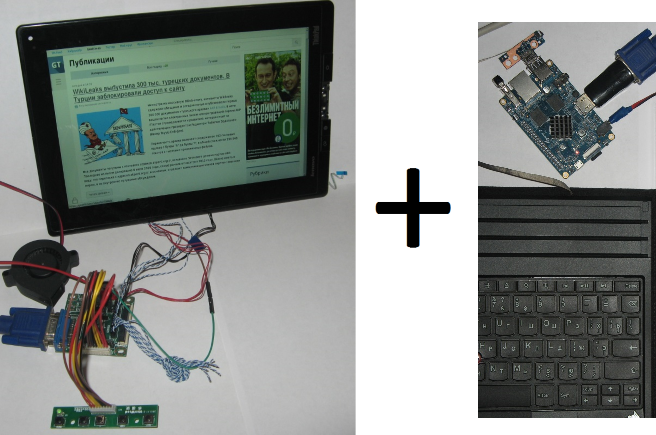
Non-working tablet + Orange Pi
For $ 8, you can turn it into a fully working Linux system with a monitor, keyboard, and trackpoint:
I once had a Lenovo Thinkpad Tablet. The device did not like and led to disappointment in both Android and Lenovo, and for a long time repulsed the desire to buy something similar. He did not like the fact that:
But one day while booting, it showed the Lenovo logo and stopped there. Attempting to reset the settings through the boot menu resulted in a message that it could not mount something there. In the service, it was decided not to go.
After disassembling the tablet, I had:
This thing was bought to play around. I have already written about it here, but I will briefly describe what I did with it and I can recommend it to others.
')
Memory chips are almost not heated. The radiator is needed only for the main chip. I bought these 40x40x11 mm:

Cut the desired size with a hacksaw and pasted on Alsil-5. The chip itself is 14x14 mm, but the radiator can be made a little more.
The recommended satie image did not support my WiFi whistle (RTL8188CUS). I took the image from here - on the links from the first post only advertising, somehow I managed to download the link from the second post, and to make it more convenient for you, I put it on Google Drive .
Powered through the GPIO comb is not convenient and dangerous - you can make a mistake and burn something. I bought this cord:
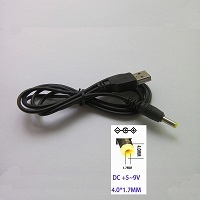
If you want the same - here .
But it turned out that the wire there is so thin that when consumed on average ~ 250 mA due to the voltage drop in the wire, Orange Pi does not want to turn on. So the wire had to be replaced, but the purchase was not in vain - I used the connectors.
For orangepi and root users, the default password is orangepi. In addition, by default, ssh can be used as root, so think about security!
If the monitor and the network do not work, you can connect with a terminal program via UART.
Now about overclocking. There is a file /media/boot/script.bin. This file stores chip settings. In a readable form it can be converted by the utility bin2fex. So we do. In the resulting fex file, look for the [dvfs_table] section and remove the modes that are unacceptable from your point of view. I left:
In such modes without a case, the chip heats up to no more than 55 ° C.
With the help of the fex2bin utility we convert all this back to script.bin, reboot, rejoice that we no longer need a fan!
It would be nice to reduce the frequency of memory and GPU, but I have not managed to do this yet.
Included with the Lenovo Thinkpad Tablet was such a keyboard case:
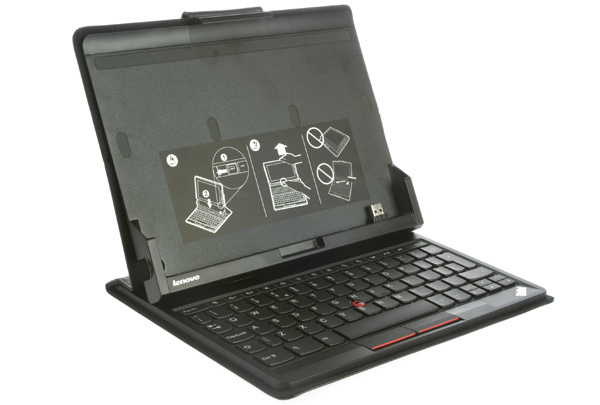
As it turned out, this is a regular USB keyboard and it can even work with a regular Windows computer. The trackpoint also works. The only problem is that instead of the F1 - F12 keys, there are all sorts of volume keys, etc. on it, and the Alt + Ctrl + <something else> combinations do not work. Alt and Ctrl are represented by different USB points. I had to reassign some keys.
How to do this, I learned from here . The resulting key remapping file is:
We connect the keyboard and now you can use the Alt + Ctrl + Fx!
Connecting the display was the most interesting task. It turns out or not knew until the end.
I already had this HDMI converter -> VGA:
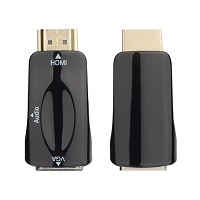
But the LVDS display, so I needed a LVDS controller with an HDMI, DVI or VGA input. The cheapest found - MT6820-B was priced at $ 6.33 with delivery . When I arrived, it turned out that his connector is not the same as that of the display. I wanted to buy a suitable connector with wires and a pad, but the price of $ 6 stopped me. I cut off the available connectors from what came and from what was in the tablet, took the pinout of the display from the datasheet and soldered the wiring with similar names, the benefit is that on the Chinese controller each output is signed.
Chip controller LVDS easily warmed up to 70C. While I am cooling with a fan, but it will also be necessary to glue radiators to it and voltage stabilizers.
The result was:

Below is a LVDS fan cooled controller
Unfortunately, we have not yet managed to get this bundle to work with a resolution of 1280x800. Moreover, if the HDMI -> VGA adapter is inserted into the HDMI port of a computer, then Windows understands that it can work at 1280x800, but Orange Pi does not.
Power supply, Orange Pi, keyboard
Hardly I will use all this in such a bundle. Most likely, the display with the controller will be assembled into a separate monitor and connect it to the computer with Windows, and the Orange Pi with this keyboard will live with another monitor simply because it is more convenient for me and because I could not get the resolution of 1280x800 in this bundle, and 1280x720 distorted proportions, but the idea itself seems interesting, and, not a fact that you can not do everything as it should. For stationary use, the Orange Pi + Linux has several advantages over an Android tablet:
And one more comparison. Orange Pi One costs $ 14 with delivery + $ 6.3 for microSD, Arduino Mega - $ 7. Paying 3 times more, we get:
This does not mean that Arduino Mega is no longer needed, but in some projects you can think about an alternative.
And the fact that if you break the tablet or some other device, be aware that many of its components can be given a second life. Let's take advantage of the fact that our electronics are not yet black epoxy filled boxes (although there is movement in this direction).
And I also have a dream to promote the idea of specialized dumps / free markets, where you can leave something that you no longer need, but that someone else can use.
Prehistory
I once had a Lenovo Thinkpad Tablet. The device did not like and led to disappointment in both Android and Lenovo, and for a long time repulsed the desire to buy something similar. He did not like the fact that:
- It seems to me that it is terrible when people who have paid a lot of money for a device are forced to use exploits to take advantage of the functionality that already exists in it. As a result, I did not root there.
- After a while, the buttons began to fall off. Initially, food. I soldered it somehow. Then adjust the volume. I scored on them and began to use software adjustment.
- Frame around the screen. With a tablet size of 259 * 179 mm, the screen is only 216 * 135 mm (with a ruler, there can be an error of 1-2 mm). Those. The screen occupies only 63% of the surface. Probably, this frame was made so that it would be more convenient to hold it without touching the touch screen, but it would be better to solve this problem somehow in a different way (not to place controls on the edges or to somehow distinguish hold from intentional touch ...) so as not to force the user to carry such a shovel.
But one day while booting, it showed the Lenovo logo and stopped there. Attempting to reset the settings through the boot menu resulted in a message that it could not mount something there. In the service, it was decided not to go.
After disassembling the tablet, I had:
- Very good display LP101WX1-SLN2 with a resolution of 1280 * 800 and a diagonal of 10.1 ";
- USB trackpoint keyboard;
- Power supply with USB output 5 V 2 A;
- Two more living lithium-ion batteries. The test showed a capacity of 3.25 Ah;
- Wifi + Bluetouth module AW-NH931;
- 3G / GPS / HSPA module Ericsson F5521gw;
- Microphone, speaker, vibration motor and other trifles.
Orange Pi PC
This thing was bought to play around. I have already written about it here, but I will briefly describe what I did with it and I can recommend it to others.
')
Cooling
Memory chips are almost not heated. The radiator is needed only for the main chip. I bought these 40x40x11 mm:
Cut the desired size with a hacksaw and pasted on Alsil-5. The chip itself is 14x14 mm, but the radiator can be made a little more.
OS installation
The recommended satie image did not support my WiFi whistle (RTL8188CUS). I took the image from here - on the links from the first post only advertising, somehow I managed to download the link from the second post, and to make it more convenient for you, I put it on Google Drive .
Nutrition
Powered through the GPIO comb is not convenient and dangerous - you can make a mistake and burn something. I bought this cord:
If you want the same - here .
But it turned out that the wire there is so thin that when consumed on average ~ 250 mA due to the voltage drop in the wire, Orange Pi does not want to turn on. So the wire had to be replaced, but the purchase was not in vain - I used the connectors.
We include and fix overclocking
For orangepi and root users, the default password is orangepi. In addition, by default, ssh can be used as root, so think about security!
If the monitor and the network do not work, you can connect with a terminal program via UART.
Now about overclocking. There is a file /media/boot/script.bin. This file stores chip settings. In a readable form it can be converted by the utility bin2fex. So we do. In the resulting fex file, look for the [dvfs_table] section and remove the modes that are unacceptable from your point of view. I left:
[dvfs_table] pmuic_type = 2 pmu_gpio0 = port:PL06<1><1><2><1> pmu_level0 = 11300 pmu_level1 = 576 extremity_freq = 1008000000 max_freq = 1008000000 min_freq = 480000000 LV_count = 3 LV1_freq = 1008000000 LV1_volt = 1120 LV2_freq = 480000000 LV2_volt = 1060 LV3_freq = 0 LV3_volt = 1060 In such modes without a case, the chip heats up to no more than 55 ° C.
With the help of the fex2bin utility we convert all this back to script.bin, reboot, rejoice that we no longer need a fan!
It would be nice to reduce the frequency of memory and GPU, but I have not managed to do this yet.
Keyboard
Included with the Lenovo Thinkpad Tablet was such a keyboard case:
As it turned out, this is a regular USB keyboard and it can even work with a regular Windows computer. The trackpoint also works. The only problem is that instead of the F1 - F12 keys, there are all sorts of volume keys, etc. on it, and the Alt + Ctrl + <something else> combinations do not work. Alt and Ctrl are represented by different USB points. I had to reassign some keys.
How to do this, I learned from here . The resulting key remapping file is:
keyboard:usb:v*p* KEYBOARD_KEY_c00e2=f1 KEYBOARD_KEY_c00ea=f2 KEYBOARD_KEY_c00e9=f3 KEYBOARD_KEY_c0223=f4 KEYBOARD_KEY_10047=f5 KEYBOARD_KEY_100a2=f6 KEYBOARD_KEY_10081=f7 KEYBOARD_KEY_c022e=f8 KEYBOARD_KEY_c022d=f9 KEYBOARD_KEY_c00b6=f10 KEYBOARD_KEY_c00cd=f11 KEYBOARD_KEY_c00b5=f12 KEYBOARD_KEY_c0040=leftctrl KEYBOARD_KEY_c0221=leftalt We connect the keyboard and now you can use the Alt + Ctrl + Fx!
Display
Connecting the display was the most interesting task. It turns out or not knew until the end.
I already had this HDMI converter -> VGA:
But the LVDS display, so I needed a LVDS controller with an HDMI, DVI or VGA input. The cheapest found - MT6820-B was priced at $ 6.33 with delivery . When I arrived, it turned out that his connector is not the same as that of the display. I wanted to buy a suitable connector with wires and a pad, but the price of $ 6 stopped me. I cut off the available connectors from what came and from what was in the tablet, took the pinout of the display from the datasheet and soldered the wiring with similar names, the benefit is that on the Chinese controller each output is signed.
Chip controller LVDS easily warmed up to 70C. While I am cooling with a fan, but it will also be necessary to glue radiators to it and voltage stabilizers.
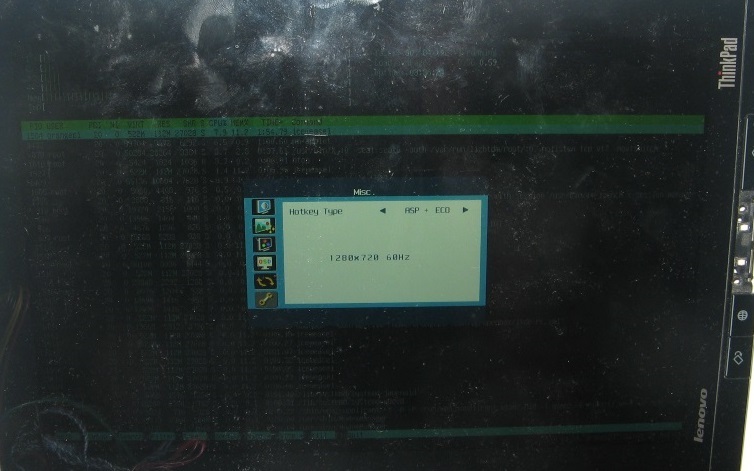
The result was:
Below is a LVDS fan cooled controller
Unfortunately, we have not yet managed to get this bundle to work with a resolution of 1280x800. Moreover, if the HDMI -> VGA adapter is inserted into the HDMI port of a computer, then Windows understands that it can work at 1280x800, but Orange Pi does not.
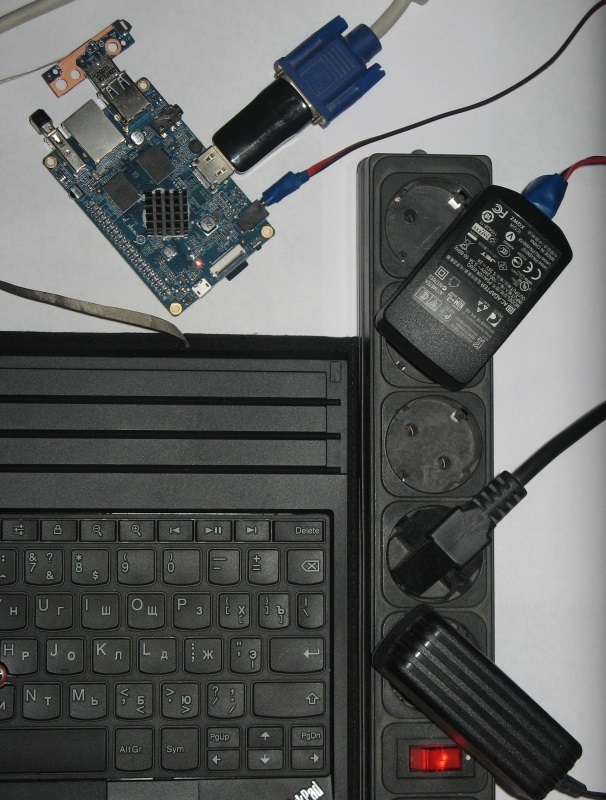
Power supply, Orange Pi, keyboard
Total
Hardly I will use all this in such a bundle. Most likely, the display with the controller will be assembled into a separate monitor and connect it to the computer with Windows, and the Orange Pi with this keyboard will live with another monitor simply because it is more convenient for me and because I could not get the resolution of 1280x800 in this bundle, and 1280x720 distorted proportions, but the idea itself seems interesting, and, not a fact that you can not do everything as it should. For stationary use, the Orange Pi + Linux has several advantages over an Android tablet:
- The ability to configure, no problem getting root'a. Change the frequency / voltage of the chip - please reassign the keys - please!
- The presence of GPIO (this advantage is not for everyone, but I am very pleased).
- The whole system on one microSD card! We can pick up a tiny card and no one gets access to our data! We can have several cards with systems for different tasks! Easy backups.
- Configuration flexibility: we can choose the right Orange Pi board and regardless of this display.
And one more comparison. Orange Pi One costs $ 14 with delivery + $ 6.3 for microSD, Arduino Mega - $ 7. Paying 3 times more, we get:
- 65,536 times more RAM;
- 4 nimble 32-bit cores;
- The ability to access the device via SSH and program / compile / debug directly in it in your favorite language;
- An operating system that can simultaneously run programs written in different languages!
This does not mean that Arduino Mega is no longer needed, but in some projects you can think about an alternative.
What is this all about?
And the fact that if you break the tablet or some other device, be aware that many of its components can be given a second life. Let's take advantage of the fact that our electronics are not yet black epoxy filled boxes (although there is movement in this direction).
And I also have a dream to promote the idea of specialized dumps / free markets, where you can leave something that you no longer need, but that someone else can use.
Source: https://habr.com/ru/post/396277/
All Articles