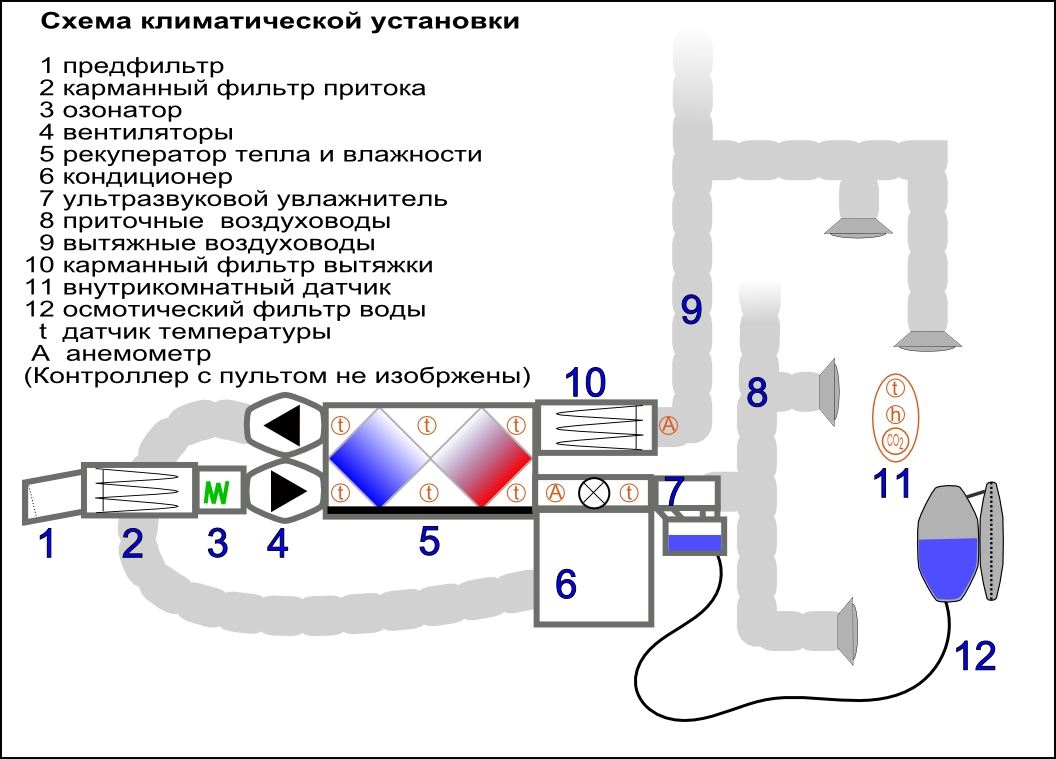
The climate system in the apartment with their own hands
Someone in childhood wants to invent a cure for cancer, someone to become an astronaut or the owner of a candle factory. And I dreamed that I would have a climate system, and in the apartment, at last, it would not be stuffy, the eternal cold from drafts would disappear, and my throat would stop to dry from dryness. And now the dream is fulfilled!
From about December 2015 to June 2016, I read forums, rode construction stores, assembled the system in the apartment and on the balcony, soldered the controller and wrote the firmware - and achieved my goal.
In this article I am going to brag about the result and tell you how my installation works. It is impossible to fully describe the assembly process in one article, but I hope the brief description will be interesting for those who want to breathe fresh warm air. In short, my installation is as follows:
')
I am not a specialist in ventilation systems and not an engineer at all, and I did not know much about climate control installations. It was clear that this is something good that provides clean fresh air in shopping centers full of people - but something complicated is much more complicated than conventional air conditioners that cool the air but cannot cope with stuffiness and dryness.
It is clear that to begin to act with such knowledge is not worth it. Therefore, for a long time (about ten years in an unhurried mode, to be honest) I wandered around the Internet - until I came to about the following conclusions:
Well, now I imagined how my installation should be arranged, and, having specified some details, I began to assemble it. Yes, I warn you right away. Such a system can be ordered "turnkey", or at least assembled from ready-made components, it will be much faster. But the elements of channel systems cost a lot of money (probably because they relate to industrial equipment?), So I did a lot on my knee.
Recuperators for large buildings are of very different designs, but the thin ones are all arranged in approximately the same way: warm air flows through a narrow gap, cold air flows towards it. The warm and cold flows are separated by a thin membrane, and the warm one heats the cold and cools itself.
When warm air cools, condensation falls out of it. Condensate can be absorbed into the membrane and evaporate from the other side of it, in a stream of heated air. Or it can flow down to drops, then it needs to be evaporated in a special chamber. Well, or somewhere to merge, if not needed.
Recuperators of mass production are made of a stack of metal plates, they are reliable and effective - but the prices for sufficiently productive models start somewhere from 50 thousand rubles. Therefore, I decided to assemble the recuperator myself: I bought cellular polycarbonate, polyurethane sealant and EPPS plates (something like foam plastic, but stronger), and spent more than a week cutting polycarbonate, gluing stacks out of it, installing stacks in EPPS drawer, sealing the box ...
To make it easier to imagine how huge it is: that on the right is the back of the chair.
In detail the method of manufacturing the heat exchanger is described, for example, here . From myself I will add only that the work was unexpectedly long and tedious. Shortly before, semi-homemade plastic heat exchangers for heat exchangers appeared on Avito. Then, six months ago, there were no reviews about them yet. But if now there are positive reviews, it is better to buy there, albeit a little more expensive, and not to glue on their own.
I also discovered polyurethane sealant for myself - it is similar to silicone in texture, but it has much better adhesive properties. Great stuff!
If you look at the prices for humidifiers for channel systems, it becomes clear that recuperators are not so expensive at all. Because the prices of duct humidifiers are measured in thousands of Euros.
Fortunately, the humidifier for an apartment should not be too powerful: comfortable for a person air contains 5-10 grams of water per cubic meter, that is, a humidifier with a capacity of 500 g / h with enough reserve for one person, and just enough for two. This is if you do not take into account that the recuperator also retains moisture.

Humidifier without lid, glued with polyurethane sealant. In the upper left corner of the overflow siphon protected by a splash cap.
Alas, ready-made ducted air conditioners ... - yes, you guessed it - they are very expensive.
Fortunately, the method of homemade duct air conditioners has long been run in: a conventional window conditioner is taken, adapters are made of improvised means, and air ducts are connected to the air inlet and outlet. Judging by the numerous reviews, window air conditioners are very reliable, judging by the less numerous reviews, as channel they work no worse. So I just bought on Avito conditioner with heating function for 2300 rubles. And I paid the same amount for twenty-five kilograms of a steel corner, of which I assembled a bracket for it - but now I know that the air conditioner does not have to be hung on a sixtieth corner.
So, with the help of simple devices window air conditioner can be turned into a channel ...
To be honest, the ozonizer is not a standard part of the ventilation system. And even non-standard is not. The reason is clear: extreme ozone is poisonous, it belongs to substances of the first danger class, along with potassium cyanide, strychnine and soman.
On the other hand, innocent potassium dichromate belongs to the first hazard class, ozonizers are used to deodorize premises and are freely sold in the United States, which are tidy to the health of the United States, and are often frightened by the danger of airborne pathogens on the forums. In general, for myself, I decided that the ozonizer would not be superfluous, but I understand that this is an ambiguous decision.
The ozonizer, after some hesitation, took from China, like this . Installed the module entirely in the lumen of the ventilation channel, ozonation is turned on, of course, by timer, with protection against accidental activation.
I think you have seen stories about hypoallergenic HEPA ultra-high purity filters, carbon filters, photocatalytic filters, and the like in advertising. They all exist in the channel versions.
But I was lucky: I have no allergies to pollen, the windows overlook the courtyard, so there is no need to defend myself from dust. Therefore, I limited myself to the primary filters that protect the air ducts from overgrowing with dirt. Installed PVCs (“Ventilation Pocket Filters”, with a filter element in the form of bags - there are also “PV”, they are smaller, cheaper, but the element should be changed several times more often), class G3 (the most common variant of protection against coarse dust, made of something like a sintepon). At the entrance to the intake filter I pulled the net (“from mosquitoes”), to protect it from birds and absolutely large debris - it already saved me when poplar fluff was flying.
Yes, more. Filters for primary cleaning are among the duct equipment a pleasant exception: they are cheap.

A pair of fans Vents TT-125 C and filter housing FVK-125.
For ventilation of the apartment, in which one person lives, there is enough air exchange at a hundred cubic meters per hour (this is with a large margin, in general, fifty is enough), that is, the air flow of a standard computer cooler. Unfortunately, it turned out that instead of a cooler, one would have to use a large, cumbersome and expensive centrifugal or mixed type fan.
The loss of air pressure is a parameter, which is described in any description of the element of channel ventilation, but it is rather difficult to calculate the total pressure drop across the entire system. According to my estimates, my system should have resisted about 100-200 Pa. I had no experience in developing ventilation systems, so I decided to take a fan with minimal pressure dependence of the air flow, so as not to be afraid of speed jumps due to some random reconfiguration of the system. The choice fell on the model Vents TT 125 C. In older articles, Systemair fans are often recommended, but I think that after a fall in the ruble exchange rate, Vents have a better price-performance ratio.
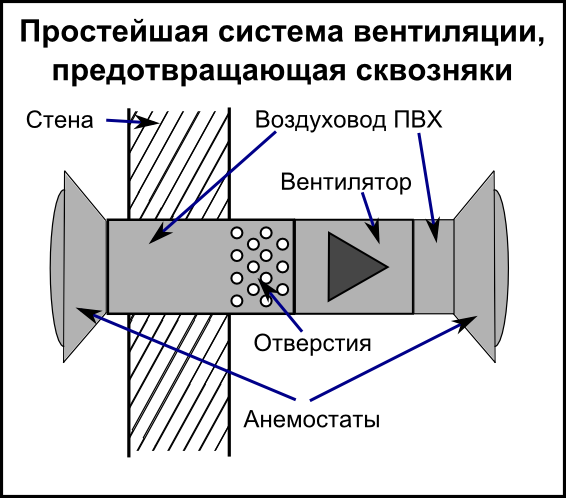
Ventilation ducts are tubes that move air. Anemostats - plugs at the ends of these tubes that scatter the air and allow you to regulate its flow.
When I hear the word "aesthetics", I grab the gun, so I don’t plan to hide anything under the wallpaper, and I used round PVC ducts with a diameter of 125 mm.
Part of the duct system. Anemostats are indicated by blue arrows.
My system has a power supply, sensors, and a microcontroller control system.
Describe in detail the power supply is not interesting. I can only say that it gives out + 5V (main supply voltage of electronic circuits), + 12V (for anemometers and a solenoid valve, if I’m ever going to connect it), + 24V (for a humidifier and color sprayer) and 170V-50Hz (for fan operation at low revs).
I collected it unexpectedly for a long time: my insufficient experience with a soldering iron and compiler affected. Everything is assembled on the ATmega328 microcontroller (with Arduino Nano 3 piping), programmed on WinAVR C. The main elements of the control unit are integrated with the I2C bus, and the converted I2C-LCD modules on PCF8574 are used as port extenders. All powerful devices are controlled by dozens of relays of standard relay modules with AliExpress. There, where it was necessary to make connectors, I tightly soldered parts, and where it was necessary to use soldering, I managed with connectors. It seems to me that all people are divided into those who will quickly and efficiently create such a device from scratch, and those who still cannot understand my Hindu code and copy this monster, therefore, tell in detail how it works for me, I will not. But for those who want to see more than a thousand lines of spaghetti code, I’ll post a link to the project .
Remote Control.
The system uses 8 ds1820 temperature sensors, a DHT-22 humidity sensor, a measuring module with a MH-Z19 carbon dioxide concentration sensor, and two anemometers.
ds1820 - simple and cheap temperature sensors, placed in all key points of the system. They work so well that I don’t even know what to say about them.
DHT-22 can measure temperature and humidity. I planned to use three sensors, but, alas, they turned out to be incredibly moody; Having spent several days on adjustment, I reconciled with the fact that two sensors connected to the main controller stop working, at best, several hours after switching on, and left only the third one installed in a separate measuring module.
On sale there are many ready-made measures of carbon dioxide concentration (the first available article on Geektimes ), but none of them has a regular way to connect to the microcontroller. Therefore, I decided to independently assemble a meter, which could also be used as a stand-alone device, but could also be connected to the microcontroller via the I2C interface. I had even planned to write a separate article about him, but while I was digging around, several articles had already published similar articles. So I will confine myself to common words: a carbon dioxide sensor MH-Z19, a temperature and humidity sensor DHT-22, an ATmega 328 controller (Arduino Nano 3 harness), an 8x2 display, and an I2C connection via an RJ-14 connector. Communication through I2C is not very stable, but thanks to a few crutches you can live. Firmware , if anyone is interested; The sensor polling function is in the firmware of the control device a little higher.
I also tried to calibrate the MH-Z19 ...
— , . , , : , , 200 , , , , , . , , , , , , .
, , .
, , — , , , . , .
. , .
( ) — 4-8 .
( - , ) — 40 .
() — 35 .
(, , ) — ~850 .
, — ~55 .
— 100-200 3 /, 75-150 3 /.
— ~400 /.
() — 9000BTU.
, -, - , - . , - , .
-, . .
-, . , . , , .
, , ( 32 ), , 10°.
, .
, , , , , , , . — , - .
, , , . , , , , , , - , , .
, : , .
, , , , -, , .
Thanks for attention.
From about December 2015 to June 2016, I read forums, rode construction stores, assembled the system in the apartment and on the balcony, soldered the controller and wrote the firmware - and achieved my goal.
In this article I am going to brag about the result and tell you how my installation works. It is impossible to fully describe the assembly process in one article, but I hope the brief description will be interesting for those who want to breathe fresh warm air. In short, my installation is as follows:
')
General idea
I am not a specialist in ventilation systems and not an engineer at all, and I did not know much about climate control installations. It was clear that this is something good that provides clean fresh air in shopping centers full of people - but something complicated is much more complicated than conventional air conditioners that cool the air but cannot cope with stuffiness and dryness.
It is clear that to begin to act with such knowledge is not worth it. Therefore, for a long time (about ten years in an unhurried mode, to be honest) I wandered around the Internet - until I came to about the following conclusions:
- The most unpleasant problem is the lack of proper air change. If an insufficient amount of air is blown through the room (less than 35-70 m 3 / h per person), then the concentration of carbon dioxide exceeds the norm, and people begin to feel tired, have a headache, cannot concentrate on working during the day and fall asleep at night.
- In fact, it is easy to replace the air: just open the window in the room and the air will enter and exit through the ventilation ducts in the kitchen and in the bathroom. This is called "natural ventilation", and it is on it is designed our housing.
- Unfortunately, natural ventilation has serious drawbacks. First, nine months a year (and even in summer, sometimes) the air outside the window is cold, and the incoming flow blows and causes colds. Secondly, the winter air is not only cold, but also dry - and the relative humidity below 30% is also not good for health. Thirdly, too cold air drains the apartment, which makes spending money on heating; in summer, respectively, increase the cost of electricity for air conditioning.
- The most effective solution to this problem is heat recuperators. Recuperators are devices through which two streams of air pass towards each other - cold fresh air enters the room from the street, and warm exhaust air goes through the hood to the outside. And the heat exchanger heats the incoming air with the heat of the outgoing air. Recuperators of various designs have been used for decades in serious ventilation systems, but in everyday life they began to appear quite recently.

The principle of countercurrent, on which the recuperator operates. - Together with the warmth of the air, recuperators are able to retain moisture too - but they do it, nevertheless, not very effectively. It is inconvenient to use humidifiers, in which you need to fill a half bucket of water every day, so it would be good to have a humidifier built into the ventilation system and connected to the water supply.
- The recuperator will help to keep warm in winter and cool in summer, but miracles do not happen, and over time the apartment will freeze or heat up. Therefore, besides a passive heat exchanger, there must be an active air conditioner in the ventilation system.
- Inside air ducts, especially those moistened with a humidifier, microorganisms begin to multiply with time. Not that it is directly pathogenic, but they can provoke allergies. In addition, it would be good to be able to get rid of odors in the rooms and sterilize them - the ozonizer will cope with all these tasks.
- Together with a cubic meter of air in the house will get a lot of dust. Worse, the dust will settle inside the elements of the ventilation system, reducing its efficiency - therefore, air filters must be installed both on the inflow and on the hood.
- It is clear that the natural ventilation capacity is not enough to drive through all these devices two oncoming air flow. Therefore, there should be fans in the ventilation system.
- The air coming out of the ventilation system should be distributed throughout the apartment; it is also necessary to take the air exhausted from the apartment out of the apartment. It is desirable to be able to speed up or slow down the change of air in different parts of the apartment. To do this, use ventilation ducts ending with adjustable anemostat .
- And, of course, all this good must somehow be managed. In principle, this is enough for the outlet and a few toggle switches, but it is better to have a controller with sensors .
- And what happens as a result will be called the channel supply and exhaust ventilation system .
Well, now I imagined how my installation should be arranged, and, having specified some details, I began to assemble it. Yes, I warn you right away. Such a system can be ordered "turnkey", or at least assembled from ready-made components, it will be much faster. But the elements of channel systems cost a lot of money (probably because they relate to industrial equipment?), So I did a lot on my knee.
Recuperator
Recuperators for large buildings are of very different designs, but the thin ones are all arranged in approximately the same way: warm air flows through a narrow gap, cold air flows towards it. The warm and cold flows are separated by a thin membrane, and the warm one heats the cold and cools itself.
When warm air cools, condensation falls out of it. Condensate can be absorbed into the membrane and evaporate from the other side of it, in a stream of heated air. Or it can flow down to drops, then it needs to be evaporated in a special chamber. Well, or somewhere to merge, if not needed.
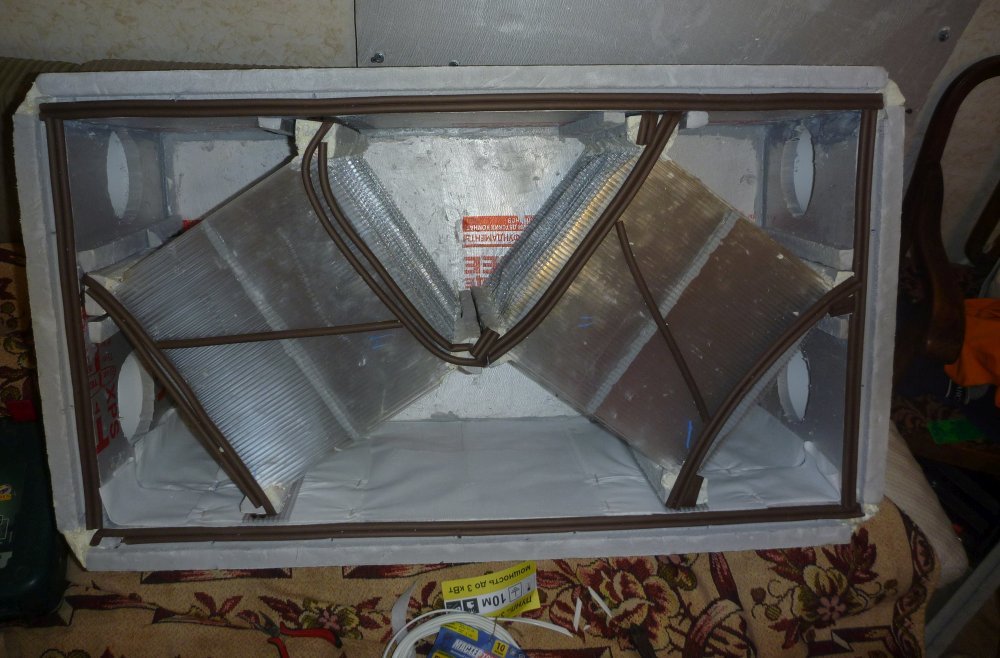
Recuperators of mass production are made of a stack of metal plates, they are reliable and effective - but the prices for sufficiently productive models start somewhere from 50 thousand rubles. Therefore, I decided to assemble the recuperator myself: I bought cellular polycarbonate, polyurethane sealant and EPPS plates (something like foam plastic, but stronger), and spent more than a week cutting polycarbonate, gluing stacks out of it, installing stacks in EPPS drawer, sealing the box ...
To make it easier to imagine how huge it is: that on the right is the back of the chair.
In detail the method of manufacturing the heat exchanger is described, for example, here . From myself I will add only that the work was unexpectedly long and tedious. Shortly before, semi-homemade plastic heat exchangers for heat exchangers appeared on Avito. Then, six months ago, there were no reviews about them yet. But if now there are positive reviews, it is better to buy there, albeit a little more expensive, and not to glue on their own.
I also discovered polyurethane sealant for myself - it is similar to silicone in texture, but it has much better adhesive properties. Great stuff!
Humidifier
If you look at the prices for humidifiers for channel systems, it becomes clear that recuperators are not so expensive at all. Because the prices of duct humidifiers are measured in thousands of Euros.
Fortunately, the humidifier for an apartment should not be too powerful: comfortable for a person air contains 5-10 grams of water per cubic meter, that is, a humidifier with a capacity of 500 g / h with enough reserve for one person, and just enough for two. This is if you do not take into account that the recuperator also retains moisture.
a little more about humidifiers
If you do not go into details, then humidifiers are of three types: traditional (the simplest option is a wet sheet, tucked in one end into a bucket of water. Water evaporates, humidity rises), steam (like a boiling electric kettle) and ultrasonic (ultrasonic generator creates fog, fog evaporates). I refused the idea to make a steam humidifier right away: it consumes a lot of electricity, besides the constantly working home-made boiler seems to me to be fire hazardous. I found projects of home-made traditional humidifiers, but they seemed too complicated and cumbersome for an apartment. Therefore, he focused on the ultrasound version.
In principle, an ultrasonic humidifier can be bought ready-made, and inexpensive. I was already quite ready to do it, but suddenly I found separate modules of ultrasonic humidifiers on Aliexpress - I thought a little and decided that the case, convenient for connecting to ventilation ducts, is easier to do from scratch, rather than redoing the finished one. In addition, it solves the problem of repair: it is easier to replace the standard packageless module installed in a homemade box than to change the entire reworked humidifier.
It remained to solve the problem of supplying the humidifier with water. It is not recommended to use tap water for this, the humidifier resonator quickly deteriorates, and a layer of lime builds up on all surfaces within a radius of several meters. Fortunately, now there are budgetary reverse osmosis filtration systems on sale; I installed the Aquaphor Osmo-50, but any other will do (the only advice is: if you don’t want to be tied to a specific series of a specific manufacturer, choose a system with standard SL-10 cartridges). To attach the filter to the humidifier, I used fifteen meters of a quarter-inch “tube for connecting filters” and a float from the same Aliexpress .
Humidifier without lid, glued with polyurethane sealant. In the upper left corner of the overflow siphon protected by a splash cap.
Air conditioning
Alas, ready-made ducted air conditioners ... - yes, you guessed it - they are very expensive.
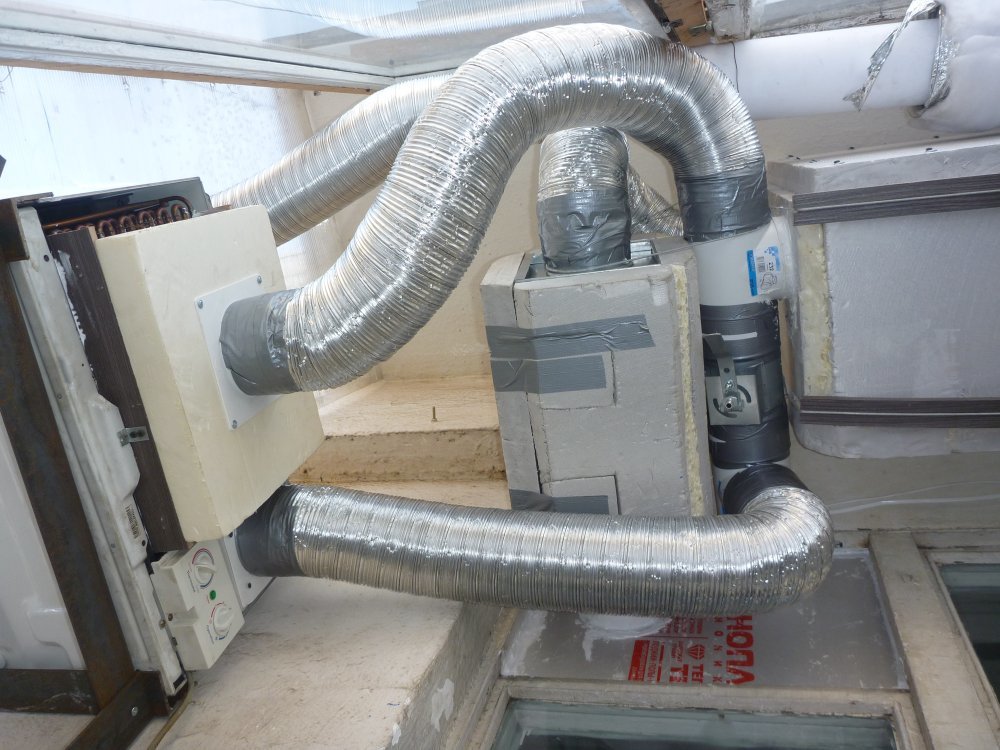
Fortunately, the method of homemade duct air conditioners has long been run in: a conventional window conditioner is taken, adapters are made of improvised means, and air ducts are connected to the air inlet and outlet. Judging by the numerous reviews, window air conditioners are very reliable, judging by the less numerous reviews, as channel they work no worse. So I just bought on Avito conditioner with heating function for 2300 rubles. And I paid the same amount for twenty-five kilograms of a steel corner, of which I assembled a bracket for it - but now I know that the air conditioner does not have to be hung on a sixtieth corner.
So, with the help of simple devices window air conditioner can be turned into a channel ...
One more photo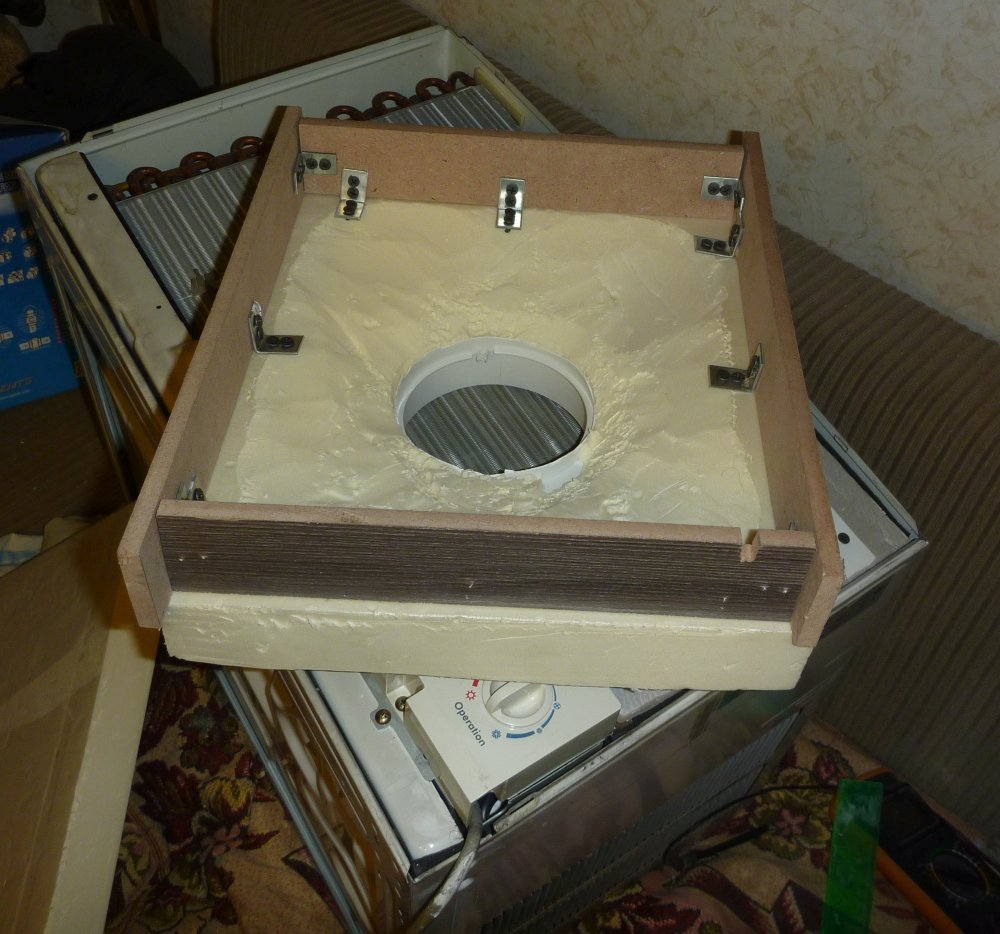
The design of the adapter for connecting the air duct is visible: an EPSS plate, plank flanks and small corners on which all this is assembled.
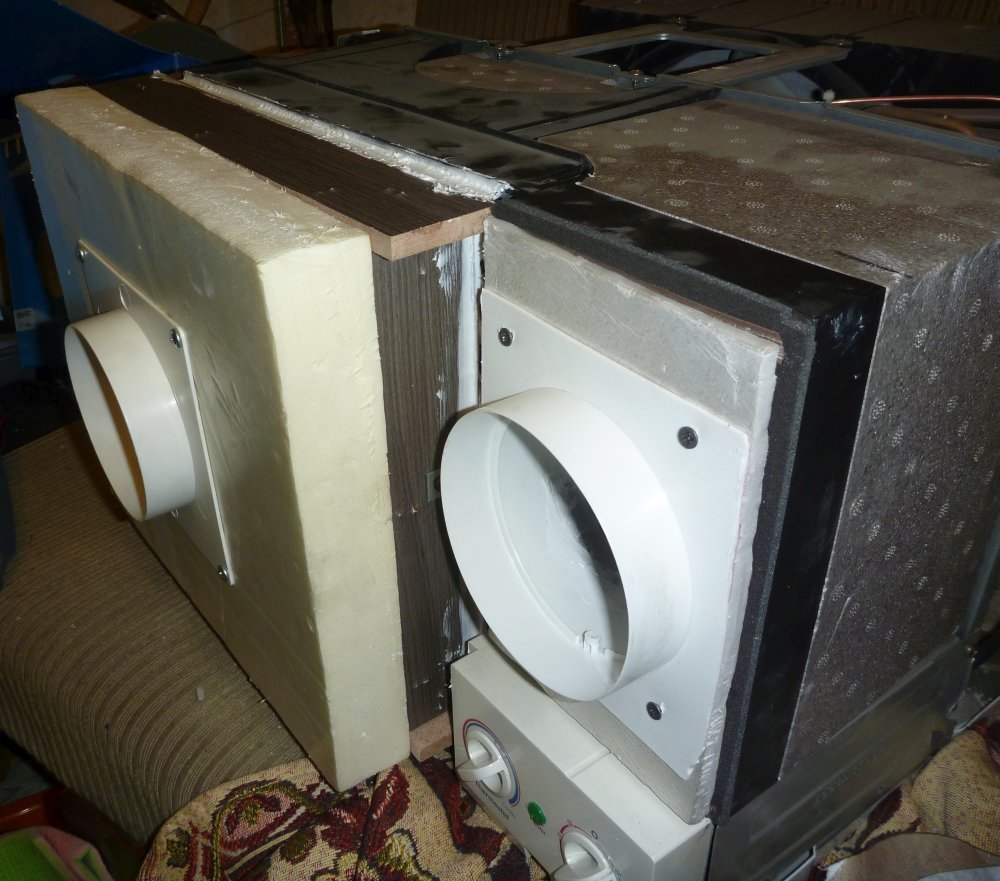
And here this adapter is already in place, and all the slots are smeared with silicone (I don’t know what, in this case, was better, silicone or polyurethane? Polyurethane holds it more reliably, but is afraid of overheating, and the air conditioner can heat up to 80 degrees). In the foreground is a small adapter inserted into the exhaust port.
The design of the adapter for connecting the air duct is visible: an EPSS plate, plank flanks and small corners on which all this is assembled.
And here this adapter is already in place, and all the slots are smeared with silicone (I don’t know what, in this case, was better, silicone or polyurethane? Polyurethane holds it more reliably, but is afraid of overheating, and the air conditioner can heat up to 80 degrees). In the foreground is a small adapter inserted into the exhaust port.
Ozonator
To be honest, the ozonizer is not a standard part of the ventilation system. And even non-standard is not. The reason is clear: extreme ozone is poisonous, it belongs to substances of the first danger class, along with potassium cyanide, strychnine and soman.
On the other hand, innocent potassium dichromate belongs to the first hazard class, ozonizers are used to deodorize premises and are freely sold in the United States, which are tidy to the health of the United States, and are often frightened by the danger of airborne pathogens on the forums. In general, for myself, I decided that the ozonizer would not be superfluous, but I understand that this is an ambiguous decision.
The ozonizer, after some hesitation, took from China, like this . Installed the module entirely in the lumen of the ventilation channel, ozonation is turned on, of course, by timer, with protection against accidental activation.
Read more about ozonizers.
Again, simplifying, ozonizers are of two types, ultraviolet and gas discharge.
An ultraviolet ozonizer is a common gas-discharge lamp, like "fluorescent lamps", only from quartz glass and without phosphor. He is able to work in any conditions, is easy to use, reliable, although somewhat cumbersome. Unfortunately, it has a big drawback: ozone is synthesized under the action of a very hard ultraviolet (185 nm band in the emission spectrum of mercury), which is absorbed by any impurities in quartz; Therefore, UV lamps are divided into bezonovye (from special, not passing 185nm-strip glass), conditionally ozonizing and good ozonizing, from pure (sometimes even synthetic, fused from aerosil) quartz. Sometimes they try to use DRL lamps with a broken outer bulb as ozonizers, but their performance is absolutely ridiculous.
Zero-free lamps are easy to find, and as for the ozone ones, they are rarely available for sale; I found only domestic DBK, which, it seems, can be ordered by mail from St. Petersburg, and some Chinese lamas, in the description of which the word Pyrex sometimes flashes. In general, I decided not to risk delivery of glass by mail and the purity of quartz, and get by with a gas-discharge ozonizer.
Gas-discharge ozonizer consists of two electrodes to which high voltage is applied. An electric discharge occurs between the electrodes, in which ozone is formed. The trouble is that in the discharge, besides ozone, numerous by-products are formed, first of all, nitrogen oxides. Not only are they very poisonous, they also corrode electrodes from them. The production of nitrogen oxides increases in warm, humid air, and at the same time, the ozone output drops significantly; in cool dry weather, as far as I understood, gas-discharge ozonizers are rather effective.
Theoretically, a gas-discharge ozonizer can be assembled on its own, from a 12 volt power supply unit and an automotive ignition coil. I even did this, he diligently hissed with a glow discharge, but even the faint smell of ozone was not felt. Therefore, I refused to do amateur, went to Aliexpress and bought ready. It seems to work, I will test normally when it gets cold.
Air filters
I think you have seen stories about hypoallergenic HEPA ultra-high purity filters, carbon filters, photocatalytic filters, and the like in advertising. They all exist in the channel versions.
But I was lucky: I have no allergies to pollen, the windows overlook the courtyard, so there is no need to defend myself from dust. Therefore, I limited myself to the primary filters that protect the air ducts from overgrowing with dirt. Installed PVCs (“Ventilation Pocket Filters”, with a filter element in the form of bags - there are also “PV”, they are smaller, cheaper, but the element should be changed several times more often), class G3 (the most common variant of protection against coarse dust, made of something like a sintepon). At the entrance to the intake filter I pulled the net (“from mosquitoes”), to protect it from birds and absolutely large debris - it already saved me when poplar fluff was flying.
Yes, more. Filters for primary cleaning are among the duct equipment a pleasant exception: they are cheap.
A bit about fine filters
I met descriptions of homemade home ventilation systems with installed F7-F9 class filters and carbon filters.
The F7 and F9 filters are somewhere between my weak G3 filter and HEPA H14 from advertising. They have standard sizes, so if I want to get cleaner air, I can simply replace the filter element G3 in my system with F9. Only need some piece of padding polyester in the place of the mosquito net to pull, so that F9 does not clog too quickly.
Ready-made carbon filters are expensive, so they are usually made independently: they assemble some body (for example, on the basis of the same PVC) and fill it with activated carbon. Coal is sold in bags.
I have not heard of any attempt to put a photocatalytic, electrostatic or HEPA filter in the home ventilation system. Moreover, in specialized forums I met the opinion that even photocatalytic filters for serious duct systems are too capricious and unreliable, and HEPA H14 in household room filters is often a fiction because real H14 requires much better protection from dust seeping through the slots in In general, I got the feeling that in low-cost home filtering systems, these high-tech cleaning systems are more of a marketing ploy than a really useful site.
A pair of fans Vents TT-125 C and filter housing FVK-125.
Fans
For ventilation of the apartment, in which one person lives, there is enough air exchange at a hundred cubic meters per hour (this is with a large margin, in general, fifty is enough), that is, the air flow of a standard computer cooler. Unfortunately, it turned out that instead of a cooler, one would have to use a large, cumbersome and expensive centrifugal or mixed type fan.
What is bad cooler, or why you need to know the pressure created by the fan.
I once thought that the only important technical parameter of a fan is how many cubic meters of air it can move in an hour.
Fortunately, I realized my mistake before starting to build the system. The fact is that the fan always works against the air pressure. The computer cooler also has to push the air between the radio components and the radiator plates, but the plates are short and the gaps between them are large. In the ventilation system, the fan must drive the air through the layers of the padding polyester, the stack of heat exchanger plates and the radiator of the air conditioner, and then drive it through a long, tortuous channel, and for this it must be able to create much more pressure. If we draw an analogy with cars, then we can say that the Oka can drive at KamAZ speed - but if both cars load with a ton of cargo, the Oka will not be able to move, and KamAZ will not even notice the increase in weight; In the same way, the complete specification of the fans indicates the air pressure versus pressure curve - and it is easy to see from it that axial fans (such as those providing computer cooling) give a good air flow, but only with minimal (several dozen Pascal) resistance.
Fortunately, I realized my mistake before starting to build the system. The fact is that the fan always works against the air pressure. The computer cooler also has to push the air between the radio components and the radiator plates, but the plates are short and the gaps between them are large. In the ventilation system, the fan must drive the air through the layers of the padding polyester, the stack of heat exchanger plates and the radiator of the air conditioner, and then drive it through a long, tortuous channel, and for this it must be able to create much more pressure. If we draw an analogy with cars, then we can say that the Oka can drive at KamAZ speed - but if both cars load with a ton of cargo, the Oka will not be able to move, and KamAZ will not even notice the increase in weight; In the same way, the complete specification of the fans indicates the air pressure versus pressure curve - and it is easy to see from it that axial fans (such as those providing computer cooling) give a good air flow, but only with minimal (several dozen Pascal) resistance.
The loss of air pressure is a parameter, which is described in any description of the element of channel ventilation, but it is rather difficult to calculate the total pressure drop across the entire system. According to my estimates, my system should have resisted about 100-200 Pa. I had no experience in developing ventilation systems, so I decided to take a fan with minimal pressure dependence of the air flow, so as not to be afraid of speed jumps due to some random reconfiguration of the system. The choice fell on the model Vents TT 125 C. In older articles, Systemair fans are often recommended, but I think that after a fall in the ruble exchange rate, Vents have a better price-performance ratio.
Ventilation ducts and anemostats
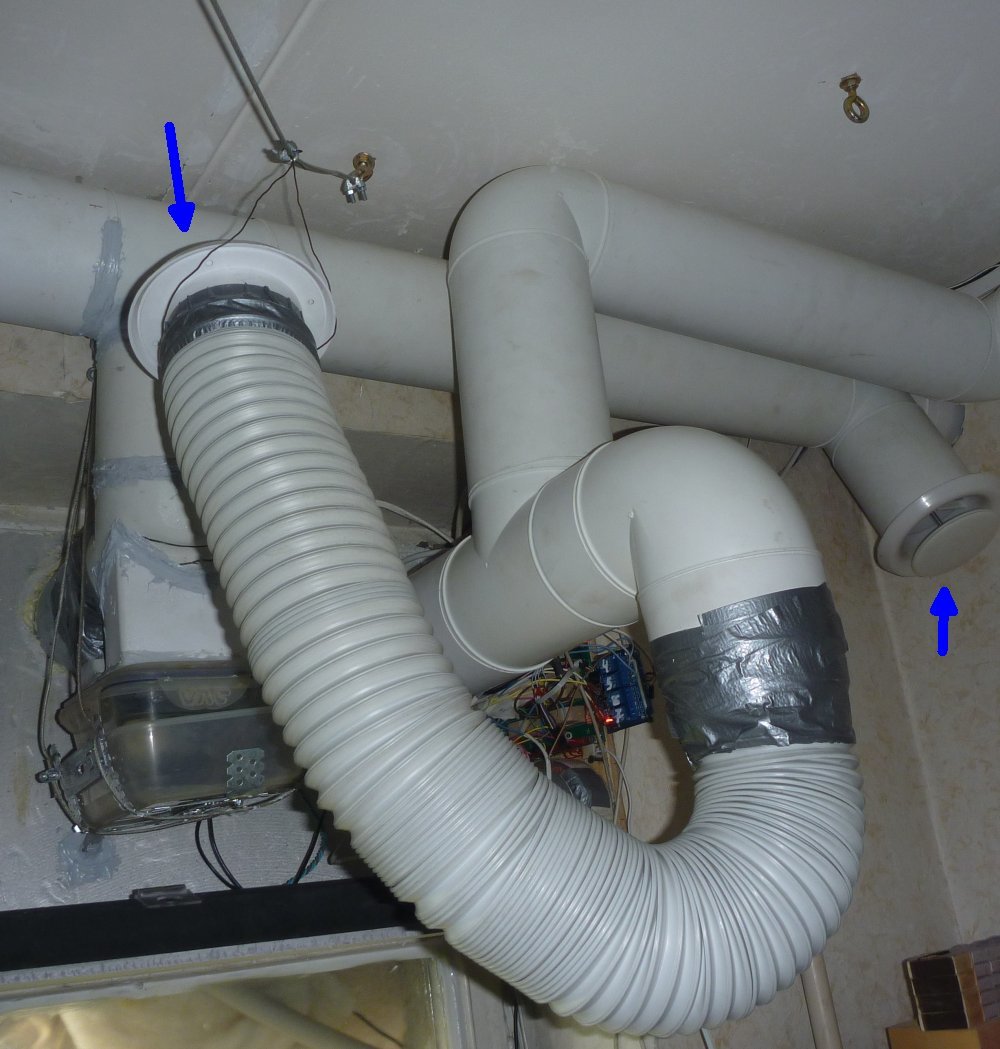
Ventilation ducts are tubes that move air. Anemostats - plugs at the ends of these tubes that scatter the air and allow you to regulate its flow.
What else can you tell about them?
Channels are usually used flexible (made of corrugated aluminum or thin plastic reinforced with a steel spiral) and hard, made of PVC or galvanized. Flexible, of course, faster to lay, but the solids have less resistance to air and do not tear, so wherever you can, you need to use them. Galvanized channels are slightly cheaper than PVC channels, but at home they are hard to cut, so PVC channels are more convenient for small systems - however, the difference is not great. PVC channels are rectangular and round in cross section - rectangular during repair can be easily hidden under a stretch ceiling or wallpaper, but round ones have less resistance to air and are easier to lay. The diameter of the circular channels - most often, 100, 125 or 150 mm.
When I hear the word "aesthetics", I grab the gun, so I don’t plan to hide anything under the wallpaper, and I used round PVC ducts with a diameter of 125 mm.
Part of the duct system. Anemostats are indicated by blue arrows.
Electronics
My system has a power supply, sensors, and a microcontroller control system.
Describe in detail the power supply is not interesting. I can only say that it gives out + 5V (main supply voltage of electronic circuits), + 12V (for anemometers and a solenoid valve, if I’m ever going to connect it), + 24V (for a humidifier and color sprayer) and 170V-50Hz (for fan operation at low revs).
A little bit about fan speed control
In general, the most correct way to control the fan speed is to change the frequency of the supply voltage. In serious ventilation systems, special frequency converters are used for this. Unfortunately, they have a big drawback - yes, precisely, “they are very expensive”.
Therefore, it is common to use either thyristor controllers and dimers or step-down transformers to slow down low-power fans; Transformers are preferable because dimers distort the shape of the sinusoid, and the fans begin to buzz and warm up.
As for the choice of voltage, I took the voltage-current characteristic from the fan, using an anemometer, plotted the performance of my system from voltage, looked at the characteristics of a transformer purchased on Avito, and decided that at minimum speed 170 V would be fed to the fan

A graph of the performance of fantirators (in m 3 / h) versus operating voltage (in V). Curves do not start from zero due to natural ventilation.
Therefore, it is common to use either thyristor controllers and dimers or step-down transformers to slow down low-power fans; Transformers are preferable because dimers distort the shape of the sinusoid, and the fans begin to buzz and warm up.
As for the choice of voltage, I took the voltage-current characteristic from the fan, using an anemometer, plotted the performance of my system from voltage, looked at the characteristics of a transformer purchased on Avito, and decided that at minimum speed 170 V would be fed to the fan
A graph of the performance of fantirators (in m 3 / h) versus operating voltage (in V). Curves do not start from zero due to natural ventilation.
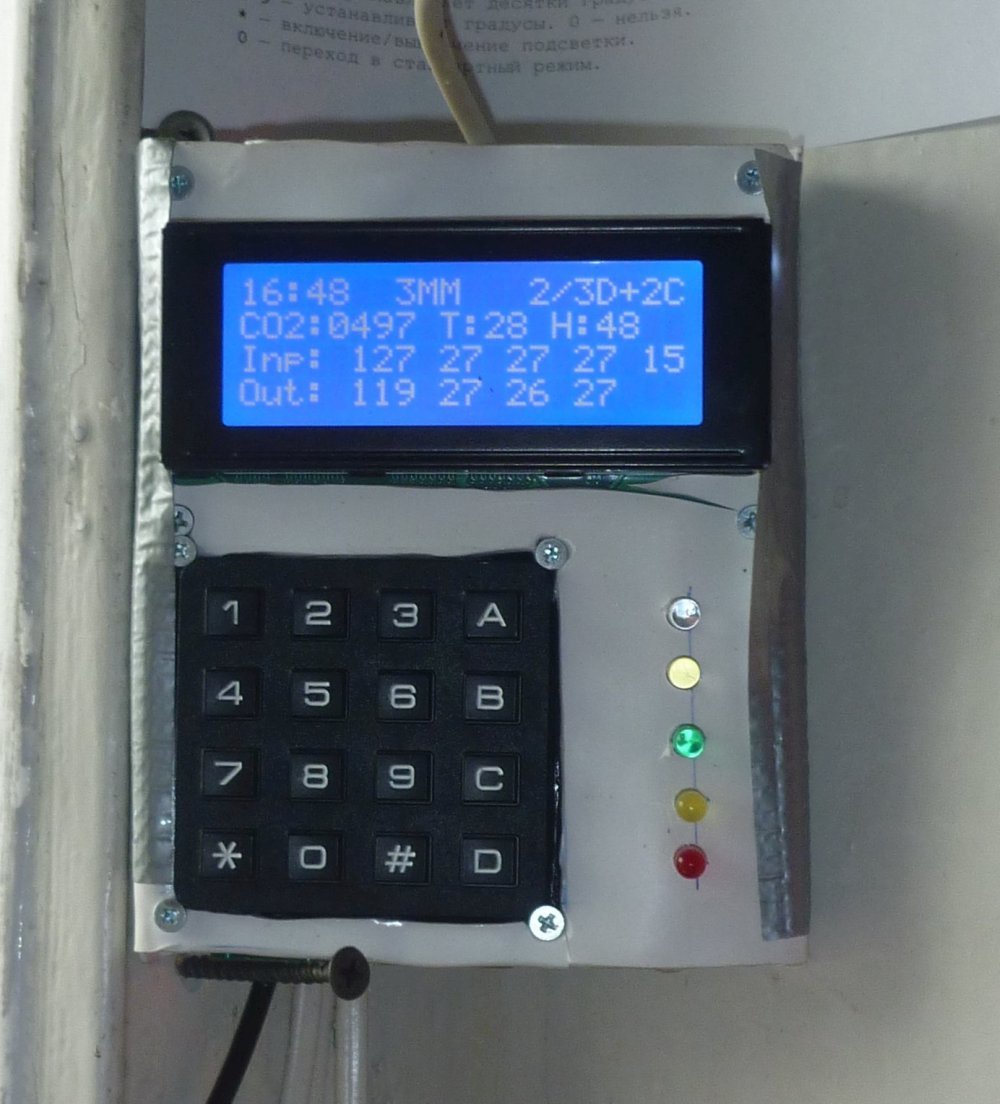
Control device
I collected it unexpectedly for a long time: my insufficient experience with a soldering iron and compiler affected. Everything is assembled on the ATmega328 microcontroller (with Arduino Nano 3 piping), programmed on WinAVR C. The main elements of the control unit are integrated with the I2C bus, and the converted I2C-LCD modules on PCF8574 are used as port extenders. All powerful devices are controlled by dozens of relays of standard relay modules with AliExpress. There, where it was necessary to make connectors, I tightly soldered parts, and where it was necessary to use soldering, I managed with connectors. It seems to me that all people are divided into those who will quickly and efficiently create such a device from scratch, and those who still cannot understand my Hindu code and copy this monster, therefore, tell in detail how it works for me, I will not. But for those who want to see more than a thousand lines of spaghetti code, I’ll post a link to the project .
Remote Control.
Sensors
The system uses 8 ds1820 temperature sensors, a DHT-22 humidity sensor, a measuring module with a MH-Z19 carbon dioxide concentration sensor, and two anemometers.
ds1820 - simple and cheap temperature sensors, placed in all key points of the system. They work so well that I don’t even know what to say about them.
DHT-22 can measure temperature and humidity. I planned to use three sensors, but, alas, they turned out to be incredibly moody; Having spent several days on adjustment, I reconciled with the fact that two sensors connected to the main controller stop working, at best, several hours after switching on, and left only the third one installed in a separate measuring module.
On sale there are many ready-made measures of carbon dioxide concentration (the first available article on Geektimes ), but none of them has a regular way to connect to the microcontroller. Therefore, I decided to independently assemble a meter, which could also be used as a stand-alone device, but could also be connected to the microcontroller via the I2C interface. I had even planned to write a separate article about him, but while I was digging around, several articles had already published similar articles. So I will confine myself to common words: a carbon dioxide sensor MH-Z19, a temperature and humidity sensor DHT-22, an ATmega 328 controller (Arduino Nano 3 harness), an 8x2 display, and an I2C connection via an RJ-14 connector. Communication through I2C is not very stable, but thanks to a few crutches you can live. Firmware , if anyone is interested; The sensor polling function is in the firmware of the control device a little higher.
I also tried to calibrate the MH-Z19 ...
I charge you, do not try to calibrate the MH-Z19!
MH-Z19 — , . , ( «Low» «Hd»). — , , .
: , ( 2 400 ppm) — ?
So here. « » — , . . , , ~150 ppm. , , . (, , , ). , , , , , — 30, . , .
:
Lord ! Citizens! ! MH-Z19, MH-Z16, MH-Z14 , !
: , ( 2 400 ppm) — ?
So here. « » — , . . , , ~150 ppm. , , . (, , , ). , , , , , — 30, . , .
:
Lord ! Citizens! ! MH-Z19, MH-Z16, MH-Z14 , !
— , . , , : , , 200 , , , , , . , , , , , , .
, , .
, , — , , , . , .
, , 120 , .
— , . , , ( ), , . , , , .
, , ; , , . , , , 12 — ( ) . , - — , .
, , , , 120 . 120 , . , (, ), 120 .
, +12, , Pull Up — , , .
-13: , .
, ( 3 /), . -13, , 1-2 /, . , , — , .
, , ; , , . , , , 12 — ( ) . , - — , .
, , , , 120 . 120 , . , (, ), 120 .
, +12, , Pull Up — , , .
-13: , .
, ( 3 /), . -13, , 1-2 /, . , , — , .
- , , , . , , . .
. — , - . - , , 130 . , , , .
- . , , . : , .
- , 500-700 3 /, 3-5 , . , ; , , , , . , .
- , 70°, . , .
- — , . , . , , .
. , .
- , - . .
- — , , , , .
, , .
, , .
. - , , , ( — ). , , .
- , , . , . . , , , Tion O2 .
- , , , .
, , Vents 150 .
: , , — , . , , , — .
Some specifications
( ) — 4-8 .
( - , ) — 40 .
() — 35 .
(, , ) — ~850 .
, — ~55 .
— 100-200 3 /, 75-150 3 /.
— ~400 /.
() — 9000BTU.
, -, - , - . , - , .
-, . .
-, . , . , , .
, , ( 32 ), , 10°.
, .
, , , , , , , . — , - .
Conclusion
, , , . , , , , , , - , , .
, : , .
, , , , -, , .
Thanks for attention.
Source: https://habr.com/ru/post/395691/
All Articles