Create installation media with multiple versions of Windows NT 6.0+ without using third-party software
 Hello. Today I will tell you how to create a single installation media with many different versions of Windows without resorting to using third-party software. Thus, you will fully understand what kind of manipulations we perform.
I will also focus on making as little as possible. entropy bring into this world change the structure of the original installation distributions.
Who cares - I ask under the cat.
Prehistory
For the last couple of years I have installed the Windows NT 6.0+ line of OS exclusively from USB media. Sometimes it was a flash drive, more often - USB-HDD. (Further, for simplicity, I will call the installation USB drive simply - a USB flash drive ).
But in the Windows installation media there is an unpleasant feature - the paths to the installation files are hard-coded . Those. At least in the root of the flash drive should be:
[boot] [sources] bootmgr If you need a UEFI boot (for example, to install the system on a disk with a GPT- style partition), then plus [efi] .
Without hacking, these names do not change. What can it be needed for? Yes, in order to have several Windows distributions on one flash drive! After all, someone does not digest Win8, put Win7 on him, and someone wants a newer and more fun system ...
Before, I didn’t bother much and just copied these files and folders from the same ISO-shnik (say, Win 8.1 x64). Renamed [sources] to [sources_w8x64] . Then I copied only the [sources] from the rest of the ISO-shnik, renaming them in passing. And that's all. No more gestures other than recording the boot sector and activating the flash drive partition I did not. As a result, I had approximately the following file structure on a flash drive:
[boot] [sources] [sources_w7x86] [sources_w8x64] [sources_w8x86] bootmgr When it was necessary to install one of the systems, I simply renamed the corresponding folders so that the files of the required Windows were in the [sources] folder.
This went on for a couple of years. Well, that did not have to do it often. But the day came when it was necessary to drive one-group laptop for disc malfunctions. Among other things, information has been carried out indiscriminately - sequential overwriting of sectors according to LBA , regardless of such trifles as MBR , partitions, etc. Naturally, after all the tortures, it would be necessary to prepare the computer for use: partition the disk, install the system, applications, etc. But you have to install nothing more than Windows 10! Otherwise, it will definitely reject it! It is not surprising: if you have already used 10, then you will not return to the old Windows. I downloaded the Media Creation Tool and started downloading images of 10 with it. Downloaded. I put her system, drivers and some of the most necessary applications. Visual Studio and the rest will deliver. But the mess on the flash drive was not at all pleased:
[boot] [sources] [sources_w7x64] [sources_w7x86] [sources_w8x64] [sources_w8x86] [sources_w10x86] bootmgr These circumstances triggered the decision:
Enough tolerating this!
After reading a few articles on the Internet on how to organize this, some of the decisions seemed to me too perverse.
For example: using Grub4Dos to copy the answer file, write the path to the required ISO to the file, mount this ISO, boot into WinPE , then mount the same ISO again (since the previous one is lost due to the transition from real mode to protected), then look for the drive letter with the installation files ... Oh, yes! If the installation media is a USB-HDD, and not a USB flash drive, then you need to also connect a USB flash drive, in the root of which is the answer file ... In a word, horror.
Of course, in this you can find a certain logic: this approach allows you not to unpack the ISO-shki, and put them in a separate folder on the flash drive ... But you need to support a bunch of other files ...
In short, this is not our way.
Create
Plan
We will not play with the ISO mount, but simply place the files for download on the installation media. But let's not just transfer these files from the installation ISO (as it was before), but slightly alter their structure so that you can simply choose the version of Windows to install without doing any more routine actions (see background).
Also, we will not consider here the creation of a Windows AiO distribution (when there are many different versions of the system in one sources\install.wim ), since this method has many disadvantages, including:
- one huge file
- FAT32 cannot be used, and therefore UEFI
- it is impossible to subsequently use a smaller flash drive skipping copying unnecessary distributions
- Difficulties with updating a specific distribution (you need to remove the old one from the image, and add a new one)
- It’s not a fact that you can settle in one image at all, for example, Win7 and Win10 (did not check)
 We will do everything with our hands and, as promised, without third-party software. And that is, a bunch of different progs to create super mega cool multiboot disks, but it's not really clear what they do and how. And we have a plan - without third-party software and with minimal intervention!
Preparing a flash drive
Decide on the file system
The choice is not great:
- FAT32
- exFAT
- NTFS
FAT32 : this is your choice if you need a UEFI download. But remember: in this FS, the maximum file size is 4 GiB .
exFAT : there is no so tangible limit on file size, but loading by UEFI is impossible. In addition, some downloaders (e.g. Grub4Dos) can not work with it correctly. But BOOTMGR works. Upd: At least some Live Linux ISO does not start .
NTFS : everything is fine, except that not all computers support UEFI booting from this file system.
So it turns out:
necessarily need UEFI - FAT32 , not necessarily or not needed at all - NTFS .
Format the USB flash drive in your chosen file system.
Note: if your flash drive already has the required filesystem, then formatting it is optional. But I would still formatted;)
Make the partition active
This is necessary so that the computer can boot from it (well, or at least try ...).
There is a difference between USB-HDD and flash drives .
For USB-HDD, you can do this:
Open the Disk Management snap-in (diskmgmt.msc). Right-click on the desired section of your USB-HDD and select "Make partition active". If this context menu item is inactive, then the section is already active.
For a flash drive, this option will not work. Here the context menu item "Make section active" will always be inactive. Therefore, you need to use a universal method:
Open Command Prompt (cmd.exe). Run the following commands:
DiskPart list disk select disk < ( )> list part select part < , ( 1)> active exit 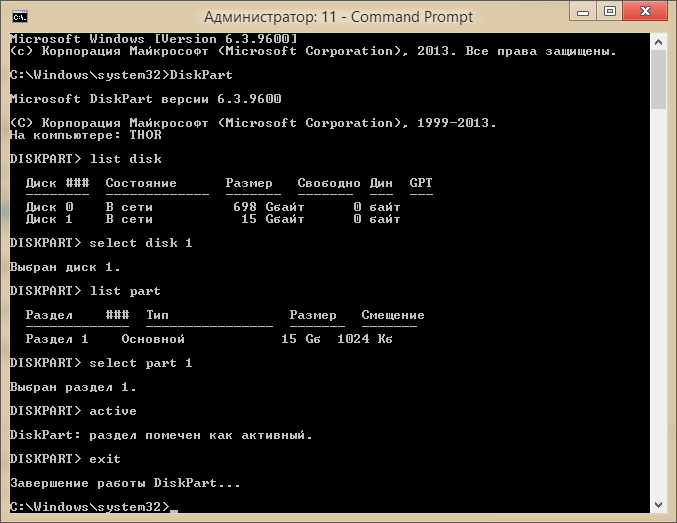
Now your flash drive is bootable. But it is still empty. It's time to fill it meaning .
')
Filling with distros
Windows boot manager files
We need a set of boot manager files. It:
[boot] [efi] - UEFI ( FAT32! ( NTFS)) bootmgr bootmgr.efi - UEFI ( FAT32! ( NTFS)) I copied these files from the most recent distribution - Windows 10 x64 (Threshold 2).
After that, you can already test how the flash drive is loaded.
If everything is done correctly, you will see the Windows Boot Manager screen with an error message. Error - due to the fact that we have not yet copied [sources] . But the fact that bootmgr gets control is just important to us.
If you do not see the Windows Boot Manager screen, then perhaps the fact is that when formatting the system did not record the boot sector compatible with BOOTMGR. To do this manually, execute the command bootsect /nt60 <_>: where <drive letter> is your flash drive.
Distributions
Distribution files are in [sources] . So you need to create a folder structure containing [sources] from different versions of Windows under different names. This structure can be done as you like. But it is important then to observe the conformity of the paths. I did this:
[WinDists] |- [Win_7_ia32] |- [Win_7_x64] |- [Win_8.1_ia32] |- [Win_8.1_x64] |- [Win_10_ia32] |- [Win_10_x64] Now in each of these folders you need to copy the contents of [sources] from the corresponding ISO-Schnick. Until now, only a few dozen MiBs were occupied on the flash drive. And now - a few GiB .
Customization
Menu
We want to be able to choose any of these systems simply from the menu. Without renaming folders, etc. routine So, you need to add a menu item for each of Windows.
Remember, we used to copy the download manager files? Now you need to edit the boot configuration data files. It:
[boot] |- bcd [efi] |- [microsoft] |- [boot] |- bcd - UEFI ( FAT32! ( NTFS)) Editing BCD
First turn on the display menu. And we’ll remove the timeout so that it appears so long before the user makes a choice (we’re not just loading, we’re installing the system! The choice must be conscious).
To do this, run the commands:
bcdedit /store <_>:\boot\bcd /set {bootmgr} DisplayBootMenu True bcdedit /store <_>:\boot\bcd /deletevalue {bootmgr} Timeout where <letter of the disc> hereinafter is your flash drive.
Next we will add installation points for each of the systems. First run the commandbcdedit /store <_>:\boot\bcd /enum {default}
to find out the value of the device and osdevice item by default. They will be approximately as follows:
device ramdisk=[boot]\sources\boot.wim,{<GUID ramdisk>} osdevice ramdisk=[boot]\sources\boot.wim,{<GUID ramdisk>} As a rule, the values of these parameters in the same loading point are the same.
For each Windows distribution we will change the path to the image with WinPE ( boot.wim ), while keeping the <GUID of the ramdisk> parameters the same. These will be the only differences between the download points of different distributions.
The device parameter specifies the device on which \windows\system32\boot\winload.exe (this value is specified in the path parameter).
The osdevice parameter specifies the device on which \windows osdevice (this value is specified in the systemroot parameter).
In our case, the device and osdevice consist of the path to the WIM image of the system (in this case, WinPE ), which is loaded into RAM (ramdisk). After the comma, the GUID of the entry is specified, which determines the parameters of the device from which WinPE will be loaded (in our case, ramdisk). You can look at it in more detail:
bcdedit /store <_>:\boot\bcd /enum {<GUID ramdisk>} ------------------- {<GUID ramdisk>} ramdisksdidevice boot ramdisksdipath \boot\boot.sdi Nothing special. We will use the same device parameters for other loading points.
boot.sdi - This is essentially an image of an empty NTFS volume. And in this volume is already mounted image from boot.wim .
Since the default item is already fully configured (except for the device and osdevice ), we will simply copy and modify it.
Adding Items
- Copy item by default:
bcdedit /store <_>:\boot\bcd /copy {Default} /d "< >"
A message will be displayed with the GUID of the new item. Something like this:{<GUID >} - Change the above parameters in it:
bcdedit /store <_>:\boot\bcd /set {<GUID >}deviceramdisk=[boot]\< >\boot.wim,{<GUID ramdisk>}bcdedit /store <_>:\boot\bcd /set {<GUID >}osdeviceramdisk=[boot]\< >\boot.wim,{<GUID ramdisk>}
These two commands differ only in one word (highlighted).
Here are some examples of creating new download points based on the default item.
Do not stupidly copy the commands from here! You will have other GUIDs. These examples are just to understand what's what.
bcdedit /store <_>:\boot\bcd /copy {Default} /d "Windows 7 (32-bit) Setup" {90fff3ef-3b91-11e6-839b-d850e607fea0}. bcdedit /store <_>:\boot\bcd /set {90fff3ef-3b91-11e6-839b-d850e607fea0} device ramdisk=[boot]\WinDists\Win_7_ia32\boot.wim,{7619dcc8-fafe-11d9-b411-000476eba25f} bcdedit /store <_>:\boot\bcd /set {90fff3ef-3b91-11e6-839b-d850e607fea0} osdevice ramdisk=[boot]\WinDists\Win_7_ia32\boot.wim,{7619dcc8-fafe-11d9-b411-000476eba25f} bcdedit /store <_>:\boot\bcd /copy {Default} /d "Windows 7 (64-bit) Setup" {e5f9b9b7-3bb1-11e6-839b-d850e607fea0}. bcdedit /store <_>:\boot\bcd /set {e5f9b9b7-3bb1-11e6-839b-d850e607fea0} device ramdisk=[boot]\WinDists\Win_7_x64\boot.wim,{7619dcc8-fafe-11d9-b411-000476eba25f} bcdedit /store <_>:\boot\bcd /set {e5f9b9b7-3bb1-11e6-839b-d850e607fea0} osdevice ramdisk=[boot]\WinDists\Win_7_x64\boot.wim,{7619dcc8-fafe-11d9-b411-000476eba25f} bcdedit /store <_>:\boot\bcd /copy {Default} /d "Windows 8.1 (32-bit) Setup" {cda5bc88-3bb4-11e6-839b-d850e607fea0}. bcdedit /store <_>:\boot\bcd /set {cda5bc88-3bb4-11e6-839b-d850e607fea0} device ramdisk=[boot]\WinDists\Win_8.1_ia32\boot.wim,{7619dcc8-fafe-11d9-b411-000476eba25f} bcdedit /store <_>:\boot\bcd /set {cda5bc88-3bb4-11e6-839b-d850e607fea0} osdevice ramdisk=[boot]\WinDists\Win_8.1_ia32\boot.wim,{7619dcc8-fafe-11d9-b411-000476eba25f} bcdedit /store <_>:\boot\bcd /copy {Default} /d "Windows 8.1 (64-bit) Setup" {330e8636-3bb5-11e6-839b-d850e607fea0}. bcdedit /store <_>:\boot\bcd /set {330e8636-3bb5-11e6-839b-d850e607fea0} device ramdisk=[boot]\WinDists\Win_8.1_x64\boot.wim,{7619dcc8-fafe-11d9-b411-000476eba25f} bcdedit /store <_>:\boot\bcd /set {330e8636-3bb5-11e6-839b-d850e607fea0} osdevice ramdisk=[boot]\WinDists\Win_8.1_x64\boot.wim,{7619dcc8-fafe-11d9-b411-000476eba25f} bcdedit /store <_>:\boot\bcd /copy {Default} /d "Windows 10 (32-bit) Setup" {87c0826c-3bb5-11e6-839b-d850e607fea0}. bcdedit /store <_>:\boot\bcd /set {87c0826c-3bb5-11e6-839b-d850e607fea0} device ramdisk=[boot]\WinDists\Win_10_ia32\boot.wim,{7619dcc8-fafe-11d9-b411-000476eba25f} bcdedit /store <_>:\boot\bcd /set {87c0826c-3bb5-11e6-839b-d850e607fea0} osdevice ramdisk=[boot]\WinDists\Win_10_ia32\boot.wim,{7619dcc8-fafe-11d9-b411-000476eba25f} {87c0826c-3bb5-11e6-839b-d850e607fea0} device ramdisk = [boot] \ WinDists \ Win_10_ia32 \ boot.wim, {7619dcc8-fafe-11d9-b411-000476eba25f} bcdedit /store <_>:\boot\bcd /copy {Default} /d "Windows 10 (32-bit) Setup" {87c0826c-3bb5-11e6-839b-d850e607fea0}. bcdedit /store <_>:\boot\bcd /set {87c0826c-3bb5-11e6-839b-d850e607fea0} device ramdisk=[boot]\WinDists\Win_10_ia32\boot.wim,{7619dcc8-fafe-11d9-b411-000476eba25f} bcdedit /store <_>:\boot\bcd /set {87c0826c-3bb5-11e6-839b-d850e607fea0} osdevice ramdisk=[boot]\WinDists\Win_10_ia32\boot.wim,{7619dcc8-fafe-11d9-b411-000476eba25f} bcdedit /store <_>:\boot\bcd /copy {Default} /d "Windows 10 (64-bit) Setup" {dd7288b2-3bb8-11e6-839b-d850e607fea0}. bcdedit /store <_>:\boot\bcd /set {dd7288b2-3bb8-11e6-839b-d850e607fea0} device ramdisk=[boot]\WinDists\Win_10_x64\boot.wim,{7619dcc8-fafe-11d9-b411-000476eba25f} bcdedit /store <_>:\boot\bcd /set {dd7288b2-3bb8-11e6-839b-d850e607fea0} osdevice ramdisk=[boot]\WinDists\Win_10_x64\boot.wim,{7619dcc8-fafe-11d9-b411-000476eba25f} bcdedit /store <_>:\boot\bcd /copy {Default} /d "Other Windows Setup (from \sources)" The entry was successfully copied to {c9ff9b3a-3c53-11e6-839c-d850e607fea0}. Finishing BCD Editing
After all items are added, we delete the item by default:bcdedit /store <_>:\boot\bcd /delete {default}
Editing BCD for UEFI
If you need a UEFI boot, then you also need to edit another boot configuration repository (the one that guides BootMgFw.efi ).
Everything is exactly the same as there , except for the path to the BCD file.
Those. insteadbcdedit /store <_>:\boot\bcd
should usebcdedit /store <_>:\efi\microsoft\boot\bcd .
 Note. You can not just take and copy
 \boot\bcd to \efi\microsoft\boot\bcd ! They should differ at least with path parameters in all points, including {memdiag} .
\windows\system32\boot\winload.exevs\windows\system32\boot\winload.efi\boot\memtest.exevs\efi\microsoft\boot\memtest.efi
Update
With UEFI , all 64-bit versions of Windows NT 6.0+ can be loaded, and from 32-bit versions, only Windows 8+ can be loaded.
In addition, there should not be an IsolatedContext parameter with the value Yes in the OS installation points prior to Windows 8 . Otherwise, you simply will not start the environment of the pre-installation of this system (ie, you can not install, for example, Windows 7 x64 UEFI mode).
Windows PE
So, when booting from a flash drive, we already have a working menu where we can choose the necessary version of Windows. Boot and make sure that when you select a specific menu item loads the corresponding Windows PE .
Problem
We have not done everything yet. After all, if you try to install some of the systems, you get an unpleasant surprise:
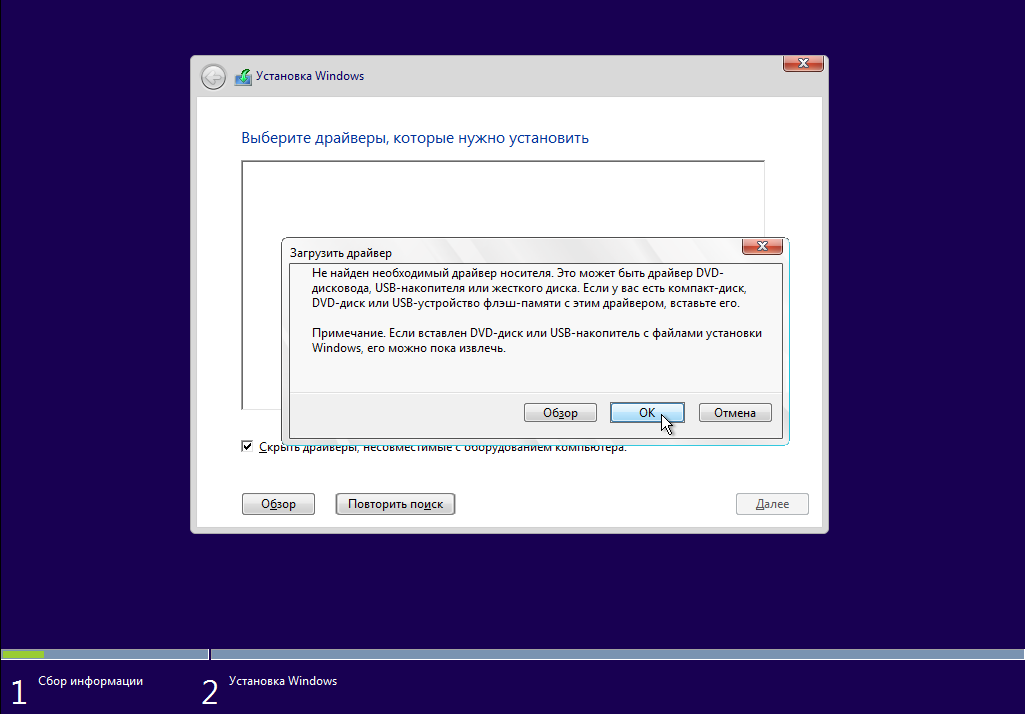
Why did this happen? The fact is that the installer is looking for an install. image install. wim or compressed install. esd in the sources folder on all available volumes. In case of failure, Windows 10 still tries to search in x64\sources or x86\sources folders, depending on the bit depth. In our case, it does not find anywhere.
She thinks that there is probably no driver from the installation media and offers to download it.
Solution options
You can already install Windows from your flash drive manually by correctly running the installer. There are several options.
- Answer file
Using an answer file, you can specify many installation options. Including the image from where to install the system.
The path to the image is specified in the elementMicrosoft-Windows-Setup | ImageInstall | OSImage | InstallFrom | PathMicrosoft-Windows-Setup | ImageInstall | OSImage | InstallFrom | PathMicrosoft-Windows-Setup | ImageInstall | OSImage | InstallFrom | Path.
You can make the installer use the response file either explicitly:setup.exe /unattend:< >
Or by placing it on one of the predetermined paths .
But in this way there is a problem. The answer file must have an absolute path. Convenient when you need to install from the network. But not practical for our case. Computers are different - the letter of the flash drive will change. Not our option. And also explicitly specify the path to the response file - well, not at all an option. - Run the installer with the parameter
You can find the image using thecmd.exescript. And then run the installer, clearly telling him where to look:X:\sources\setup.exe /installFrom:< install.wim install.esd>
This option is suitable. You will be able to install the system as with the usual ISO ISO.
But there is an option even better. - Running the installer from a flash drive
You can start the installation not fromX:(mountedboot.wimimage), but directly from the flash drive! Thus, it is not necessary to explicitly specify the path toinstall.wimorinstall.esd. The installer will find this file next to itself (in the launch folder)!
So, for example, to install Win 10 x64 you need to run:< >:\WinDists\Win_10_x64\setup.exe
This method has many advantages. After all, we actually completely refuse to use anything fromX:\sources, in favor of the corresponding folder on the flash drive. This means that we can subsequently modify it without making changes to theboot.wimimage. Conveniently! For example, you can put here an individual (for this particular distribution) answer file (next tosetup.exe) and it will be picked up according to the 6th paragraph from here .
Decision
That's all well and good, but we don’t want to start the installation manually, right? We want it to itself. It means that it should be made so that it starts the installation from where it is necessary.
Automation options
Consider running Windows PE to figure out how to get it to do what we need with minimal intervention.
The registry HKLM\SYSTEM\Setup\CmdLine indicates the first application that runs after running WinPE. This is winpeshl.exe . It does all sorts of useful things, like this:
- Includes a background image (running
WallpaperHost.exe) - Checks if there is a
winpeshl.inifilewinpeshl.ini. If there is - executes commands from it. - Initializes PNP
- If there was no
winpeshl.inifile, it tries to start one of the applications (in order of priority):- X: \ $ Windows. ~ BT \ sources \ setup.exe
- X: \ setup.exe
- X: \ windows \ system32 \ cmd.exe / k startnet.cmd
We need to run our script, which will find the file on the flash drive and run it. As you can see, we have more than one option:
- add a script file and
winpeshl.iniwith the command to runcmd.exeto execute our script - remove / rename
X:\setup.exeand editstartnet.cmd
I will demonstrate the option only with the addition of files (minimal intervention, yes).
Modify boot.wim
The example distribution Windows 10 x64.
So, we need to edit the contents of volume X: which is mounted from boot.wim . First, find out the index of the image to mount:
dism /get-wimInfo /wimFile:<_>:\WinDists\Win_10_x64\boot.wim C DISM : 6.3.9600.17031 : <_>:\WinDists\Win_10_x64\boot.wim : 1 : Microsoft Windows PE (x64) : Microsoft Windows PE (x64) (): 1 357 917 901 : 2 : Microsoft Windows Setup (x64) : Microsoft Windows Setup (x64) (): 1 540 370 231 . We need not clean Windows PE , and the installation - Windows Setup . Those. index - 2.
We also need to create a folder where we will mount the image. I created C:\mnt .
dism /mount-wim /wimFile:<_>:\WinDists\Win_10_x64\boot.wim /index:2 /mountDir:C:\mnt C DISM : 6.3.9600.17031 [==========================100.0%==========================] . Now, as planned, we copy the winpeshl.ini files and our script file (I called it runsetup.cmd ) to C:\mnt\Windows\System32\ .
[LaunchApps] cmd.exe, "/k runsetup.cmd" @echo off Title TishSerg Windows Setup Bootstrapper v1.0 color 9f ver echo. echo [%time%] Initializing Windows PE... Wpeinit echo. Wpeutil UpdateBootInfo > nul for /f "tokens=3" %%a in ( 'reg query "HKLM\System\CurrentControlSet\Control" /v PEBootRamdiskSourceDrive' ) do set RamdiskSourceDrive=%%a echo [%time%] Detected setup media: %RamdiskSourceDrive% echo. :: Windows dist path Affix set WinDistAfx=WinDists\Win :: Find Windows arch Affix if "%PROCESSOR_ARCHITECTURE%" == "x86" ( set WinArchAfx=ia32 ) else ( set WinArchAfx=x64 ) :: Find Windows version Affix for /f "tokens=3" %%b in ( 'reg query "HKLM\SOFTWARE\Microsoft\Windows NT\CurrentVersion" /v CurrentBuildNumber' ) do set /a CurrentBuildNumber=%%b if %CurrentBuildNumber% lss 6100 ( :: Build < 6100 is Vista set WinVerAfx=Vista echo [%time%] Determined version of Windows: Vista (build %CurrentBuildNumber%^) %PROCESSOR_ARCHITECTURE% ) else if %CurrentBuildNumber% lss 7700 ( :: Build < 7700 is 7 set WinVerAfx=7 echo [%time%] Determined version of Windows: 7 (build %CurrentBuildNumber%^) %PROCESSOR_ARCHITECTURE% ) else if %CurrentBuildNumber% lss 9300 ( :: Build < 9300 is 8 set WinVerAfx=8 echo [%time%] Determined version of Windows: 8 (build %CurrentBuildNumber%^) %PROCESSOR_ARCHITECTURE% ) else if %CurrentBuildNumber% lss 9700 ( :: Build < 9700 is 8.1 set WinVerAfx=8.1 echo [%time%] Determined version of Windows: 8.1 (build %CurrentBuildNumber%^) %PROCESSOR_ARCHITECTURE% ) else ( :: Build > 9700 is 10 set WinVerAfx=10 echo [%time%] Determined version of Windows: 10 (build %CurrentBuildNumber%^) %PROCESSOR_ARCHITECTURE% ) echo. echo [%time%] Launching Windows Setup (%RamdiskSourceDrive%\%WinDistAfx%_%WinVerAfx%_%WinArchAfx%\setup.exe^) %RamdiskSourceDrive%\%WinDistAfx%_%WinVerAfx%_%WinArchAfx%\setup.exe :: When closed Windows Setup color 2e echo. echo [%time%] Windows Setup closed echo WScript.Quit MsgBox("You have closed Windows Setup."+vbCrlf+"Run 'System restore' instead? Or reboot?"+vbCrlf+vbCrlf+"Yes - Run 'System restore'"+vbCrlf+"No - Reboot"+vbCrlf+"Cancel - 'Just give me a Command line!'", vbQuestion+vbYesNoCancel, "Setup cancelled") > msgdlg.vbs cscript msgdlg.vbs > nul if %errorLevel% == 6 ( echo [%time%] Here is Task Manager for you :^) start taskmgr echo [%time%] Run 'System restore' (%SystemDrive%\Sources\recovery\RecEnv.exe^) %SystemDrive%\Sources\recovery\RecEnv.exe ) else if %errorLevel% == 7 ( echo [%time%] Will reboot now... Wpeutil Reboot ) , winpeshl.ini runsetup.cmd Windows NT 6.0+ . Those. Win7, Win8 .. .
, .. - \sources\setup.exe X:\setup.exe :
, Windows . ISO X:\setup.exe .
Attention! runsetup.cmd <_>:\\<_____>_<>_<>\setup.exe
( %RamdiskSourceDrive%\%WinDistAfx%_%WinVerAfx%_%WinArchAfx%\setup.exe ). Those. ( , ) :
- D:\WinDists\Win_7_ia32\setup.exe
- D:\WinDists\Win_10_x64\setup.exe
— .
:
dism /unmount-wim /mountDir:C:\mnt /commit C DISM : 6.3.9600.17031 : <_>:\WinDists\Win_10_x64\boot.wim : 2 [==========================100.0%==========================] [==========================100.0%==========================] . ?
.
Windows
ei.cfg
[Channel]
Retail
setup.exe . , ramdisk- ( boot.wim ), ei.cfg . (+1 , ramdisk- /installFrom ).
Windows
bcdedit /store <_>:\boot\bcd /create /d "Grub4Dos Menu" /application BootSector {b3923807-3ebb-11e6-83a0-d850e607fea0} . bcdedit /store <_>:\boot\bcd /set {b3923807-3ebb-11e6-83a0-d850e607fea0} device boot bcdedit /store <_>:\boot\bcd /set {b3923807-3ebb-11e6-83a0-d850e607fea0} path \grldr bcdedit /store <_>:\boot\bcd /DisplayOrder {b3923807-3ebb-11e6-83a0-d850e607fea0} /AddFirst . : BOOTMGR GRLDR .
boot.wim ramdisk
BootMgr boot.wim ramdisk . Those. Windows , . , . WinPE .
bcdedit /store <_>:\boot\bcd /set {<GUID Windows>} BootMenuPolicy Legacy , ( , ), (^̮^)
. Windows 7 . Windows 8+ - ( ).
bcdedit /store <_>:\boot\bcd /set {<GUID Windows>} Sos True Windows 7 . — .
Total
, :
- Windows ( ISO-)
- Windows (
[sources]ISO-) - Windows
boot.wim
That's all. , (ʘ‿ʘ)
Source: https://habr.com/ru/post/395629/
All Articles