Haier air conditioning control based on ESP8266
In the continuation of articles on building a "smart home" ...

Haier air conditioning Lightera series has on its board a WiFi module to control it through an application on the phone that works through an unknown Chinese cloud service. For older models, the module was an option and was purchased separately, it is connected to the control board in the indoor unit. On new models, the connector is placed under the decorative overlay and the module is already installed in the Lightera series. Thus, this device is applicable to many Haier air conditioners.
To control the air conditioner through the native WiFi module, you need to download the application on your smartphone / tablet, register in it, connect your smartphone / tablet to the router via Wi-Fi. Turn on the air conditioner in cooling mode at 30 degrees with the minimum fan speed, make sure that the Haier-uAC network has appeared, and start the program for searching devices and networks. The program finds your air conditioner and available networks. You register your network by selecting it from the list and proceed to registering your model of equipment (air conditioner). In my home network, the DHCP server is disabled on the router and in order to connect to my WiFi network on the connected device, you need to create a new connection and register there besides the SSID (because it is hidden) and the password also a static IP address. It is for this reason that I could not add my air conditioner to the application, as it asks me to select only the WiFi access point and password when adding the air conditioner. The application sends the entered data to the WiFi module of the air conditioner and using these data, it tries to connect to your access point, hoping that it will be given an IP address, but my router is breaking all its hopes.
')
Appearance of the native WiFi module.

For the test, I still connected it through another router. Management through the application works, but there is no possibility to control the air conditioner without the application, through which cloud service it is not clear, there is no personal account. As a result, Haier, like many manufacturers of equipment, created their hardware with their application without the possibility of integration with other automation systems (without special modules and equipment). In the end, I decided to make my WiFi module with all the characteristics of a well-known character.
The basis was taken by ESP8266 12F, which will work directly with my server using the MQTT protocol. IOBroker is installed on the server, which also acts as an MQTT server.
It remained to understand the exchange protocol with the air conditioner itself. Having studied the native module and the control circuit diagrams of previous models, it became clear that the WiFi module communicates with the air conditioner through a regular UART with TTL levels. By connecting the UART / USB adapter in parallel with the RX / TX line and controlling the air conditioner from the application and from the remote, I read all the data.
Photo board native module.
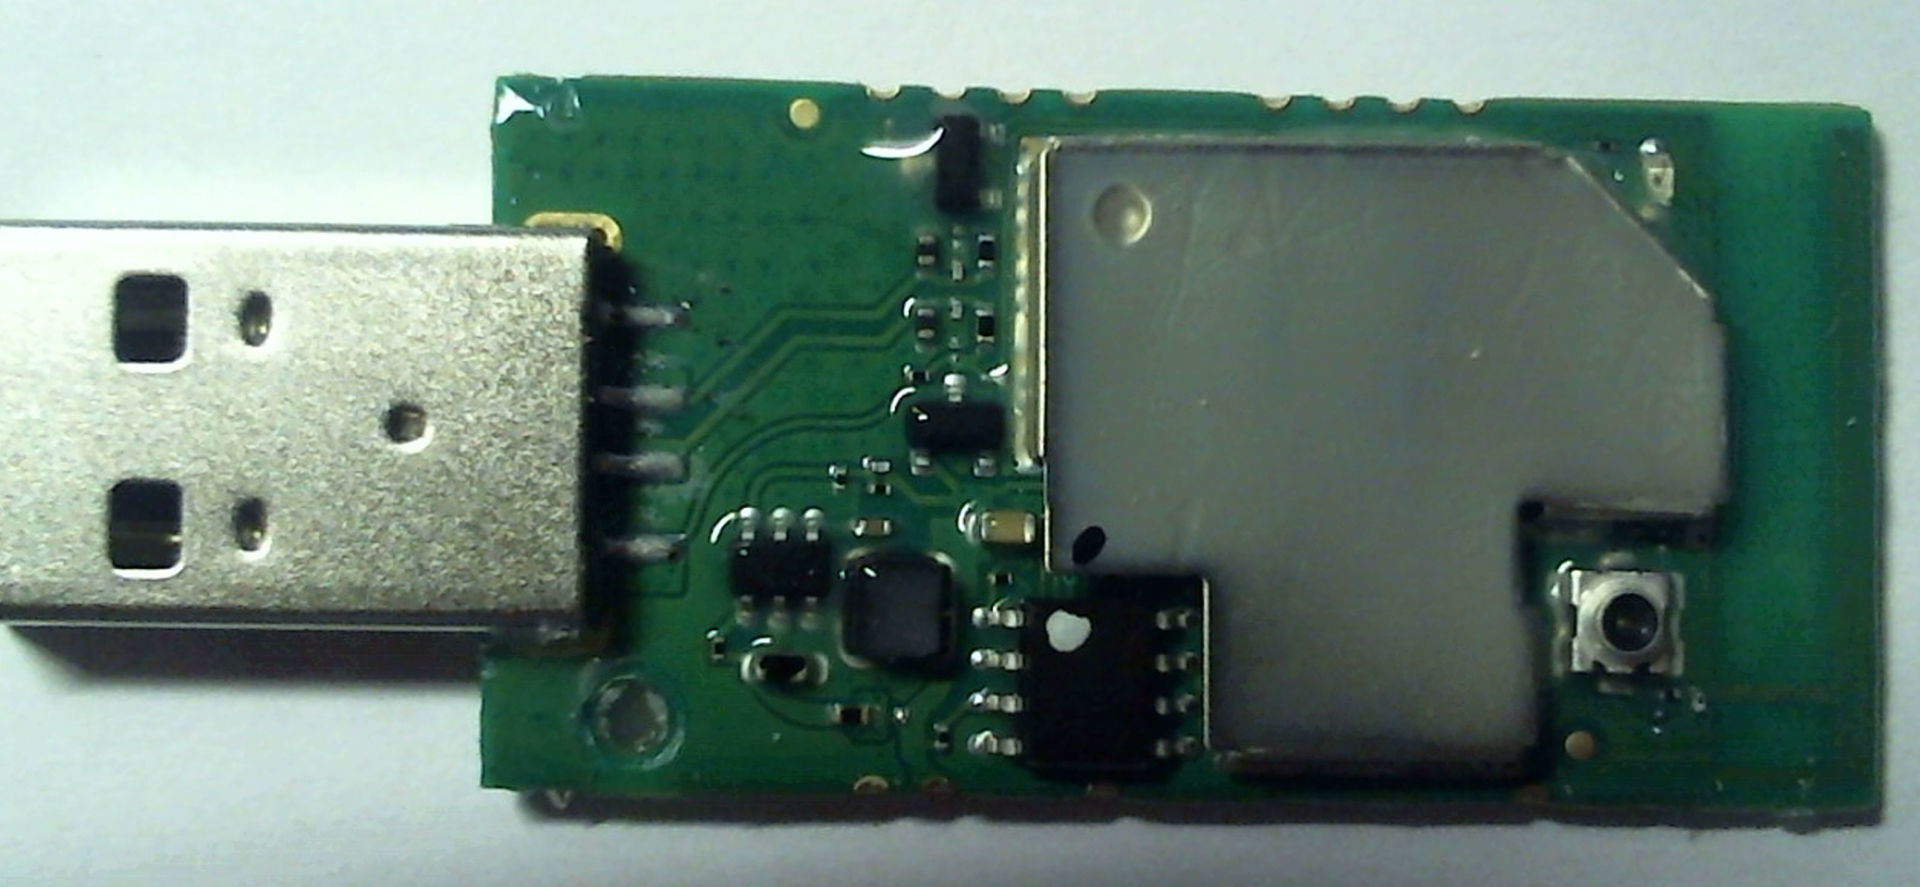
The board shows a DC / DC 3.3 V converter and logic level converters. The screen did not shoot that is unknown under it.

This is my first experience of reverse protocol, but in my opinion the protocol was very simple.
The exchange rate is 9600/8-N-1. The WiFi module sends a request every 13 seconds (13 bytes), to which the air conditioner issues a packet (37 bytes) with all the data. Under the spoiler a list of bytes that turned out to be solved.
For example, to set the temperature you need to send:
FF FF 22 00 00 00 00 00 01 01 4D 5F 00 00 00 00 00 00 00 00 00 00 00 00 00 00 D 00 - set to 20 degrees.
Draw a schematic diagram. The circuit is powered by 5 volts from the air conditioner, and since the supply voltage of the ESP8266 is 3.3 volts, the LM1117 linear regulator (AMS1117) is then supplied to the corresponding output voltage. The elements of R1, Q1, R3 and R2, R3 assembled logic level converters since the RXD TXD of the ESP8266 module is not tolerant to 5 V. To program the ESP, the contacts U2 U3 must be closed together.
Schematic diagram.

We part the PCB. The layout of the board is made for installation in the case of the native WiFi module.


The photo below is a test board.

The code is written in the Arduino environment. The current version is available on GitHub .
After the firmware ESP8266 we put the module in the air conditioner. Topics are automatically created on the MQTT server:

Air conditioning control panel on the web page.

In addition to the management from the web page, the management of voice commands is organized, as well as through the Telegram driver for IOBroker.
The cost of the new module cost about 200 rubles.
The first part - the smart home, the beginning.
Part Two - Bathroom Visitor Counter
Haier air conditioning Lightera series has on its board a WiFi module to control it through an application on the phone that works through an unknown Chinese cloud service. For older models, the module was an option and was purchased separately, it is connected to the control board in the indoor unit. On new models, the connector is placed under the decorative overlay and the module is already installed in the Lightera series. Thus, this device is applicable to many Haier air conditioners.
To control the air conditioner through the native WiFi module, you need to download the application on your smartphone / tablet, register in it, connect your smartphone / tablet to the router via Wi-Fi. Turn on the air conditioner in cooling mode at 30 degrees with the minimum fan speed, make sure that the Haier-uAC network has appeared, and start the program for searching devices and networks. The program finds your air conditioner and available networks. You register your network by selecting it from the list and proceed to registering your model of equipment (air conditioner). In my home network, the DHCP server is disabled on the router and in order to connect to my WiFi network on the connected device, you need to create a new connection and register there besides the SSID (because it is hidden) and the password also a static IP address. It is for this reason that I could not add my air conditioner to the application, as it asks me to select only the WiFi access point and password when adding the air conditioner. The application sends the entered data to the WiFi module of the air conditioner and using these data, it tries to connect to your access point, hoping that it will be given an IP address, but my router is breaking all its hopes.
')
Appearance of the native WiFi module.
For the test, I still connected it through another router. Management through the application works, but there is no possibility to control the air conditioner without the application, through which cloud service it is not clear, there is no personal account. As a result, Haier, like many manufacturers of equipment, created their hardware with their application without the possibility of integration with other automation systems (without special modules and equipment). In the end, I decided to make my WiFi module with all the characteristics of a well-known character.
The basis was taken by ESP8266 12F, which will work directly with my server using the MQTT protocol. IOBroker is installed on the server, which also acts as an MQTT server.
It remained to understand the exchange protocol with the air conditioner itself. Having studied the native module and the control circuit diagrams of previous models, it became clear that the WiFi module communicates with the air conditioner through a regular UART with TTL levels. By connecting the UART / USB adapter in parallel with the RX / TX line and controlling the air conditioner from the application and from the remote, I read all the data.
Photo board native module.
The board shows a DC / DC 3.3 V converter and logic level converters. The screen did not shoot that is unknown under it.
This is my first experience of reverse protocol, but in my opinion the protocol was very simple.
The exchange rate is 9600/8-N-1. The WiFi module sends a request every 13 seconds (13 bytes), to which the air conditioner issues a packet (37 bytes) with all the data. Under the spoiler a list of bytes that turned out to be solved.
Exchange protocol
1 - FF start byte
2 - FF start byte
3 - 22
4 - 00
5 - 00
6 - 00
7 - 00
8 - 00
9 - 01
10 - 01 - when requested, 02 - in response
11 - 4D - at the request, 6D - in the answer
12 - 5F - upon request
13 - 00
14 - 1A - 26 degrees, 1B - 27, Current temperature
15 - 00
16 - 00
17 - 00
18 - 00 - at request, 7F-in response
19 - 00
20 - 00
21 - 00
22 - 00
23 - 00
24 - 00 - smart, 01 - cool, 02 - heat, 03 - ventilation, 04 - DRY,
25 - 00
26 - 00 - max, 01 - mid, 02 - min, 03 - auto - FanSpeed
27 - 00
28 - 00 - off, 01 - upper and lower limit on. 02 - left / right incl. 03 - both on
29 - 00 - lock of buttons of the panel off, 80 blocking incl.
30 - 00 - power off, x1 - power on, (1x) - Compressor? x9 - QUIET
31 - 00
32 - 00 - fresh off, 01 - fresh on
33 - 00
34 - 00
35 - 00
36 - 00 - 16 degrees, 01 - 17 0E - 30 degrees. Set temperature
37 - Checksum. Just the sum of all bytes without two starting.
Short teams
FF FF 0A 00 00 00 00 00 01 01 4D 02 5B Switching on
FF FF 0A 00 00 00 00 00 01 01 4D 03 5C Switching off
FF FF 0A 00 00 00 00 00 01 03 00 00 0E Lock the console
FF FF 0A 00 00 00 00 00 01 01 4D 01 5A Poll Status
FF FF 0A 00 00 00 00 00 01 01 4D 03 5C Switching off
FF FF 0A 00 00 00 00 00 01 03 00 00 0E Lock the console
FF FF 0A 00 00 00 00 00 01 01 4D 01 5A Poll Status
For example, to set the temperature you need to send:
FF FF 22 00 00 00 00 00 01 01 4D 5F 00 00 00 00 00 00 00 00 00 00 00 00 00 00 D 00 - set to 20 degrees.
Draw a schematic diagram. The circuit is powered by 5 volts from the air conditioner, and since the supply voltage of the ESP8266 is 3.3 volts, the LM1117 linear regulator (AMS1117) is then supplied to the corresponding output voltage. The elements of R1, Q1, R3 and R2, R3 assembled logic level converters since the RXD TXD of the ESP8266 module is not tolerant to 5 V. To program the ESP, the contacts U2 U3 must be closed together.
Schematic diagram.
We part the PCB. The layout of the board is made for installation in the case of the native WiFi module.
The photo below is a test board.
The code is written in the Arduino environment. The current version is available on GitHub .
code
#include <ESP8266WiFi.h> #include <PubSubClient.h> const char* ssid = "..."; const char* password = "..."; const char* mqtt_server = "xx.xx.xx.xx"; // MQTT IPAddress ip(xx,xx,xx,x); //IP IPAddress gateway(xx,xx,xx,xx); // IPAddress subnet(xx,xx,xx,xx); // WiFiClient espClient; PubSubClient client(espClient); #define ID_CONNECT "myhome-Conditioner" #define LED 12 #define LEN_B 37 #define B_CUR_TMP 13 // #define B_CMD 17 // 00- 7F- ??? #define B_MODE 23 //04 - DRY, 01 - cool, 02 - heat, 00 - smart 03 - #define B_FAN_SPD 25 // 02 - min, 01 - mid, 00 - max, 03 - auto #define B_SWING 27 //01 - . 00 - . 02 - / . 03 - #define B_LOCK_REM 28 //80 . 00 - #define B_POWER 29 //on/off 01 - on, 00 - off (10, 11)-??? 09 - QUIET #define B_FRESH 31 //fresh 00 - off, 01 - on #define B_SET_TMP 35 // int fresh; int power; int swing; int lock_rem; int cur_tmp; int set_tmp; int fan_spd; int Mode; long prev = 0; byte inCheck = 0; byte qstn[] = {255,255,10,0,0,0,0,0,1,1,77,1,90}; // //byte start[] = {255,255}; byte data[37] = {}; // byte on[] = {255,255,10,0,0,0,0,0,1,1,77,2,91}; // byte off[] = {255,255,10,0,0,0,0,0,1,1,77,3,92}; // byte lock[] = {255,255,10,0,0,0,0,0,1,3,0,0,14}; // //byte buf[10]; void setup_wifi() { delay(10); WiFi.begin(ssid, password); WiFi.config(ip, gateway, subnet); while (WiFi.status() != WL_CONNECTED) { delay(500); digitalWrite(LED, !digitalRead(LED)); } digitalWrite(LED, HIGH); } void reconnect() { digitalWrite(LED, !digitalRead(LED)); while (!client.connected()) { if (client.connect(ID_CONNECT)) { client.publish("myhome/Conditioner/connection", "true"); client.publish("myhome/Conditioner/RAW", ""); client.subscribe("myhome/Conditioner/#"); digitalWrite(LED, HIGH); } else { delay(5000); } } } void InsertData(byte data[], size_t size){ set_tmp = data[B_SET_TMP]+16; cur_tmp = data[B_CUR_TMP]; Mode = data[B_MODE]; fan_spd = data[B_FAN_SPD]; swing = data[B_SWING]; power = data[B_POWER]; lock_rem = data[B_LOCK_REM]; fresh = data[B_FRESH]; ///////////////////////////////// if (fresh == 0x00){ client.publish("myhome/Conditioner/Fresh", "off"); } if (fresh == 0x01){ client.publish("myhome/Conditioner/Fresh", "on"); } ///////////////////////////////// if (lock_rem == 0x80){ client.publish("myhome/Conditioner/Lock_Remote", "true"); } if (lock_rem == 0x00){ client.publish("myhome/Conditioner/Lock_Remote", "false"); } ///////////////////////////////// if (power == 0x01 || power == 0x11){ client.publish("myhome/Conditioner/Power", "on"); } if (power == 0x00 || power == 0x10){ client.publish("myhome/Conditioner/Power", "off"); } if (power == 0x09){ client.publish("myhome/Conditioner/Power", "quiet"); } if (power == 0x11 || power == 0x10){ client.publish("myhome/Conditioner/Compressor", "on"); } else { client.publish("myhome/Conditioner/Compressor", "off"); } ///////////////////////////////// if (swing == 0x00){ client.publish("myhome/Conditioner/Swing", "off"); } if (swing == 0x01){ client.publish("myhome/Conditioner/Swing", "ud"); } if (swing == 0x02){ client.publish("myhome/Conditioner/Swing", "lr"); } if (swing == 0x03){ client.publish("myhome/Conditioner/Swing", "all"); } ///////////////////////////////// if (fan_spd == 0x00){ client.publish("myhome/Conditioner/Fan_Speed", "max"); } if (fan_spd == 0x01){ client.publish("myhome/Conditioner/Fan_Speed", "mid"); } if (fan_spd == 0x02){ client.publish("myhome/Conditioner/Fan_Speed", "min"); } if (fan_spd == 0x03){ client.publish("myhome/Conditioner/Fan_Speed", "auto"); } ///////////////////////////////// char b[5]; String char_set_tmp = String(set_tmp); char_set_tmp.toCharArray(b,5); client.publish("myhome/Conditioner/Set_Temp", b); //////////////////////////////////// String char_cur_tmp = String(cur_tmp); char_cur_tmp.toCharArray(b,5); client.publish("myhome/Conditioner/Current_Temp", b); //////////////////////////////////// if (Mode == 0x00){ client.publish("myhome/Conditioner/Mode", "smart"); } if (Mode == 0x01){ client.publish("myhome/Conditioner/Mode", "cool"); } if (Mode == 0x02){ client.publish("myhome/Conditioner/Mode", "heat"); } if (Mode == 0x03){ client.publish("myhome/Conditioner/Mode", "vent"); } if (Mode == 0x04){ client.publish("myhome/Conditioner/Mode", "dry"); } String raw_str; char raw[75]; for (int i=0; i < 37; i++){ if (data[i] < 10){ raw_str += "0"; raw_str += String(data[i], HEX); } else { raw_str += String(data[i], HEX); } } raw_str.toUpperCase(); raw_str.toCharArray(raw,75); client.publish("myhome/Conditioner/RAW", raw); /////////////////////////////////// } byte getCRC(byte req[], size_t size){ byte crc = 0; for (int i=2; i < size; i++){ crc += req[i]; } return crc; } void SendData(byte req[], size_t size){ //Serial.write(start, 2); Serial.write(req, size - 1); Serial.write(getCRC(req, size-1)); } inline unsigned char toHex( char ch ){ return ( ( ch >= 'A' ) ? ( ch - 'A' + 0xA ) : ( ch - '0' ) ) & 0x0F; } void callback(char* topic, byte* payload, unsigned int length) { payload[length] = '\0'; String strTopic = String(topic); String strPayload = String((char*)payload); /////////// if (strTopic == "myhome/Conditioner/Set_Temp"){ set_tmp = strPayload.toInt()-16; if (set_tmp >= 0 && set_tmp <= 30){ data[B_SET_TMP] = set_tmp; } } ////////// if (strTopic == "myhome/Conditioner/Mode"){ if (strPayload == "smart"){ data[B_MODE] = 0; } if (strPayload == "cool"){ data[B_MODE] = 1; } if (strPayload == "heat"){ data[B_MODE] = 2; } if (strPayload == "vent"){ data[B_MODE] = 3; } if (strPayload == "dry"){ data[B_MODE] = 4; } } ////////// if (strTopic == "myhome/Conditioner/Fan_Speed"){ if (strPayload == "max"){ data[B_FAN_SPD] = 0; } if (strPayload == "mid"){ data[B_FAN_SPD] = 1; } if (strPayload == "min"){ data[B_FAN_SPD] = 2; } if (strPayload == "auto"){ data[B_FAN_SPD] = 3; } } //////// if (strTopic == "myhome/Conditioner/Swing"){ if (strPayload == "off"){ data[B_SWING] = 0; } if (strPayload == "ud"){ data[B_SWING] = 1; } if (strPayload == "lr"){ data[B_SWING] = 2; } if (strPayload == "all"){ data[B_SWING] = 3; } } //////// if (strTopic == "myhome/Conditioner/Lock_Remote"){ if (strPayload == "true"){ data[B_LOCK_REM] = 80; } if (strPayload == "false"){ data[B_LOCK_REM] = 0; } } //////// if (strTopic == "myhome/Conditioner/Power"){ if (strPayload == "off" || strPayload == "false" || strPayload == "0"){ SendData(off, sizeof(off)/sizeof(byte)); return; } if (strPayload == "on" || strPayload == "true" || strPayload == "1"){ SendData(on, sizeof(on)/sizeof(byte)); return; } if (strPayload == "quiet"){ data[B_POWER] = 9; } } //////// if (strTopic == "myhome/Conditioner/RAW"){ char buf[75]; char hexbyte[3] = {0}; strPayload.toCharArray(buf, 75); int octets[sizeof(buf) / 2] ; for (int i=0; i < 76; i += 2){ hexbyte[0] = buf[i] ; hexbyte[1] = buf[i+1] ; data[i/2] = (toHex(hexbyte[0]) << 4) | toHex(hexbyte[1]); } Serial.write(data, 37); client.publish("myhome/Conditioner/RAW", buf); } data[B_CMD] = 0; data[9] = 1; data[10] = 77; data[11] = 95; SendData(data, sizeof(data)/sizeof(byte)); } void setup() { pinMode(LED, OUTPUT); Serial.begin(9600); setup_wifi(); client.setServer(mqtt_server, 1883); client.setCallback(callback); } void loop() { if(Serial.available() > 0){ Serial.readBytes(data, 37); while(Serial.available()){ delay(2); Serial.read(); } if (data[36] != inCheck){ inCheck = data[36]; InsertData(data, 37); } } if (!client.connected()){ reconnect(); } client.loop(); long now = millis(); if (now - prev > 5000) { prev = now; SendData(qstn, sizeof(qstn)/sizeof(byte)); // } } After the firmware ESP8266 we put the module in the air conditioner. Topics are automatically created on the MQTT server:
Air conditioning control panel on the web page.
In addition to the management from the web page, the management of voice commands is organized, as well as through the Telegram driver for IOBroker.
The cost of the new module cost about 200 rubles.
The first part - the smart home, the beginning.
Part Two - Bathroom Visitor Counter
Source: https://habr.com/ru/post/395533/
All Articles