How to find out which websites are accessed by LAN clients?
The Syslog feature provides users with the ability to monitor Vigor Router and use debugging. In addition, we can use Syslog to track browser history on the LAN. Since we want to print access to the URL log, you need to enable the URL filtering function and the DNS Filter function; however, we can use a null URL and DNS filter so that no web site is actually blocked. The following note will show how to record the sites that were accessed and save the syslog in a USB drive.
Create a URL Filter and apply it to the Firewall Rule
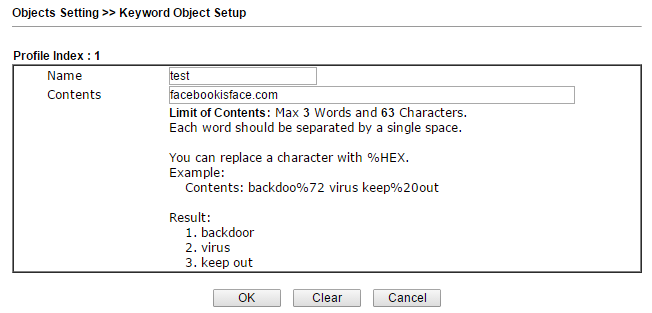
1. Go to Objects Setting >> Keyword Object (Object Settings >> Key Objects)
a. Click on Index Number
b. Enter Name
c. Enter zero content
d. Click OK and save
')
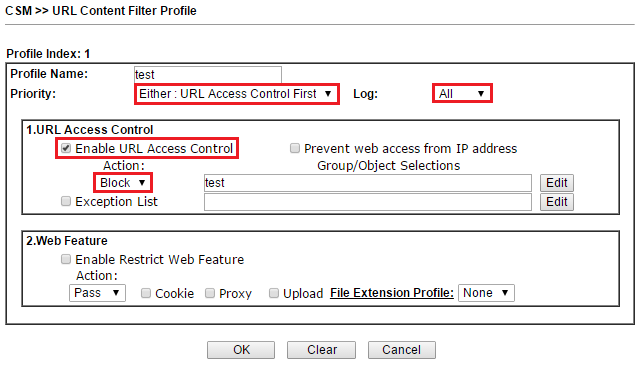
2. Create URL Content Filter Profile in CSM >> URL Content Filter Profile (CSM >> Content Filter Profile URL)
a. Click Profile Number
b. Enter Profile Name (Profile Name)
c. Select Priority "or": URL Access Control First (First Control URL Access)
d. Activate the Log as “All” so that all URLs are recorded regardless of whether they are transmitted or blocked.
e. Activate the URL Access Control
f. Select the action “Block” for URL Access Control
g. Click Edit and select the Keywords object created in Step 1
h. Click OK to save
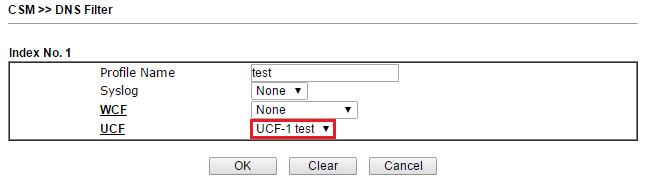
3. Create a DNS profile in CSM >> DNS Filter (CSM >> DNS Filter)
a. Click on the Profile Number in the DNS Filter Profile table.
b. Enter Profile Name (Profile Name)
c. Select UCF as URL Content Filter Profile created in URL Filter in Step 2
d. Click OK and save
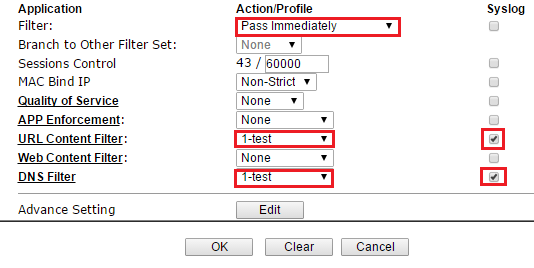
4. Apply the Content Filter URL and DNS Filter URL to the Firewall Rule and remember to activate syslog. Go to Firewall >> Filter Setup >> Set 2 (Default Data Filter) (Firewall >> Filter Installation >> Installation 2 (Default Data Filter)).
a. Click on the Filter Rule number.
b. Enable (Enable) Filter Rule
c. Select Filter as “Pass Immediately” (Pass Now)
d. Select the created profile in the URL Content Filter (URL Content Filter) and activate Syslog
e. Select the created profile in DNS Filter (DNS Filter) and activate Syslog
f. Click OK and save
Save Syslog to USB
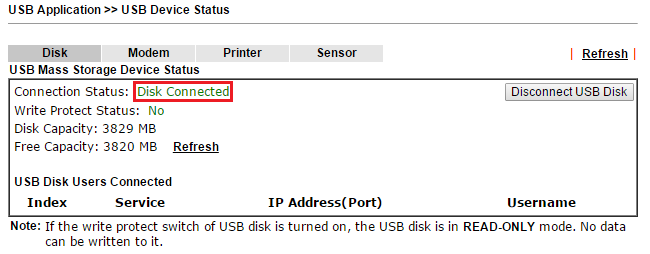
5. Insert one USB, go to USB Application >> USB Device Status (USB Application USB Device Status) and check the connection status of Disk connected.
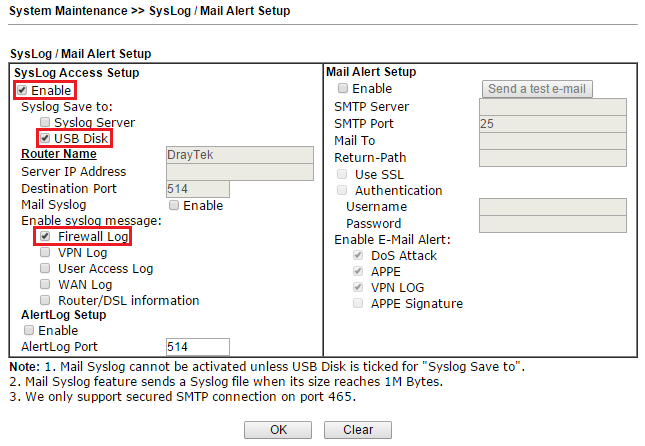
6. To save the Syslog to a USB drive, go to System Maintenance >> SysLog / Mail Alert Setup (System Support >> SysLog / Mail Alarm Setup).
a. Enable (Enable) access to SysLog
b. Activate USB Disk to make sure the logs will be saved on your device.
c. Activate only Firewall Log
d. Click OK and save
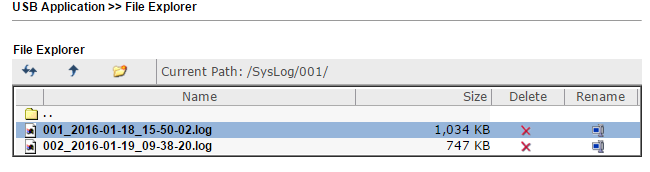
7. When the above settings are complete, go to USB Application >> File Explorer (USB Application >> File Manager) and check the log stored in the new “Syslog” folder on the USB device. Click and download the file to your computer, the site history is recorded one by one, so network administrators can check it.

Create a URL Filter and apply it to the Firewall Rule
1. Go to Objects Setting >> Keyword Object (Object Settings >> Key Objects)
a. Click on Index Number
b. Enter Name
c. Enter zero content
d. Click OK and save
')
2. Create URL Content Filter Profile in CSM >> URL Content Filter Profile (CSM >> Content Filter Profile URL)
a. Click Profile Number
b. Enter Profile Name (Profile Name)
c. Select Priority "or": URL Access Control First (First Control URL Access)
d. Activate the Log as “All” so that all URLs are recorded regardless of whether they are transmitted or blocked.
e. Activate the URL Access Control
f. Select the action “Block” for URL Access Control
g. Click Edit and select the Keywords object created in Step 1
h. Click OK to save
3. Create a DNS profile in CSM >> DNS Filter (CSM >> DNS Filter)
a. Click on the Profile Number in the DNS Filter Profile table.
b. Enter Profile Name (Profile Name)
c. Select UCF as URL Content Filter Profile created in URL Filter in Step 2
d. Click OK and save
4. Apply the Content Filter URL and DNS Filter URL to the Firewall Rule and remember to activate syslog. Go to Firewall >> Filter Setup >> Set 2 (Default Data Filter) (Firewall >> Filter Installation >> Installation 2 (Default Data Filter)).
a. Click on the Filter Rule number.
b. Enable (Enable) Filter Rule
c. Select Filter as “Pass Immediately” (Pass Now)
d. Select the created profile in the URL Content Filter (URL Content Filter) and activate Syslog
e. Select the created profile in DNS Filter (DNS Filter) and activate Syslog
f. Click OK and save
Save Syslog to USB
5. Insert one USB, go to USB Application >> USB Device Status (USB Application USB Device Status) and check the connection status of Disk connected.
6. To save the Syslog to a USB drive, go to System Maintenance >> SysLog / Mail Alert Setup (System Support >> SysLog / Mail Alarm Setup).
a. Enable (Enable) access to SysLog
b. Activate USB Disk to make sure the logs will be saved on your device.
c. Activate only Firewall Log
d. Click OK and save
7. When the above settings are complete, go to USB Application >> File Explorer (USB Application >> File Manager) and check the log stored in the new “Syslog” folder on the USB device. Click and download the file to your computer, the site history is recorded one by one, so network administrators can check it.
Source: https://habr.com/ru/post/395505/
All Articles