Hedgehog - a talking bird [if with an MP3 player]

A long time ago, so much so that it already seemed wrong, the masterkit told about a wonderful built-in MP3 player , which you can equip anything, even MP3 players, if you first take out your own and then put this one out. In short, a useful thing. Especially if you want to make a child's toy, firstly, with your own hands, and, secondly, correctly, and not like those who make them on an industrial scale.
However, in the presented product I was not only satisfied with everything, so I thought: there could not be such a thing that did not appear on Chinese in such a Chinese-looking way. And indeed, there were a number of such players, and familiarization with the model range showed that there are more attractive options than models with a fixed amount of memory. That is - with a slot for removable microSD cards.
')
And away we go.
To make it clear what and where it went, a hedgehog demo in various modes.
Entertaining phrases while waiting:
Switching tales, volume and switching off cards and shaking:
Wireless charger:
Before continuing the story, I apologize for the fact that I can allow some inaccuracies in the description and circuit design, since I did not document anything in the process, everything is so to say, on a whim. Please use common sense and practical materials so that it will not be excruciatingly painful.
So, after a brief search and comparisons, I switched to Ebay, where I acquired what I wanted - a player with a JQ6500 decoder chip, 4 megabytes of internal memory and a slot for microSD .
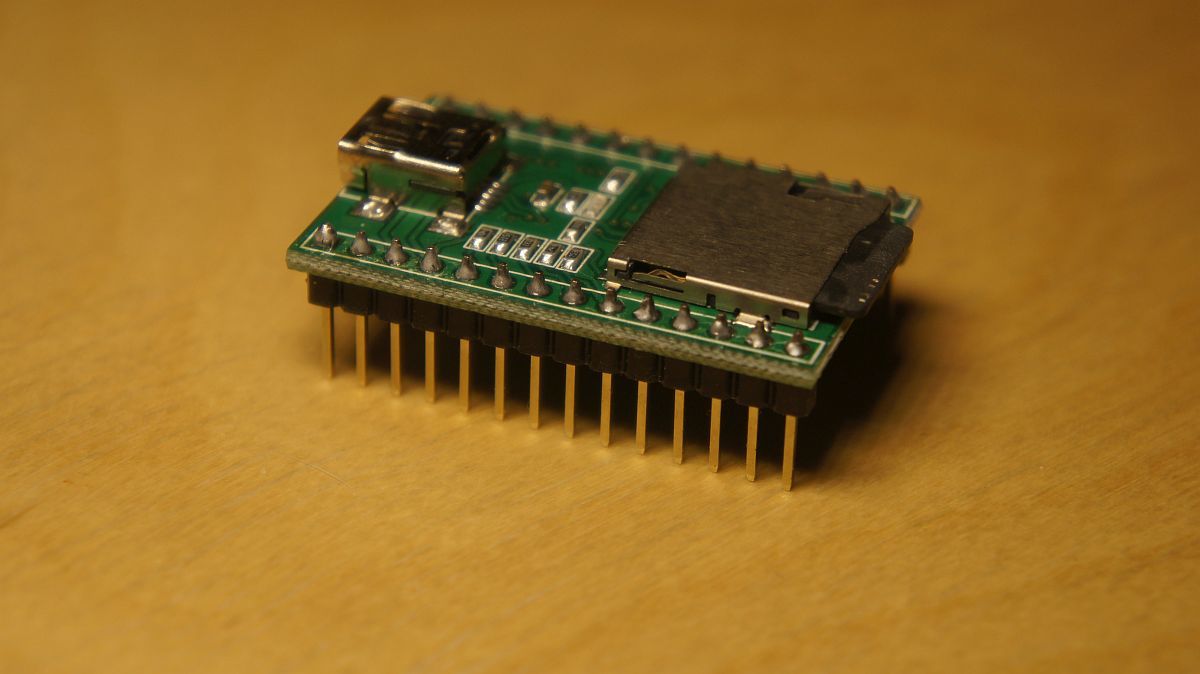
Why this particular player? Because then it seemed to me that this is an ideal option for homemade. Since all with him. If you want, use it separately: for this there are play / pause pins, track switching, volume, fast playback of five tracks and a mono amplifier to connect the speaker directly to the board (there is a stereo output, but it already needs an external amplifier). That is, at a minimum, enough batteries, speakers, a few buttons and a memory card with music.
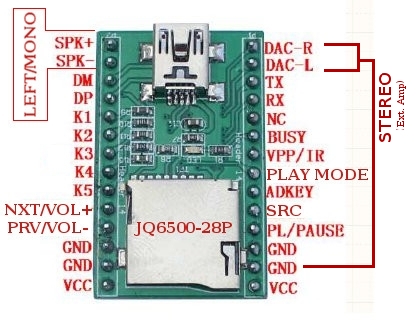
But much more interesting is the complete control of the player through some semblance of a serial port. Here you can do anything at all - play, stop, change the volume, switch the equalizer and playback modes, start playback of arbitrary tracks both in the pass-through order and from certain folders. And, not least in my case, there was already a ready-made library for Arduino.
So, two components are already known: the player and the Arduino. But personally, I did not want to stop there, because it’s foolish to imitate buttons with a whole microcontroller. We need something special to Emelya, so to speak, and pike.
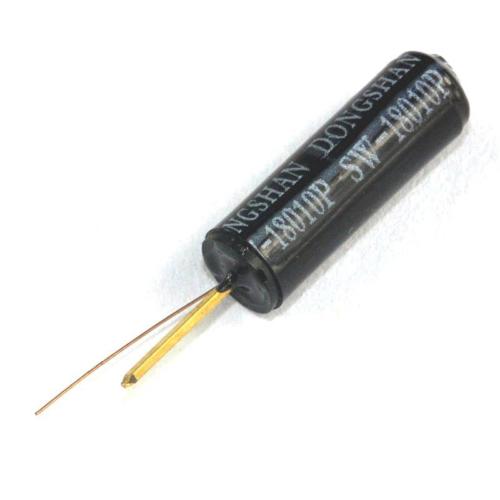
Therefore, the simplest vibration sensor SW-18010P and the well-known card reader RC522 added here .
All only in order to completely get rid of the buttons that I found unnecessary in an entertaining toy. Judge for yourself: if there are buttons, the child will somehow press them, more often by accident than deliberately. But the over-switching of fairy tales is still not entirely correct.
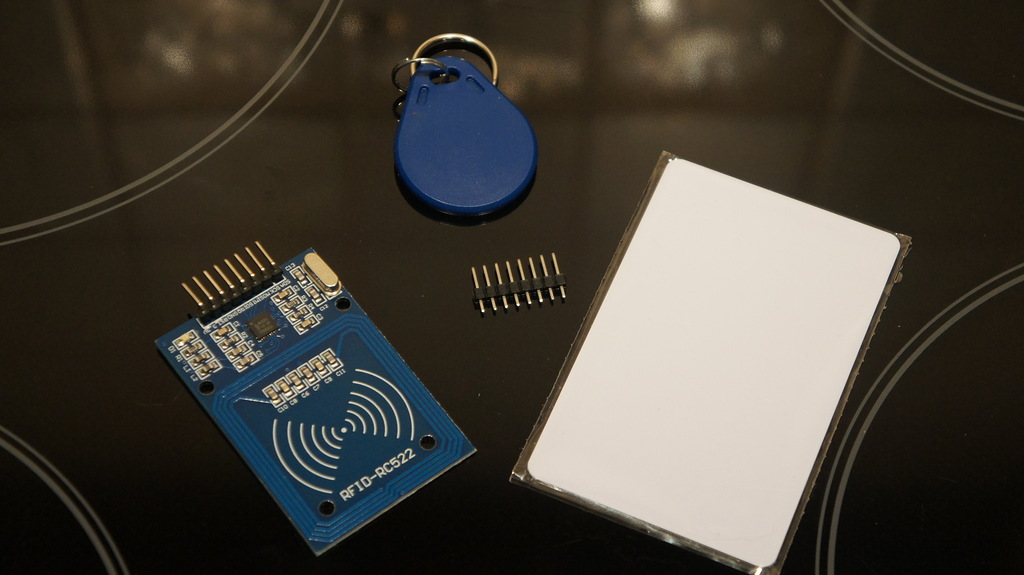
Here it turns out like: a vibration sensor serves to turn on a toy when a child picks it up. The same sensor will not allow the toy to turn off until the child places it for a sufficiently long time. As for the Mifare card reader, this thing, in my opinion, is extremely convenient for switching tales. For example, cards can be attached to books, and then the child will be able to listen to a fairy tale, bringing the toy to the book.
And still cards can be attached to various subjects, and then the child will be able to listen to their description and rules of use. For example, that this white figovina is a refrigerator, and that we store food there so that they do not deteriorate, and that for this reason it is not worth it to open it. Or something like this is an oven, and it can be hot, so you don’t need to hang on its handle and put your palms on the glass. You can think up a lot of things, especially since the cards are used metro tickets (yes, I was lucky, I'm in Moscow), which you can easily put together in the right quantity.
So while I was thinking, in between times I got the ATmega328p controller out of stock, soldered it to the mock-up shawl, and patched the Adruino loader through the Arduino Mega 2560.
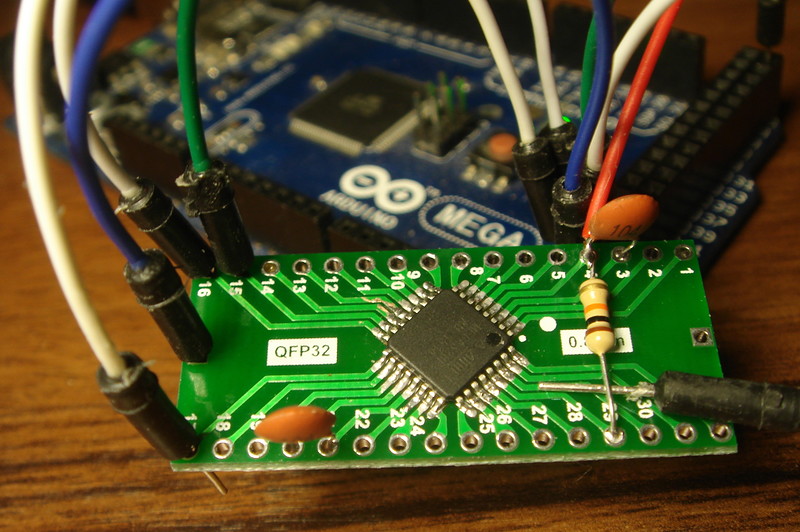
For convenience, brought the serial port, reset and ground to a separate connector for quick reprogramming. And then I know myself - I will fill in the sketch, and then one is not this, the other is not.
I also added a 3.3V stabilizer nearby, as the RC522, due to a misunderstanding, is powered by this voltage, while the other components feel fine on universal 5V, which I assumed to take from a simple power bank on 18650 batteries.
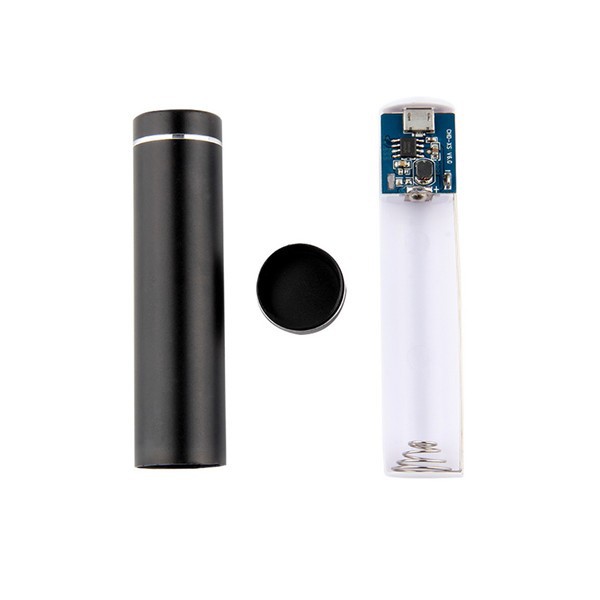
The decision to use such a power bank, rather than a typical flat battery, may seem illogical. But I thought that since the toy will consume a fairly decent current (only the controller and player in standby mode eat about 40 mA), then the ability to quickly replace an empty battery with a full one is very useful.
And I also had to add a piezo-ceramic squeaker for the sound indication of some events (reading a card, for example). This, you say, is generally funny - there is a speaker, right? Well, yes, not so. The speaker is connected to the player, not to the controller. And also added a transistor as a key that turns off the MP3 player during sleep to reduce power consumption.
An attentive reader may notice that the player could be powered from a digital pin of the controller, which would do a great job of turning it on and off. I would like that myself, but this only in standby mode the player consumes 16 mA. And when the music, it easily takes more than 100 mA, which is at least twice as high as ATmega. Therefore, I took “any” npn transistor with a collector current of 300 mA and brought it to the controller's digital pin through a resistor of about 200 ohms.
But the card reader consumes within 40 mA, so the stabilizer that feeds it can be connected to the controller's digital pin. He did so, but all the same it did not work out, about which - at the end.
Another such moment: the player needs a dynamic head with resistance not lower than 8 ohms. I had one (a speaker from the system unit), but the sound was not very good. There were also 4-ohm speakers (from a typical Chinese speaker). In general, I connected both in series: one gives more high, the other low, and together they just sound great.
There is a trifle, i.e. the mirror of one's heart. Which is easiest to make a pair of LEDs connected in series. Brutal-red did not take - very scary. But the amber-yellow eyes - the most it.
So, the layout of the toy is assembled and debugged. Now the most important thing: you need a donor of the physical shell. In general, I really wanted a talker bird , but judging by the price of neighboring toys, the pleasure is not exactly budgetary. Especially when you consider that the interest of the child is unpredictable.
Therefore, for a start, I began to look for a more accessible candidate for transplantation. And this was found: a charming hedgehog Evelyn , sold in the Children's World.

Of course, I had to almost completely get rid of the rich inner world of the hedgehog. And replace it with homemade, packed in a regular soap box. However, not quite normal. The fact is that, unlike many, this soap box has a flat back side, so it is convenient to place a card reader there - the minimum distance is obtained. On the other hand, the soap dish is something like a massage brush and there are even holes, i.e. there is a perfectly placed speaker: the sound will come out through the holes that will not be blocked due to the massage spikes. Holes, however, was not enough, but it does not matter - I still nasverlil.
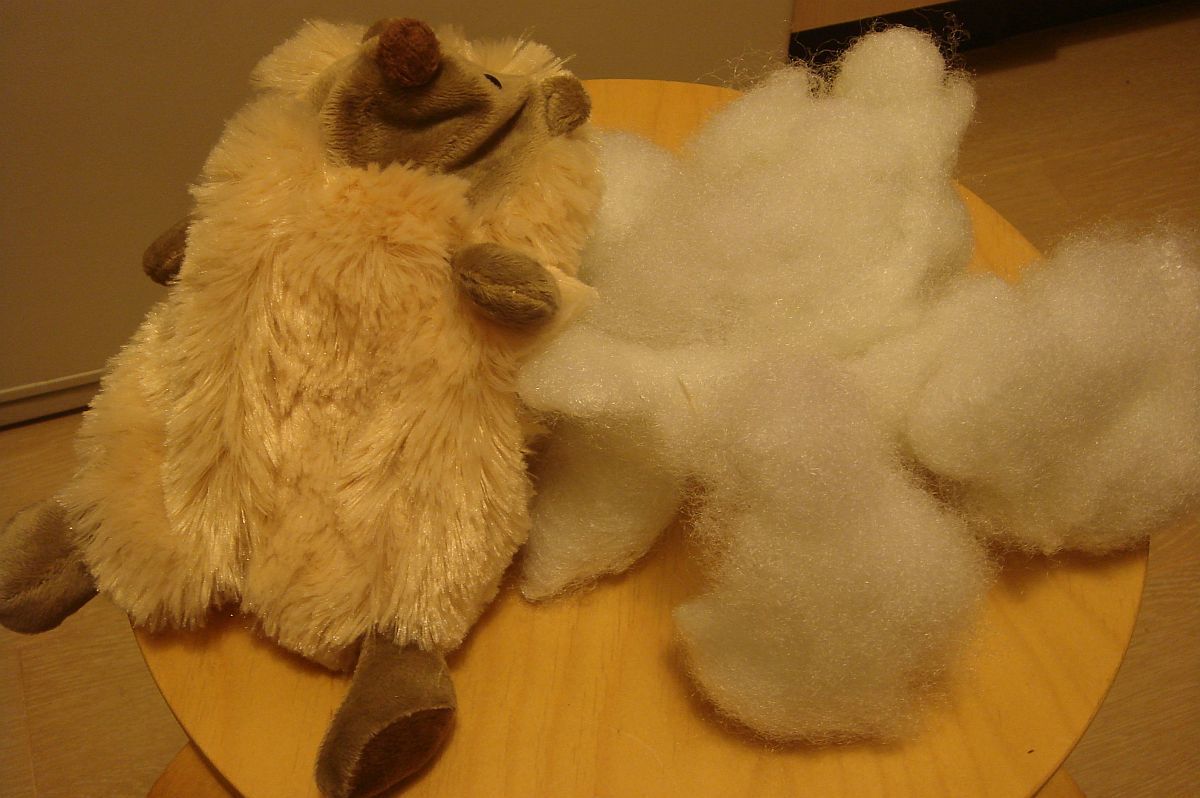
Most difficult, I must admit, was a hedgehog surgery. First, I do not like to sew. And it was necessary decently: at first it was ripped, then it sealed the edges, then sewed six buttons. Then he opened six buttons and sewed four buttons. Why all? Because at first I sewed on small and wrong, so that the hedgehog was unbuttoned.
Secondly, the eyes. LEDs, of course, I prudently acquired a diameter of 3 mm, so that they could be guaranteed to portray their pupils. However, drilling holes in the eyes of the hedgehog Evelyn was not so easy. It would seem: you take an engraver, put the necessary drill in it - and go ahead. But it turned out that during drilling, plastic turns into a viscous mass, where the drill of a weak engraver gets tight.
And, I must say, a hedgehog with a drill sticking out of his eye, is an infernal sight.
By the way, on this occasion I do not even know what to advise. I somehow twisted and still made holes, inserted LEDs into them and filled with epoxy, and on top I covered with colorless nail polish. The eyes also stuck to the hedgehog with epoxy, as the native mount died during the drilling process. The result was not perfect, but quite tolerable.
How the hedgehog works, you have already seen. Therefore, I can only duplicate the text of its current logic. Initially, the hedgehog is in sleep mode. If you take it in your hands (or just move, or move the surface on which it lies, etc.), it will wake up by an interruption, which will be generated by the vibration sensor.
After that, at predetermined intervals, the hedgehog will say pre-defined phrases, and if you do not touch the hedgehog for some time, he will fall asleep again. And if you touch - do not fall asleep. And if you shake some time - will begin to tell a fairy tale, selected in random order.
If you bring a card to a hedgehog (when he is awake), then the hedgehog will begin to tell a fairy tale associated with this card. There is no hard binding, the order will change when replacing fairy tales. Only two service cards are fixed: to adjust the volume and force the hedgehog to sleep. Loudness, by the way, is adjusted by successive switching of three stages (silent - medium - loud).
As for the amber eyes, they flash twice (in a cycle) when the hedgehog woke up, but it is silent and changes brightness when the hedgehog tells a fairy tale. It seemed to me the best option.
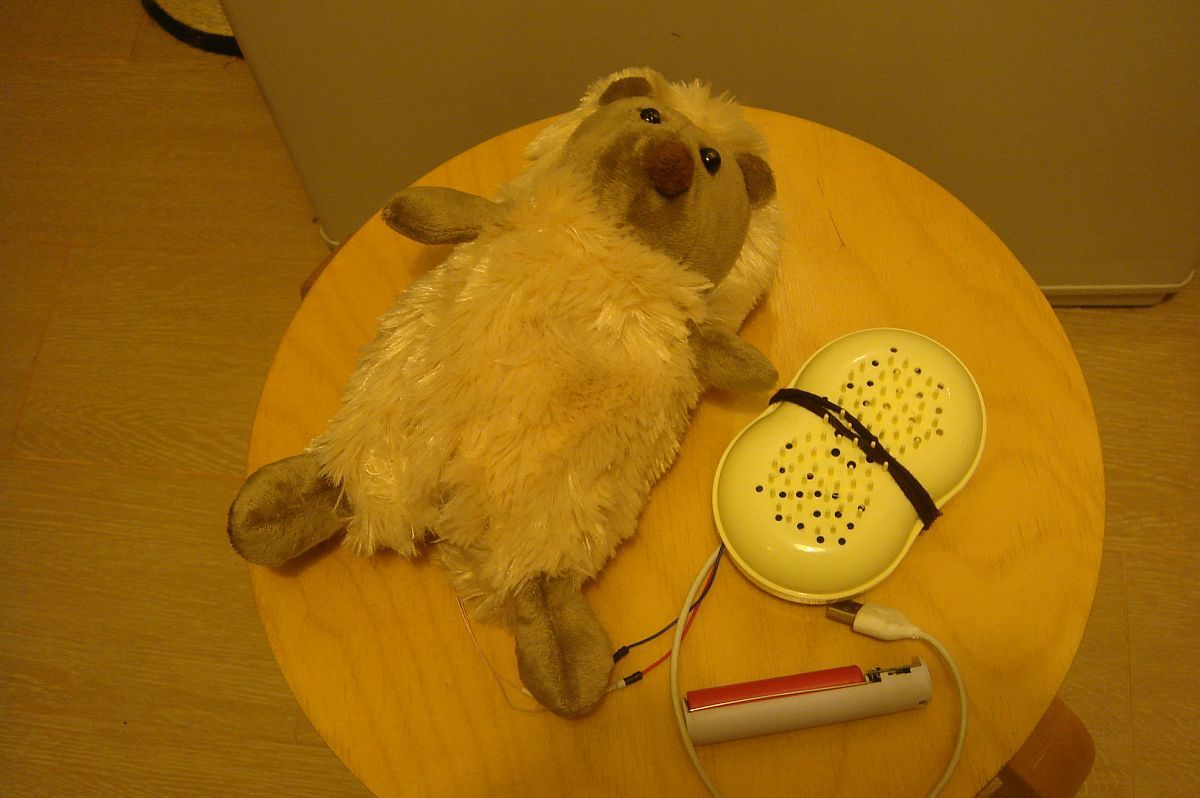
During the assembly, I tried another innovation: since the power bank has two connectors (input and output), I connected the Qi wireless charging adapter that I had to my input. And so it turned out that to recharge the hedgehog, it does not need to be unfastened at all - just put it on the wireless charger for the night. However, just this function is still in test mode.
In general, despite the seeming simplicity, some things puzzled me. For example, from the code you may notice that I send some commands to the player several times in a row, and I also set a timeout at the end. And all because in practice in my configuration only is possible.
It also shows that for some reason I control the end of the playback by the player’s hardware signal instead of a simple command to enable it to play only one file. This is also not easy: for some reason, this mode does not work for me, so when one song ends, the player starts playing the next one.
It may seem curious that the function random to play a random composition is constantly spinning in a loop, instead of being called only when it is really needed. But there is such a thing: if you call it only when it is needed, for some reason it in most cases returns the same value. But if you put in a loop, then really pseudo-random values are generated. Actually, I also found this out in practice when I tried to understand the inappropriate behavior of the hedgehog.
Finally, what stunned me completely was the inability to cope with turning off the card reader with the help of a digital pin of the controller, from which the reader is powered. For some reason, it turns out that if the pin is set to LOW and then to INPUT, the reader is not turned off.
At the same time, if you simply set LOW, then the LED of the card reader “lights up” fully, the voltage at the output of the stabilizer supplying the reader is about a volt. If then on the pin of the controller to make INPUT, this voltage rises to about 3V.
Even more interesting is that if you first put the controller pins connected to the SS and RST reader in LOW and INPUT, and then transfer the power supply pin of the controller to the same position, the reader turns off. And even then it turns on after sleep, if the power pin is transferred to OUTPUT and HIGH.
However, this happens something irreparable with timers. That is, I think so, because after such a trick (sleep with the reader turned off), the eyes and the shaking counter are inadequate, and both of these processes are tied to millis (). What happens and how to restore the timer, I do not know, so for now I left it as it is - the card reader continues to feed even during sleep.
If older comrades will help find a way out - I will be very grateful. Although it is hard to believe that older comrades finish reading this place.
In view of the above, Evelyn’s hedgehog code is not perfect at all, but you can always comb it (code or hedgehog - choose it yourself), optimize, add, shorten it or otherwise adapt it to your needs. That is why I attach it. And in order to make it easier to use what is, the maximum of settings (I tried everything at all, but it turned out as usual) is not in the code, but in the section for defining variables. There is a pin configuration, time delays, and the number of tracks.
In the section describing card numbers, it should be understood that the last two cards are always “reserved” for internal functions — volume and sleep switching.
Action program
/* A0 - MP3 ( ) * pin 0, 1 - () * pin 2 - * pin 4 - MP3 ( ) * pin 5 - * pin 6 - * pin 7, 8 - MP3 * pin 9 - * pin 10 - * pin 11, 12, 13 - SPI */ #include <Arduino.h> #include <SoftwareSerial.h> #include <JQ6500_Serial.h> #include <avr/pgmspace.h> // PROGMEM #include <SPI.h> #include <MFRC522.h> #include <avr/sleep.h> #include <avr/power.h> #define adc_disable() (ADCSRA &= ~(1<<ADEN)) // disable ADC (before power-off) #define adc_enable() (ADCSRA |= (1<<ADEN)) // re-enable ADC #define RST_PIN 9 #define SS_PIN 10 #define mp3Pin 4 #define mp3Busy A0 #define readerPin 6 #define tonePin 5 #define ledPin 3 #define offDelay 70000 // #define winkStep 1500 // #define on 150 // "" #define off 80 // "" #define tOut1 0 // (x - / x1 - ) #define tOut11 500 #define tOut2 14000 #define tOut21 15000 #define tOut3 29000 #define tOut31 30000 #define tOut4 44000 #define tOut41 45000 #define tOut5 60000 #define tOut51 65000 #define tShake 2000 // #define nShakeQ 10 // #define introQ 5 // - #define minVol 18 // #define midVol 22 // #define maxVol 25 // unsigned long dimDelay, winkStepDelay, onDelay, ledOffDelay, tShakeDelay; boolean ledOn, ledOff, eyes, pwm; int wink; int pwmVal; boolean playON = false; boolean pwmUp = false; byte pwmStep = 1; unsigned int playFile; MFRC522 mfrc522(SS_PIN, RST_PIN); // MFRC522 unsigned long uidDec, uidDecTemp; // byte bCounter, readBit, nShake, rnd; byte vol = midVol; // unsigned long ticketNumber; unsigned long offTimeOut = 0; // boolean mp3ON = false; // boolean isInt = false; // byte ticketQ = 32; // ( - ) byte fileQ = 0; // MP3- // ( , ), . , PROGMEM const uint32_t ticketSet[] = {2515217196, 2540548337, 2490970856, 2486466332, 2485920633, 35870611, 37836807, 37836806, 2377004330, 2522873668, 2514304566, 23472725, 2485702426, 2374853555, 2374391583, 2492957469, 2486467162, 2489280075, 2488031661, 2491726641, 2491720188, 2490968782, 2490968783, 2488900952, 2489969016, 2506562651, 2375447052, 2375449579, 2489276180, 2483389692, 2486466331, 2484789326}; JQ6500_Serial mp3(8,7); // void enterSleep() { mp3.playFileNumberInFolderNumber(01, 005); // - mp3.playFileNumberInFolderNumber(01, 005); // - delay(2500); tone(tonePin, 800, 500); delay(500); digitalWrite(readerPin, LOW); digitalWrite(mp3Pin, LOW); digitalWrite(ledPin, LOW); pinMode(ledPin, INPUT); pinMode(readerPin, INPUT); pinMode(mp3Pin, INPUT); adc_disable(); set_sleep_mode(SLEEP_MODE_PWR_DOWN); sleep_enable(); sleep_mode(); sleep_disable(); power_all_enable(); adc_enable(); tone(tonePin, 450, 500); pinMode(ledPin, OUTPUT); pinMode(readerPin, OUTPUT); pinMode(mp3Pin, OUTPUT); digitalWrite(ledPin, LOW); digitalWrite(readerPin, HIGH); digitalWrite(mp3Pin, HIGH); SPI.begin(); // SPI mfrc522.PCD_Init(); // MFRC522 mp3Init(); offTimeOut = millis(); ledOffDelay = millis(); mp3.playFileNumberInFolderNumber(01, 001); // - mp3.playFileNumberInFolderNumber(01, 001); // - delay(500); playON = false; mp3ON = true; } void wakeUp() { detachInterrupt(0); ledOffDelay = millis(); if (isInt == false) { // isInt = true; } attachInterrupt(0, wakeUp, LOW); } void setup() { pinMode(2, INPUT_PULLUP); attachInterrupt(0, wakeUp, LOW); pinMode(readerPin, OUTPUT); digitalWrite(readerPin, HIGH); SPI.begin(); // SPI mfrc522.PCD_Init(); // MFRC522 pinMode(mp3Pin, OUTPUT); mp3Init(); pinMode(ledPin, OUTPUT); digitalWrite(ledPin, LOW); eyes = false; ledOn = false; ledOff = false; dimDelay = millis(); winkStepDelay = millis(); wink = 0; pwmUp = true; // pwmVal = 0; ledOffDelay = millis(); offTimeOut = millis(); mp3.playFileNumberInFolderNumber(01, 001); // - mp3.playFileNumberInFolderNumber(01, 001); // - delay(500); playON = false; mp3ON = true; } void loop() { rnd = random(1, fileQ-1); if ((millis() - offTimeOut) > offDelay) { // enterSleep(); } else { ledWink(); // if (isInt == true) { offTimeOut = millis(); // - , if (nShake == 0) { tShakeDelay = millis(); } if ((millis() - tShakeDelay) < tShake){ nShake = nShake + 1; } else { tShakeDelay = millis(); nShake = 0; } isInt = false; } if (nShake > nShakeQ) { playRandom(); nShake = 0; } // playPreset(); // // if (mp3ON == true) { if (playON == true) { // , offTimeOut = millis(); // } nShake = 0; eyesPWM(); // // MP3 if(analogRead(mp3Busy) < 250) { // - , mp3ON = false; playON = false; digitalWrite(ledPin, LOW); } } scanPlay(); // } } void setBitsForGood(byte daBeat) { if (daBeat == 1) { bitSet(ticketNumber, bCounter); bCounter=bCounter+1; } else { bitClear(ticketNumber, bCounter); bCounter=bCounter+1; } } // MP3 void mp3Init() { digitalWrite(mp3Pin, HIGH); delay(100); mp3.begin(9600); mp3.reset(); mp3.setVolume(vol); mp3.setLoopMode(MP3_LOOP_NONE); fileQ = mp3.countFiles(MP3_SRC_SDCARD); // fileQ = fileQ - introQ; // } // void playRandom() { tone(tonePin, 450, 500); delay(500); playFile = rnd; mp3ON = true; playON = true; mp3.playFileByIndexNumber(playFile); mp3.playFileByIndexNumber(playFile); mp3.playFileByIndexNumber(playFile); delay(500); } // void ledWink() { // if ((millis() - winkStepDelay) > winkStep) { // // if (eyes == true) { // if (ledOn == false) { onDelay = millis(); // ledOn = true; // , } if ((millis() - onDelay) > on) { // digitalWrite(ledPin, LOW); // eyes = false; // } } // if (eyes == false) { // if (ledOff == false) { ledOffDelay = millis(); // ledOff = true; // , } if ((millis() - ledOffDelay) > off) { // digitalWrite(ledPin, HIGH); // eyes = true; // } } if (ledOn == true && ledOff == true) { // ( /) wink = wink+1; ledOn = false; ledOff = false; } if (wink == 4) { // / winkStepDelay = millis(); wink = 0; } } } // void playPreset() { if (mp3ON == false) { if ((millis() - offTimeOut) > tOut2 && (millis() - offTimeOut) < tOut21) { mp3.playFileNumberInFolderNumber(01, 002); // /001/002.mp3 tOut21 . mp3ON = true; delay(500); } if ((millis() - offTimeOut) > tOut3 && (millis() - offTimeOut) < tOut31) { mp3.playFileNumberInFolderNumber(01, 003); // /001/003.mp3 tOut31 . mp3ON = true; delay(500); } if ((millis() - offTimeOut) > tOut4 && (millis() - offTimeOut) < tOut41) { mp3.playFileNumberInFolderNumber(01, 004); // /001/004.mp3 tOut41 . mp3ON = true; delay(500); } } } // void eyesPWM(){ if ((millis() - winkStepDelay) > (pwmStep)/4) { // MP3 if (pwmUp == true) { if (pwmVal < 128) { // 254 - ( 255, ) analogWrite(ledPin, pwmVal); pwmVal = pwmVal + 1; pwmStep = pwmStep - 1; winkStepDelay = millis(); } else { pwmUp = false; pwmStep = 1; pwmVal = 128; } } if (pwmUp == false) { if (pwmVal > pwmStep) { analogWrite(ledPin, pwmVal); pwmVal = pwmVal - 1; pwmStep = pwmStep +1 ; winkStepDelay = millis(); } else { pwmUp = true; pwmStep = 128; pwmVal = 1; } } } } // void scanPlay() { if (fileQ > 0) { // if ( ! mfrc522.PICC_IsNewCardPresent()) { return; } // if ( ! mfrc522.PICC_ReadCardSerial()) { return; } uidDec = 0; // , byte status; byte byteCount; byte buffer[18]; // (16 + 2 ) byte pages[2]={4, 8}; // byte pageByte; // byteCount = sizeof(buffer); byte bCount=0; mfrc522.MIFARE_Read(4, buffer, &byteCount); bCounter = 0; // 32- // 0-3 for (bCount=0; bCount<4; bCount++) { readBit = bitRead(buffer[6], (bCount+4)); setBitsForGood(readBit); } // 4 - 27 for (pageByte=5; pageByte > 2; pageByte--) { for (bCount=0; bCount<8; bCount++) { readBit = bitRead(buffer[pageByte], bCount); setBitsForGood(readBit); } } // 28-31 for (bCount=0; bCount<4; bCount++) { readBit = bitRead(buffer[2], bCount); setBitsForGood(readBit); } for (byte ticketNum = 0; ticketNum < ticketQ; ticketNum++) { unsigned long ticketTemp = pgm_read_dword_near(ticketSet + ticketNum); if (ticketTemp == ticketNumber) { tone(tonePin, 450, 500); delay(500); if (ticketNum < (ticketQ - 2)) { if ((ticketNum+1) < fileQ) { digitalWrite(ledPin, HIGH); playFile = ticketNum+1; mp3ON = true; playON = true; mp3.playFileByIndexNumber(playFile); mp3.playFileByIndexNumber(playFile); mp3.playFileByIndexNumber(playFile); delay(500); } return; } else { if (ticketNum == ticketQ-1) { enterSleep(); // } if (ticketNum == ticketQ-2) { setVol(); // } } } } // } // Halt PICC mfrc522.PICC_HaltA(); } } // void setVol() { switch (vol) { case maxVol: vol = minVol; break; case midVol: vol = maxVol; break; case minVol: vol = midVol; break; } mp3.setVolume(vol); } The scheme approximately restored by the code should look like this (I apologize if there were my errors somewhere):
Here:
- U1 = ATmega328p
- UHT7333 = HT7333
- Capacitor C1 = 0.1 μF
- R2 = ~ 50 Ohm
- Resistor R3 = 220 Ohm
- Resistor R4 = 1 kΩ
- M1 = vibration sensor
- Resistor R4 = 1 kΩ
- SP1 = 8 ohm speaker
- Piezo = piezoceramic radiator
- T1 = suitable NPN transistor with a collector current of at least 0.3A
- U2 = JQ6500 with the following pinout: 1 - TX, 2 - RX, 3 - GND, 4 - VCC, 5 - BUSY, 6 - SPK +, 7 - SPK -
Habrayuzer Chigin , for which many thanks to him, has noticeably improved and put all this economy in order. But note that here the PNP transistor is already there, and the player’s power management needs to be inverted (i.e., with this connection, the player turns on low on the controller pin and turns off - high):
With the current configuration of the battery capacity of about 2500 mAh enough for about a day using a hedgehog. Not to say that much, but we must understand that the schedule is different all the time and most of the energy is spent, I hope, in active mode. Which to some extent allows us to neglect the failed complete withdrawal to sleep of all the hedgehog electronics.
If you give yourself the trouble to calculate an approximate budget, you get something like this (in USD):
- Player: 8.9
- ATmega328p: 1.1
- Development Board: 0.28
- Reader RC522: 2.21
- Dynamic head: 0.99
- Piezoceramic Emitter: 0.77
- LED: 0.12
- Transistor: 0.14
- Stabilizer: 0.13
- Vibration sensor: 0.13
- Soap dish: 0.99
- Powerbank: 0.75
- 18650 battery: 3.9
- Qi charging adapter: 1.65
- Memory card: 3
- Hedgehog Evelyn: 6
Total 31.06, but in fact a little more, because you still need a wire for connections and other little things like hot melt glue, double-sided tape and blue electrical tape.
Perhaps there should be some particularly important final phrase, but in my head it definitely does not exist. It probably makes sense to say that the child is quite happy with the toy, and this is definitely better (and often faster) than turning on the laptop.
ps. I know about Bluetooth speakers, it's a little different, even if you put such a cute hedgehog.
Source: https://habr.com/ru/post/395423/
All Articles