We will marry Arduino with Lego and build a pervobot
I wanted to captivate my child with technology and introduce him to programming. So that not only virtual houses in Minecraft built, but also worked with pens. Simply programming abstract tasks is not an exciting activity for adults, let alone children. It is necessary that for clarity, everything blinked and moved according to our wishes.
It was decided to take Arduinka, and then we'll see ...
First of all, I’ll make a reservation that the child is purely for saying here, I wanted to touch Arduinka and the glands very long ago. And here such comfort has come - order what you wish, there is almost nothing to solder. Only the eyes run, and bad ideas do not give sleep.
To begin with, the Arduino UNO board itself was purchased, plus a pile of small things in bulk, so that it was at hand. All this, for a penny, in the expected time frame, came from famous Chinese friends.
Having spent the evening explaining the basics of electricity with wires, switches, LEDs and simple sensors, it became clear that the dead end is near. The child had enough interest for the first 30 minutes. Further enthusiasm melted in his eyes. It is necessary to move on to solving more complex issues.
We make a robot! (so that for beer in the pantry ran)
A lot of examples on the Internet, somehow we can handle. Still, dad - Engineer (IT). There would be a goal and faith in a bright, robotic future.
Again the store is wool - standard wheel platforms - "like everyone else" or already from the category of non-budget toys. The result will be as with managed machines - a few days to play and then again from time to time. Unsporting somehow.
“ Yes, we have Legov’s details — a wagon, ” says my second self, who does not want to leave childhood.
Ok, pa-problems, here is the minimum task:
- We will build a roboplatform on Legovsky details with Arduino brains.
- Only standard sets of cubes, and scattering from Lego-technician, strips and connections. (No, we have no mindstorm. A toad is choking.)
- Motorcycle wheels will be rotated individually, plus the third - fine, for support.
- Somehow we are adapting the budget step and servo motors from Ali under Lego.
- What would be as autonomous as possible, and not discharged after 10 minutes.
- In. And to manage what would be with the phone.
As the weapon is designed for chuck, we started from the existing components, inciting them to the final goal.
1) Android phone on bluetooth will control the robot. It's simple.
Take bluetooth HC-06 shawl with transceiver. On the phone, launch the application from the Market - "Bluetooth RC Controller".
Teams - more than enough to start. We will catch the buttons pressed on the phone and program something.
2) Power. We tried the pads with 6 AA batteries, the adapter under the Krona ...
From Krona, Arduin went into reboot (maybe not a contact in the connector). A block with batteries somehow occupied a lot of space, and you don’t bother with batteries / accumulators. As a result, they took the unit under two Li-ion batteries. They write 9900 mAh 3.7V. It turned out that the power supply is slightly more than 7 volts per Arduinka with a body weight for HZ of some Amp hours.
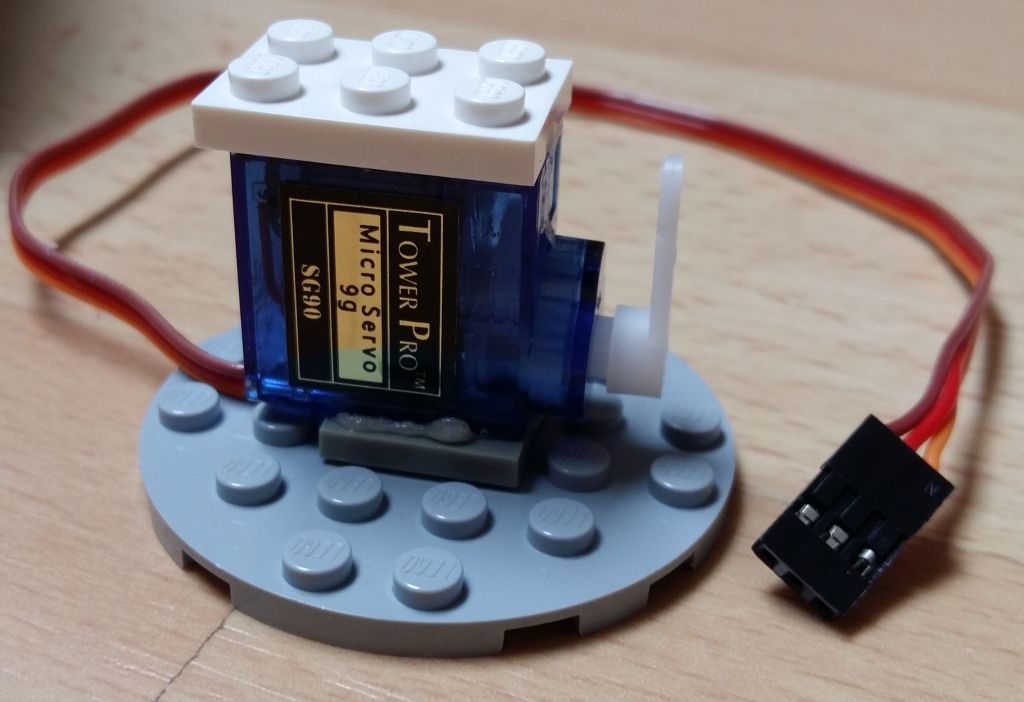
3) There were the cheapest step motors 28BYJ-48 and SG90 micro servo. They then began to adapt to Lego.
Cut down flies servo ears They only prevent us from deciding on leveling.
We build the leveling stand. The dimensions of the SG90 servo's boxing fit:
- the height ideally coincides with the height of 2 standard Lego blocks and another plate 1/3 block high,
- in width slightly less than 2 lego cells. We center with the help of projections "rocket launchers" (LEGO Part 61184 - Technic Pin 1/2 with 2L Bar Extension),
- in depth a little less than 3 lego cells. Aligned to the front of the working part of the servo.

In this case, the servo axis coincides with perforated lego-blocks. Hence, on the basis of geometry - the same with gears. This is for the future.
Last measurements and put on the glue Lego fasteners:
- down 2x2 smooth plate (LEGO Part 3068 - Tile 2 x 2),
- 2x3 plate on top (LEGO Part 3021 - Plate 2 x 3).

We disassemble the stand until the next time, preserving the instructions.
As a result, the servo can already stand on any platform from the lego-blocks or attach to the lego-technics strips via adapters.
At the motor metal mounting ears. The main problem was to find the "golden" section for the ears and to build a frame resistant to stress. Mounted without glue. "Flares" inserted into a black round connector (LEGO Part 2780 - Technic Pin) give the necessary rigidity. Around the perimeter of the frame around the corners of the Lego-Technics.
Mirror built frame on the 2nd wheel.
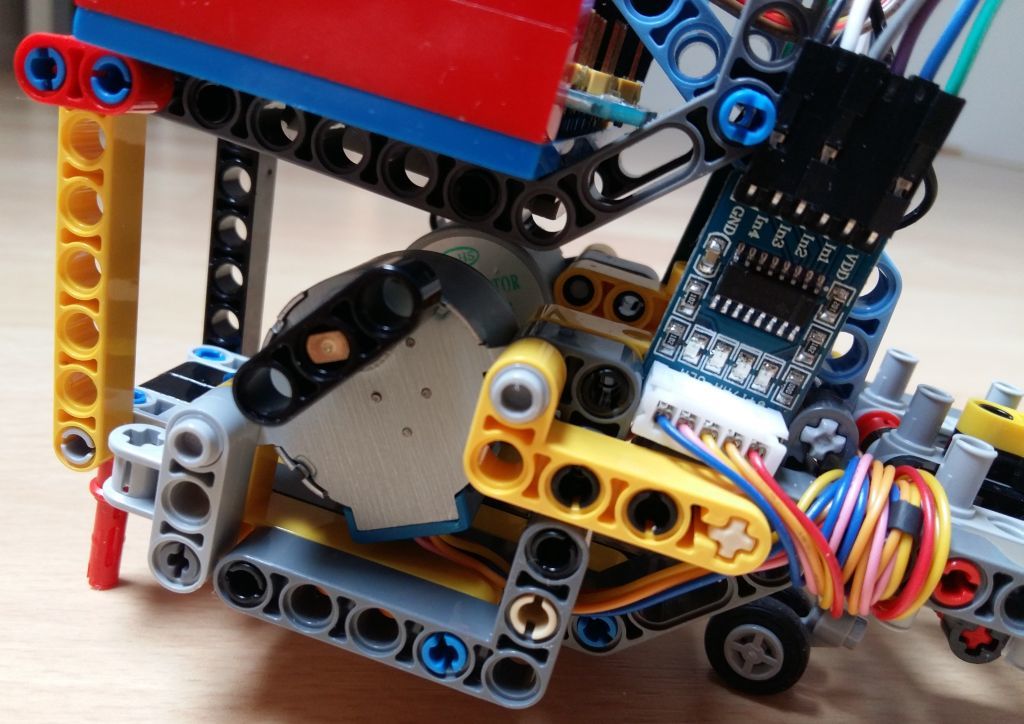
4) The axis of the step motor is rigidly inserted into the round holes of the Lego-Technics.
I used the LEGO Part 32523 - Technic Beam 1 x 3 Thick to transfer the moment to the bikes. Fasten the wheels on step motors. Based on their radius - we estimate the size of our future robot.
5) We assemble a roboplatform.
- We connect motor-wheels with a platform for the battery compartment.
- Scarves with ULN2003 for step motors get in the thrust between the details.
- Add the third wheel to support.
- Cause ahead seat under the servo.
- From above we mount on shield Deek-Robot shield with Arduino NANO, and we will keep UNO as a reserve.
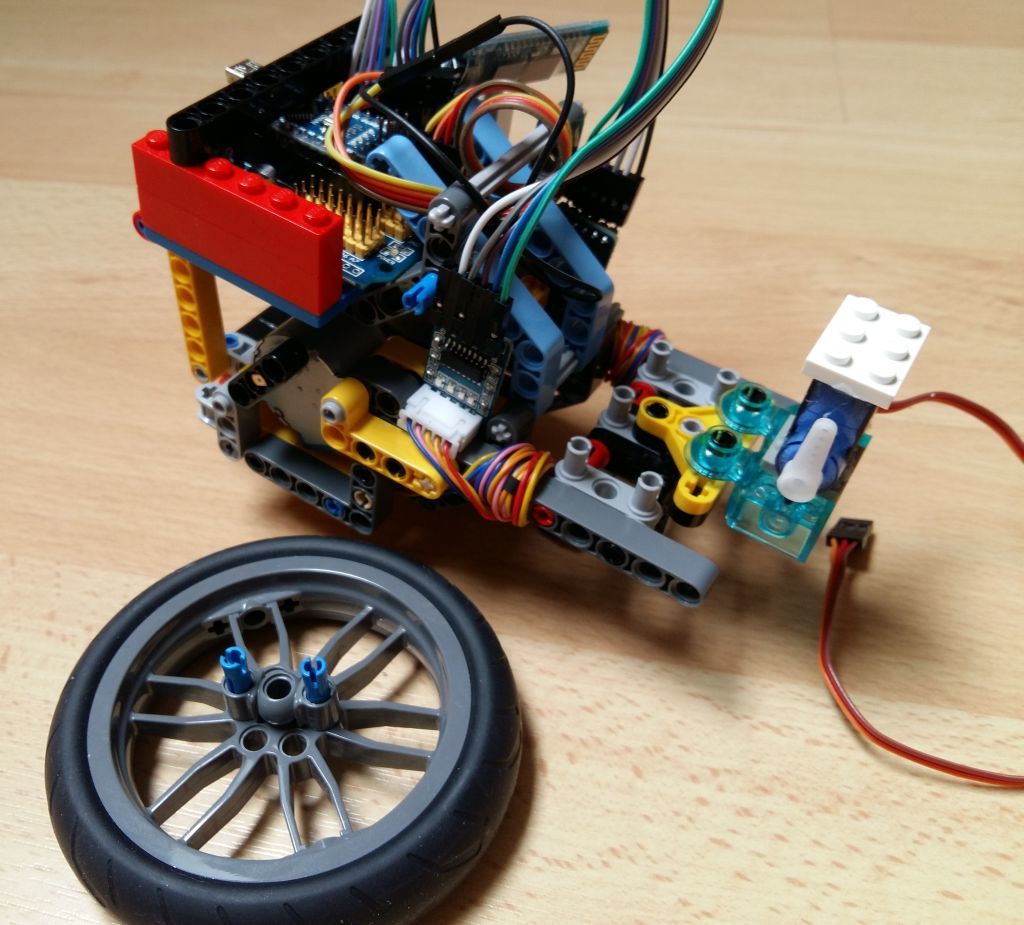


6) We deal with the management of this entire farm from Arduinka.
Basically, all of the examples. Simple enough. They accepted the command - they performed the action. It was decided to turn the wheels at independent speeds. This has the effect that the platform can turn on the spot and turn in an arc.
Here are the unpleasant little things that were decided in parallel with the construction of the Lego platform:
Well, how fonit. If the bluetooth is on hold / search, then everything is fine. When a connection is established - the servo starts to "tremble".
As advised on the Internet - to hang the servo motor on a separate power supply, and there is something else with resistors, it did not help me.
If the Bluetooth is connected to Serial RX / TX, then no side effect is observed at all. So far, and stopped.
The problem, as it turned out, is known. You must use the correct sequence to switch steps.
It is solved without problems using http://playground.arduino.cc/Main/CustomStepper
This is from the category of mysticism. The same code, the same (externally) connection.
One is turning clockwise, the other is counterclockwise ...
Total:
Played in Lego. Sorted out with Arduino and some peripherals. Found a cheap alternative to Lego-mindstorm.
It turned out quite a working platform for further toys with Arduino.
What's next?
Attach a pencil to the servo and teach the cart to draw. The blessing that step motors allow to orient a platform on the district with the minimum errors.
Minute video with pokatushkami:
#include <CustomStepper.h> int lSpeed = 4; int rSpeed = 4; int maxSpeed = 16; const char bNone = 0; const char bFwd = 2; byte tSteps[] = {8, B1000, B1100, B0100, B0110, B0010, B0011, B0001, B1001}; CustomStepper stepR(4, 5, 6, 7, (byte *)&tSteps, 4075.7728395, maxSpeed, STOP); CustomStepper stepL(8, 9, 10, 11, (byte *)&tSteps, 4075.7728395, maxSpeed, STOP); #define BT Serial enum { jF = 'F', // Forward jB = 'B', // Back jL = 'L', // Left jR = 'R', // Right }; int incSpeed(int I, int i) { I = I + i; if (I > maxSpeed) I = maxSpeed; else if (I < -maxSpeed) I = -maxSpeed; return I; } // Process steppers void stepRun() { if (!stepL.isDone()) stepL.run(); if (!stepR.isDone()) stepR.run(); } // change steppers speeds independently void stepRotate(char L, char R) { // owercode here if (L != bNone) { lSpeed = incSpeed(lSpeed, L); if (lSpeed == 0) stepL.setDirection(STOP); else { stepL.setRPM((lSpeed > 0) ? lSpeed : - lSpeed); stepL.setDirection((lSpeed > 0) ? CW : CCW); if (stepL.isDone()) stepL.rotate(); } } if (R != bNone) { rSpeed = incSpeed(rSpeed, R); if (rSpeed == 0) stepR.setDirection(STOP); else { stepR.setRPM((rSpeed > 0) ? rSpeed : - rSpeed); stepR.setDirection((rSpeed > 0) ? CCW : CW); if (stepR.isDone()) stepR.rotate(); } } stepRun(); } void setup() { BT.end(); BT.begin(9600); } void loop() { switch (BT.read()) { case jF: stepRotate( bFwd, bFwd); break; case jB: stepRotate(-bFwd, -bFwd); break; case jL: stepRotate(-bFwd, bFwd); break; case jR: stepRotate( bFwd, -bFwd); break; } stepRun(); } Ps. Yes, I see that is not perfect. There is something to strive for and what to rewrite.
')
Source: https://habr.com/ru/post/395291/
All Articles