Smart home: the operation of the microclimate or the path to comfort step by step
The first rule of a smart home: it should not take time.
The second rule of a smart home: everyone should know about your smart home.
All materials about smart home
A smart home ceases to be abstract when you enter the store, set out your Wishlist and give you a large package with a bunch of boxes. Coming home and getting a dozen devices at first horrified. But after spending one or two evenings, you begin to understand that a smart home is not so difficult, and many tasks are easily solved in a few mouse clicks.
I already wrote how a smart home did not let the cat freeze and how a smart home increases the comfort of being in a room . This time I will tell you how smart home allowed me to save 30% of funds for heating, filled the house with fresh air and did not let the plumbing system freeze this winter. So, we get out of the package boxes and go to teach the house to the mind of the mind!
')

Go to section:
Heating
Ventilation
Water supply
Technique involved
Conclusion
But before proceeding with the installation of the receiving and executive units of the smart home, I will take a little excursion into the functioning of engineering systems so that it is clear why and where it is being mounted. If you want to start installing smart blocks right away, then it’s enough just to scroll to the end of each block, where I will show how this smart home system is installed and functioning.
I will break the material into blocks to make it easier to read. The first and largest unit will be about heating, the second, smaller, about ventilation and the third - about maintaining the water supply system. Perhaps these are the three most important factors that allow you to live in your own home in the winter. It’s just impossible to live without heat or water in the house, and without normal ventilation by the spring you can easily find a fungus on the walls and ceiling. Let's get started!
Heating
There are many heating systems and they are often selected on the basis of available opportunities. I was repelled by the fact that my house is made of SIP panels, which means that the heat loss will not be as great as, say, at a brick house. The SIP panel itself in the section looks like this: it is a foam plastic, glued on both sides by OSB plates (or OSB - Oriented Chipboard).
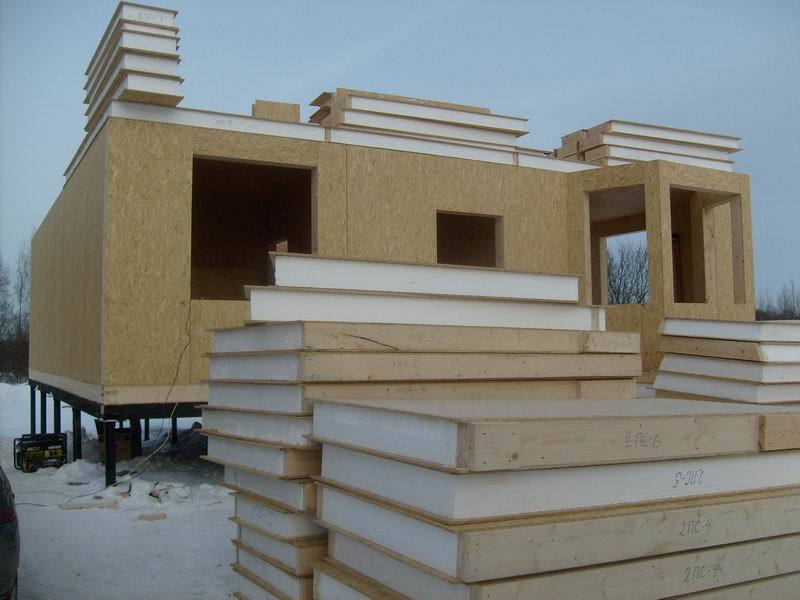
At the factory, panels are made according to a pre-approved plan, signed, and collectors are given documentation that indicates the order of the panels docking. A two-storey house of up to 200 square meters in 2-3 weeks is being built. To collect such a house is better in winter or dry in summer. In the winter, because the snow is easily swept away with a broom, and in the dry summer - so as not to soak the mounting foam in the seams between the panels. Foam is hygroscopic and very readily absorbs moisture.
After assembling the house and installing the windows of the doors get a thermos. The house practically does not “breathe”, unlike a log house or a frame house, so it will be necessary to install forced supply and exhaust ventilation. This I will discuss in more detail later.
To select a heating system, it is necessary to determine the source of heat and heat carrier.
Gas : Since there is no gas in my village, I excluded the gas boiler almost immediately. Why almost? Because I also considered the possibility of installing a gas tank and heating with propane-butane. Local companies charged me a minimum bill for a gas-gable barrel with installation ranging from 300 thousand rubles. In this case, the gas line to the house is mounted for some money. And the room itself with a gas boiler should be specially prepared. It is easier with turbo-boilers, but gas is also a fire hazard. So I switched to the second type of fuel.
Diesel or waste oil : The boilers work stably, the adjustment and setting is such that it can be played in wide temperature limits. Diesel does not explode, as happens with gasoline fumes. But the experience of operating my diesel-fired boilers indicates that finding the fuel of normal quality is still a problem. There may also be a specific smell. I rejected this option.
Pellets : Many have seen feline filler of pressed wood shavings - this is pellets. They burn well, have good efficiency. Many boilers with pellet burners are easily converted for burning solid fuel - wood or coal. But even the best boiler with a bunker requires replenishing this bunker with pellets every 2-3 days. In addition, we need a boiler room and a pipe. Pellet boilers are volatile. In general, not my option.
Electric boiler : The advantages of mass: electricity - one of the most inexpensive energy carriers, if there is no main gas. The electric boiler does not need to make a pipe, the fuel for it will not spill or ignite, there is no need to throw firewood every N hours. All maintenance is reduced to the timely verification of components and assemblies. Most importantly, with proper operation, it does not require attention at all. Minus: requires stable power and three-phase (very desirable) connection to the power grid.
So, I chose the electric boiler .
For myself, I chose the easiest way to transfer heat - liquid. That is, the boiler heats the liquid, the liquid transfers heat to the heaters. And here there was a question: batteries or a heat-insulated floor.
Batteries: cheaper and easier to install. Easy to replace. Allow them to dry things :). The minuses are also present: the required coolant temperature starts at 40 and ends at almost 80 degrees. At the same time, according to the physical law of convection, warm air rushes upwards, leaving the floors cold, so I chose ...
Heated floor: Water floor heating is more expensive. Visibly more expensive. Much more expensive! But having mounted such a floor all over the house and injecting it with a tie, I got a huge battery of 200 square meters, which, although it heats up slowly, but it accumulates heat and gives it away for a long time. Yes, and walk barefoot nicely in the warm.
Why not heating cable? Yes, because to replace a burned-out cable (we will not exclude such), opening the floor covering is required, which causes a lot of problems. In addition, water-heated floor does not impose any restrictions on the heat source. Today, I heat the house with an electric boiler, and tomorrow I will install a wood-burning stove, connect it to the water circuit and start burning wood, that is, there is always a reserve.
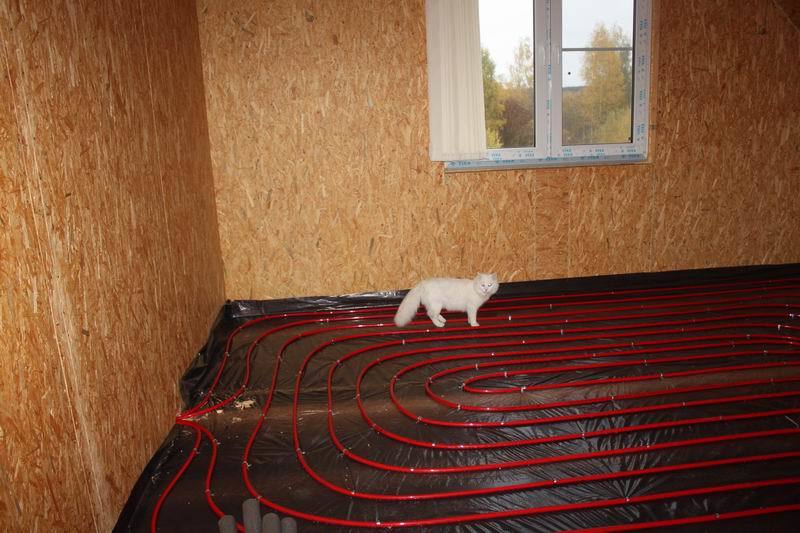
The pipes are laid "snail", the shoulder of each highway tried to do as close as possible to the others. By the way, the cat also walked by a snail and did not step over the pipes.
Then everything is poured with a screed, the minimum thickness of which is 5 cm. And already from above you can apply any floor covering, whether it be parquet, laminate, tile or linoleum. I chose tile and laminate. I must say that the tile gives off heat much more readily, but it is more pleasant to walk barefoot on the laminate.
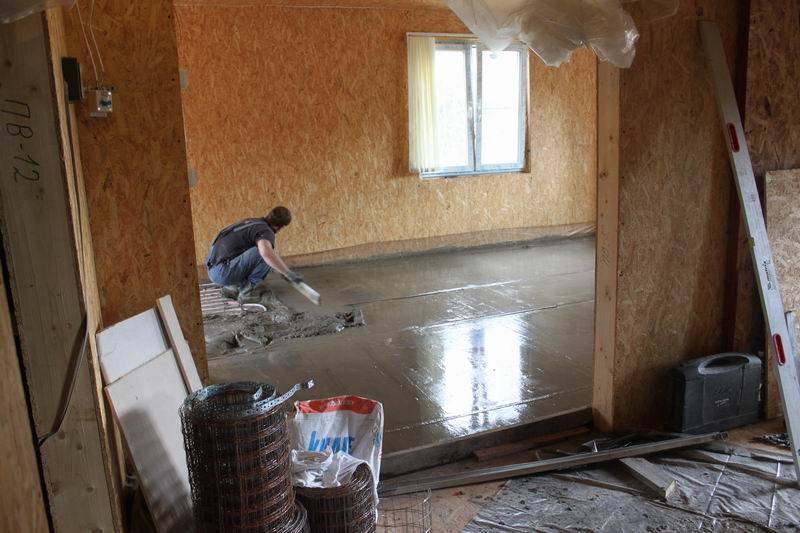
The process of casting screed is very time consuming and frankly dirty. Dust was on all surfaces. Screed dried for about two weeks in hot weather and open windows.
In order not to delay, I will immediately show you how the boiler was connected to the heated floors and what came of it.

For heating, an electric three-phase boiler Vaillant eloBlock VE12 is used. From the name it follows that its power is 12 kW, despite the fact that the house has three phases and a power of 15 kW. That is, there remains a reserve for other consumers. And given the fact that the entire system was designed to work only at night, there were no problems with overload.
There was a question: how to operate the boiler?
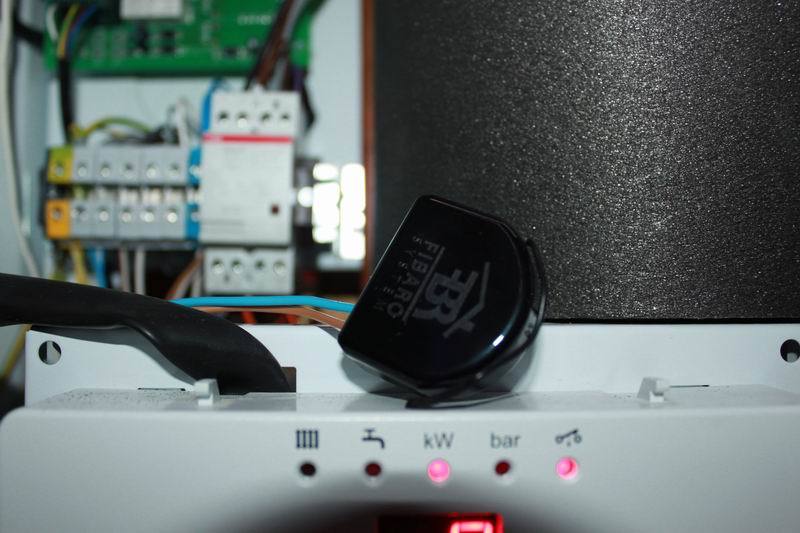
The boiler has only power and temperature settings for the heat carrier; it is not adjustable by timer. But the boiler itself supports the connection of an external thermal switch, which closes or opens the circuit when a certain temperature is reached. For him highlighted the contacts on the block. The photo is marked in red.
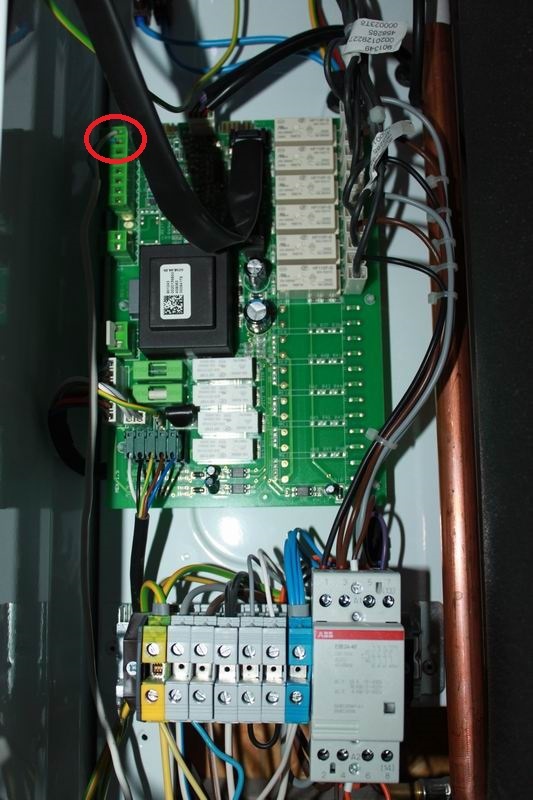
Bingo! No contactors and high voltage work required. We connect to the board with a pair of wires and hook them to the Fibaro Double Switch 2x1.5kW dual relay.
Here it turned out that the relay itself is also powered from 220V, so the second pair of wires is connected to the 220V network (directly in the boiler at the switching board of the external wires) and we get.
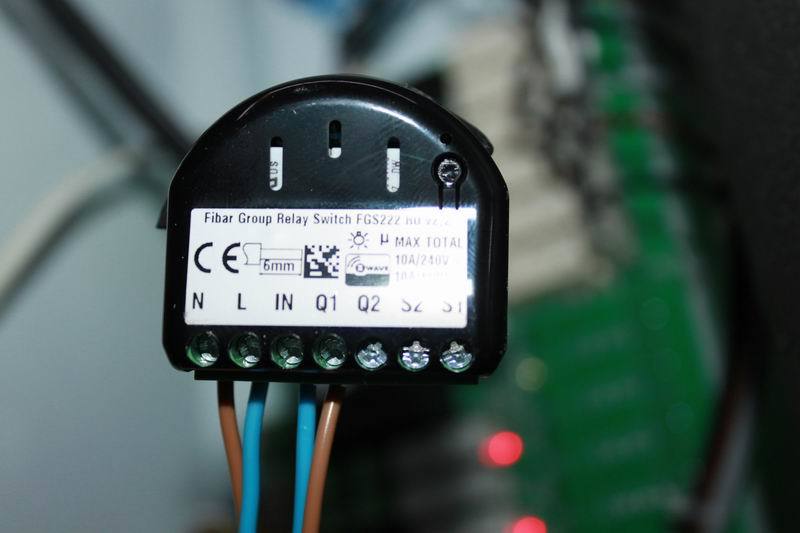
Note that the relay is signed, where the zero is connected, and where the phase is. Close the lid, leaving the tail-antenna of the relay outside, as the metal body of the boiler completely muffles the signal. Find a tiny hole in the boiler is not a problem, so it was necessary only to configure the inclusion mode.
So how do you save? Electricity at night rate is 30% cheaper than during the day. Therefore, at night to warm the house more profitable. I have already told how to save and stock up heat. In winter, at a temperature of about -10 degrees, the boiler was set at a coolant temperature of 23-25 degrees and warmed the house every other day. Finishing work was going on at that time, so there was no need to make the temperature higher, but the ventilation was necessary because the humidity in the room was very high.

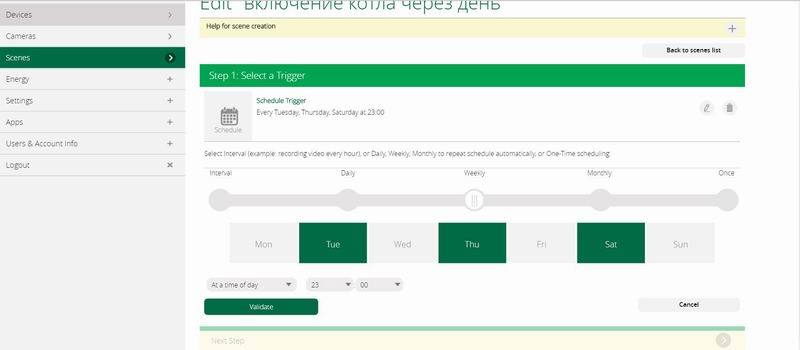
Now we go into the menu of the MI CASA VERDE VERA 3 controller, we connect the relay and create two schedules for it: one to turn on the relay and the second to turn off.

The result of all these works is very interesting to see with an infrared eye.


With the heating sorted out, go to the ventilation.
Ventilation
Above it was said that according to the chosen construction technology, I had a thermos-house. It has a huge advantage in terms of heat preservation, but the reverse side is the need for forced ventilation. I chose exhaust ventilation by installing a duct fan in the attic. The standard 120 mm sewer pipe goes along the riser, and then it is bred with flexible sleeves.

Air intake is from the toilet, bathroom and kitchen hood. That is, all smells and moisture are thrown out of the house. Naturally, wherever left, must come. Air intake provides valves on the windows. If you took the window without valves, then you can simply purchase and install. Visually, an additional pad appears.

They work schematically as follows.

The ventilation hood is activated according to the scenario and according to the schedule. For my house (about 600 m3 in volume) I selected the following scenario:
- The exhaust fan turns on every hour for 10 minutes from 9 to 22 (so that it does not make noise at night)
- The exhaust fan turns on each time the light in the bathroom or toilet turns on.
Includes built-in fan Fibaro Single Switch 2,5kW . I specifically chose a more powerful relay, since the starting currents of the motors can exceed the rated power 10 or more times. At weak relays contacts can stick.
The lighting is organized with a safe voltage of 12V and corresponding LED strips. To determine the inclusion of light in the bathroom or toilet, I laid a 3x1.5 mm cable in advance. The power supply is provided for two cores, and the third + 12V is returned to the shield. This is done from all ventilated rooms and they are connected to the point of contact through a diode, so that when you turn on the light in the same room, there is no light in all. Next, use the universal sensor Fibaro Universal Sensor . I wrote about its settings and capabilities earlier .
According to this scheme, the ventilation has been working for a year and a half and no problems have been observed.
What can be done differently? Add money and put the heat exchanger, installing ventilation with heated. Unfortunately, I did not know about such things at the design stage of the house, so I did not lay the possibility of installing this device.
Water supply
Without heating and water to live in the house is almost impossible. Now we are talking about comfortable living, when you do not need to spend time delivering water from a common well or a regular furnace firebox and cleaning it from ash. If you do not have a central water supply, then it remains to do it yourself. The most common are two options: a well and a well. Initially, I went along the beaten path and dug a well. My reasons were simple: easy to maintain, own accumulated water capacity with a known volume, high availability of workers.
In the dry summer of 2014, the well dried up and had to be deepened by 2 rings. The situation was aggravated by the fact that after 2 weeks the water went even lower and only the bottom of the well remained wet. It was decided to drill a well.
It revealed that there are three types of well available:
- well "needle";
- well on the sand;
- well on limestone.
The last two were distinguished by a great depth of drilling (drillers often make a well based not on the required depth, but on the budget of the customer, because each meter of burial is paid) and the need for additional water treatment. Such an installation costs substantial money, and there are no extra money at a construction site, so I decided to drill an “Abyssinian well” or a “needle” well. Its peculiarity lies in the fact that it is drilled shallowly, a pipe with a diameter of 32 mm is immersed in it, and the pump is on the surface.
Drilling is carried out in one day by two people.
In order to avoid freezing in winter, the pipe from the well to the entrance to the house was insulated with two layers of polyethylene foam.

The calculation was simple: water from the well is supplied with a temperature of about +4 degrees and flowing through the pipe, it will “defrost” what it has managed to freeze. Since no accumulators are used, the pumping station is turned on every time the valve opens. So that there were no questions about water hammering, I will say that the pumping station itself is equipped with a small 0.5 liter tank. It has been working properly for more than 1.5 years, so I can recommend Grundfos mq 3-45 . Having heated the pipe with running water, it worked exactly until the temperature dropped to -28 degrees outside and from the evening until the morning nobody opened the tap. In the morning there was no water ...
Urgently, a self-regulating heating cable was purchased, and the insulation was removed from the pipes. The cable is sold by the meter, but you can buy ready-made blocks, even with a plug or wire leads.

There are two types of cables: for laying inside a pipe or outside. Since the diameter of my pipe is only 32 mm, a cable with an external gasket was chosen. Most schemes on the Internet recommend laying a cable on the side or twisting with torsion, but this method seems doubtful to me.

Since water and ice, according to the law of gravity, will always be from the bottom (there should not be air in the pipe with correct check valves), I laid the cable along the bottom of the pipe and tightly wound it with ordinary paper tape and fixed two layers of insulation on top. There was no time for photographs, since the frost was below -20, and the house was without water. It should be borne in mind that the cable does not like strong bends and has requirements for the radius of rounding - this is stated in the instructions. Also, the cable varies in power per linear meter: I chose 15 watts per meter and was not at all disappointed. The pipe got warm for half an hour and the water went into the house.
Then there was the matter of technology. In my first review of the smart home, " How a smart home did not let the cat freeze, " I wrote about the wonderful multi-sensor Aeotec 4 in 1 .

Its peculiarity is that it also has a temperature sensor. We create the simplest scene: if the temperature is less than -20 and the time is more than 21 hours (the water consumption is noticeably reduced and the pipes are no longer heated by running water), then the heating cable relay turns on. Scenario two: switching off the relay at 7 am
I also chose the relay for 3 kW , since the cable consumes 1100 W at start-up, and as it warms up, its consumption decreases. Upon reaching the required temperature, the cable is disconnected by segments to reduce power consumption. In general, I am satisfied with the operation of my system, but the actual operation did not reveal any problems.
Technique involved
This time I used the following devices:
- The controller of the smart home Mi Casa Verde Vera 3
- 1 built-in dual relay Fibaro Double Switch 2x1.5kW for the boiler
- 2 built-in Fibaro Single Switch 3kW relays for controlling ventilation and heating cable
- Multisensor Aeotec 4 in 1 for taking readings of outdoor temperature
- Universal sensor Fibaro Universal Sensor to respond to the inclusion of light in the bathroom and toilet
Conclusion
The story turned out not so much about technology, but about how to adjust the smooth operation of engineering systems without deep knowledge of technology. I did not have to program anything: the controller allows you to create quite flexible scenarios, although, if desired, you can write a lot more conditions for the triggering of a rule using the built-in programming language. Once connected sensors and actuating relays did not require additional intervention, and the official free application allows you to monitor the status of all systems directly from your smartphone. And most importantly: I saved about 2-3 thousand rubles a month on heating, which can be invested in the development of a smart home. It is very important that the smart home can be created without laying additional cables - the z-wave radio channel is not loaded, and the protocol provides for monitoring the execution of the sent command. This is not the last material of the “Smart Home” series, so I am ready to answer questions or conduct tests on my home, as a testing ground for this technology.
In the meantime ... Prepare a sleigh in the summer!
Source: https://habr.com/ru/post/394489/
All Articles