jQuery for beginners. Part 2. JavaScript Menu.

In the first part , the basic principles of the work of selectors were considered and several examples are given, in this article I will try to focus on the implementation of the JavaScript menu for your site.
If you have a ready-made code for visual documentation, then move from words to deeds, i.e. on the page with examples .
')
Slide menu
Two slide-menu on the page: above and below.
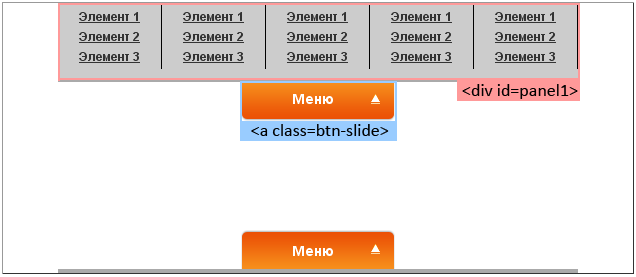
We click on the link with the class "btn-slide", leaves the panel with the menu.
Partially this example is present in the first part , so I will not go deep into the implementation, I will give only JavaScript code with explanations:
  <script type = "text / javascript">
 // when the page loads
 $ (document) .ready (function () {
	 // hang the handler on the link with the class "btn-slide" (top menu)
	 $ (". btn-slide"). click (function () {
		 // push / hide panel with id = panel1
		 $ ("# panel1"). slideToggle ("slow");
		 // change the class of the link itself
		 $ (this) .toggleClass ("active");
		 // and do nothing further (so that there is no link transition)
		 return false;
	 });

	 // hang the handler on the link with the class "btn-slide2" (bottom menu)
	 $ (". btn-slide2"). click (function () {
		 // push / hide panel with id = panel2
		 $ ("# panel2"). slideToggle ("slow");
		 // change the class of the link itself
		 $ (this) .toggleClass ("active2");
		 // and do nothing further (so that there is no link transition)
		 return false;
	 });
 });
 </ script>
Slide menu 2
Slide menu on the left and right of the page. First, let's prepare HTML:
 <div class = "left">
     <! - Directly the contents of the menu, we hide it ->
     <div class = "panel">
    	 <ul>
    	    <li> <a href="#" title="Element 1"> Element 1 </a> </ li>
    	    <li> <a href="#" title="Element 2"> Element 2 </a> </ li>
    	    <li> <a href="#" title="Element 3"> Element 3 </a> </ li>
    	 </ ul>
    	 <ul>
    	    <li> <a href="#" title="Element 1"> Element 1 </a> </ li>
    	    <li> <a href="#" title="Element 2"> Element 2 </a> </ li>
    	    <li> <a href="#" title="Element 3"> Element 3 </a> </ li>
    	 </ ul>
    	 <ul>
    	    <li> <a href="#" title="Element 1"> Element 1 </a> </ li>
    	    <li> <a href="#" title="Element 2"> Element 2 </a> </ li>
    	    <li> <a href="#" title="Element 3"> Element 3 </a> </ li>
    	 </ ul>
     </ div>
     <! - Panel with button ->
     <p class = "slide"> <a href="#" class="btn-slide"> Menu </a> </ p>
 </ div>
We should have something like the following:
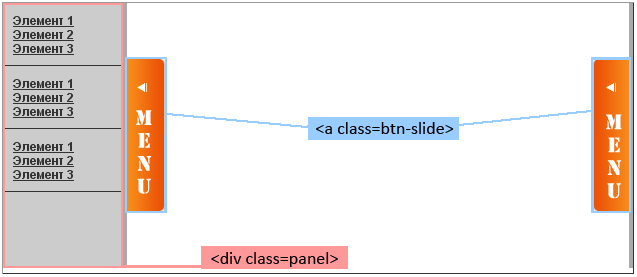
Now let's create an event handler for links with the “btn-slide” class:
	 // create an event handler for links with the class "btn-slide"
	 $ (". btn-slide"). toggle (function () {
		 // ... 1st click on the link
		 // return false
		 return false;
	 }, function () {
		 // ... 2nd click on the link
		 // return false
		 return false;
	 });
Then we need to find an element with the class "panel" and push it to 120 pixels:
 // go along the DOM to level 2 up, inside the element (this is a div with the class left / right) we find the element we need and increment it 120 pixels wide
 $ (this) .parent (). parent (). find (". panel"). animate ({"width": "+ = 120px"}, "slow");
 // replace the button class (for changing the arrow)
 $ (this) .toggleClass ("active");
We connect it together:
 $ (document) .ready (function () {
	 $ (". btn-slide"). toggle (function () {
		 $ (this) .parent (). parent (). find (". panel"). animate ({"width": "+ = 120px"}, "slow");
		 $ (this) .toggleClass ("active");  return false;
	 }, function () {
		 $ (this) .parent (). parent (). find (". panel"). animate ({"width": "- = 120px", opacity: "hide"}, "slow");
		 $ (this) .toggleClass ("active");  return false;
	 });
 });
Drop-down menu
One of the most common menu implementations for the site is a horizontal drop-down menu, of course, you can implement it with CSS, but we’ve got an article about jQuery, so we’ll use it. Let's start with HTML (I note that for all other examples, the code is almost the same):
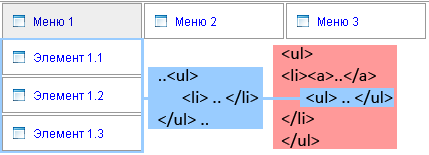
Well, actually HTML itself:
     <div class = "topmenu">
         <ul>
             <li> <a href="#" title="Menu 1"> Menu 1 </a>
                 <ul>
            	    <li> <a href="#" title="Element 1.1"> Element 1.1 </a> </ li>
            	    <li> <a href="#" title="Element 1.2"> Element 1.2 </a> </ li>
            	    <li> <a href="#" title="Element 1.3"> Element 1.3 </a> </ li>
                 </ ul>
             </ li>
             <li> <a href="#" title="Menu 2"> Menu 2 </a>
                 <ul>
            	    <li> <a href="#" title="Element 2.1"> Element 2.1 </a> </ li>
            	    <li> <a href="#" title="Element 2.2"> Element 2.2 </a> </ li>
            	    <li> <a href="#" title="Element 2.3"> Element 2.3 </a> </ li>
                 </ ul>
             </ li>
             <li> <a href="#" title="Menu 3"> Menu 3 </a>
                 <ul>
            	    <li> <a href="#" title="Element 3.1"> Element 3.1 </a> </ li>
            	    <li> <a href="#" title="Element 3.2"> Element 3.2 </a> </ li>
            	    <li> <a href="#" title="Element 3.3"> Element 3.3 </a> </ li>
                 </ ul>
             </ li>
         </ ul>
     </ div>
Next, we need to add a handler for the hover event for li elements:
     $ ('. topmenu ul li'). hover (
         function () {
             // ...
         },
         function () {
             // ...
         }
     );
And display the sub-menu:
 // find the ul element and call the animation slideDown
 $ (this) .find ('ul'). slideDown ();
 // change the background of the selected item by adding an active class
 $ (this) .addClass ("active");
And now all together:
 $ (document) .ready (function () {
     $ ('. topmenu ul li'). hover (
         function () {
             $ (this) .addClass ("active");
             $ (this) .find ('ul'). slideDown ();
         },
         function () {
             $ (this) .removeClass ("active");
             $ (this) .find ('ul'). slideUp ('fast');
         }
     );
 });
Drop-down AJAX menu
Horizontal drop-down menu with AJAX elements loading.
First we need the menu itself:
<div class = "topmenu">
<ul>
<li id = "menu1"> <a href="#" title="Menu 1"> Menu 1 </a> </ li>
<li id = "menu2"> <a href="#" title="Menu 2"> Menu 2 </a> </ li>
<li id = "menu3"> <a href="#" title="Menu 3"> Menu 3 </a> </ li>
</ ul>
</ div>
And blanks for submenus, let's call them menu1.html , menu2.html and menu3.html - by id the corresponding menu items (most likely these items will be generated dynamically, but to simplify the example we use static pages):
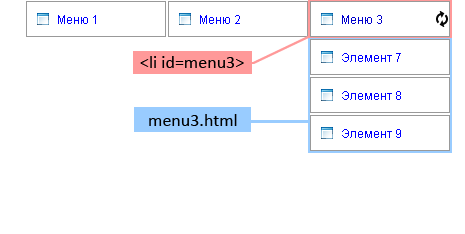
Example menu1.html:
  <ul>
     <li> <a href="#" title="Element 1"> Element 1 </a> </ li>
     <li> <a href="#" title="Element 2"> Element 2 </a> </ li>
     <li> <a href="#" title="Element 3"> Element 3 </a> </ li>
 </ ul>
Now, as in the previous example, we need a handler for the hover event:
 $ (document) .ready (function () {
     $ ('. topmenu ul li'). hover (
         function () {
             // ... here you need to make changes to the code
             $ (this) .addClass ("active");
         },
         function () {
             // leave here as is
             $ (this) .removeClass ("active");
             $ (this) .find ('ul'). slideUp ('fast');
         }
     );
 });
Now you need to load the missing menu items through AJAX'a:
 // get the id of the active menu item
 var id = $ (this) .attr ('id');
 // we push the active element into a local variable
 var li = $ (this);
 $ .ajax ({
      // form the name of the page requested by AJAX
      url: 'ajax /' + id + '. html',
      beforeSend: function () {
           // before the "ask" change the class of the element - display the loading image
           li.addClass ('loading');
      },
      success: function (data) {
           // fill the submenu
           li.append (data);
           // show what happened
           li.find ('ul'). slideDown ();
           // remove loading image
           li.removeClass ('loading');
      }
 });
We collect:
 $ (document) .ready (function () {
     $ ('. topmenu ul li'). hover (
         function () {
             // add verification - haven't the elements been loaded before
             if ($ (this) .find ('ul'). length == 0) {
                 var id = $ (this) .attr ('id');
                 var li = $ (this);
                 $ .ajax ({
                     url: 'ajax /' + id + '. html',
                     beforeSend: function () {
                          li.addClass ('loading');
                     },
                     success: function (data) {
                          li.append (data);
                          li.find ('ul'). slideDown ();
                          li.removeClass ('loading');
                     }
                 });
             } else {
                 $ (this) .find ('ul'). slideDown ();
             }
             $ (this) .addClass ("active");
         },
         function () {
             $ (this) .find ('ul'). slideUp ('fast');
             $ (this) .removeClass ("active");
         }
     );
 });
Drop-down menu
Vertical drop down menu. A pretty simple example:

 $ (document) .ready (function () {
     // add hover event handler
     $ ('. topmenu ul li'). hover (
         function () {
             $ (this) .find ('ul: first'). slideDown ();
         },
         function () {
             $ (this) .find ('ul: first'). slideUp ('fast');
         }
     );
     // add nesting to all menu items with nesting ”
     $ ('. topmenu li: has (ul)'). find ('a: first'). append ('"');
 });
Float menu
Floating menu. We need the Dimensions plugin (so that the height () and width () methods work). Well, with HTML, I think you will figure it out:
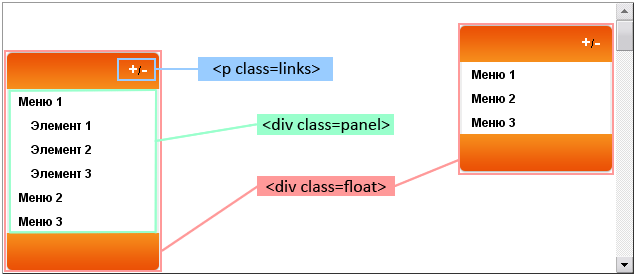
Now, in order - let's start with getting information about the current location of the "floating" menu:
 // get css information about the location of the top menu
 menu1 = parseInt ($ (". right"). css ("top"). substring (0, $ (". right"). css ("top"). indexOf ("px"));
 // location of the bottom menu is calculated based on the window size (96 taken by eye)
 menu2 = $ (window) .height () - 96;
Next, we need to “hang” our function for the scroll event:
 $ (window) .scroll (function () {
 // here we will drag our menus
 });
Well, actually filling:
 $ (window) .scroll (function () {
	 // define new position for our menus
	 offset1 = menu1 + $ (document) .scrollTop () + "px";
	 offset2 = menu2 - $ ('. left .panel'). height () + $ (document) .scrollTop () + "px";

	 // drag items to a new place
	 $ ('. right'). animate ({top: offset1}, {duration: 500, queue: false});
	 $ ('. left'). animate ({top: offset2}, {duration: 1000, queue: false});
 });
Also add display / hide submenu items:
     // for all elements "a" which are in "li" with nested lists "ul"
     $ ('. panel ul li: has (ul) a'). click (function () {
         // go to the parent, find the "ul" and hide / hide it
         $ (this) .parent (). find ('ul'). slideToggle ();
         return false;
     });
     // button "+" - hide all "ul" nested in "li"
     $ ('a.plus'). click (function () {
        // go to the parent, find the next element in the house, look for "ul li ul" in it, perform "slideUp"
        $ (this) .parent (). next (). find ('ul li ul'). slideUp ('fast');
        return false;
     });
     // button "-" - display all "ul" nested in "li"
     $ ('a.minus'). click (function () {
        // go to the parent, find the next element in the house, look for "ul li ul" in it, perform "slideDown"
        $ (this) .parent (). next (). find ('ul li ul'). slideDown ('slow');
        return false;
     });
You can also download all the examples in one archive .
Cycle of articles
- jQuery for beginners
- jQuery for beginners. Part 2. JavaScript Menu.
Source: https://habr.com/ru/post/39440/
All Articles