Linking the Digital Lab NR05 to the Internet of Things
In this material, we will show how to assemble a device based on the Digital Lab NR05 , which collects data from a temperature sensor and sends it to a specialized site for storing and processing such data.
As we have repeatedly noted, the Digital Lab kit from the Alphabet of the Electronic Engineer series is intended not only for teaching the beginnings of programming microcontrollers and designing electronic devices based on them, but also for creating completely complete and useful devices. In our project, we will use ThingSpeak - an open platform for projects built on the “Internet of Things” concept. The platform is designed to collect and process data from various sensors. The main features of ThingSpeak are:
- data collection in real time;
- mathematical and statistical data processing;
- data visualization.
')
The ThingSpeak platform has an advanced API (Application Programming Interface) - an interface between the site and your applications, which allows you not only to send, store and access data, but also provides various statistical methods for processing it. We consider, for example, one channel for data collection, the whole platform provides up to 8 channels to each user. With the data of each channel, you can perform individual actions and use the results obtained at your discretion.
To access the Internet, we will use a Wi-Fi module based on an ESP8266 chip with AT firmware version 0.21 . This popular chip serves as the basis for building a large number of modules that physically differ in the number of pins, antenna type, USB interface and additional features. In principle, any device assembled on the basis of the ESP8266 is a self-contained device to which external sensors can be connected, but this is a matter for separate consideration. In this case, we use the module only as a device for wireless Internet access, and we will use it to connect to any access point and transmit data to ThingSpeak. A list of all AT commands of the firmware for comparison with the program for Arduino can be found here .
A few words should be said about how to check the firmware version and how to reflash the module if the version is not suitable. To do this, you need to connect the module to a USB-UART adapter, for example, the BM8051 , and issue the AT + GMR command. If the firmware version is displayed as 0021, then everything is in order. If not, then there are two ways: change the program for Arduino in accordance with possible mismatches in command formats, or reflash the module. ESP8266 flashing questions claim to be a separate article, so here we will not consider them, but we advise you to refer to the materials published on the websites and specialized forums devoted to this module. As a temperature sensor, we use the DS18B20 sensor included in the NR05 kit. The training kit contains a chapter on how to connect and use this sensor, as well as programming examples for reading and displaying temperature measurements. The sensor is connected to the correspondingly marked contacts on the NR05 expansion card.
As a module based on the ESP8266, you can use several devices from the Master Kit product range: MP8266-01 , MP8266-03 , MP8266-07 , MP8266-12E , and MP3508 . The last device is a developer's fee and is “stuffed” to the maximum. It does not require an additional 3.3V stabilizer and a USB-UART adapter for programming - all this is already on the board.
For other modules, a USB-UART adapter may be required for flashing, if necessary, but a 3.3V stabilizer (for example AMS1117) will be needed precisely because the source of this voltage in the Arduino Nano board, included in the NR05 kit, does not provide the current required for power supply ESP8266.
In any case, in the finished project, we use only four ESP outputs: power, ground, and RX and TX to communicate with Arduino.
The general algorithm of the program for Arduino is as follows:
- we check the readiness of ESP;
- if ready, connect to the access point;
(further actions are repeated once per minute):
- read data from the temperature sensor;
- display the current temperature on the expansion board indicator;
- establish a connection with the site thingspeak.com;
- we transfer the current temperature to the corresponding channel of the site.
About theory, perhaps, enough. Let's go to practice.
To begin with, we register for free on thingspepeak.com and as a result of registering an API key that must be used when transferring data to the channel. The site interface is changing, so our description may be a little inconsistent in part of what is visible in the browser. But in general, the interface is intuitive, so there should not be any serious problems when registering and creating a new channel.
So, after registering, create a new channel: Channels-My Channels-New Channel. You need to give the channel a name and enter a short description, the channel can also be Private and Public, choose it yourself. After creating the channel, you can see the desired API key, we need a Write API Key to write data to the channel.
You can test the data record by typing the following line in the browser row: api.thingspeak.com/update?key= your API key&field1=0
The last character in the string (0) can be any value, and it will be written to the channel. After pressing Enter, the site will respond with a digit corresponding to the number of values written to the channel. Keep in mind that the minimum interval between recordings is 15 seconds. Now you can transfer data, form the same lines in Arduino and transmit them using ESP8266 to our channel.
The wiring diagram of the elements is shown in the following figure:

We used the MP8266-07 module, so we needed a stabilizer and a capacitor. Also, for correct operation of the module, it is necessary to connect the output of GPIO15 to ground, and the output of CH_PD (chip select) with a power supply of 3.3V. The module confidently connects even with the built-in antenna to the access point, located in the next room at a distance of about 20 meters.
Sketch listing for Arduino with detailed comments:
// connect the necessary libraries
#include <DallasTemperature.h>
#include <OneWire.h>
#include <SoftwareSerial.h>
#include <LiquidCrystal.h>
// pause between sending data, ms
unsigned long pauseTime = 60000;
// variables for pause organization
unsigned long currentTime;
unsigned long previousTime = 0;
// assign the output D10 to connect the temperature sensor D18B20
// and create instances of the ONE WIRE bus and sensor objects
#define ONE_WIRE_BUS 10
OneWire oneWire (ONE_WIRE_BUS);
DallasTemperature sensors (& oneWire);
// set the parameters for connecting to WiFi
#define SSID "Your Access Point Name"
#define PASS "Your Access Point"
// set the IP address of the site thingspeak.com
#define IP "184.106.153.149"
// set the GET command line according to thingspeak.com API
String GET = "GET / update? Key = your API key & field1 =";
// set the pins for connecting the module ESP8266 for which we will
// send AT commands to the module;
// (the system uses AT commands v0.21 SDK 0.9.5
// esp8266.ru/esp8266-sdk-0-9-5-v0-21 )
SoftwareSerial esp (11, 12); // RX, TX
// set the pins for connecting the LCD indicator
LiquidCrystal lcd (A1, A2, A3, 2, 4, 7);
void setup ()
{
// initialize:
esp.begin (9600); // transmit-receive in ESP8266 at 9600 baud
Serial.begin (9600); // send-receive to the virtual COM port of the computer (for control)
sensors.begin (); // temperature sensor
lcd.begin (16, 2); // LCD indicator
lcd.clear ();
// send AT command to ESP8266
Send ("AT");
delay (1000);
// if the module responded OK, connect to the wireless network
if (esp.find ("OK")) {
Serial.println ("ESP8266 Ready: OK");
connectWiFi ();
previousTime = millis () + 2 * pauseTime;
}
}
void loop () {
currentTime = millis ();
if (currentTime - previousTime> pauseTime) {
// request temperature from the sensor
sensors.requestTemperatures ();
float tempC = sensors.getTempCByIndex (0);
// convert temperature to character string
char buffer [10];
String temp = dtostrf (tempC, 4, 1, buffer);
// send this line to the channel of the site thingspeak.com
updateData (temp);
lcd.setCursor (0,0);
lcd.print (temp);
lcd.print ("\ xDF" "C"); // \ xDF - degree icon
previousTime = currentTime;
}
}
// function to send data from ESP8266 to thingspeak.com
void updateData (String data) {
// form and send a connection command to thingspeak.com
String cmd = "AT + CIPSTART = \" TCP \ ", \" ";
cmd + = IP;
cmd + = "\", 80 ";
Send (cmd);
delay (3000);
if (esp.find ("OK"))
Serial.println ("CONNECT TO IP: OK");
else
Serial.println ("CONNECT TO IP: Error");
// form and send the command to send data
cmd = GET;
cmd + = data;
cmd + = "\ r \ n";
esp.print ("AT + CIPSEND =");
esp.println (cmd.length ());
// if the ESP8266 module is ready to receive and send data
if (esp.find (">")) {
Serial.print (">");
// send data
esp.print (cmd);
Serial.print (cmd);
if (esp.find ("OK")) Serial.println ("DATA SEND: OK");
else Serial.println ("DATA SEND: Error");
}
else {
Send ("AT + CIPCLOSE");
if (esp.find ("OK")) Serial.println ("CONNECTION FOR CLOSE: OK");
else Serial.println ("CONNECTION FOR IP CLOSE: Error");
}
Serial.println ();
}
// function to send data to the ESP8266 module
void Send (String cmd) {
Serial.print (“SEND TO ESP8266:„);
esp.println (cmd);
Serial.println (cmd);
}
// function to connect to a WiFi network
boolean connectWiFi () {
esp.println (“AT + CWMODE = 1”);
delay (2000);
String cmd = "AT + CWJAP = \" ";
cmd + = SSID;
cmd + = "\", \ "";
cmd + = PASS;
cmd + = "\" ";
Send (cmd);
delay (5000);
if (esp.find ("OK")) {
Serial.println ("CONNECT TO WIFI: OK");
return true;
}
else {
Serial.println ("CONNECT TO WIFI: Error");
return false;
}
}
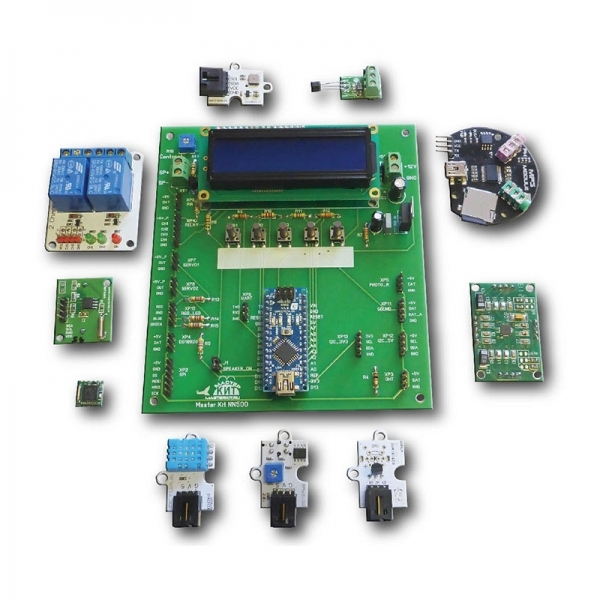
All items in the collection, the program is running:

And here is what the measurement results on the site look like:

The first graph shows the temperature change over time, and the second is a histogram created by MatLab-based visualization tools built into ThingSpeak, which shows how many times in the past 24 hours each temperature value was measured. On the website, such a histogram is called “temperature variation”, the closest Russian term is temperature fluctuations.
Thus, using the Digital Lab kit in combination with the service provided by the ThingSpeak platform, you can collect and process data from various sensors in up to eight channels. For example, using the four-channel voltmeter scheme described in the previous article, you can monitor the status of batteries or solar panels, while receiving meteorological information at the place of their installation.
Source: https://habr.com/ru/post/394357/
All Articles