Setting up a UEFI Dual Boot system spiced with rEFInd
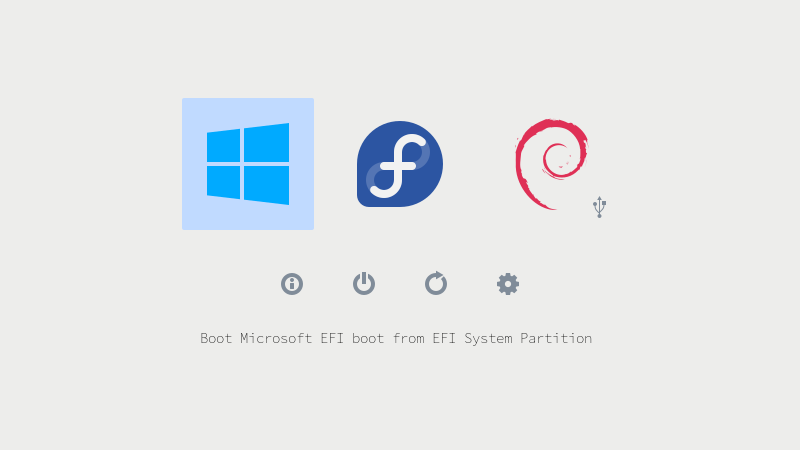
KDPV. Boot manager rEFInd with the theme of design Regular .
To date, almost everyone has already heard about the technology of UEFI. I am not going to talk about what it is and why it is needed. Today I would like to describe the simplest scenario of installing a Dual Boot system with full UEFI support, and also consider separately installing and configuring the rEFInd boot manager. Perhaps you have already seen similar manuals and guides, but I will try to convey quite lucidly the essence of what we will do and why. In other manuals, you just look at the "magic" of the gambler and try to repeat it, often making elementary mistakes. To whom this topic is interesting - I ask under the cat.
In general, UEFI is designed to simplify the download process rather than complicate it. For example, using this technology, a computer can boot the OS and no layer at all in the face of GRUB / LILO / etc, UEFI itself can act as a loader. However, this method has its drawbacks, for example, you have to tinker after updating the kernel, you can, of course, write a script, but in general this is
grub2-efi')
So, let's form an approximate list of our actions, some will stop reading it and get down to business. Actually there will be only four points. The fifth and sixth paragraph is optional.
- Burn Windows 10 (8 / 8.1) image to a disk / flash drive.
- Install Windows 10 on a part of the disk.
- Burning a Linux distribution image with EFI support (most) to a disk / flash drive.
- Installing the Linux distribution for the remainder of the disk.
- Install and configure rEFInd.
- Remove grub and complete transition to rEFInd.
At first glance, everything is very simple, only 4 basic points, but there are a lot of nuances here.
They make mistakes at all stages: they enter the Legacy-bios mode, indicate the wrong boot partition, simply do not understand what they are doing, etc. In the end, all this leads to a lot of pain and suffering on the forums, in chat rooms, etc. In fact, everything is simply impossible, you just need to understand what you are doing at each stage and check yourself.
First a bit of theory.
UEFI sees only one special ESP partition, usually it is 100–200 megabytes in size and is formatted in FAT32 (it happens in FAT16), it contains folders named à la Boot, Microsoft, Fedora, Ubuntu, etc. If you tried a sufficient number of OSes and never formatted this partition, then there could be a decent amount of folders. For example, I had 2 live axes and there were about 6 folders.
PS CodeRush prompted that all FS are supported, if they have the appropriate drivers :
This is not true. UEFI sees all partitions for which there are drivers for a file system in a specific implementation of the firmware. ESP differs from the rest of the sections only in that a) for the FAT driver it is necessary to have and b) on the ESP partition it searches for boot loaders and automatically creates the corresponding variables BootXXXX if the boot loaders are found.
In the folders themselves are executable files. Efi which act as OS loaders. In the debian folder, you will surely find the
grubx64.efi file, and in the Microsoft folder, bootmgr.efi .Most Linux distributions mount an ESP partition to
/boot/efi , which means the Debian boot loader will be approximately the /boot/efi/EFI/debian/grubx64.efi path: /boot/efi/EFI/debian/grubx64.efiC directory understood, and then what?
And then you need to understand that there is still a boot order, which can be managed using the
efibootmgr utility, if you don’t have one, you can download it through your package manager, it is present in all standard repositories. To get started, you can simply enter this command and see the list of boot order, as well as all UEFI entries. If you want to deal with the utility, then smoke mans and read the Internet, in general, it is very simple. Evil Windows is here and overwrites our GRUB and puts the Windows Boot Manager first priority, so it has to be restored. Let me just say how to edit posts:efibootmgr -b < > -< > < >For example,
efibootmgr -b 0 -B means delete record 0.PS CodeRush and other commentators have noticed that efibootmgr is a very dangerous utility and note that it is much safer to use EFI Shell.
In fact, GRUB can not be touched at all, because it probably lies in the
EFI/< > folder, you just need to restore the record and set the first priority, but why dig something if you can chroot and enter grub-install ? In most cases, he will do everything himself.By the way, it is worth remembering that the basic functionality of
efibootmgr itself has, in fact, UEFI, it can read these records and prioritize. But he doesn’t know how to browse the ESP-sections and add new entries, these duties are assigned to EFI Shell and operating systems.PS CodeRush
Even as he can, and this skill is required by the specification since UEFI 2.2 (SecureBoot appeared in UEFI 2.3.1C).
And lastly: All your actions in
efibootmgr recorded in NVRAM! In most cases, UEFI is able to restore a broken NVRAM each time checking it and overwriting it in case of problems. However, some unscrupulous manufacturers produce raw firmware and you can get a real brick. For example, laptops with UEFI based on Phoenix SCT are scrutinized! So before you continue to read, make sure that your motherboard or laptop model is resistant to such experiments.PS After writing most of the article, I remembered Secure Boot. Usually, UEFI pulls it along, but in most cases it can be quite simply turned off in the UEFI settings. Many Linux distributions support it, but I still recommend turning it off, as it can pull a lot of problems with it.
The basic excursion into the theory is complete.
Now you can go to practice
Disclaimer : Immediately I stipulate that I prefer sterile conditions and do a full reinstall myself with the help of tools I have personally verified. If you use other utilities, then please do not write why you are failing something at this or that stage. My version tested hundreds of reinstallations friends and colleagues.
First we need to write Windows
Because if you put Windows a second, it will overwrite the bootloader. Restore? No problem. But why bother, if you can immediately do everything according to your mind? However, I still discuss the nuances of recovery a little later at the end of the article.
Unlike Linux, Windows is much easier to record in my opinion. The first method is probably familiar to many, you just need to log in to cmd.exe as administrator and enter these commands. Not difficult to notice, there is absolutely no magic here. We just format the flash drive in FAT32:
diskpart
list disk
select disk < >
clean
create partition primary
select partition 1
active
format fs fat32 quick
assign
exit
After that, you just need to open the ISO file with the archiver and transfer the contents to a blank USB flash drive. All, UEFI-flash drive is ready. On Linux, you can do everything the same way, just format it in FAT32 and copy the content.
The resulting flash drive should be perfectly loaded by any PC with UEFI support.
By the way, let's turn to the theory: our image with Windows 10 contains an efi daddy, it contains all the good things to start downloading, which our UEFI should see. Therefore, simple formatting and copying in most cases is enough for most PCs.
However, I prefer the second method using the Rufus utility . He never let me down. However, this is a Windows-only way. On Linux systems, using ddresque to create a bootable USB flash drive DOES NOT WORK. So try other utilities if the first method with simple formatting did not help.
All you need is: select your USB flash drive, set the “Partition scheme and system interface type” parameter to “GPT for computers with UEFI” , and press start. The remaining parameters do not need to touch. It is better to use flash drives smaller (8-16 gigabytes).
Surely one of the ways should have been a ride, personally I have never met any problems at this stage, the main thing is that the computer supports UEFI.
Therefore, we proceed to the installation phase.
After loading in the UEFI mode, we do everything according to the standard scheme, but at the stage of selecting the type of installation, we select “expert”, that is, we will partition the partition ourselves. I recommend to mark it carefully, especially if there are many disks. Finally, after selecting the disk, delete all existing partitions. Create one partition with the size you need, for example, 150 gigabytes. (If you prefer to create two or more partitions for the OS and files - no problem, create). Select this section by clicking the mouse and click "Next . " And if you did everything right, then Windows will ask you to create additional ones. Be sure to answer "Yes . " The system will create three sections. Two of its own for system needs and one that we need the EFI-section. I have it on the numbering is always the second, just get 4 sections, including the user NTFS. If the installer did not suggest creating partitions or created only one, it means that you booted in Legacy mode and you need to rewrite the flash drive, something went wrong. Unfortunately, the Windows Installer partition editor is extremely weak in its capabilities, so there’s no point in trying to mark partitions for future Linux, leaving this place simply free. Next, install everything in normal mode.
By the way, one of the signs of the correct installation of Windows in UEFI mode is the appearance of the logo of the manufacturer of the motherboard / laptop / tablet when booting. In many UEFI (for example from ASUS and ASRock) there is a separate setting for this. So if there is no logo, but everything else went like clockwork, then there is nothing wrong with that.
I do not recommend fine-tuning Windows at the moment, because if something goes wrong, you may have to reinstall it.
Do we write Linux?
Yeah. After logging in to Windows, I recommend immediately downloading the image of the distribution kit you have chosen and writing it in the same way via Rufus . However, in the case of Linux distributions, Rufus may ask a lot of questions, for example, it may ask to download the syslinux bootloader from the Internet or select the image recording mode: ISO or DD. We answer all questions with “Yes.” , That is, yes, download the latest version of syslinux and record it in ISO mode. Tested on Ubuntu (and its variations Server, Mate, GNOME), Fedora, RHEL7, Debian, and others.
Up to Dual Boot just one step
Unlike Windows, most distributions have an excellent indication of UEFI mode. For example, Debian, in his installer, writes in black and white that the system is running in UEFI-mode. Other distros show this as a strange grub-downloader that looks “somehow wrong”.
I think if you are going to install Linux, then you probably yourself know how to install your favorite distribution, so I will not focus on the details of installing a single distribution. Because this stage is painfully simple. If you have already really loaded into UEFI mode and installed Windows as it should, then Dual Boot is almost in your pocket.
So all you need to do when installing Linux :
Select the
/dev/sda2 partition (in your case it may be another partition) and specify the mount point - /boot/efi . Everything. No, really, everything. Of course, do not forget to partition ext4 / Btrfs / ReiserFS / XFS / JFS partition, mount it to the root /. Who needs a swap (if needed) create it too. Then the installer of your distribution kit will do everything by itself, install its GRUB folder in the EFI/< > directory and find the Windows entry ( EFI/microsoft ).This logic has been tested in all the above distributions. That is, I repeat once again: The main thing is to show your distribution kit where you have this coveted ESP partition and where you need to throw the bootloader. It does not format it, but simply adds GRUB. But GRUB itself does magic, changes boot priorities, etc. I note that some distros mount this partition where necessary, since they see the ESP and BOOT flags. For example, in the Debian installer you just need to create a custom partition and that's it.
Induce beauty, set rEFInd
TO
It is worth noting immediately that rEFInd is NOT a bootloader. This is the so-called Boot Manager, it causes other .efi-binaries to be executed, and can also send UEFI to launch the kernel directly from the/bootpartition. In other words, that is, it is not he who loads the system, but UEFI itself. For Multi-Boot machines is a great solution. By itself, rEFInd is a .efi application compiled by UEFI Shell. Itself is in the directoryEFI/refind/refind_x64.efi
In addition to the fact that you can choose between already installed systems on your PC, a pleasant advantage is the automatic detection of bootable flash drives and disks. At KPDV it can be seen. I have a bootable USB flash drive with Debian (not an installer, but a full-fledged OS) and you can see a convenient indication that this is a flash drive, and not something else. If you have several cores, you can see their list by pressing the F2 key. In addition, several options with different kernel parameters can be set in the
/boot/refind_linux.conf file (for example, the first is the standard GUI for loading, the second is safe mode without a video driver, etc., you can make a dozen options, the default is only three). Also in the EFI/tools folder, you can distribute various .efi-binaries, for example, UEFI Shell or memtest86 +. rEFInd will automatically pick them up and show them as utilities in the bottom row.Another pair of screenshots

Want also?
The process of installing from under Linux is extremely simple. All methods are described on the official site, you can install from virtually any operating system. To get started, visit this page and download the .deb or .rpm package.
If you have a rare distribution such as Slackware or Gentoo, then I personally can’t help you, but the site has a regular .zip archive and other installation options, so if you work with such distributions, you will certainly be able to install on your own. problems.
Backup EFI-directories:
cp -r /boot/efi/EFI /boot/EFI.bkpAfter downloading the package, run:
cd Downloads or cd DownloadsAnd install the package:
sudo dpkg -i < >.deb or sudo dnf install < >.rpmIn my case,
dpkg couldn’t sometimes pull up dependencies, if you experience the same difficulties, install gdebi ( sudo apt-get install gdebi ) and execute sudo gdebi < >.deb .If you have RHEL or CentOS, use
yum instead of dnf .In the installation logs of the package, you can track the installation log of rEFInd, in which there may be errors, you must immediately track them. However, in my experience, errors do not occur if everything is done correctly. You can check the result of the rEFInd installer using the
efibootmgr utility, where the rEFInd Boot Manager should be the first priority.Install rEFInd again, if the package is already installed, you can use the command:
refind-installSetting rEFInd first priority can be done manually using the command:
refind-mkdefaultReboot.
Everything is very scary and where did I get so much OS?
Yes, everything is scary, bye. Actually, you have only two OS. Just rEFInd collected all the .efi-binaries and also displayed the OS with the ability to download directly. To correct this misunderstanding, we will remove the unnecessary, write our config and put a beautiful theme on rEFInd.
First go to Linux by selecting one of the workload downloads. The menu should have an item to load WITHOUT using grubx64.efi! In the
/boot section it is easier to work as an administrator (because the cd lacks privileges, and sudo does not work), so su and enter the root password.This item is not in vain optional, because if you do not have enough experience, then you can very easily break something and not notice. I recommend to prepare a flash drive with a working LiveCD, in order to carry out the restoration, in case of surprises.
Our first task is to remove unnecessary loading directives, there can easily be 6 of them, and only two systems.
Go to the directory:
cd /boot/efi/EFI && lsThere will probably be five folders:
BOOT, microsoft, <your distribution>, refind and tools.
If there is something extra - feel free to delete.
Method 1 (through cleansing, more dangerous) :
After making sure that you boot via rEFInd (!) And did not use GRUB for this, you can safely delete the folder of your distribution. Reboot and see if you can boot into your Linux. If you can, then there are probably 4 directives left in the boot menu: Windows, Linux and two strange items that lead (most likely) to boot Linux. One could guess that these are .efi-binaries from the
EFI/BOOT folder. Folder can be deleted completely. BUT! Make sure you have a backup. We are unloading. All perfectly?Remove GRUB:
sudo apt-get remove grub2 grub2-efi grub grub-efiOr:
sudo dnf remove grub2Now you can set the topic.
Some UEFI other directories do not see at all. Therefore, a small work around for such systems exists. Delete the BOOT folder, rename the refind folder to the BOOT folder, and also the refind_x64.efi file itself to bootx64.efi. Reboot.
Method 2 (via the rEFInd config, safer) :
This method is much safer, because we will not touch or touch anything, we will achieve rezultata by properly configuring the config. The config itself is here:
/boot/efi/EFI/refind/refind.confTo set up your own set of load directives, you need to use two parameters,
scanfor and menuentry , after configuring you should get something like this config:# ,
scanfor manual,external,optical
# Linux
menuentry Linux {
loader /EFI/ubuntu/grubx64.efi
icon /EFI/refind/icons/os_linux.png
}
# Windows 10
menuentry "Windows 10" {
loader \EFI\Microsoft\Boot\bootmgr.efi
icon /EFI/refind/icons/os_win.png
}
Of course, this is only part of the config, other parameters can be taken from the example
My config based on the first method with comments
# -
timeout 20
# 300 , ,
#
screensaver 300
# -
resolution 1280 1024
# Linux. Plymouth
#
use_graphics_for linux
scanfor internal,external,optical,netboot,biosexternal
#
include themes/refind-theme-regular/theme.conf
Separately about Plymouth can be read here .
The inclusion of a beautiful theme
Everything is simple with this, just above the last line of the config points to the .conf file of the theme. Themes themselves should be placed in the
/boot/efi/EFI/refind/themes . By default, it is not there, create it via mkdir .Go to the themes directory and just write
git clone https://github.com/munlik/refind-theme-regular.git . In the config, write the line include themes/refind-theme-regular/theme.confOther topics can be viewed at the office. site .
You can also see detailed installation processes, parameters for configuring the config and much more.
Perhaps that's all. We got a beautiful boot manager for choosing the right OS with full UEFI support. The item with the rEFInd setting is the most complex, and therefore optional, most will suffice
grub2-efi.Lastly, a little video from me:
Surely a decent amount of errors in the text crept in, I will be glad if you write about them to me about drugs.
Source: https://habr.com/ru/post/394005/
All Articles