ABS plastic printing on a cold table
Information about the availability of my 3D printer is slowly spreading among my friends and acquaintances ... Anyone who comes to visit requires access to the device and a print demonstration, hanging for a long time over the bewitching process. But here one of the comers set a real task: to print a kind of holding device, placed in a chemical solution. The solution should not dissolve the plastic, but when checking it turned out that only ABS does not dissolve, and PLA is not that dissolved, but “floats”, losing its geometry.
As is known, ABS-type plastic has the property of substantially more than PLA, expand when heated, and taper when cooled. The main consequence of this is the almost inevitable separation of the part or its parts from the table in the printing process and the associated irreparable distortion of dimensions. I do not have a heated table, but the device is urgently needed, so I myself, respectively, set the task of learning to type ABS on a cold table. Having experimented with blue scotch, office glue, hairspray (I did not try dark beer, but there are precedents in the network) and other materials, I found a way acceptable for my tasks and printer.
The glass of the table is covered with a layer of PVA glue, which is ground until a uniform thin layer is obtained. Not frozen PVA glue, as you know, white and opaque, and frozen - transparent. By the onset of transparency of the adhesive and is determined by the readiness of the surface for printing. But it is not worth waiting too long, at the beginning of printing the glue should be freshly hardened. A very important point at the beginning of printing is the correct calibration of the table (auto-levelling). I use 9-point calibration, it takes a little more than a couple of minutes, but it is quite justified by a good calibration result. The first layer should be as thin as possible; the extruder should literally wipe the plastic in the adhesive film. Only in this case, good adhesion of the ABS to the table is ensured. In this case, I use in the Cura slicer settings adhesion of the “edge” type of at least 5 mm (more is better if there is a possibility in the dimensions of the part). The first layer can be printed at reduced speed with increased plastic feed. I include in the Repetier Host 80% print speed and 120-130% feed. Airflow is turned off. After printing the first layer, I turn on a small airflow (30%), and set the speed and feed to 100%.
')
After printing is complete, you have to wait until the part has cooled completely, and very carefully separate it (together with the “skirt”) from the table with a thin spatula, since the part sticks to the table very firmly and there is a danger of tearing off one or several lower layers.
It helps a MC2 printer to easily remove the table and put it back. If it is possible to apply glue to an installed table (although it is more convenient to remove it), then it is better to wash it from PVA under a stream of hot water. Those places that are not in contact with the printed part are washed off with just a finger, and those where the part stuck with only a spatula. This suggests that the glue in these places actually dries to the glass under the influence of temperature.
I will not lie, I do not always get to print any part made of ABS from the first time, but with some experience, you can achieve good results. For example, I could not print a disc with a diameter of about 100 mm and a thickness of 10 mm with 100% filling - it always came off. At 30% completion, such a disc was printed.
It seems that it is necessary to develop models with cuts and notches, if possible, in order to minimize the stresses caused by plastic shrinkage during cooling.
The following photographs illustrate the stages of applying glue to the table, the printing process and its results:
Freshly-applied PVA glue:

The glue is almost dry, you can print:

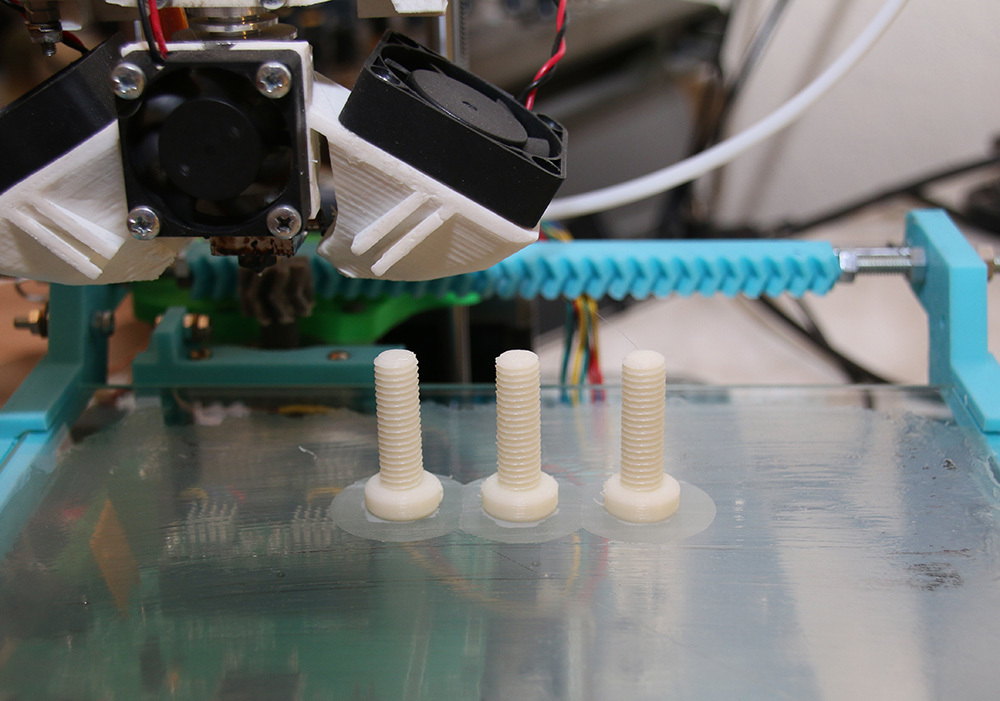
We print bolts M8:

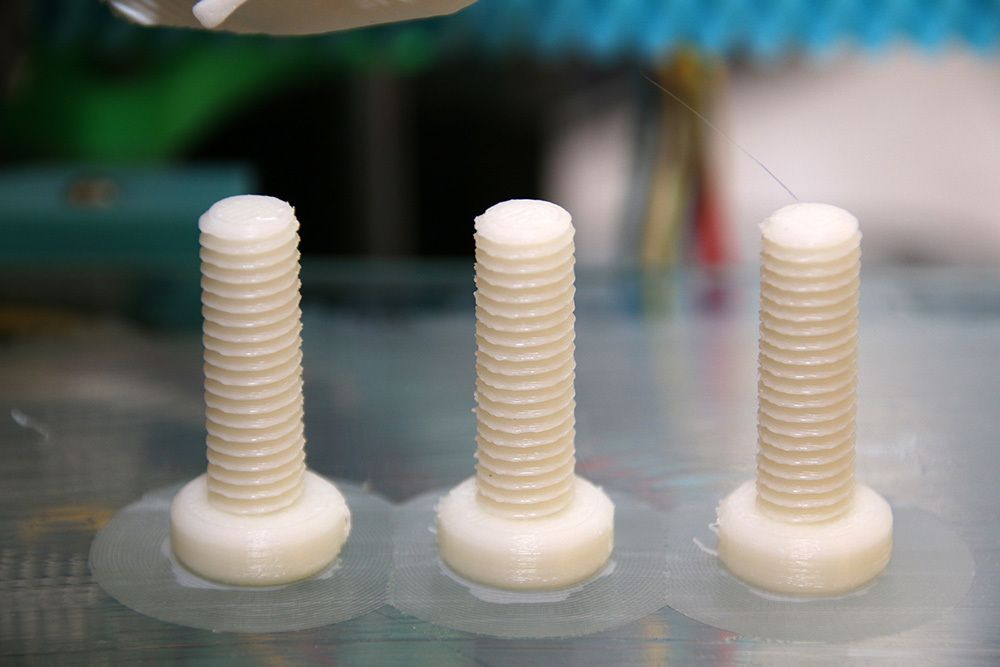
The print is just over:
It can be seen how the “skirt” of the edge near the heads of bolts slightly departs, but holds:
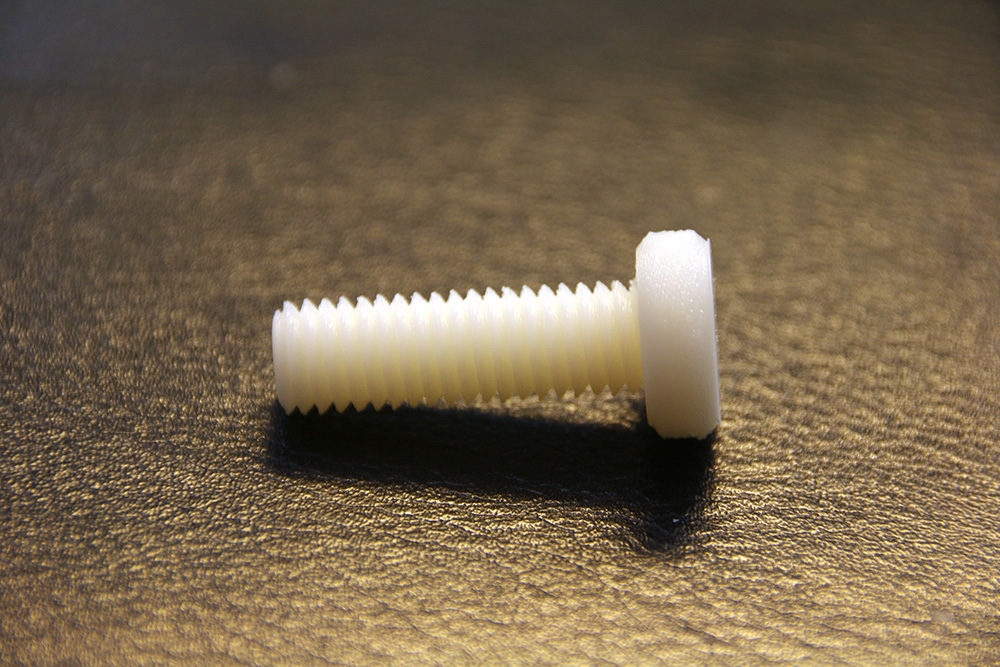
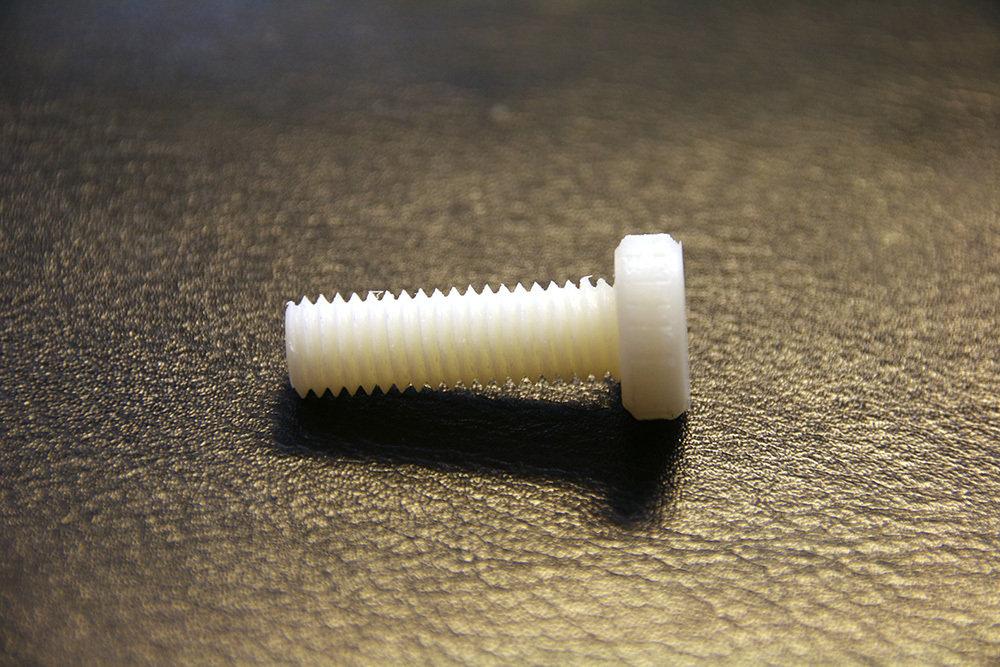
The thread and without any post-processing turned out to be quite good, and after machining the thread with one pass, the M8 plates are just hand-threaded: the thread is very good:
Already printed parts of the device (also made of ABS plastic), for which the bolts were printed:


ABS parts that are attached to a cold table when printed. As a bonus, since the ABS plastic is loaded into the printer, I printed several hooks on the frame of the working stand for hanging any wires and tools:

Hooks in work:


Moral: do not be afraid to experiment with printing ABS plastic on a cold table, with some perseverance and skill you can do it.
And a home 3D printer is a useful device, so that the spiteful critics would not speak!
Previous article: 3D printer as a home tool
As is known, ABS-type plastic has the property of substantially more than PLA, expand when heated, and taper when cooled. The main consequence of this is the almost inevitable separation of the part or its parts from the table in the printing process and the associated irreparable distortion of dimensions. I do not have a heated table, but the device is urgently needed, so I myself, respectively, set the task of learning to type ABS on a cold table. Having experimented with blue scotch, office glue, hairspray (I did not try dark beer, but there are precedents in the network) and other materials, I found a way acceptable for my tasks and printer.
The glass of the table is covered with a layer of PVA glue, which is ground until a uniform thin layer is obtained. Not frozen PVA glue, as you know, white and opaque, and frozen - transparent. By the onset of transparency of the adhesive and is determined by the readiness of the surface for printing. But it is not worth waiting too long, at the beginning of printing the glue should be freshly hardened. A very important point at the beginning of printing is the correct calibration of the table (auto-levelling). I use 9-point calibration, it takes a little more than a couple of minutes, but it is quite justified by a good calibration result. The first layer should be as thin as possible; the extruder should literally wipe the plastic in the adhesive film. Only in this case, good adhesion of the ABS to the table is ensured. In this case, I use in the Cura slicer settings adhesion of the “edge” type of at least 5 mm (more is better if there is a possibility in the dimensions of the part). The first layer can be printed at reduced speed with increased plastic feed. I include in the Repetier Host 80% print speed and 120-130% feed. Airflow is turned off. After printing the first layer, I turn on a small airflow (30%), and set the speed and feed to 100%.
')
After printing is complete, you have to wait until the part has cooled completely, and very carefully separate it (together with the “skirt”) from the table with a thin spatula, since the part sticks to the table very firmly and there is a danger of tearing off one or several lower layers.
It helps a MC2 printer to easily remove the table and put it back. If it is possible to apply glue to an installed table (although it is more convenient to remove it), then it is better to wash it from PVA under a stream of hot water. Those places that are not in contact with the printed part are washed off with just a finger, and those where the part stuck with only a spatula. This suggests that the glue in these places actually dries to the glass under the influence of temperature.
I will not lie, I do not always get to print any part made of ABS from the first time, but with some experience, you can achieve good results. For example, I could not print a disc with a diameter of about 100 mm and a thickness of 10 mm with 100% filling - it always came off. At 30% completion, such a disc was printed.
It seems that it is necessary to develop models with cuts and notches, if possible, in order to minimize the stresses caused by plastic shrinkage during cooling.
The following photographs illustrate the stages of applying glue to the table, the printing process and its results:
Freshly-applied PVA glue:
The glue is almost dry, you can print:
We print bolts M8:
The print is just over:
It can be seen how the “skirt” of the edge near the heads of bolts slightly departs, but holds:
The thread and without any post-processing turned out to be quite good, and after machining the thread with one pass, the M8 plates are just hand-threaded: the thread is very good:
Already printed parts of the device (also made of ABS plastic), for which the bolts were printed:
ABS parts that are attached to a cold table when printed. As a bonus, since the ABS plastic is loaded into the printer, I printed several hooks on the frame of the working stand for hanging any wires and tools:
Hooks in work:
Moral: do not be afraid to experiment with printing ABS plastic on a cold table, with some perseverance and skill you can do it.
And a home 3D printer is a useful device, so that the spiteful critics would not speak!
Previous article: 3D printer as a home tool
Source: https://habr.com/ru/post/393877/
All Articles