Learning GNU Radio with a microphone
The last article about SDR and GNU Radio showed that the topic is interesting to the community. Considering that there is almost no information about the GNU Radio package in Russian, and in English everything is not clear, I decided to describe my experiences with GNU Radio.
I already wrote about SDR and GNU Radio in the previous article . Let me remind you, my goal is to show how to intercept and even emit a radio signal to control smart home devices (and indeed IoT). I consider it important to draw attention to security in IoT. But before that, we are still far away ... To begin with, it would be to deal with GNU Radio!
')
Not everyone has an SDR receiver, and it seemed to me that it would be useful to show what can be done with GNU Radio with what everyone has - namely, with a microphone of your PC and headphones.
Under the cut there are several interesting exercises with sound.
Sounds around
So let's start with a simple one: study the spectrum of sounds around. We assume that you have made the installation of the GNU Radio package or the launch of the prepared Ubuntu / Windows image with GNU Radio. If not, on the GNU Radio website, download an image based on Ubuntu .
Start by creating a simple project for capturing sound from a microphone. To do this, add an Audio Source block, set samp_rate 48000 (many cards work at 44100 Hz, not 48000 Hz).
You can find out the limit of your card on Linux as follows:
$ pactl list short sinks 0 alsa_output.pci-0000_00_03.0.hdmi-stereo module-alsa-card.c s16le 2ch 44100Hz SUSPENDED 1 alsa_output.pci-0000_00_1b.0.analog-stereo module-alsa-card.c s16le 2ch 44100Hz SUSPENDED Immediately the question arises: why 48 kHz? After all, they say, we hear up to 20 with trifle kHz, and then not all.
If we turn to the Kotelnikov-Nyquist-Shannon theorem, it becomes clear that the sampling frequency should be 2 times higher than the high frequency of the useful signal. So, 24 kHz is closer. Well written about it here .
In general, the numbers 48 kHz and 44.1 kHz are a tribute to the past. They are related to the number of frames per second and the scanning lines in ancient video recording systems, then with the CD format. Nowadays, these values remain standards.
In general, the numbers 48 kHz and 44.1 kHz are a tribute to the past. They are related to the number of frames per second and the scanning lines in ancient video recording systems, then with the CD format. Nowadays, these values remain standards.
Let's go back to our GNU Radio scheme. By Audio Source connect WX FFT. Do not forget to replace QT GUI with WX GUI in top_block, as well as change the input type to Float. And now we will run around the apartment, making different sounds. School physics told us a lot about what we will see, but all this is forgotten, and it’s always more interesting to see with your own eyes than to just read it in a textbook.
The first thing we will see - can not see anything! All significant part of the spectrum is concentrated in the first 2 or 3 kHz. Well, ok, let's add a new block between the source and the WX FFT: Rational Resampler - it will allow changing the Sample Rate, leaving only the required part of the spectrum. For convenience, let us create a new Variable block (variable), call resamp and set a value, for example, 15. In the Decimation block, enter the name of this variable in the re-sampler block. Now a signal with a Sample Rate equal to samp_rate / resamp will be sent to WX FFT, i.e. In this block, in the Sample Rate field you need to insert this expression. Now our signal will reach 1.5 kHz, which is better. Well, now everything is visible!
So start with a note of 440 Hz. Check your voice for
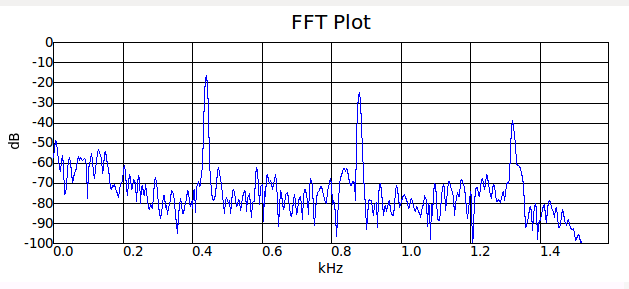
But for a small octave. Just like a textbook - the peaks were 2 times bigger, the lowest peak was 2 times lower (220 Hz)
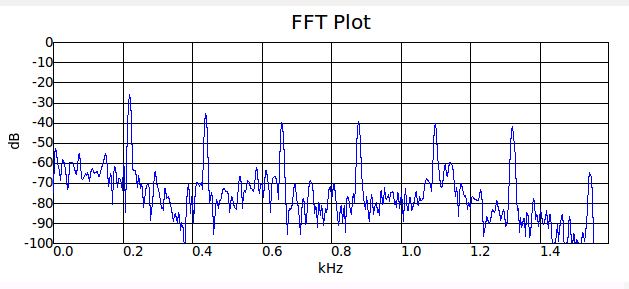
The multiples are not random. Indeed, in the case of a piano / guitar / ... (strings), the sound is extracted by the vibration of a string. And the string has two fixed ends, i.e. only modes with a long wavelength λ / 2 = L * n, where n = 1,2,3 ...
Similar to the voice. Bundles allow you to change the characteristics of the larynx, which acts as a resonator (forgive me, fans of anatomy for inaccurate names). Again, the walls are fixed, there are nodal points for oscillations, i.e. again the same formula for excited modes.
And now let's slap:

(blue - the spectrum of "silence", green - the spectrum of cotton)
Oh, right here all the frequencies are visible (pay attention to the scale of frequencies and the signal level in comparison with the graphs above!). It is logical, because cotton is a short-term increase in pressure (very sharp), i.e. almost a δ-function, and its spectrum contains all frequencies.
This is the way you can use. Who remembers from the 90s such key rings to search for keys that started to make sounds at the whistle? Convenient thing was. So they also reacted to cotton, because in the sound of the clap there is also the frequency corresponding to the whistle.
Alphabet Spectrum
And now let's listen to ourselves. Speak different letters of the alphabet and look at the spectrum (preferably without resampling, to see which frequencies are used in the range of 0-20 kHz). A person uses several types of sound generation: labial (starting with opening the lips, which creates many frequencies at once), guttural, dental, lingual and nasal. Sizzling and whistling look especially interesting (these are laryngeal and dental ones) - their spectrum is very wide and mostly located in the spectrum> 2.5 kHz (the sound from “c” even> 5 kHz). This explains why words with this sound are hard to hear on the phone (in the old days the bandwidth was at 3 kHz or even lower - try adding a Low Pass filter and send the result to Audio Sink with headphones - the result will resemble the good old wired phone).
Who has children, listen to them - they are much louder, their voice contains many high frequencies. That is why their voice on the phone is always strange, and it is often simply impossible to understand them (voice distortion is much greater than that of an adult).
By the way, I tried to squeeze out the highest note. Well, above 700 Hz, I did not take. Son took 1200 Hz! I didn’t expect such limitation from myself - it’s less than 5% of the spectrum I heard. Felt flawed ...
Talk to dolphins
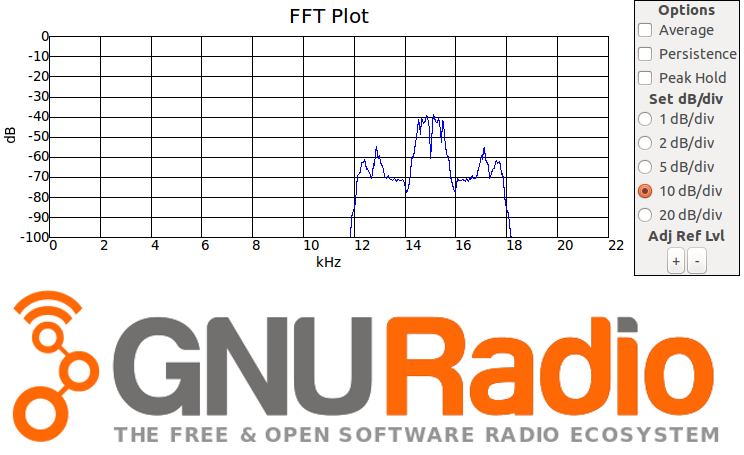
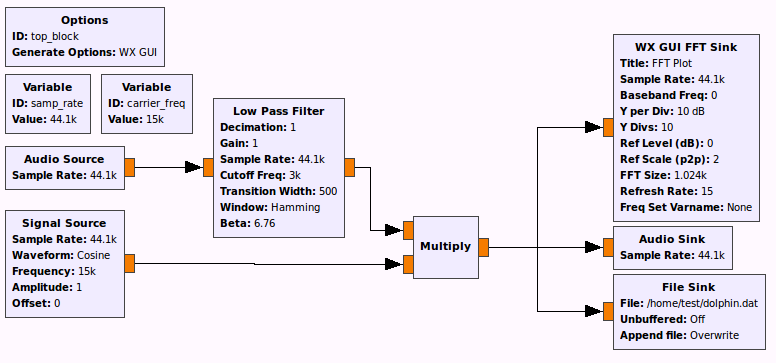
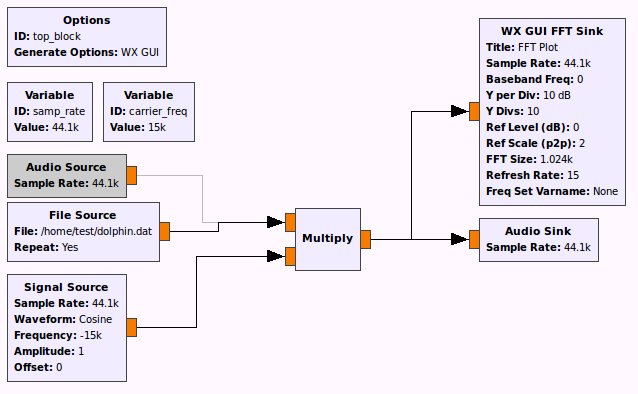
Well, ok, we can not sound so high, so use this band for another. Now we will try to make a voice transmission by ultrasound. Put a Low Pass filter (low pass) after the Audio Source block, multiply by a cosine of 15 kHz (thus transfer our signal to 15 kHz above) and send it to the speaker (it copes with this so-so). But such a file can be written using File Sink. Having lost such a file, a third-party listener cannot make out what is said there. Spy game at grade 2.
And now let's do the opposite - we will restore the coded signal. A normal laptop microphone is not very good at taking high frequencies, but from a file it is easy (for our tests, that's enough). The voice after recovery is very well perceived.
In this way, you can even transfer data: here is an example of a network interface based on ultrasonic transmission .
This example shows that with GNU Radio and a sound card you can do a lot already!
Overview of GNU Radio Blocks
GNU Radio has a lot of different blocks, and it's not easy to understand them. And the most difficult thing is to understand what is there in general. Below I will give only the most popular blocks used "in everyday life".
Mathematical operations:
Add - the addition of two signals
Mulitly - multiplication of two signals (for example, for AM)
Add Const - add (subtract) a constant (for example, remove AM DC component when demodulating AM)
Multiply Const - signal multiplication by a constant (for amplification, for example)
Char / Integer / Float / Complex to Char / Integer / Float / Complex - data type conversion
Sources:
Constant Source - a source that always produces the same value.
Signal Source - a source that produces a sinusoidal signal (for a synthetic signal)
Audio Source / Sink - capture from a sound card or output to it
File Source / Sink - read from file (use Throttle to limit read speed to the desired Sample Rate) and write to file
Wav File Source / Sink - read / write wav file
TCP / UDP Source / Sink - the ability to dock the project with the network software using TCP or UDP sockets
osmocom Source / Sink - receive data from RTL-SDR or HackRF One or transfer (for HackRF One)
Vector Source - the source of a sequence of numbers
Filters and modulation:
Low / High / Band Pass Filter - low / high / bandpass filters
Frequency Xlating FIR Filter - combines frequency shift and low pass filter to highlight the desired frequency band
AM / FM / GFSK / ... Mod / Demod - various modulators and demodulators
Sampling:
Rational Resampler - allows you to convert the incoming sequence of samples from one Sample Rate to another by decimation and interpolation (used for "fitting" under the desired Sample Rate)
Throttle - limiting the sample rate to the desired Sample Rate (if there is not a single block in the project that limits the processing speed)
Delay - delays the stream for the desired number of samples.
UI:
WX GUI FFT Sink - graphical output of the signal spectrum
WX GUI Waterfall Sink - output of the spectral power in the “waterfall” mode (along the X axis - frequency, Y - time, Z (color) - amplitude). Useful for finding the frequency of radiation rarely transmitting source in a given range.
WX GUI Constellation Sink - output the phase diagram of the signal (phase difference between the oscillations of the real and imaginary parts of the signal)
WX GUI Scope Sink - Oscilloscope
Miscellanea:
Variable - variable, allows the use of variables instead of numbers in the set of blocks
Selector - multiplexer, in combination with WX Slider will enable on-the-fly switching of inputs and outputs
Pack / Unpack K bits - converts from bytes 0/1 to a sequence of K bits and vice versa from a byte to a sequence of bytes 0/1, corresponding to bits (convenient for encoding / decoding packets - bytes 0/1 can be multiplied by the carrier, for example)
What else do you need to know about the GNU Radio Companion (GRC)?
All blocks in GRC with inputs or outputs require the definition of a data type. The output type of one block must be the same as the input type of the block associated with it. The output from one block can be transferred into several blocks (i.e., draw several links). But only one stream can enter one entrance!
Most blocks have minimal documentation in the tab in the settings window, as well as in the footnotes to the parameters. Although usually this is not enough. A little outdated dock is here .
All parameters for blocks can be Python expressions. Those. instead of a number, you can substitute a formula involving variables defined by Variable blocks.
Often you want to "twist" the parameters of the project by changing the values of variables. To do this, use WX Slider or a similar UI component, using its name instead of the desired variable. After launching the project, a slider will appear in the UI. This is convenient for tuning the frequency or filter parameters.
Errors in the type of links or in the block parameters are highlighted in red. They also block the launch of the project (in the settings of the block, highlighted in red, you can read about the problem). There are run-time errors that appear already when the project is launched - the log at the bottom of the GRC window will tell you what the problem is.
Some blocks require an integer as a parameter. Substitution of a formula can lead to type mismatch. Use Python's int () function to convert to integer.
To disable the block, use Disable / Enable. This will allow you not to delete the block, but simply to exclude it from the project for a while, while retaining all the entered parameters.
All schemes in GRC are converted to Python scripts, which allows them to be modified later, as well as to automate some processes bypassing GRC.
It is often convenient to save the sound / radio signal to a file for further analysis. To do this, use the File sink block. Please note that when reading a file you need to remember the used data format when writing (type of number), as well as the Sample Rate. I recommend including these values in the file name in addition to the description of the recorded signal itself - this will allow you not to forget how to read it later.
When playing from a file, be sure to use the Throttle block to limit the reading speed. This is not required if there is another block in the circuit that physically limits the speed at which data is read. For example, the Audio Sink block limits the speed of the data supplied to it specified in its Sample Rate settings.
To find the desired block, use the magnifying glass icon in the toolbar. Double clicking on the name in the list of available block will add a block to the project. Instead, you can drag it from the list to the desired location in the project.
Try to conveniently place the blocks in the project. This does not affect anything other than readability.
I hope this article will encourage someone to experiment with sound.
Source: https://habr.com/ru/post/393713/
All Articles