How to make a virtual reality helmet with your own hands
Hello everyone who enjoys gadgets, stereoscopic images and 3D graphics!
Unfortunately, after opening pre-orders for the consumer version of Oculus CV1, it became clear that this gadget was not as accessible as many people would like. Indeed, $ 599 is the cost in the United States. In Russia, these devices will probably cost around $ 800-1000 for the first year or two. HTC Vive starts at $ 799. Perhaps, these are the most advanced VR devices now, but you have to admit that they are not particularly accessible.
It's a shame, because right now, perhaps, we are standing at the origins of the formation of a truly new era in multimedia, which opens up tremendous opportunities and new niches in business.
')
What to do if you are already fed up with ordinary cardboards with mobile phones, and you want something more complete, cinematic and exciting? Maybe you have a desire to start developing games, architectural solutions for VR or just you want to try to make money on the attraction?
We are evangelists of computer VR systems in Russia, and in this article we want to show how to assemble a real virtual reality helmet at home, even better than the Oculus Rift DK1, and then with engineering power we will elegantly turn it into DK2. As a result, the helmet will be compatible with the latest versions of the SDK and Otime Rift Runtime at a relatively affordable price. (Palmer Lucky probably would have choked after reading this article, but we, after all, Russians always come up with something and know how to get out of different situations beautifully).
Let it be an example of a national helmet for all Russians, and I don’t divide Ukrainians, Russians, Belarusians, etc., since we work and cooperate with all of them ... This should be in the public domain. VR should be available!

How to build a budget virtual reality helmet compatible with the Oculus Rift DK2 at home ...
Important : all the work described below must be performed in accordance with safety regulations. Of course, you are fully responsible for the result of the work and what you end up with. Legally it will or not, whether you will use the content developed for helmets from other manufacturers, the SDK or the Oculus Runtime, medical contraindications and the consequences of using a helmet are all up to you personally and responsibly.
We are not responsible for the result, use and device created by you. This is DIY.
You will need some soldering skills, an understanding of electricity at the school level and certain skills of a fitter.
Since this is a tutorial, the first thing we start with is of course the preparation of the workplace:
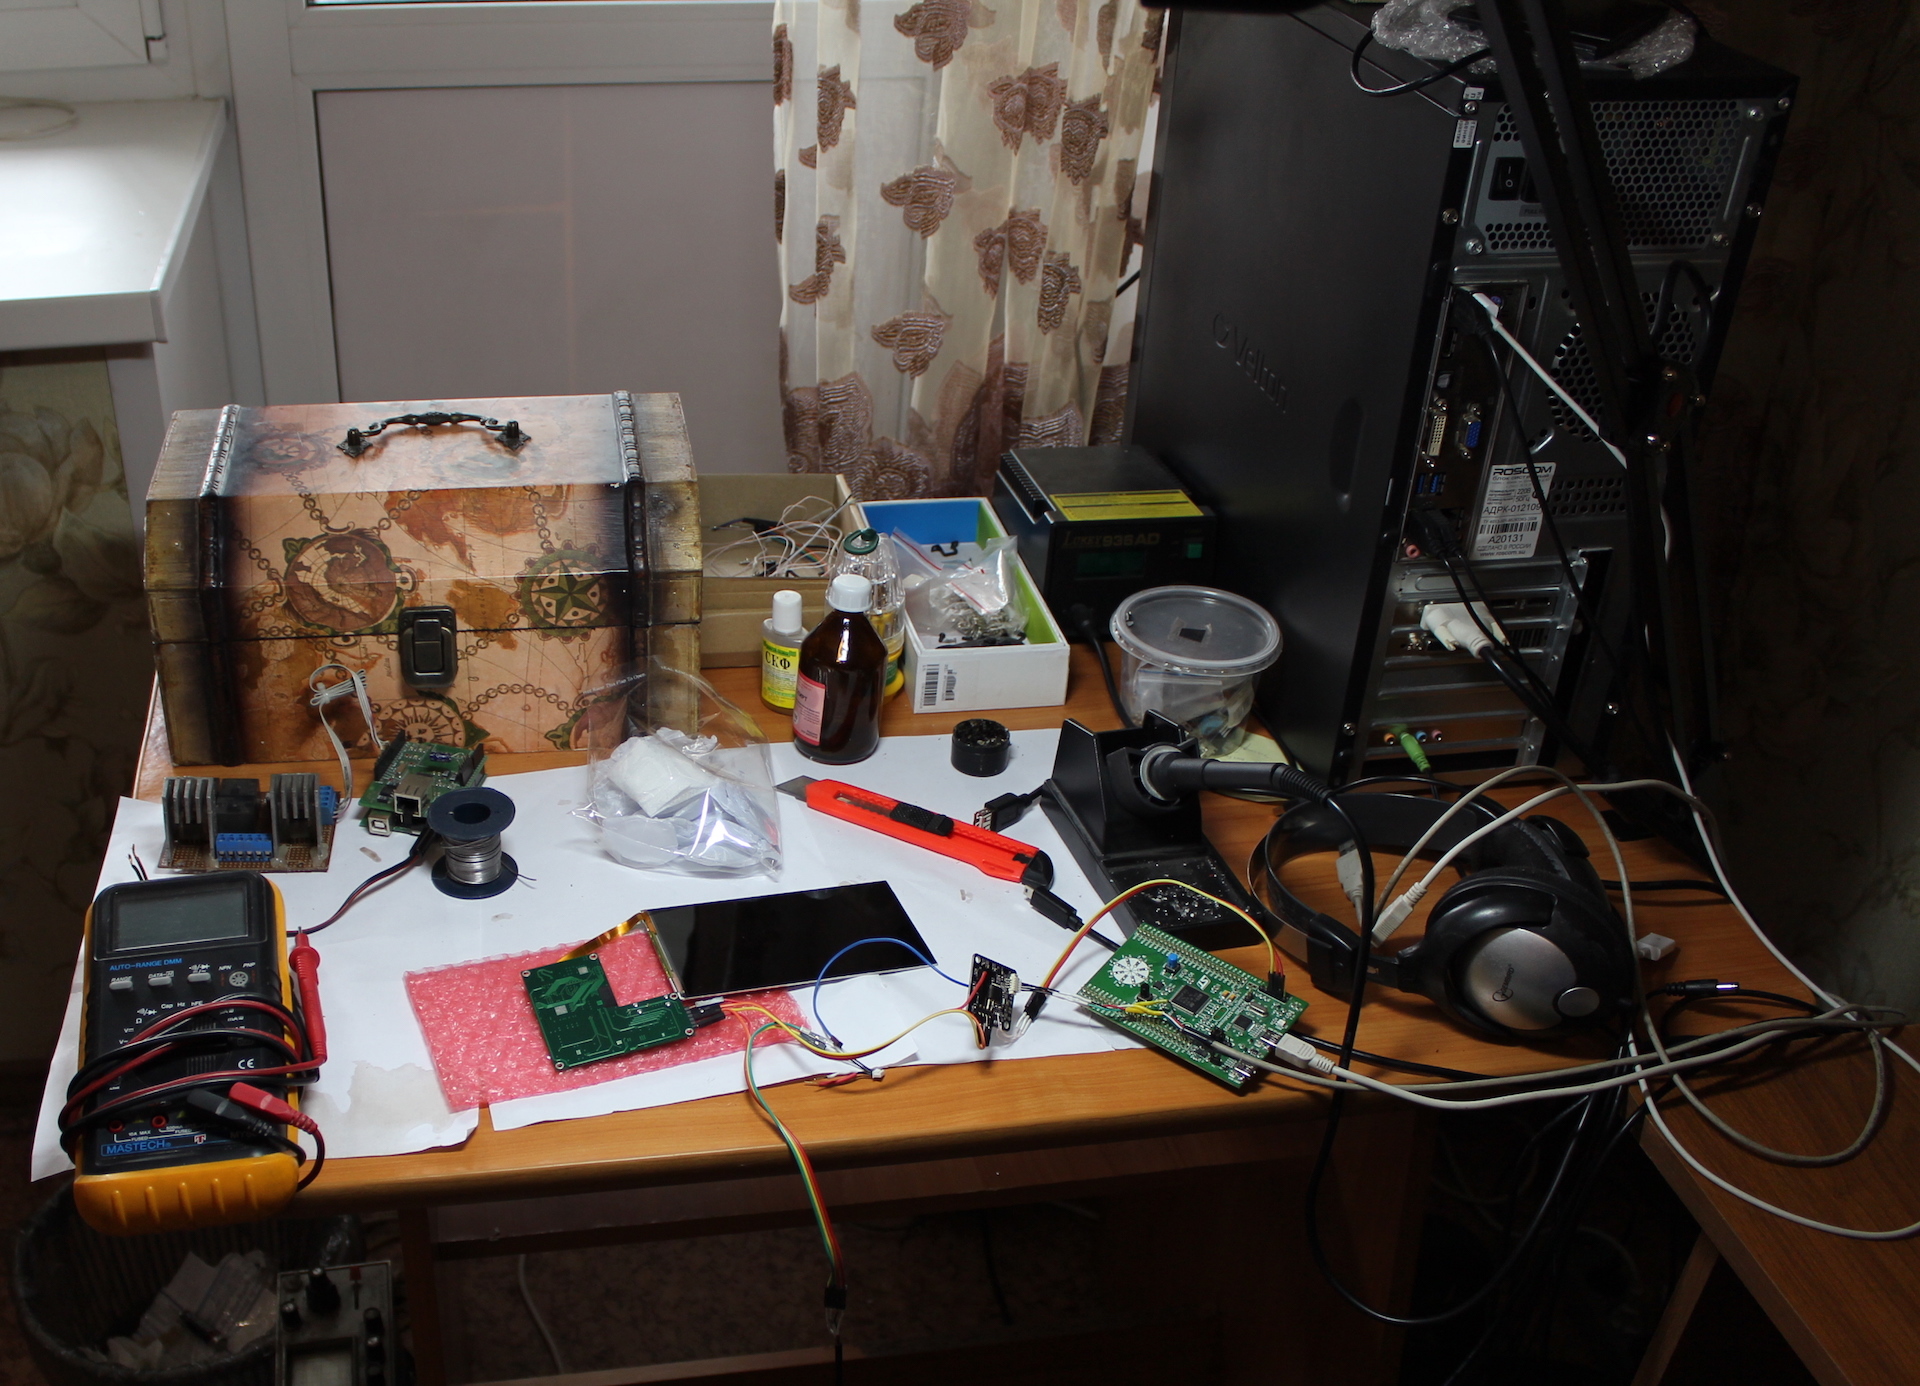
Remove all the mess and extra things so that they do not interfere:

From the tools we need:
Consumables:
Accessories:
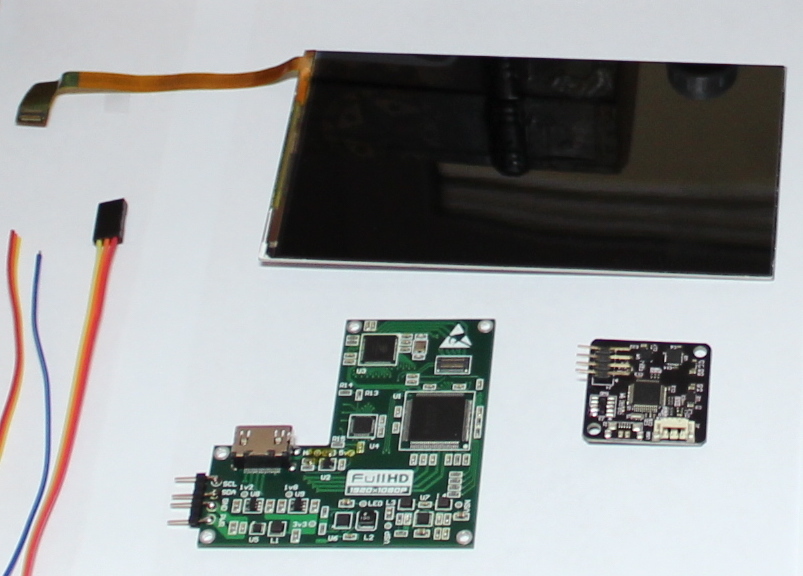
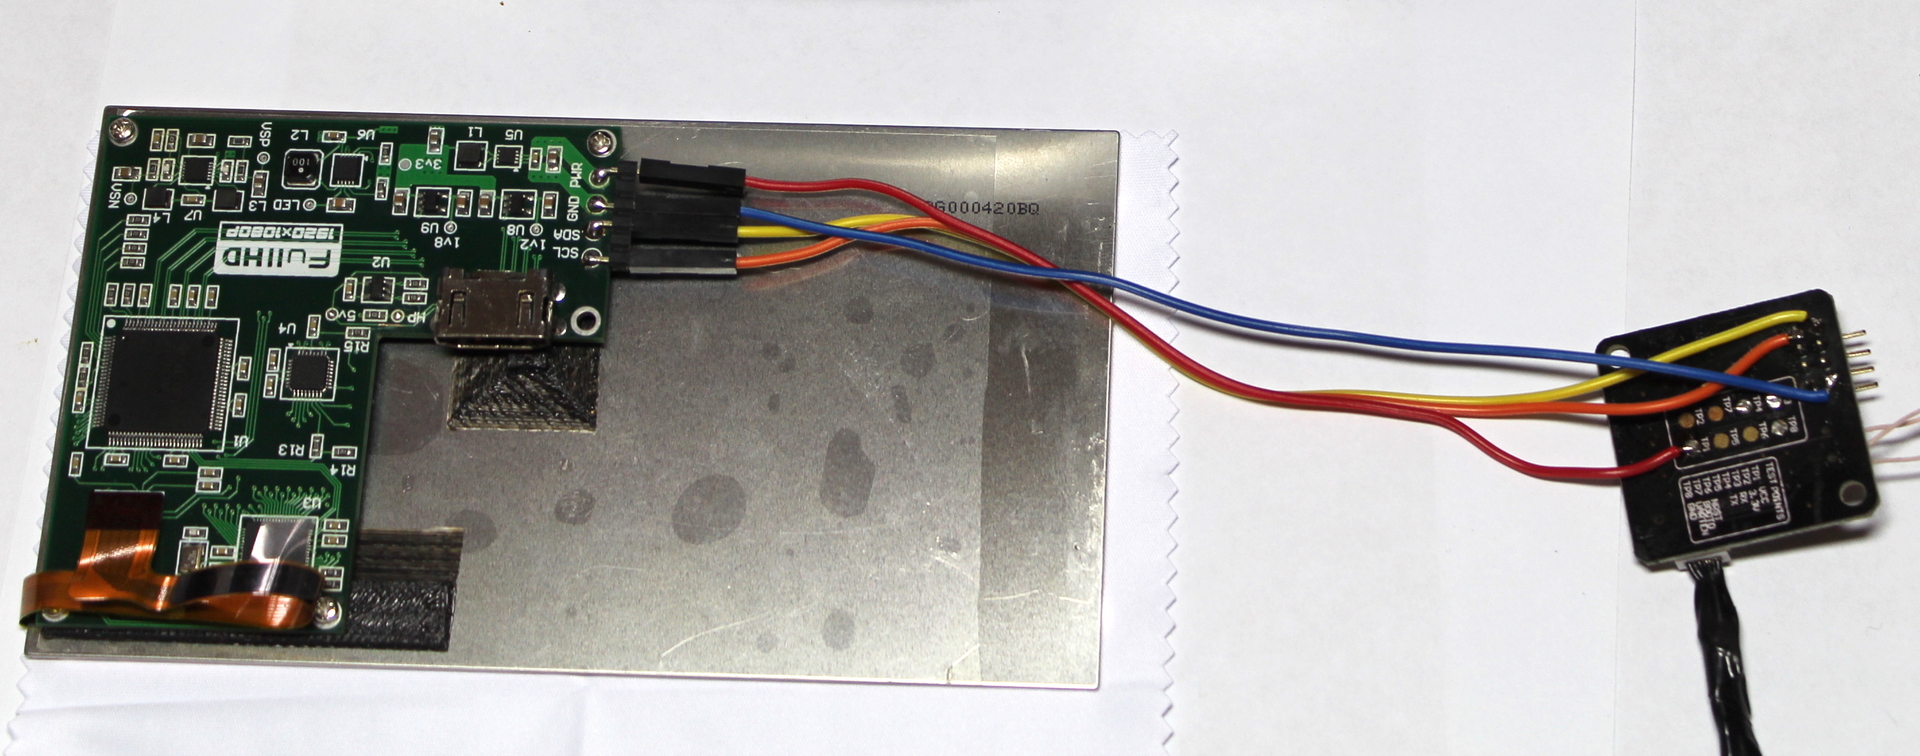
After you finally have the necessary accessories, connect the screen with the board and secure the latter with a double-sided thick tape or a special plastic frame + tape that can be printed on a 3D printer :


Next, we solder the conductors to the tracker board:
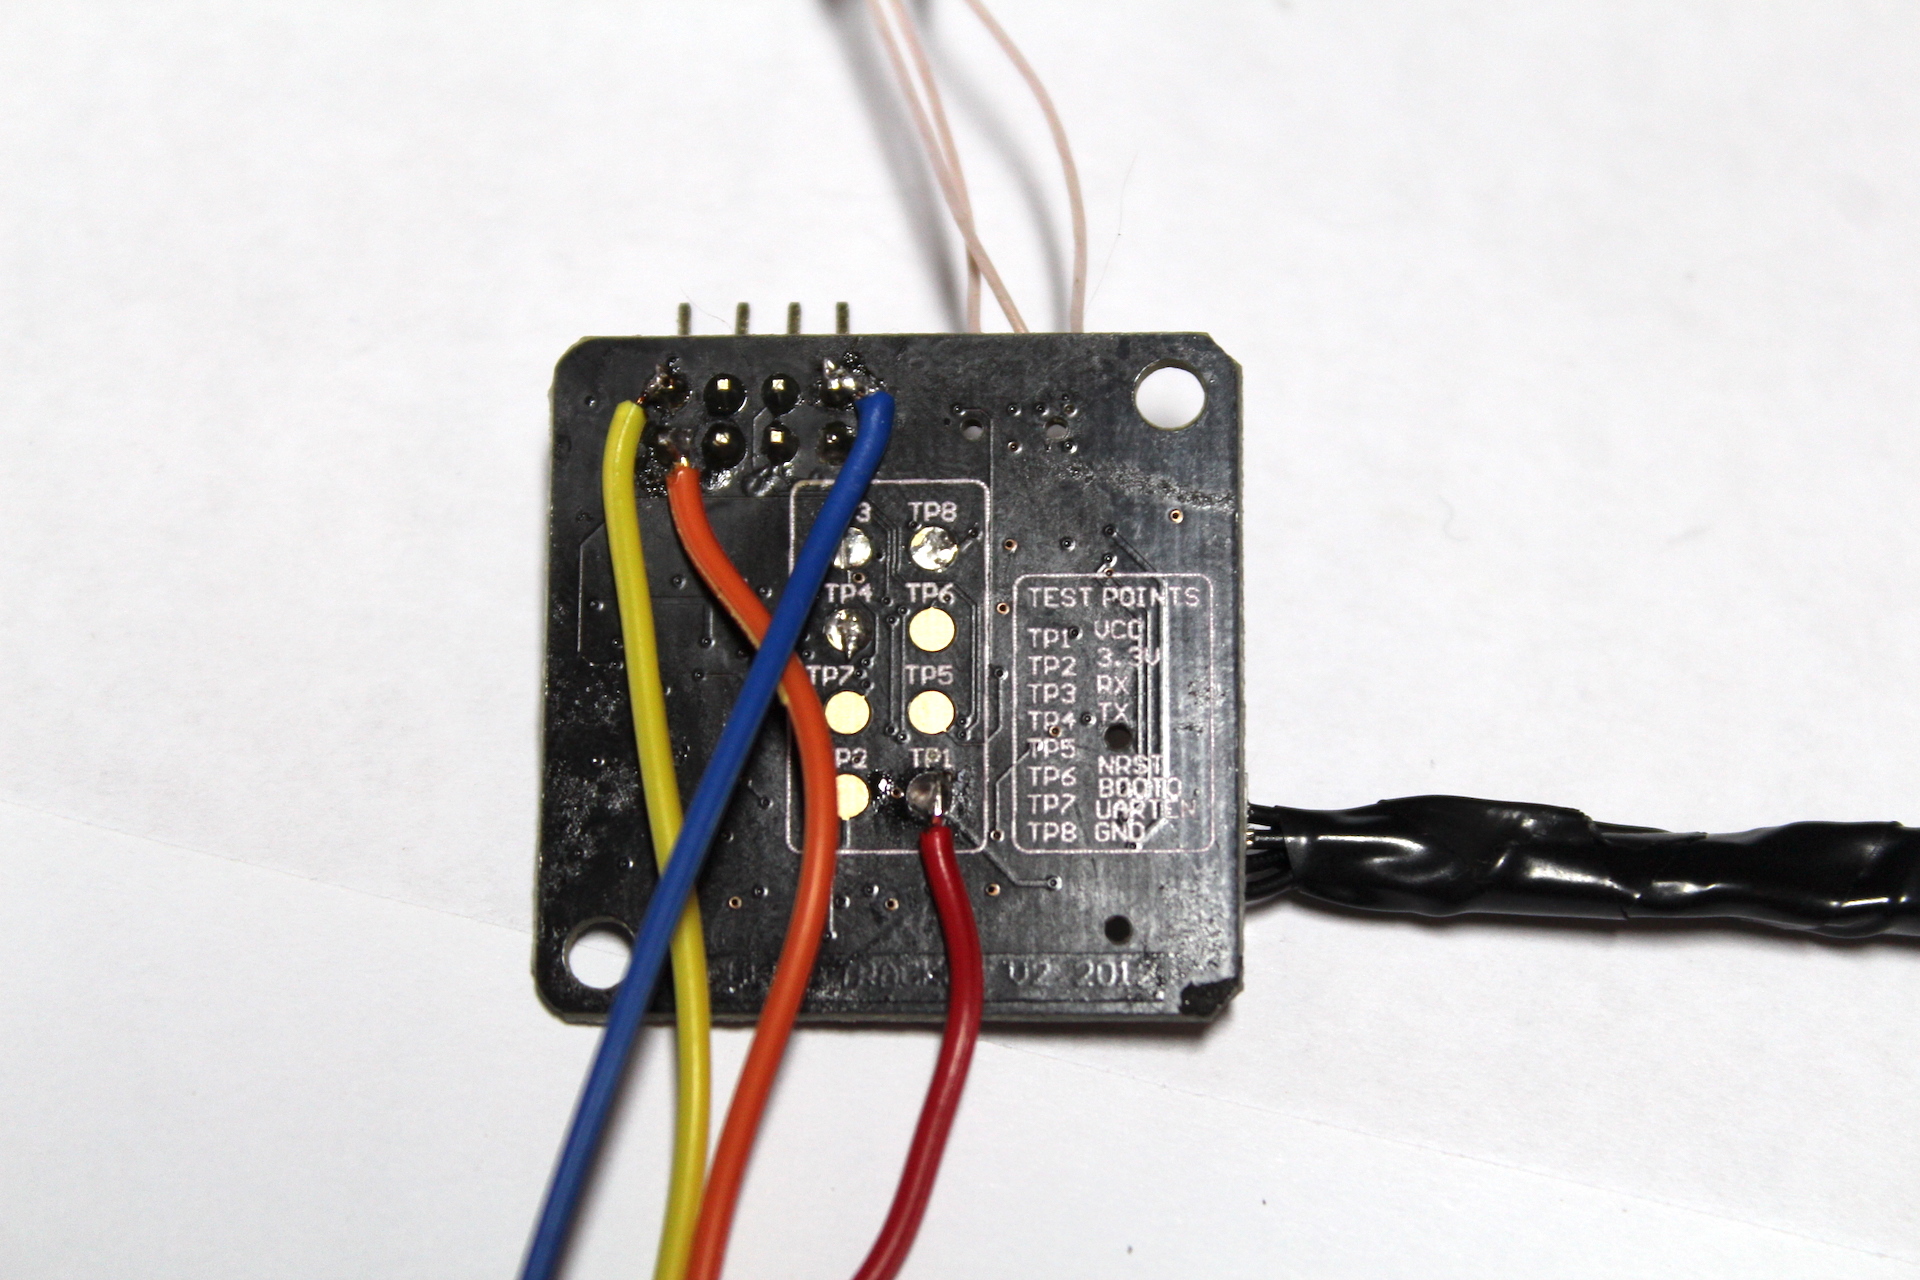
We connect these wires with the screen board according to the indicated marking (Ground, PWR, SCL, SDA).
Important : do not confuse Ground and PWR, otherwise the screen board will “burn”:
You can refuse the soldering of 3 pins (SDA, SCL and Ground) by putting the pins directly on the tracker pins on the reverse side, however, this may not be entirely reliable.
If you are using a Mojing 4 case, then everything is relatively simple.
Important : Mojing 4 has only the adjustment of the interpupillary distance. If you have severe myopia, you can use glasses, but in the case of Mojing 3 Plus, in addition, there is a focal length adjustment, which makes using a helmet more comfortable in this case. For people with farsightedness or astigmatism, a helmet refinement will be required.
Glue on the bottom shelf to hold the phone gasket from the kit to the glasses and place the screen with the board in the case. We stitch the tracker board onto the helmet cover, first onto double-sided tape, and then you can “grip” it with hot glue around the perimeter:
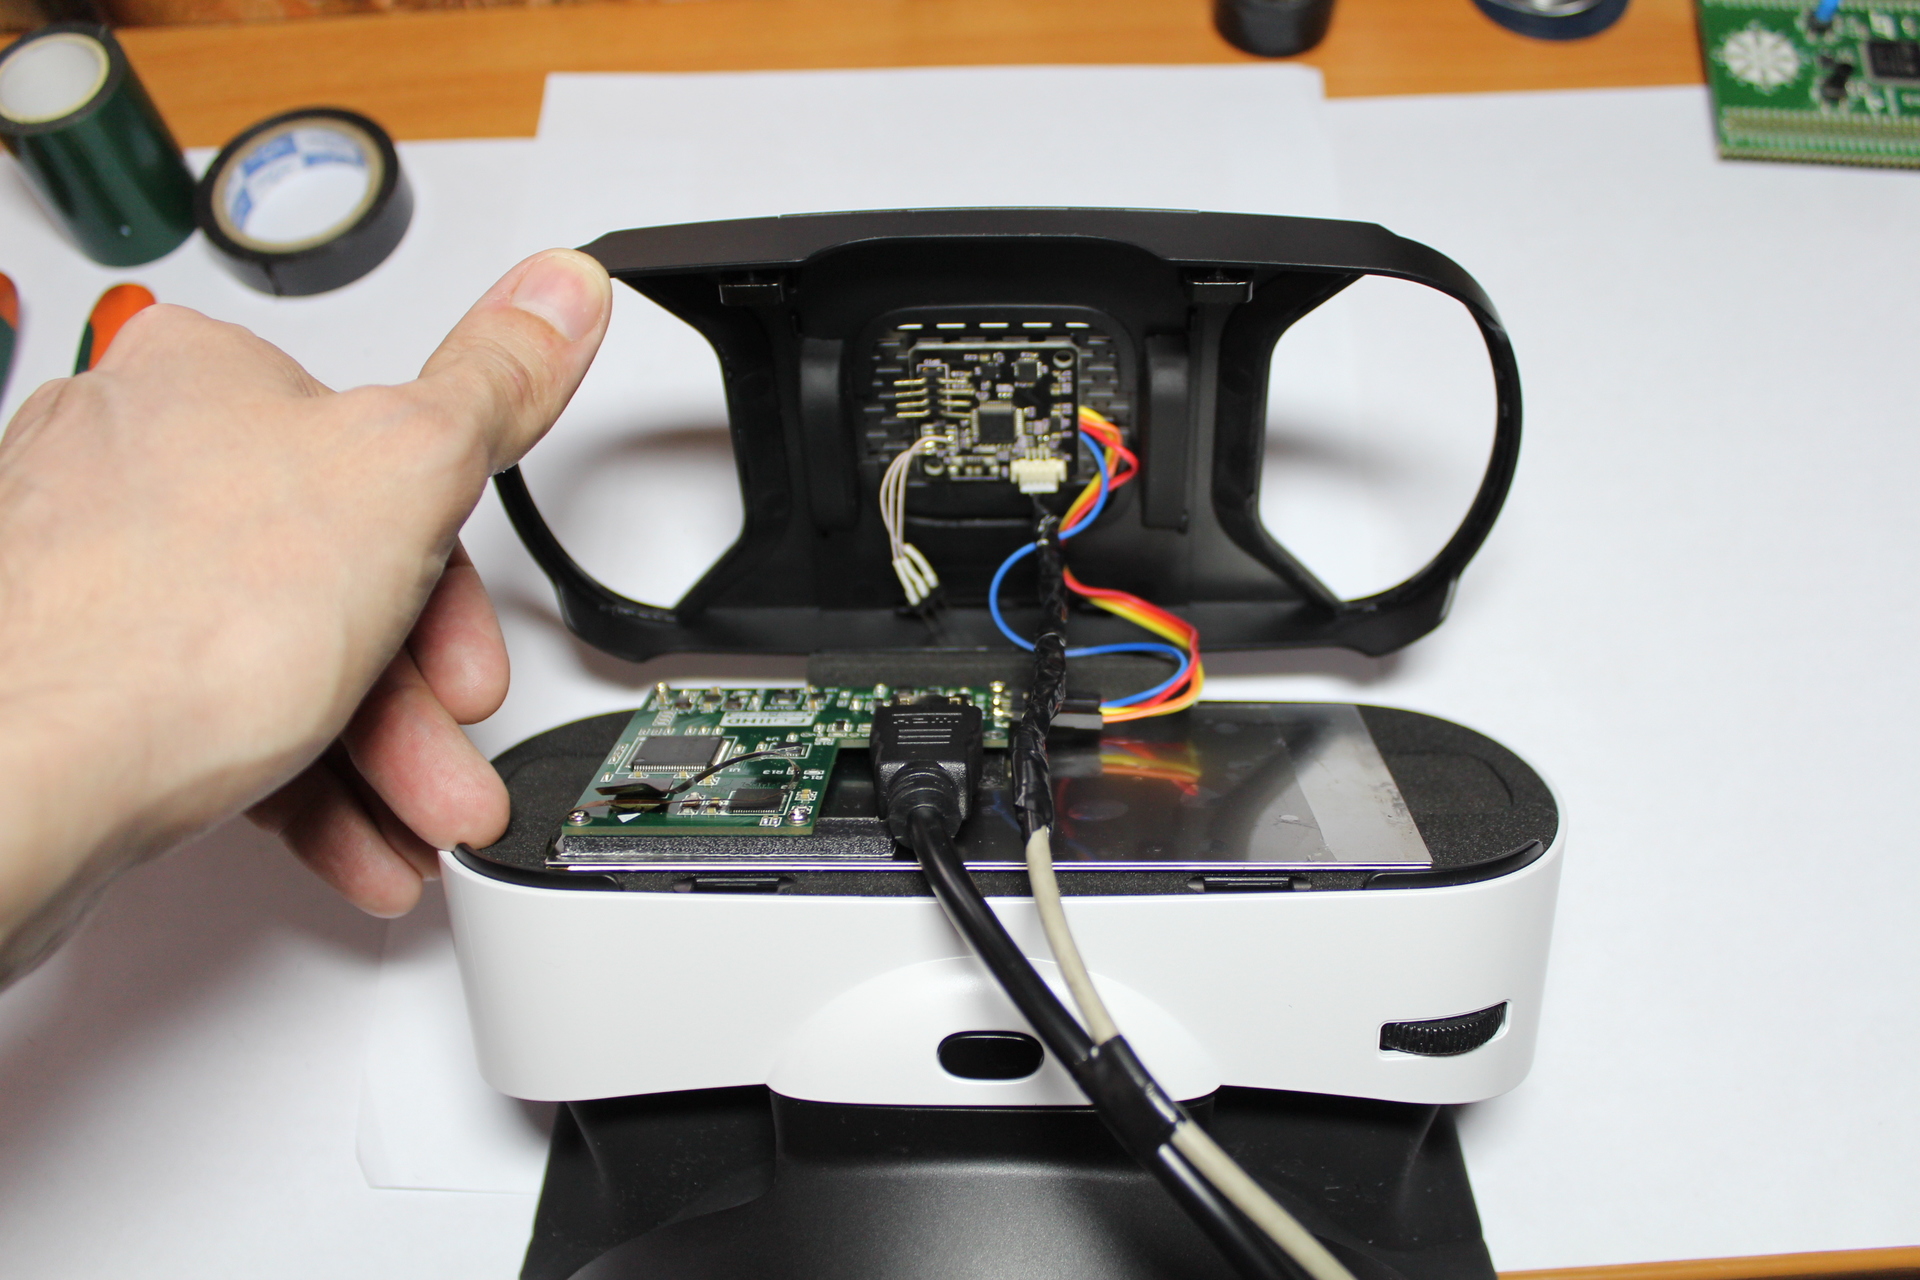
Important : Try to stick the tracker exactly horizontally and vertically. It is better to isolate open contacts so that they are not short-circuited to the board (SWD-connector).
We plug the USB and HDMI wires into the helmet and close the case:
With the help of the usual "Velcro" cut out strips for fastening the wires to the helmet and fasten the wires in the direction where the computer is located:
Important : the length of the wires to the PC should not exceed 2.5 meters. Otherwise, it threatens to lose the signal via HDMI, interference, unstable operation, etc. However, there are HDMI wires with a built-in amplifier (as, for example, in the Oculus). Such options work quite well with a length of 3 to 5 m.

We detach all the protective films from the glasses (from the lenses, the case), install the Oculus Runtime 0.4.4 to start, reboot the PC and connect the helmet.
As a result, if you run Oculus Utils, then the helmet is recognized as Oculus DK1 and now you can play some games under Runtime 0.4.4 at your discretion:

If you have already purchased a tracker with VRD firmware, then you can skip the procedure for changing the firmware.
Are you afraid to chat with a werewolf in VR? Then go ahead! We take a soldering iron, conductors, connector and make a conclusion for the SWD connector and tracker programming (if you have your own):

In this place, perhaps the most important:
Important : it is necessary to generate the key with the help of a special utility, get an individual firmware for your tracker in the .hex format and “fill” it through the programmer into the tracker via the SWD connector.
Since the firmware is the “heart” of this system, in order to receive the firmware, you need to contact us via mail at kit@vrdevice.ru and follow the instructions. I ask you to understand, but we still do not really want the firmware used by various other manufacturers of helmets, for example, from under heaven. Yes, and excessive publicity can provoke the company Oculus to abandon the support of DK2 in Oculus Home faster. Let's not rush things, we have not yet received our own copy of CV1, in order to arrange an inquisition for it ...
However, there is a simpler way - to get a tracker that is already flashed, or even a screen + tracker kit.
As a result of these manipulations after flashing the tracker, you need to remove the old Runtime (if it was installed), restart the PC, install Runtime 0.6 - 0.8 and run Oculus Utils:
Unbelievable, but true: your virtual reality helmet, now compatible with the Oculus Rift DK2, is ready for work and defense!
A bit of Oculus Home:
On our site there are a couple of useful articles on how to run a helmet for the first time.
You can also find other interesting VR articles on our blog . You can also find and contact us in VK .
At the moment we are developing a more advanced tracker with additional USB, hi-fi sound and the ability to change firmware without reprogramming. The output of the module is planned for the autumn, and it can be simply replaced. Those customers who make a helmet based on all of the above information will receive a 15% discount on the future tracker.
In the future, if the project is developed, we have plans to create our own device driver, which will allow using and updating the helmet for full-fledged work with SteamVR as an independent vendor (and not Oculus), which potentially opens up much greater opportunities for the platform as a whole.
For questions about how and where you can purchase components now, please write to kit@vrdevice.ru. In the letter, specify which components you need (case, screen, tracker, wires, firmware), and we will try to help you.
That's all for now, we hope that all the above information will benefit the development of the VR industry as a whole. Create your own VR games and applications in Unity , Unreal Engine , try to create VR rides, transfer architectural visualization and design to VR - go for it, the ocean VR is relatively blue and this is a truly plowed field.
We all live in an amazing time, good luck with your projects!
Unfortunately, after opening pre-orders for the consumer version of Oculus CV1, it became clear that this gadget was not as accessible as many people would like. Indeed, $ 599 is the cost in the United States. In Russia, these devices will probably cost around $ 800-1000 for the first year or two. HTC Vive starts at $ 799. Perhaps, these are the most advanced VR devices now, but you have to admit that they are not particularly accessible.
It's a shame, because right now, perhaps, we are standing at the origins of the formation of a truly new era in multimedia, which opens up tremendous opportunities and new niches in business.
')
What to do if you are already fed up with ordinary cardboards with mobile phones, and you want something more complete, cinematic and exciting? Maybe you have a desire to start developing games, architectural solutions for VR or just you want to try to make money on the attraction?
We are evangelists of computer VR systems in Russia, and in this article we want to show how to assemble a real virtual reality helmet at home, even better than the Oculus Rift DK1, and then with engineering power we will elegantly turn it into DK2. As a result, the helmet will be compatible with the latest versions of the SDK and Otime Rift Runtime at a relatively affordable price. (Palmer Lucky probably would have choked after reading this article, but we, after all, Russians always come up with something and know how to get out of different situations beautifully).
Let it be an example of a national helmet for all Russians, and I don’t divide Ukrainians, Russians, Belarusians, etc., since we work and cooperate with all of them ... This should be in the public domain. VR should be available!
How to build a budget virtual reality helmet compatible with the Oculus Rift DK2 at home ...
A warning
Important : all the work described below must be performed in accordance with safety regulations. Of course, you are fully responsible for the result of the work and what you end up with. Legally it will or not, whether you will use the content developed for helmets from other manufacturers, the SDK or the Oculus Runtime, medical contraindications and the consequences of using a helmet are all up to you personally and responsibly.
We are not responsible for the result, use and device created by you. This is DIY.
You will need some soldering skills, an understanding of electricity at the school level and certain skills of a fitter.
Training
Since this is a tutorial, the first thing we start with is of course the preparation of the workplace:
Remove all the mess and extra things so that they do not interfere:
From the tools we need:
- soldering iron (preferably with temperature control)
- knife
- screwdriver
- Toothbrush
- pliers
- hot melt glue gun
- any suitable programmer for STM32. In case you already have your DK1 tracker and you will upgrade it to DK2.
straightworking hands
Consumables:
- flux
- solder
- alcohol
- double sided scotch tape
- insulating tape
- flexible thin (multicore) conductors. It is better if it is a wire in a fluoroplastic sheath, it does not melt.
Accessories:
- HDMI 2 wire - 2.5 meters
- USB 2 wire - 2.5 meters
- pin connector, 3 pins
- 4 conductors with pins
- Any suitable VR glasses (Mojing, BoboVR, Cardboard, etc.) for a screen size of 6 '
- Oculus DK1 based tracker (better closer to the original). Yes, we will turn it into a DK2 tracker!
- LCD screen 6 'with a resolution of 1920x1080 and the converter board HDMI -> MIPI. At the moment we are able to connect to several similar screens, but we use the option presented in the photo, because it will be cheaper, and the quality of them all is about the same. Of course, it is better if it is an AMOLED or OLED screen (less plume and pixel ignition time), but at the moment the cost of such solutions will quickly cool you down if you find them together with the adapter card.
"Go!"
After you finally have the necessary accessories, connect the screen with the board and secure the latter with a double-sided thick tape or a special plastic frame + tape that can be printed on a 3D printer :
Next, we solder the conductors to the tracker board:
- blue "Ground"
- red (PWR) + 5V
- yellow we will have SDA
- green scl
We connect these wires with the screen board according to the indicated marking (Ground, PWR, SCL, SDA).
Important : do not confuse Ground and PWR, otherwise the screen board will “burn”:
You can refuse the soldering of 3 pins (SDA, SCL and Ground) by putting the pins directly on the tracker pins on the reverse side, however, this may not be entirely reliable.
Assembly
If you are using a Mojing 4 case, then everything is relatively simple.
Important : Mojing 4 has only the adjustment of the interpupillary distance. If you have severe myopia, you can use glasses, but in the case of Mojing 3 Plus, in addition, there is a focal length adjustment, which makes using a helmet more comfortable in this case. For people with farsightedness or astigmatism, a helmet refinement will be required.
Glue on the bottom shelf to hold the phone gasket from the kit to the glasses and place the screen with the board in the case. We stitch the tracker board onto the helmet cover, first onto double-sided tape, and then you can “grip” it with hot glue around the perimeter:
Important : Try to stick the tracker exactly horizontally and vertically. It is better to isolate open contacts so that they are not short-circuited to the board (SWD-connector).
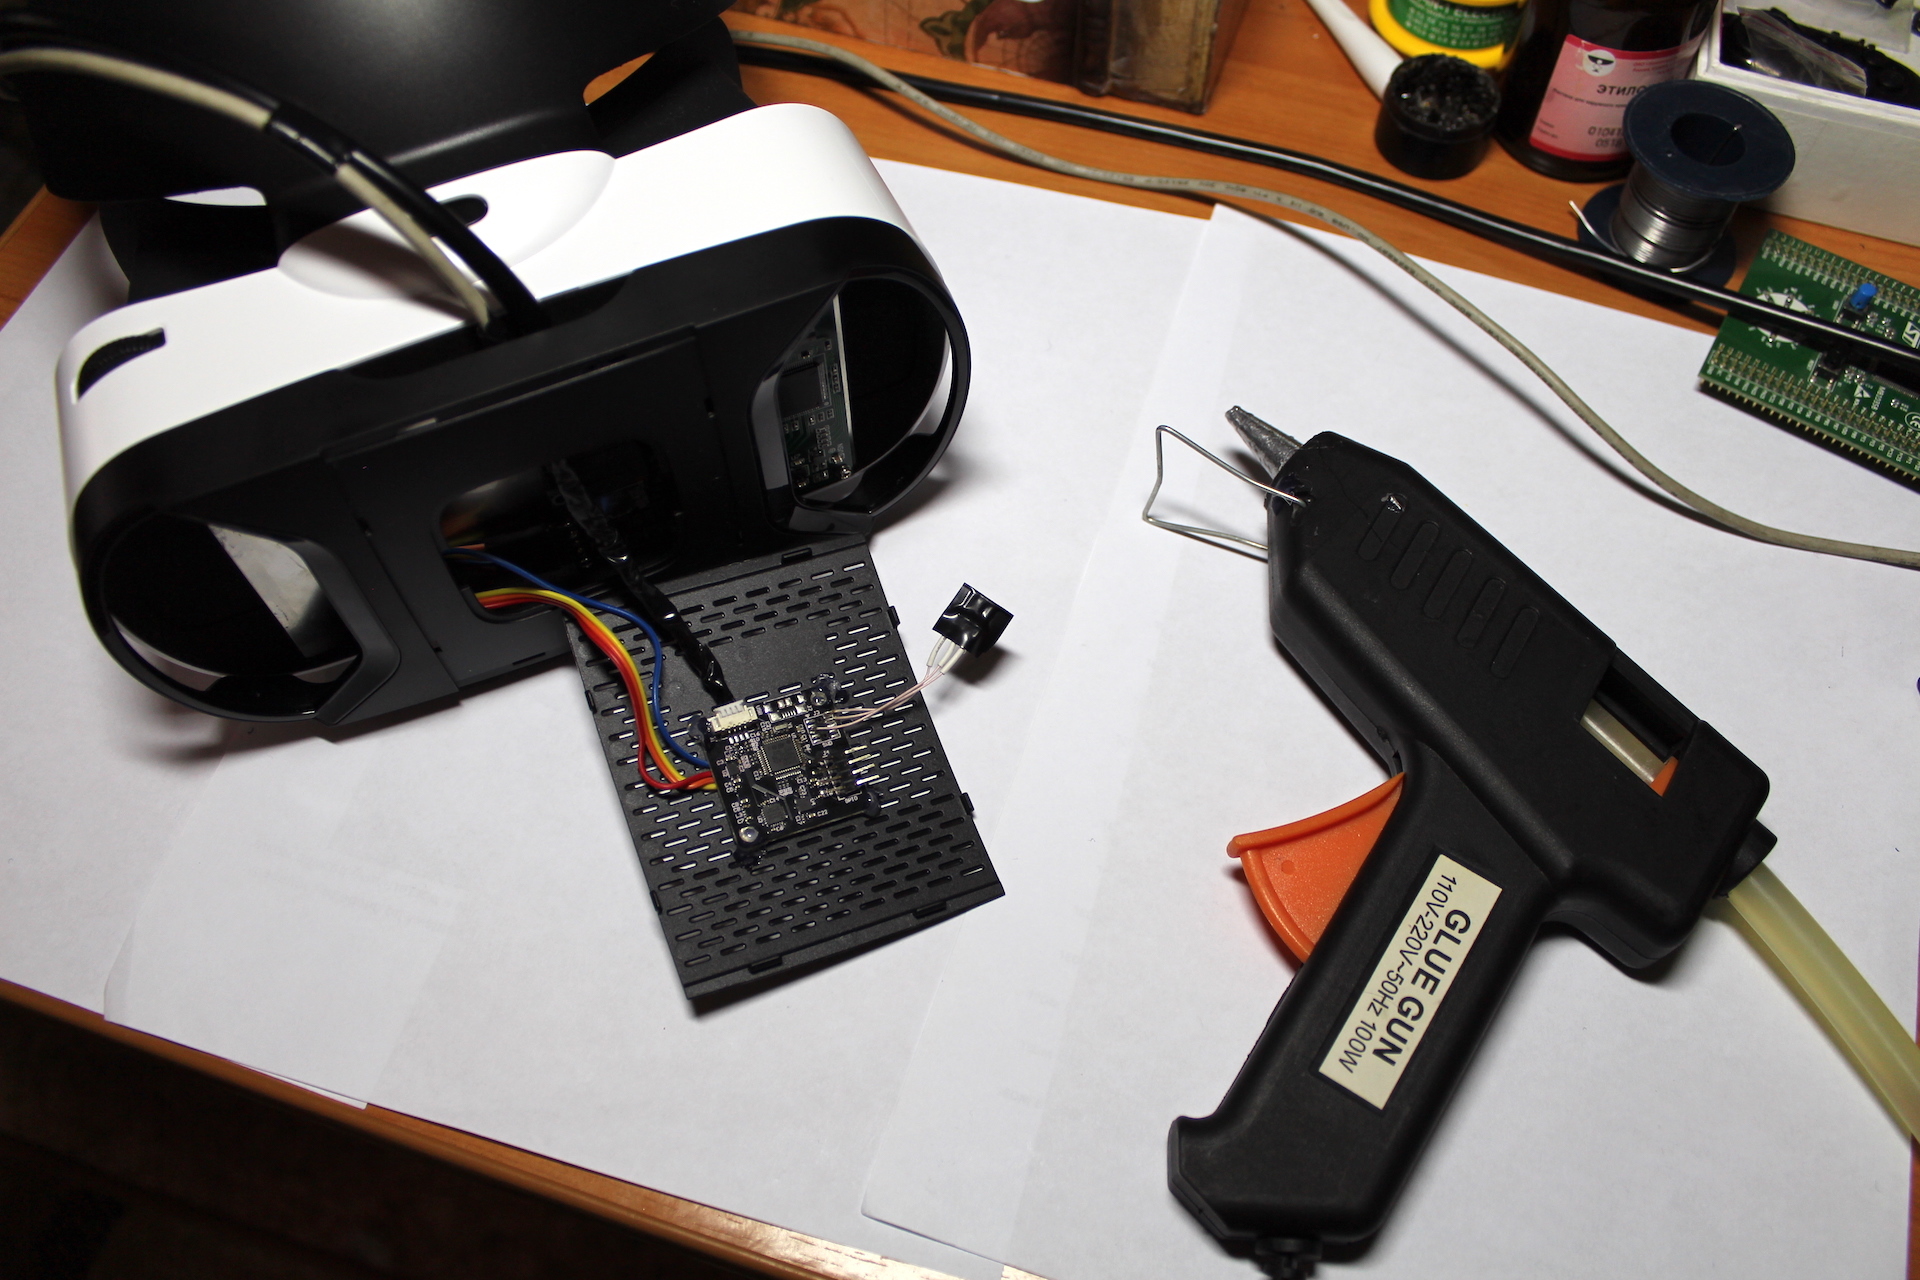
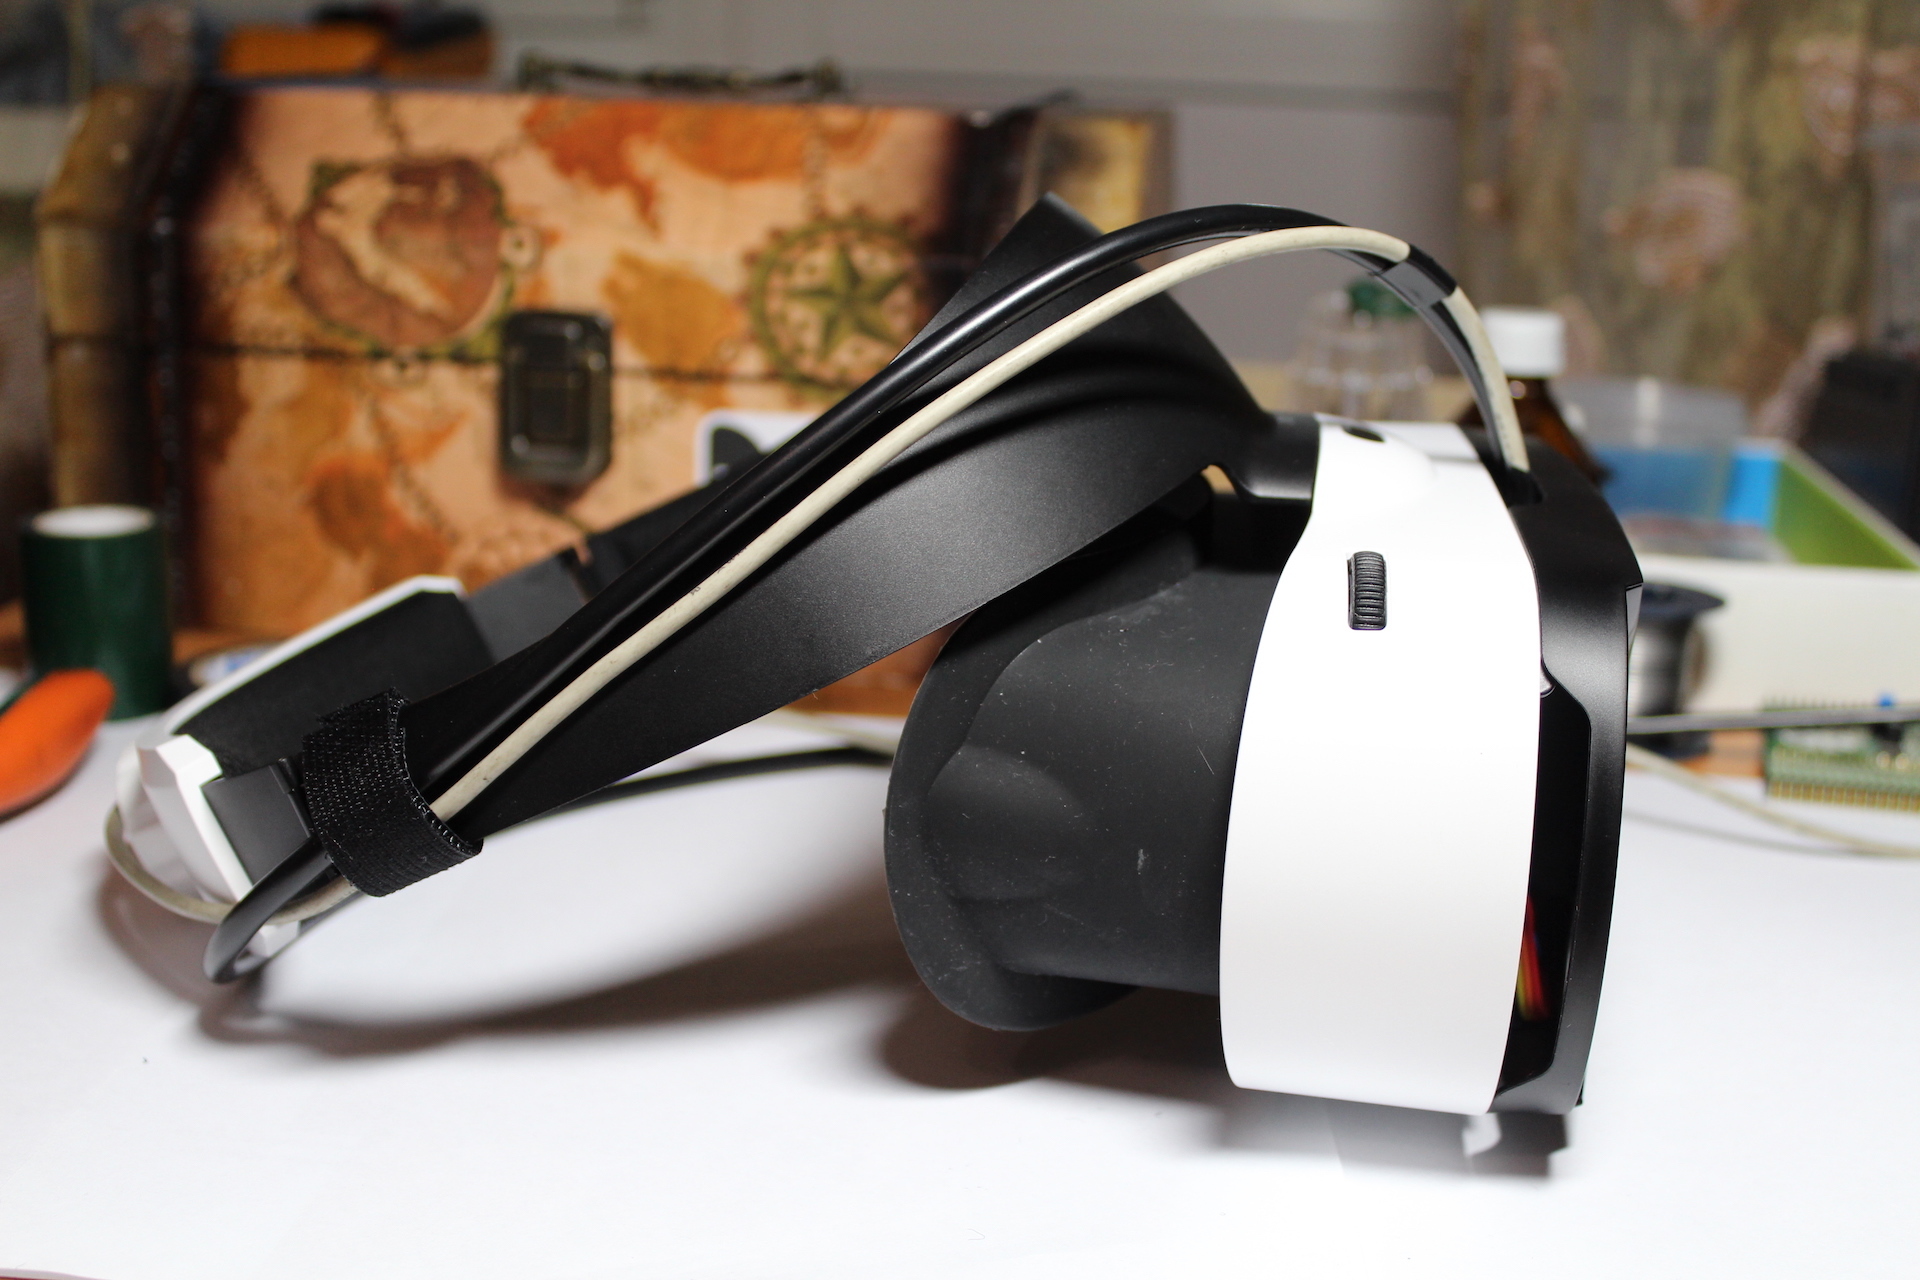
We plug the USB and HDMI wires into the helmet and close the case:
With the help of the usual "Velcro" cut out strips for fastening the wires to the helmet and fasten the wires in the direction where the computer is located:
Important : the length of the wires to the PC should not exceed 2.5 meters. Otherwise, it threatens to lose the signal via HDMI, interference, unstable operation, etc. However, there are HDMI wires with a built-in amplifier (as, for example, in the Oculus). Such options work quite well with a length of 3 to 5 m.
Connect and configure
We detach all the protective films from the glasses (from the lenses, the case), install the Oculus Runtime 0.4.4 to start, reboot the PC and connect the helmet.
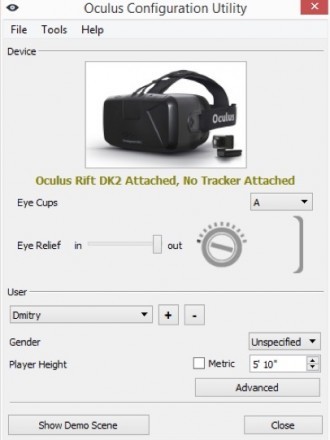
As a result, if you run Oculus Utils, then the helmet is recognized as Oculus DK1 and now you can play some games under Runtime 0.4.4 at your discretion:
If you have already purchased a tracker with VRD firmware, then you can skip the procedure for changing the firmware.
Pants are turning ...
Are you afraid to chat with a werewolf in VR? Then go ahead! We take a soldering iron, conductors, connector and make a conclusion for the SWD connector and tracker programming (if you have your own):
In this place, perhaps the most important:
Important : it is necessary to generate the key with the help of a special utility, get an individual firmware for your tracker in the .hex format and “fill” it through the programmer into the tracker via the SWD connector.
Since the firmware is the “heart” of this system, in order to receive the firmware, you need to contact us via mail at kit@vrdevice.ru and follow the instructions. I ask you to understand, but we still do not really want the firmware used by various other manufacturers of helmets, for example, from under heaven. Yes, and excessive publicity can provoke the company Oculus to abandon the support of DK2 in Oculus Home faster. Let's not rush things, we have not yet received our own copy of CV1, in order to arrange an inquisition for it ...
However, there is a simpler way - to get a tracker that is already flashed, or even a screen + tracker kit.
As a result of these manipulations after flashing the tracker, you need to remove the old Runtime (if it was installed), restart the PC, install Runtime 0.6 - 0.8 and run Oculus Utils:
Unbelievable, but true: your virtual reality helmet, now compatible with the Oculus Rift DK2, is ready for work and defense!
A bit of Oculus Home:
What's next?
On our site there are a couple of useful articles on how to run a helmet for the first time.
You can also find other interesting VR articles on our blog . You can also find and contact us in VK .
At the moment we are developing a more advanced tracker with additional USB, hi-fi sound and the ability to change firmware without reprogramming. The output of the module is planned for the autumn, and it can be simply replaced. Those customers who make a helmet based on all of the above information will receive a 15% discount on the future tracker.
In the future, if the project is developed, we have plans to create our own device driver, which will allow using and updating the helmet for full-fledged work with SteamVR as an independent vendor (and not Oculus), which potentially opens up much greater opportunities for the platform as a whole.
For questions about how and where you can purchase components now, please write to kit@vrdevice.ru. In the letter, specify which components you need (case, screen, tracker, wires, firmware), and we will try to help you.
That's all for now, we hope that all the above information will benefit the development of the VR industry as a whole. Create your own VR games and applications in Unity , Unreal Engine , try to create VR rides, transfer architectural visualization and design to VR - go for it, the ocean VR is relatively blue and this is a truly plowed field.
We all live in an amazing time, good luck with your projects!
Source: https://habr.com/ru/post/393415/
All Articles