Hardware informant about new e-mails using TLS secure connection on ESP8266
When the Arduino IDE for Wi-Fi module based on ESP8266 appeared, its more convenient programming became possible for me. And the lack of an external controller for management brings another huge advantage. The ideas of various electronic features using this module immediately got into my head. And here came the idea to make a stand-alone autonomous informant about the arrival of new letters to my email. As a result, the device was born «E-Mail Notifier».

Details below.
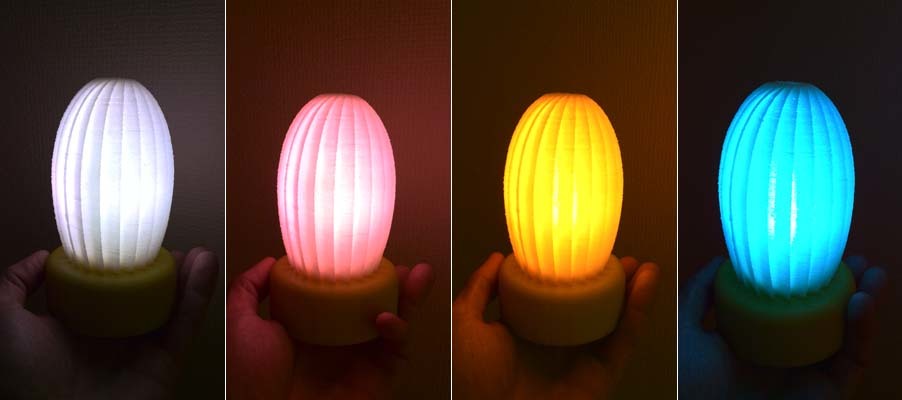
The device periodically establishes a TLS connection with the mail server and requests the number of letters. At the first appeal, the number of letters is stored in memory. Further, with an increase in the number of letters in the box, a decision is made about the arrival of a new letter, the light and sound alarm is activated. The event is acknowledged by pressing a button or by deleting a letter from the mailbox. Audible alarm lasts about 15 seconds, and light before acknowledging the event by the user. The device is made in the form of a lamp and works, including as an ordinary lamp. When you press a button, the light is switched on smoothly. When you press and hold the button, the glow spectrum changes smoothly. A short press on the button when the light is on leads to a fade-out of the glow. You can also set the color of the glow through a UDP connection from a smartphone or computer with the appropriate software.
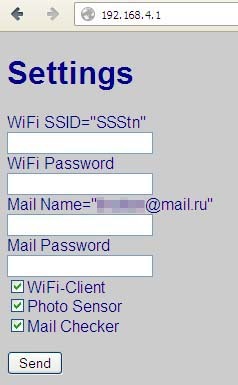
Configuring the Wi-Fi connection, login and password to the mailbox, etc., is done through the device web page. Multiple mail servers are supported.
Currently, well-known mail servers work over secure connections. Before you can work with the server using the POP3 protocol commands, you must be authorized. This is where we need the TLS protocol. The most difficult thing for me was to establish a TLS connection with the mail server. Together with the Arduino IDE there was an example of accessing a web page via an SSL connection. Checked - works! Now I just need to understand what a “fingerprint” is, which is present in the code of the SSL example. For web pages, everything is clear, because In the properties of the connection in the browser, this footprint is present. But I need to create a connection with the sweat server. Began to explore the question. Found a cool OpenSSL tool. A set of programs allows you to do a lot of interesting things. This is essentially a Telnet with an SSL connection. I tried to log into the mail server and, lo and behold, a TLS connection was established with the mail server! Then I could work with the usual POP3 and IMAP protocol commands. It remains to extract from the certificate the fingerprint I need. This is done through the command:
After that, a secure connection is established and the mail server prompt is visible below. Further we work also as in Telnet. USER, PASS, STAT. You can also use the IMAP protocol. Who is more like it. It is only necessary to change the address and port of the mail server.
Now you need to get a certificate and extract from it the fingerprint that we need for the SSL library.
Maybe there is a simpler way, I did not understand in detail with the keys of the OpenSSL kit, so I will tell you how I did it myself. So, we execute the line:
After that, exit the program and the necessary certificate will be stored in the crt file in the current directory. Something like that
Copy everything between --BEGIN CERTIFICATE-- and --END CERTIFICATE--, including these labels themselves, into a separate file. Let's call it mail.key. And now we will get the long-awaited imprint with the command:
Now the keyprint will contain our fingerprint in the first line. For the server pop3.mail.ru it will be
SHA1 Fingerprint = E0: 10: 11: B5: E6: C9: 1B: 7B: 90: 88: F8: A6: AE: 6E: 21: 97: 69: 30: 7A: 04
Actually this was the most difficult task in the development of the device. It was necessary to get to all these nuances, but when it came out, I was very happy!
For other mail servers, everything is exactly the same. You must specify the server name and port for the corresponding POP3 or IMAP protocol. I have never had to work with secure connections, so, again, maybe there is a simpler way.
All the initial data is received, now we are quickly writing a program for ESP8266 and, we are surprised that everything works! The program extracts from the e-mail address the name of the server and substitutes the certificate imprint corresponding to the server in the SSL function.
Thus, we get the opportunity to work with mailboxes on many servers.
I will separately provide the procedure for accessing the mail server with the establishment of a TLS connection.
Hardware Description
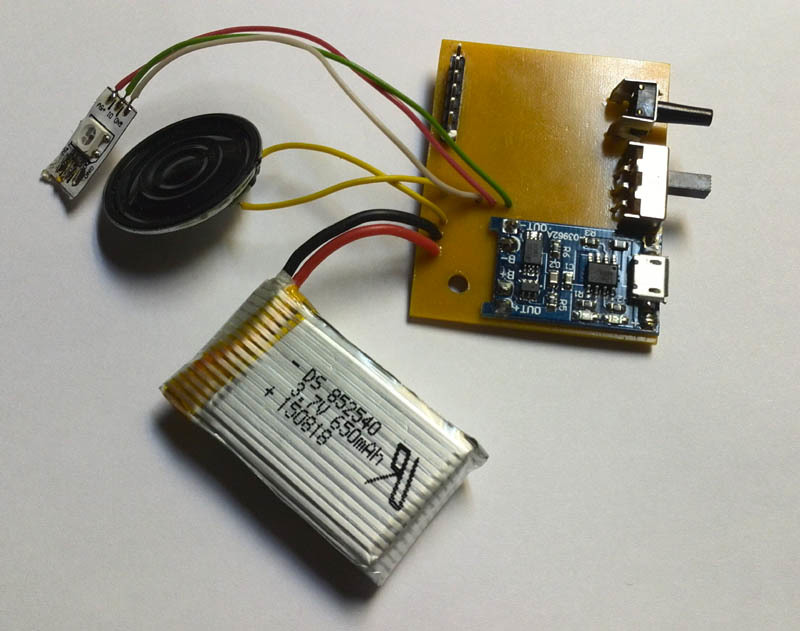
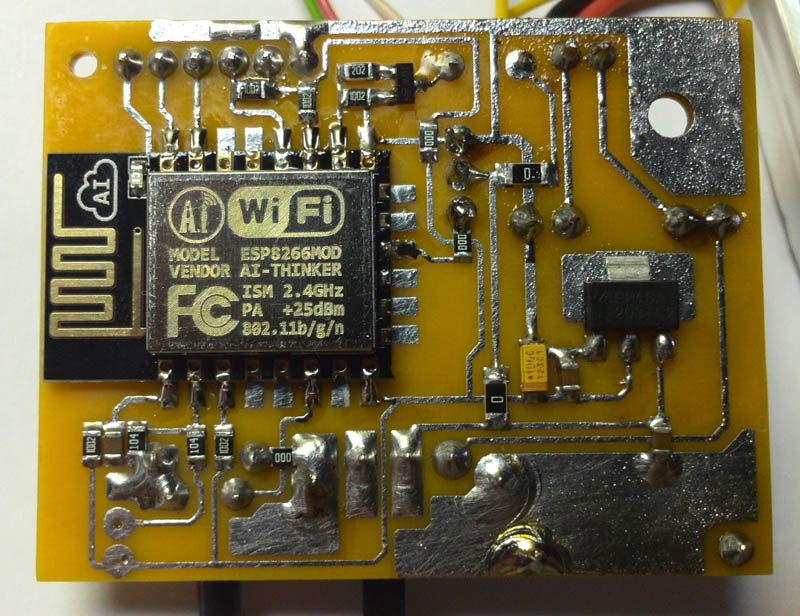
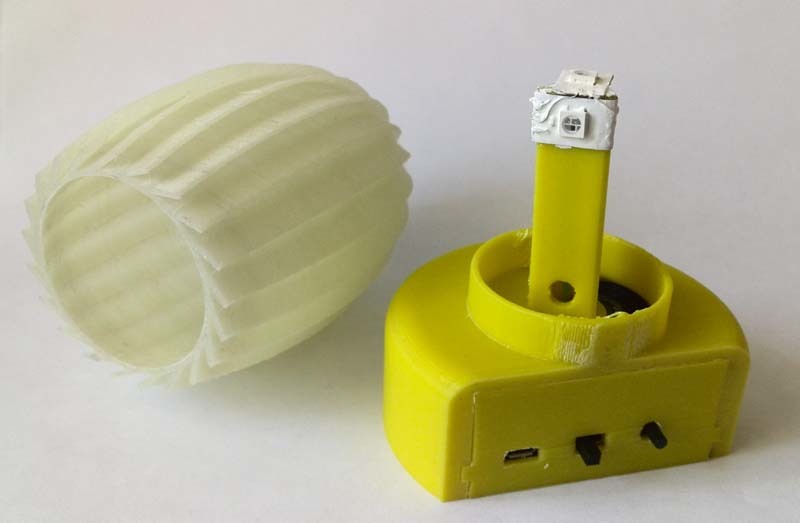
The concept is simple. Applied module ESP-12, "smart" LEDs WS2812b.
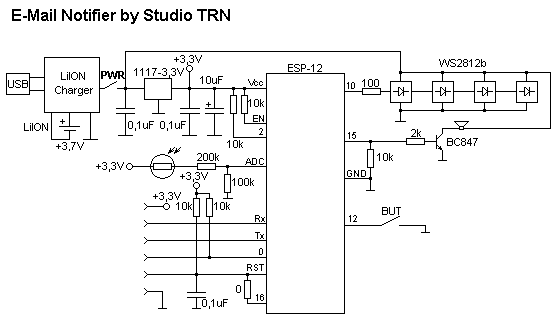
The device is powered by USB, as well as from the built-in battery of 650 mA * h, which is enough for 2 hours of work in the information mode - “You have a letter!”. Battery charger for TP4056 microcircuit.
A separate connector for in-circuit programming ESP-12.
Description of the software
The program was developed in the Arduino 1.6.4 environment with the SDK installed for the ESP8266. The main functions were taken from examples. The ESP8266 module is configured for a mixed mode of operation: access point and client. When you first turn on, you need to configure the Wi-Fi connection settings (login, password), mailbox, and password to the mailbox. To do this, you need to connect via Wi-Fi connection to the access point "MailNotifier" password: qwertyqwerty. A page will open on which you need to enter data and restart the module. Data is recorded in the nonvolatile memory of the module. When the power is turned on, the settings are read and the process of establishing the connection between our informant and the Internet access point begins. The process is accompanied by a flashing blue LED. If the connection is successful, the LED turns yellow and goes out. From this point on, the informant periodically polls the mail server and, in the event of a new letter, inform the light and sound signal. If the attempt to establish a connection with the access point failed, then the LED starts blinking in red.
Enhancements
An NTP server has been added to the program from the examples, using it you can get the system time. There were thoughts to add alarm clocks, but changed his mind, because no need.
It is also possible to connect to the device via UDP and transmit a stream of data for the individual switching on of each LED. For example, through the corresponding plugin from Winamp to visualize music. And much more.
Also involved a photoresistor to control the light, so that, for example, do not turn on the audio alarm at night. But in this version this function is not used programmatically.
No problem, you can add an indicator to display on it the headers of letters or anything else. But this is all for the future.
Finally a video showing the work of the informant.
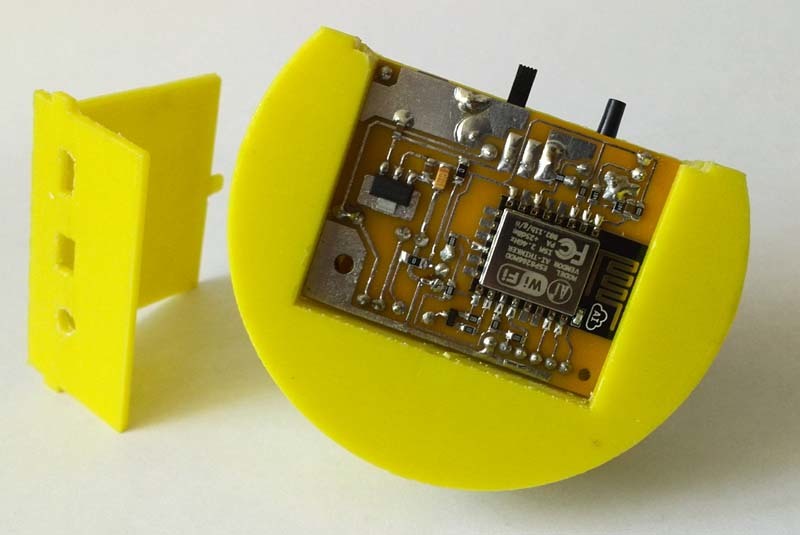
The case was helped by the development and printing of friends from the 3D-LIFE team, for which many thanks to them! Now the device has acquired a finished look.
Thanks to the author of the integration of the Arduino IDE and ESP8266 for their tremendous work!
Project archive with schematic, printed circuit board in SL4 and source
Details below.
The device periodically establishes a TLS connection with the mail server and requests the number of letters. At the first appeal, the number of letters is stored in memory. Further, with an increase in the number of letters in the box, a decision is made about the arrival of a new letter, the light and sound alarm is activated. The event is acknowledged by pressing a button or by deleting a letter from the mailbox. Audible alarm lasts about 15 seconds, and light before acknowledging the event by the user. The device is made in the form of a lamp and works, including as an ordinary lamp. When you press a button, the light is switched on smoothly. When you press and hold the button, the glow spectrum changes smoothly. A short press on the button when the light is on leads to a fade-out of the glow. You can also set the color of the glow through a UDP connection from a smartphone or computer with the appropriate software.
Configuring the Wi-Fi connection, login and password to the mailbox, etc., is done through the device web page. Multiple mail servers are supported.
Currently, well-known mail servers work over secure connections. Before you can work with the server using the POP3 protocol commands, you must be authorized. This is where we need the TLS protocol. The most difficult thing for me was to establish a TLS connection with the mail server. Together with the Arduino IDE there was an example of accessing a web page via an SSL connection. Checked - works! Now I just need to understand what a “fingerprint” is, which is present in the code of the SSL example. For web pages, everything is clear, because In the properties of the connection in the browser, this footprint is present. But I need to create a connection with the sweat server. Began to explore the question. Found a cool OpenSSL tool. A set of programs allows you to do a lot of interesting things. This is essentially a Telnet with an SSL connection. I tried to log into the mail server and, lo and behold, a TLS connection was established with the mail server! Then I could work with the usual POP3 and IMAP protocol commands. It remains to extract from the certificate the fingerprint I need. This is done through the command:
openssl s_client -connect pop3.mail.ru:995 After that, a secure connection is established and the mail server prompt is visible below. Further we work also as in Telnet. USER, PASS, STAT. You can also use the IMAP protocol. Who is more like it. It is only necessary to change the address and port of the mail server.
Now you need to get a certificate and extract from it the fingerprint that we need for the SSL library.
Maybe there is a simpler way, I did not understand in detail with the keys of the OpenSSL kit, so I will tell you how I did it myself. So, we execute the line:
openssl s_client -connect pop3.mail.ru:995 >crt After that, exit the program and the necessary certificate will be stored in the crt file in the current directory. Something like that
Certificate example
----- BEGIN CERTIFICATE -----
MIIE5jCCA86gAwIBAgIQEuH8d4WVsue + Ohe / WiSqgDANBgkqhkiG9w0BAQUFADBE
MQswCQYDVQQGEwJVUzEWMBQGA1UEChMNR2VvVHJ1c3QgSW5jLjEdMBsGA1UEAxMU
R2VvVHJ1c3QgU1NMIENBIC0gRzIwHhcNMTUwODI3MDAwMDAwWhcNMTYwODI2MjM1
OTU5WjByMQswCQYDVQQGEwJSVTEbMBkGA1UECBQSUlVTU0lBTiBGRURFUkFUSU9O
w / s63J8N2ihPDA ==
----- END CERTIFICATE -----
Copy everything between --BEGIN CERTIFICATE-- and --END CERTIFICATE--, including these labels themselves, into a separate file. Let's call it mail.key. And now we will get the long-awaited imprint with the command:
openssl x509 -in mail.key -fingerprint -sha1 -noout -text >keyprint Now the keyprint will contain our fingerprint in the first line. For the server pop3.mail.ru it will be
SHA1 Fingerprint = E0: 10: 11: B5: E6: C9: 1B: 7B: 90: 88: F8: A6: AE: 6E: 21: 97: 69: 30: 7A: 04
Actually this was the most difficult task in the development of the device. It was necessary to get to all these nuances, but when it came out, I was very happy!
For other mail servers, everything is exactly the same. You must specify the server name and port for the corresponding POP3 or IMAP protocol. I have never had to work with secure connections, so, again, maybe there is a simpler way.
All the initial data is received, now we are quickly writing a program for ESP8266 and, we are surprised that everything works! The program extracts from the e-mail address the name of the server and substitutes the certificate imprint corresponding to the server in the SSL function.
Thus, we get the opportunity to work with mailboxes on many servers.
I will separately provide the procedure for accessing the mail server with the establishment of a TLS connection.
Treatment procedure
const char * ssid = "yourSSID";
const char * password = "yourPassword";
const char * host = "pop3.mail.ru";
const char * mailuser = "mymail mail. ru";
const char * mailpass = "mypassword";
const int httpsPort = 995;
const char * fingerprint = "E0 10 11 B5 E6 C9 1B 7B 90 88 F8 A6 AE 6E 21 97 69 30 7A 04"; // Certificate SHA1 thumbnail pop3.mail.ru:995
// Procedure for requesting new emails in the mail .ru box
void CheckMail (void)
{
String line;
')
if (! client.connect (host, httpsPort))
{
Serial.println ("MAIL # ERR");
client.flush ();
return;
}
if (! client.verify (fingerprint, host)) // Certificate Error
{
Serial.println ("MAIL # Error certificate");
client.flush ();
return;
}
line = client.readStringUntil ('\ n');
client.print (String ("USER") + mailuser + String ("\ r \ n"));
line = client.readStringUntil ('\ n');
client.print (String (“PASS„) + mailpass + String (“\ r \ n”));
line = client.readStringUntil ('\ n');
if (line == String ("+ OK Welcome! \ r"))
{
client.print (String ("STAT \ r \ n"));
line = client.readString ();
Serial.println (line);
client.print (String ("QUIT \ r \ n"));
line = client.readStringUntil ('\ n');
}
else {Serial.println ("MAIL # ERA"); }
client.flush ();
client.stop ();
}
// **** The procedure for requesting the availability of new letters in the mail .ru box
Hardware Description
The concept is simple. Applied module ESP-12, "smart" LEDs WS2812b.
The device is powered by USB, as well as from the built-in battery of 650 mA * h, which is enough for 2 hours of work in the information mode - “You have a letter!”. Battery charger for TP4056 microcircuit.
A separate connector for in-circuit programming ESP-12.
Description of the software
The program was developed in the Arduino 1.6.4 environment with the SDK installed for the ESP8266. The main functions were taken from examples. The ESP8266 module is configured for a mixed mode of operation: access point and client. When you first turn on, you need to configure the Wi-Fi connection settings (login, password), mailbox, and password to the mailbox. To do this, you need to connect via Wi-Fi connection to the access point "MailNotifier" password: qwertyqwerty. A page will open on which you need to enter data and restart the module. Data is recorded in the nonvolatile memory of the module. When the power is turned on, the settings are read and the process of establishing the connection between our informant and the Internet access point begins. The process is accompanied by a flashing blue LED. If the connection is successful, the LED turns yellow and goes out. From this point on, the informant periodically polls the mail server and, in the event of a new letter, inform the light and sound signal. If the attempt to establish a connection with the access point failed, then the LED starts blinking in red.
Enhancements
An NTP server has been added to the program from the examples, using it you can get the system time. There were thoughts to add alarm clocks, but changed his mind, because no need.
It is also possible to connect to the device via UDP and transmit a stream of data for the individual switching on of each LED. For example, through the corresponding plugin from Winamp to visualize music. And much more.
Also involved a photoresistor to control the light, so that, for example, do not turn on the audio alarm at night. But in this version this function is not used programmatically.
No problem, you can add an indicator to display on it the headers of letters or anything else. But this is all for the future.
Finally a video showing the work of the informant.
The case was helped by the development and printing of friends from the 3D-LIFE team, for which many thanks to them! Now the device has acquired a finished look.
Thanks to the author of the integration of the Arduino IDE and ESP8266 for their tremendous work!
Project archive with schematic, printed circuit board in SL4 and source
Source: https://habr.com/ru/post/392885/
All Articles