How to embrace the immensity: the assembly system. NET Micro Framework Part 1

Most developers have long been accustomed to using this or that IDE and do not think about how their source code turns into an executable module. Modern development tools include UI and build automation for a huge number of project types for all occasions. And this is very cool, as it allows not to think about things that are not directly related to the problem being solved. But sometimes the task is so complicated that it is no longer possible to use standard types of projects. And then the "Project Build System" appears.
A striking example of this type of project is the .NET Micro Framework , an implementation of the Microsoft .NET microcontroller platform. This article will provide an overview of its build system and features of its implementation.
Formulation of the problem
Before we talk about how the project is organized and how it is assembled, you need to understand what goals the project has and what requirements follow from it.
The idea of .Net Micro Framewok is to develop .Net applications for the smallest devices controlled by microcontrollers. Such devices have several hundred kilobytes of Flash and several tens of kilobytes of RAM. Due to limited resources, they cannot use full-fledged operating systems, including IoT editions.
Usually development for such devices is carried out on C \ C ++ with inserts in assembler and is closely connected with a specific microcontroller. All management of "iron" occurs through writing and reading a set of registers. In this case, compilers and linkers from the specialized toolchain platform set are used .
Previously, many architectures were represented on the market.
microcontrollers . Each manufacturer had several families of devices and any of them could have their own register scheme. In addition, there were many different toolchain. Therefore, the choice of a microcontroller was an extremely important milestone of the project, since then it was very difficult to switch to another device.
Now the world of microcontrollers is ruled by ARM . Many manufacturers abandoned their own cores and switched to this architecture. This greatly unified the development and facilitated the migration from one device to another. In addition, CMSIS is developing at a tremendous pace - a vendor -independent set of standard software interfaces for working with ARM microcontrollers. Each organization supplies the CMSIS implementation for its devices, which allows, theoretically, to abstract from the implementation features of one or another microcontroller.
But nevertheless, there are still quite a number of devices on the market, both with an architecture different from ARM and with no implementation of CMSIS.
.Net Micro Framework is an attempt to raise the development for microcontrollers to a higher level of abstraction. If CMSIS unifies devices with ARM architecture, then .NetMF tries to unify work with microcontrollers in principle. And at the same time allows you to use the power of managed code and the convenience of Visual Studio when developing for embedded systems. At the same time, no one limits the use of .NetMF to microcontrollers only. For example, there is its implementation for Windows, which is used in the emulator .
Thus, the main requirement for .NetMF is the ability to run on any microcontroller that has enough memory (the documentation lists the minimum requirements for 256KB RAM and 512K Flash / ROM). Based on this, compilation must be performed by different toolchain, depending on the device selected. The system architecture must take into account that work at a low level, with hardware, can be carried out either by means of one of the CMSIS implementations, or by any other library or operating system (as in the case of an emulator for Windows).
Other requirements associated with the implementation of .Net, security systems, debugging, etc., I will not consider, since they do not affect the project build system.
Solution Architecture
So, the system has three basic requirements:
- Ability to run on any microcontroller with the necessary memory.
- Ability to use different toolchain.
- The ability to use both the operating system API, and a wide range of libraries to work with hardware.
Moreover, paragraphs 2 and 3 are a consequence of the first paragraph.
The .Net Micro Framework has the following architecture:

The system is divided into several layers:
The top two layers (user applications and system libraries) are written in manageable code. This is what we see in Visual Studio. The hardware layer is the hardware itself, on which .NetMF is running. The TinyCLR layer is the code execution environment.
TinyCLR is divided into 3 parts:
- CLR - everything that concerns the execution of managed code, typing, garbage collection, etc.
- PAL (Platform Abstraction Layer) - classes and functions for working with common abstractions, such as counters, timers, input-output. These classes are the same for all hardware platforms.
- HAL (Hardware Abstraction Layer) - classes and functions of the day working directly with the "iron".
The division into PAL and HAL fulfills requirement number three (the ability to use both the operating system API and a wide range of libraries for working with hardware).
HAL Abstraction is a set of interfaces that PAL works with and higher levels. This allows you to make many implementations for different platforms and use any libraries or APIs.
Thus, developers divide the code into the following layers:
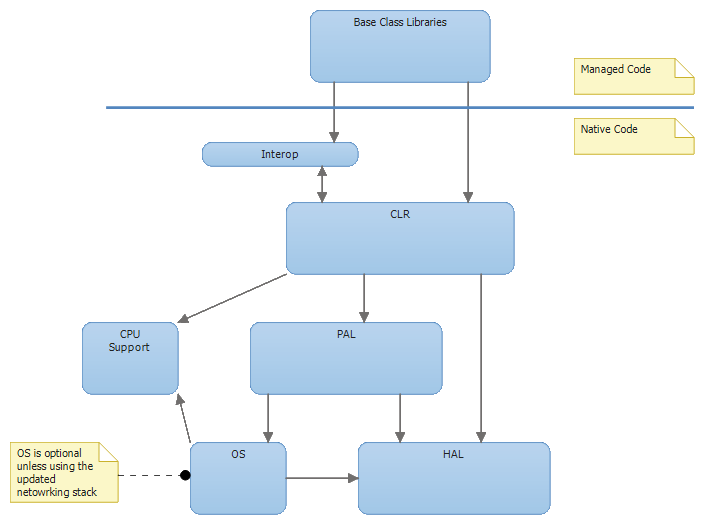
The part designated in the diagram as Native Code is written in C / C ++. Managed Code is written in C #. Accordingly, different parts of the repository are compiled by different compilers.
To implement the ability to compile different toolchain and at the same time preserve the integrity of the project, you need a powerful build system that allows you to customize the entire process. The build system of the first versions of .NetMF was based on MAKEFILE . Then there was a transition to MSBuild . And at that time, the build of Visual C ++ projects in Visual Studio did not use MSBuild (and most of NetMF was written in C \ C ++), so I had to do a “non-standard” project. The result is a copy of the build system based on MAKEFILE converted to MSBuild format.
As a result, this made it possible to fulfill all the requirements related to the multiplatform .NetMF.
Features of the implementation
Recently an article about the .NetMF build system was published. The author describes the problems faced by the project.
There are several scenarios:
- Build the components needed to build the rest of the repository. Namely, any extensions that are required for the assembly, but are not included in the standard set of MSBuild.
- Build and configure utilities required for building the project. This item is important to distinguish from the previous one. If in the first paragraph extensions of the assembly system were assembled, in the second, additional utilities are collected. For example, digital signature software.
- Build an SDK that developers will use when creating an application for .NetMF in Visual Studio. These include VSIX Palagin and the necessary libraries included in the project.
- The assembly of "ports" for hardware is TinyCLR for a specific board.
Before examining each scenario, you need to remind once again that the .Net Micro Framework is “architecturally neutral” and includes both big-endian and little-endian systems. Therefore, many different toolchains can be used for assembly. To do this, use the complex script for MSBuild. Moreover, when creating this script, the developers proceeded from a very interesting interpretation of requirement number two: the ability to use different toolchains. For them, it was important, firstly, to be able to add new toolchain, without "breaking" the existing solution. And, secondly, to give the user a choice of toolchain. For example, now compilation can be done using GCC ARM , as well as using MDK .
Assembly of components for assembly
At this stage, extensions are used from the source code that are used by MSBuild to build the rest of the repository. The reasons why this scenario is separated from the rest are in particular the implementation of MSBuild. The fact is that before starting the build process, MSBuild immediately loads all the necessary components. This means that they should already exist by this point. In addition, MSBuild has a caching system, due to which the assembled components may be inaccessible if you try to assemble the rest of the repository immediately after assembling the preliminary components.
Therefore, you must first build the extensions, then completely unload MSBuild and only then build the rest of the repository.
Build and configure utilities
A lot of utilities are involved in the .NetMF build process. Some of them are involved in signing modules, others in compression, others in format conversion, etc. These utilities are mainly Windows console applications. They participate in the assembly of "ports" for devices, and in the assembly of the SDK. Therefore, they must be collected in advance. In MSBuild, they are used with the help of wrappers.
Build SDK
The process of creating an infrastructure for developing an application for .NetMF involves many steps:
- Assembly of preliminary parts. This stage includes 1 and 2 points of the previous list.
- Compile source code into a DLL.
- Conversion of DLL to PE files containing debug information for both big-endian and little-endian systems.
- Building components for integration with Visual Studio.
- Signing all components before packaging.
- Build VSIX packages for supported versions of Visual Studio.
- Signing VSIX packages.
- Build SDK MSI packages.
- Signing SDK MSI packages.
It is worth noting that the packages need to write several times at different stages. And here the problem described above also manifests itself (pre-assembly). The SDK includes the asseblies required for building the SDK. This is solved by the implementation of the first paragraph.
Build "ports"
Firmware for a specific device also appears as a result of a large number of steps:
- Compiling native code into .obj files.
- Compile native code in .lib files.
- Link native .obj and .lib files to a binary file.
- Link / Locate on a binary file to get a flash XIP image.
- Signing binary images to support secure downloads.
- Creating a custom compressed and signed package that can be used by the MFUpdate program.
- Generate a configuration section image for a Flash device.
- Compiling managed code into managed assemblies.
- Generation of necessary components for interaction between native and managed code.
- Generation of PE files that are executed in .NetMF and corresponding debug information files for big-endian and little-endian systems.
- Generate DAT files from managed assemblies that will be loaded into the flash device.
All this is done using scripts for MSBuild.
Dependency resolution
This point follows from the requirement to use a wide range of libraries for working with hardware.
Any project somehow encounters dependencies between its component parts. These can be either links between files, or links between software modules, such as .exe and .dll. In general, there are two types of dependencies that need to be resolved:
- Hard dependencies .
This type appears when one part of the program is clearly dependent on the other. For example, application A uses the xyz library. Such dependencies can easily be resolved automatically. In this case, the build system understands that you first need to build the xyz library, and then Appendix A. In more modern build systems, xyz and A can be built in parallel in different threads, but linking will still occur after all the components have been assembled. - Soft dependencies .
This type occurs when one part of a program references an interface or API that can have many equivalent implementations. In this case, the build system cannot automatically determine which implementation to use. An exception is the case when there is only one implementation: the build system will be able to determine what to use. If there are several implementations, then it needs to explicitly indicate in one way or another what needs to be taken.
NetMF has both hard and soft dependencies. And if hard dependencies are resolved automatically, then the problem of soft dependencies is one of the most difficult. Now it is solved by specifying certain values in environment variables and specifying references to implementations in MSBuild scripts. This is not the best solution, although it works. Scripts are so complex and full of links to each other that it is very difficult to understand exactly where to change the links.
Conclusion
Summarizing, we can say that .NetMF because of its "architectural neutrality" has a very complex structure. The consequence of this is a very difficult project assembly system. We reviewed the main tasks, their general solutions and some features of the .NetMF build system. In the next article I will discuss the details of the implementation of this system using scripts for MSBuild.
')
Source: https://habr.com/ru/post/392721/
All Articles