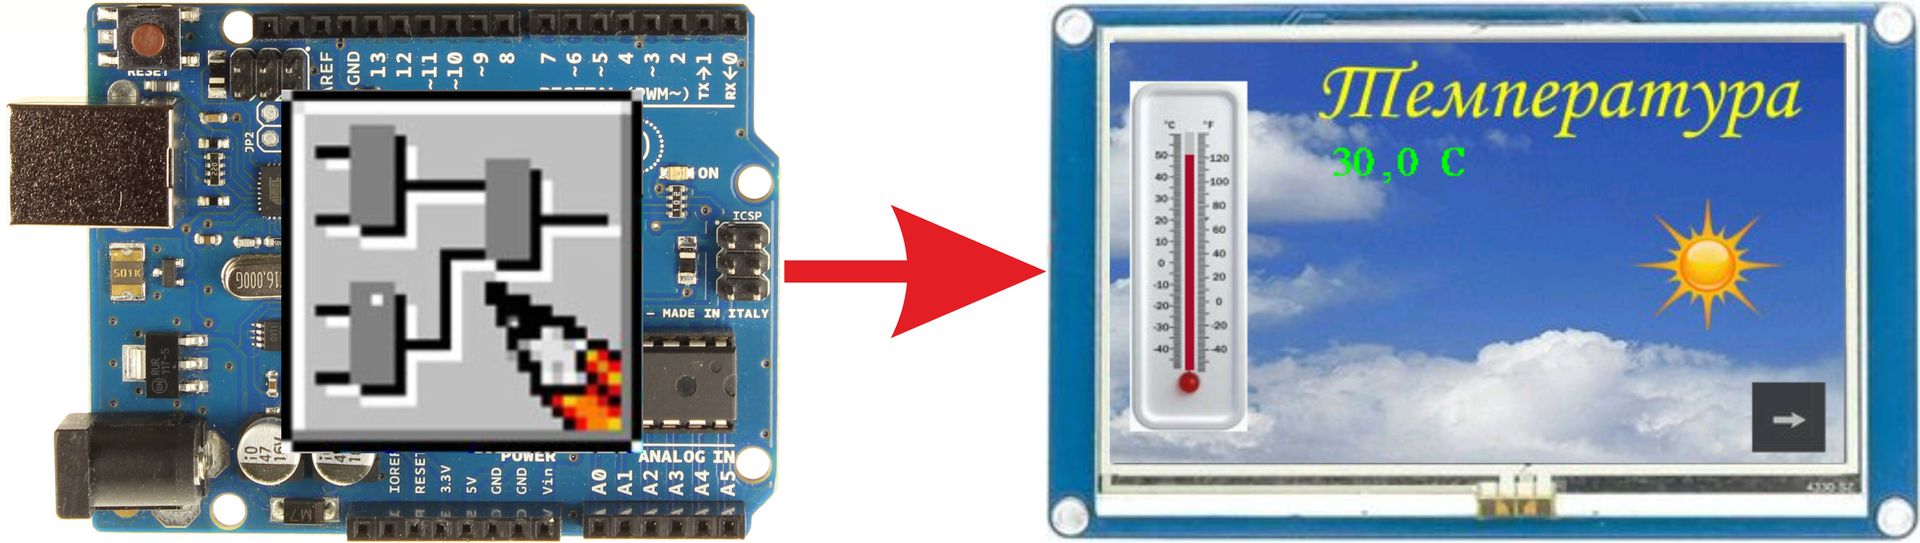
FLProg + Nextion HMI. Lesson 2
In the last lesson, I talked about the Nextion HMI panel and about creating projects for this panel in the Nextion Editor.
In this tutorial, I’ll tell you how to use FLProg from an Arduino board to control this panel. For example, let's collect the simplest weather station that will read data from the temperature and humidity sensor DHT-22 and display them on the panel. It will also draw a graph of changes in these parameters. The brightness of the backlight of the panel screen will vary with a variable resistor.
The scheme of the test stand.

First you need to upload the project to the panel (the project file in the archive link to which at the end of the article is Lesson2.hmi).
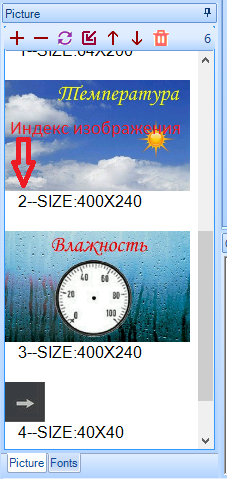
This project consists of three screens.
The first screen is used to display the temperature (page “page0” index - 0).
')

It consists of the following elements:
1 - A picture with the image of an alcohol thermometer.
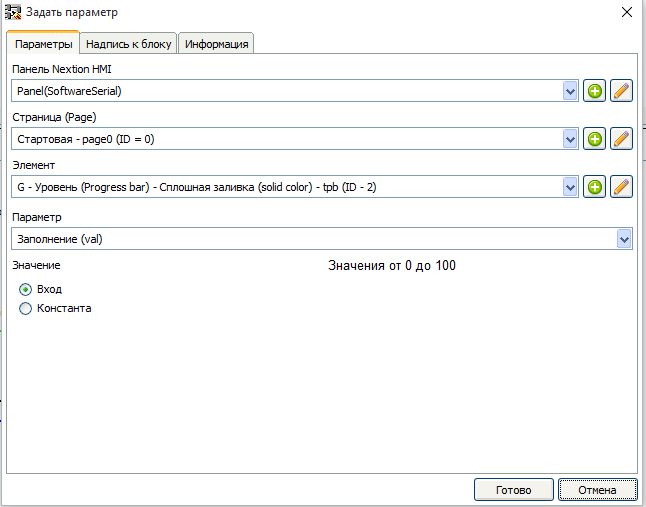
2 - The “Progress bar” element. It simulates the operation of the thermometer.
Item settings.

I recommend those elements with which it is planned to always make global (the “vccope” attribute the value “global”) through UART and, accordingly, give them unique names (the “objname” attribute) within the entire project. This speeds up the operation of the Arduino controller, and reduces the code for it. I will explain why.
When you try to write an attribute of a local element, you must first request the current page from the panel (this is a separate request that takes at least 20 ms.). If the page is the one to which the element belongs, then the value is sent to the panel, if not the one, then the value to be sent is written to the variable (for which the same space is needed in memory). When you go to the page with the element, you need to immediately update its attributes with the latest actual values, because when drawing a page, the local variables are initialized with the values specified when the project was created. And if there are a lot of elements managed from the controller on the village, then when switching to it, this controller will be busy for a long time to update all the elements.
For a global element, everything is much simpler. You can record attribute values for it at any time, and the last values are used when drawing the page. This means that there is no need to request the page number before sending and the need for a variable to store the value.
But of course it all depends on the project. If the project for the panel is very large, and there is not enough space for global elements, then you can, as it were, take the memory from the controller and make them local.
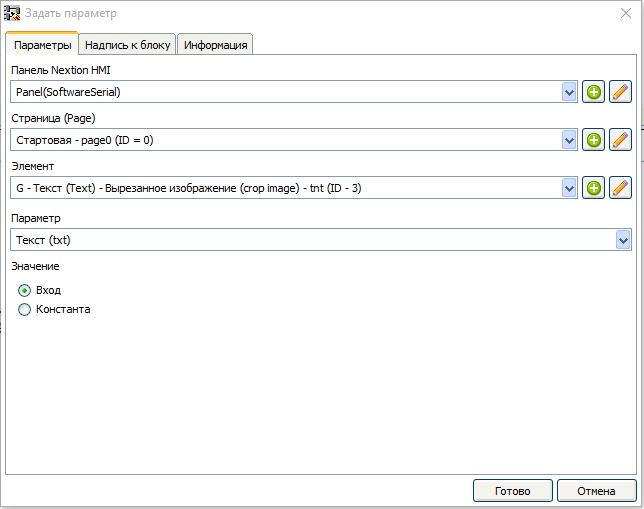
3. Text field for displaying temperature.
Item Parameters

The cut image was selected as the background (the “sta” attribute is the “crop image” value). And as the image that is used for cutting, the same is used as for the background of the entire page (the “picc” attribute is an image index from the image library). Thanks to this tex is obtained as if with a transparent background.
As I wrote in the last lesson, the panel does not know how to work with fractional and negative numbers, and for temperature, both are possible. Therefore, to display the temperature value, a text field is used, into which the finished line will immediately be sent from the controller.
4. Cut image.
Item Parameters

With the help of this element will be shown the sun when the temperature exceeds a predetermined limit. In general, it was possible to use a regular image, and change its appearance, but since the example is a teacher, I decided to use this element. I myself have long understood the ideology of this element, I will try to show how it works. For his work, I made two pictures, one with the sun, the other without the sun.


The element displays a plot of an image attached to it (the “picc” attribute is the index of the image in the image library). The top left corner of this area is in the coordinates of the element insertion (attributes “x” and “y”) and has the width and height of the element (attributes “w” and “h”). During the operation of the controller program, if necessary, the binding of the element to the picture will change.
5. Button.
Item Parameters
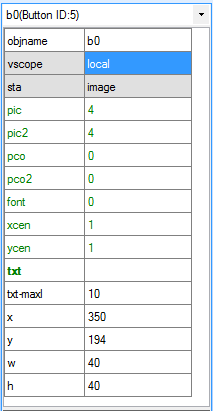
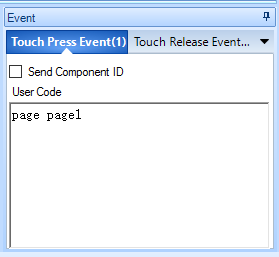
Clicking on the button takes you to the next page. I used a picture as a background for the button. For both states, I used the same picture (the attributes “pic” and “pic2” - indexes of pictures in the image library) since the pressed state will never be visible, pressing the button immediately goes to the next page. Since we will not change anything in this button, we left it local and the default name.
The code in the event “Touch Press Event”.
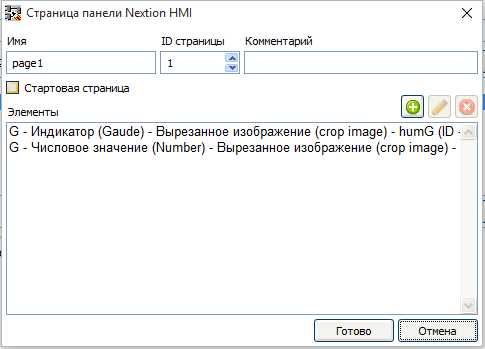
The second screen is used to display humidity (page “page1” index - 1).

For the background of the page I used a picture with a prepared image of the hygrometer scale.

Consider the elements included in the page.
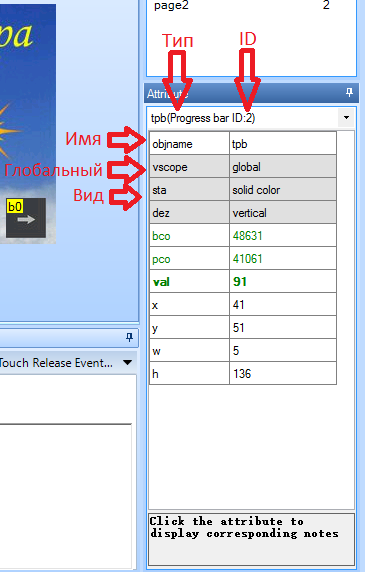
1. The element “Gaude”, which will simulate the work of the hygrometer.
Item Parameters
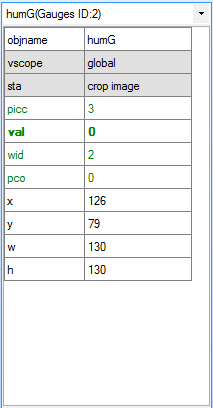
Since we will manage it from the controller, it is made global. The cut image was selected as the background (the “sta” attribute) and the background image of the page (the “picc” attribute) was selected as it.
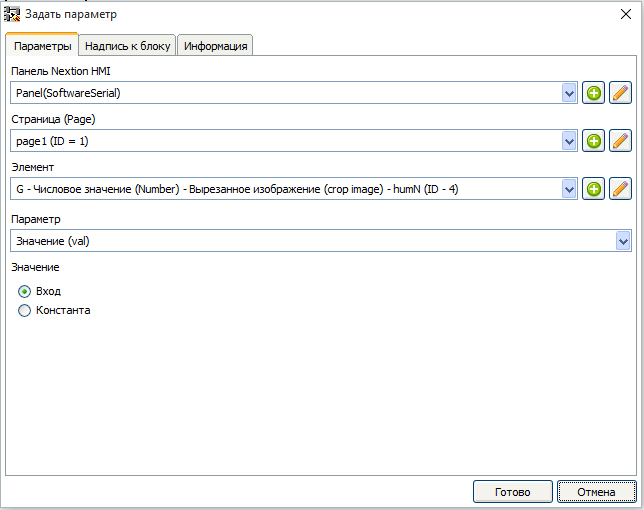
2. Numerical field.
Item Parameters

This field will display the humidity value. Since the panel does not support working with fractional numbers, we will output the value of humidity without the fractional part. The cut image was selected as the background (the “sta” attribute is the “crop image” value). And as the image that is used for cutting, the same is used as for the background of the entire page (the “picc” attribute is an image index from the image library). For the beauty of the display, I adjusted the alignment to the right (the “xcen” attribute value is 2), and next to it I put a text field (3) with the value “%”. The background settings for it are the same as the numeric field settings.
Parameters of the text box (3).

4 and 5. Buttons the previous page and the next page. Pressing button 4 takes you to the first page, and pressing button 5 takes you to the next. Button display settings are similar to the button on the first page.
Button 4 Settings (“Previous Page”)

The code in the event is “Touch Press Event” for button 4 (“Previous page”).

Button 5 Settings (“Next Page”)

The code in the event “Touch Press Event” for button 5 (“Next page”).
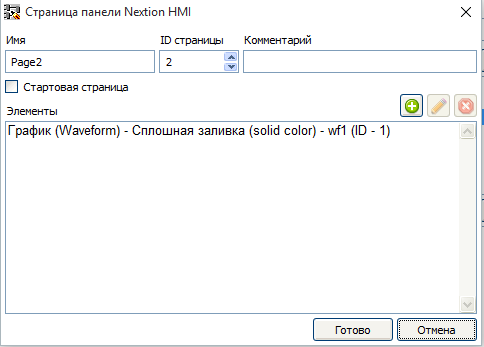
The third page is a graph of changes in temperature and humidity (“page2” index - 2).

This page will display a graph of changes in temperature and humidity. Consider the elements included in the page.
1. Waveform element.
Item Parameters
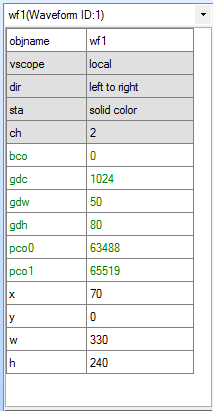
In the last lesson, I already wrote that this element does not know how (I hope so far) becomes global, that is, the attribute value can be switched, but this will not lead to anything. So I left it local (who knows, what if he still eats the memory of global variables). In this element there will be two display channels (the “ch” attribute value is 2).
2 and 3 are simply text fields showing the axes of the graphs.
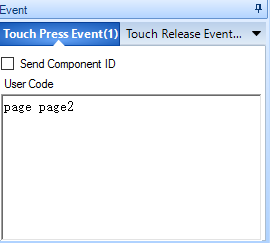
4 –Button back. Similar to the same button on the previous screen, except for the code in the event handler.
The code in the event is “Touch Press Event” for button 4 (“Previous page”).

With the panel sorted out, now let's do the controller. I will not tell you how to open a FLProg program, create a project, and draw a scheme. I told all this in previous lessons ( lesson 1 , lesson 2 ), and besides there is a lot of information about this in the training center on the project website. Therefore, I will immediately show the finished circuit boards and tell what is happening on them.
Fee 1. Read data from the sensor.
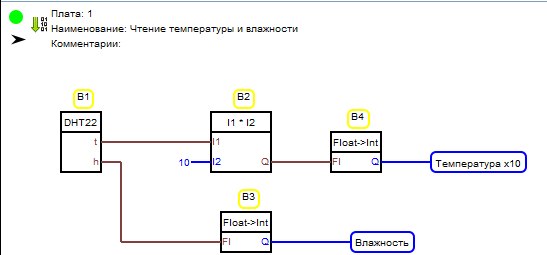
To obtain the values of temperature and humidity with a DHT-22 sensor, use the B1 block - “DHT11, DHT21, DHT22” (Member Library, “Sensors” folder).
Block settings (caused by double clicking on it).
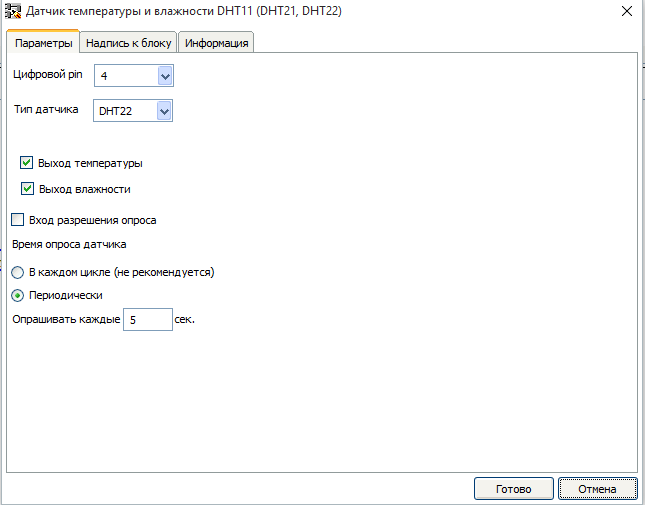
In the settings you can set the pin to which the “Data” output of the sensor is connected, the type of sensor, and the presence of temperature and humidity outputs. Also selects the sensor polling mode. I set up a sensor poll once every 5 seconds.
Since Arduino controllers do not work very well with floating point numbers, and working with them eats up a lot of memory, I immediately translate all values into Integer format. To do this, use the B3 and B4 blocks - “Float to Integer Conversion” (library of elements, “Type Conversion” folder), which cut off the fractional part of the number. In order to lose a few tenths of a degree, the temperature value obtained from the sensor is first multiplied by 10 using the B2 block - “MUL (*)” (library of elements, “Mathematics” folder).
Then the resulting values in the Integer format are entered into the corresponding variables.
Board 2. Display temperature values on the panel.

In this project I use named connections. You can learn more about them in the corresponding lesson .
In order to limit the load on the controller, it makes sense to send data to the panel only when the data has changed. Therefore, we first determine that the data has changed. For this purpose, block B5 is used - “Number change detector” (library of elements, folder - “Base blocks”). This block controls the number at its input “Value” and, when it is changed, forms a pulse at the output of a length of one program execution cycle.
After that we prepare the string to be sent to the panel text field. First, we divide the temperature value multiplied by 10 by a constant of type Float with a value of 10. Thus, we obtain the temperature value with a fractional part. We do this with the help of block 6 - “DIV (/)” (library of elements, “Mathematics” folder). Then turn the resulting value in the Float format into a string using block B7 - “String Conversion” (library of elements, “Type Conversion” folder). Then we connect the resulting string with the string constant “C” using the block B8 - “Addition of Strings” (library of elements, “Strings” folder). The resulting string is fed to the input of the attribute value recording block in the Nextion HMI B9 panel - “Set Parameter” (element library -> “Nextion HMI Panel” folder -> “Elements” folder).
This block writes the value to the specified attribute.
Block parameterization.
Double-clicking on a block opens the block editor window.

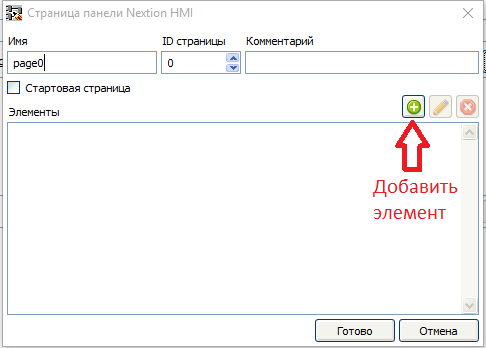
If no project has yet created any panels, then you need to create a panel. If the required panel has already been created, it can be selected from the drop-down list by pressing the button 3. The selected panel can be changed using the Change Panel button (2). To create a panel, click the button “Add panel” (1). The panel creation window will open.

In this dialog, select the port for connecting the panel (in our lesson - SoftwareSerial). In the case of selecting SoftwareSerial, it is also necessary to select pins assigned as UX port RX and TX signals (in our case 2 and 3). It is also necessary to assign a panel name. It must be unique. A project can have several panels connected, as long as there are enough free UART ports. Each panel must be unique within the project. In the same dialog, you can add pages included in the panel. What we do. Click the add page button. The page creation window opens.
In this window, we need to enter the page name and its ID. This information can be found in the project in the Nextin Editor.

By default, the start page (opened when the controller starts) will be a page with an ID equal to 0, but you can check the Start Page checkbox in the properties of any page and it will become the start page.
In this window you can add the elements of interest on this page. Click the button "Add item".
The item creation window opens.

Here we need to select the type and type of the element, enter its name, index, and if the element is global, check the corresponding box. All this data can be spied on in the project in the Nextin Editor.
After filling in all the data, click "Finish", and then in the creation window of the page in the same way add all the elements of interest on this page.

After creating all the elements on the page, we also press the “Finish” button in the creation page and in the creation window of the panel using the same script we create the remaining pages.

We finish the panel creation with the familiar “Done” button.
In the block editor, select the “page0” page “Text” element with the name “tnt” and its “Text (txt)” attribute. As a value, select the input.
The block is configured.
We consider the scheme further.
Experienced it was definitely that the value of -40 degrees of the drawn thermometer corresponds to the value 10 in the element “Progress bar” located on it, and the value 50 degrees on the thermometer - the value 91 progress bar. In accordance with this, we scale the value of the variable “Temperature x10” using block B10 - “Scale” (Library of elements, folder “Scaling”) without forgetting that we have the temperature value multiplied by 10. Parameters of this block.

The scaled temperature value is sent to the panel using block B11 - “Set Parameter” (element library -> Nextion HMI Panel folder -> Elements folder). Settings of this unit.
The next block B12 - “Comparator” (the library of elements, the “Comparison” folder) determines that the current temperature exceeds the setpoint by the default “Setpoint - Hot” variable. It is 290 (do not forget that the temperature is everywhere multiplied by 10).

Block B12 is configured to issue a logical unit at its output if the value at input “I1” exceeds the value at input “I2”.

Blocks B13, B14, and B15 constitute the detection of changes in a discrete signal. Blocks B13 and B14 - Rtrig (library of elements, folder “Triggers”) when the leading edge of a discrete signal appears, output a pulse with a duration of 1 program execution cycle at its output. Block B14 detects the leading edge of the signal “Exceeding the Threshold” by inverting on its input. Block B15 –OR (library of elements, folder “Basic Elements”), in the presence of a logical unit on any input, outputs a logical unit to its output. Thus, the signal "Sending data when the threshold is exceeded." On the leading edge of this signal, a command is sent to change the font color of the text field displaying the current temperature. Sending takes place using block 17– “Set Parameter” (element library -> Nextion HMI Panel folder -> Elements folder). Settings of this unit.
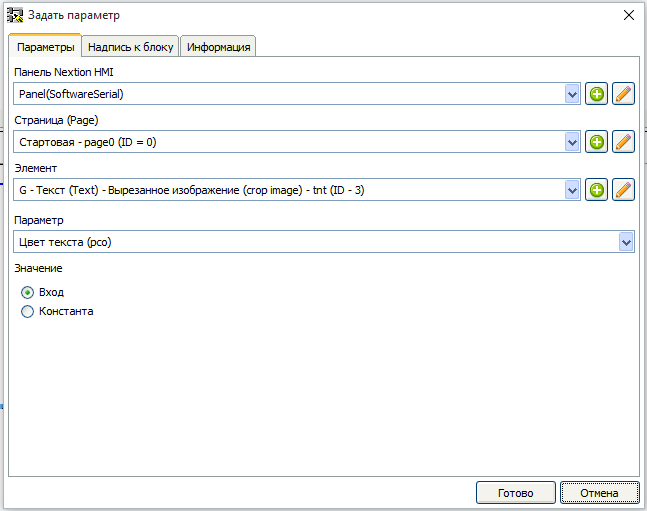
The value transmitted in the command is selected using the block B16 - “Switch” (element library, “Switch” folder). At its input, this block, at a low logic level, transmits to the output a value from input “0” and at high, from input “1”. The value of colors supplied to the switch inputs are set using blocks B44 and B45 - “Hight Color” color constant (element library -> Nextion HMI Panel folder -> Color folder). The color is selected in the block editor (double click on the block).

To select a color, you must click the "Change" button. A color picker window will open.

In it, exposing the values of the components R (red), G (green) and B (blue) selects the desired color.
Also, on the leading edge of the signal “Sending data when the threshold is exceeded,” the command is sent to change the cutoff image binding. This happens with the help of block B19 - “Set Parameter” (library of elements -> folder “Nextion HMI Panel” -> folder “Elements”).
Settings of this unit.
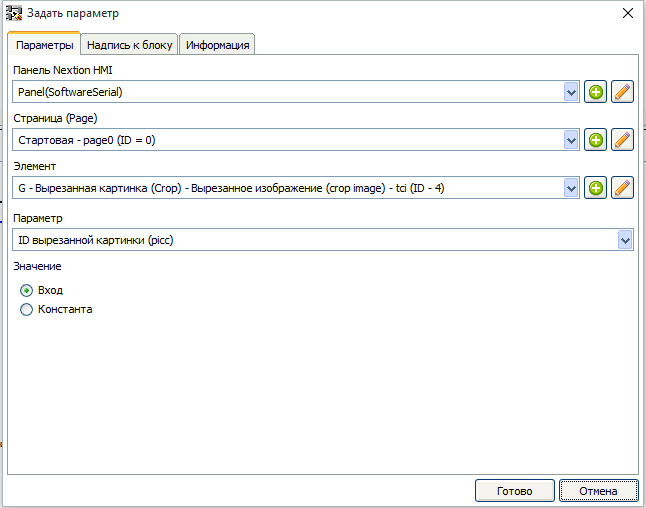
Image index is selected using block B18 - “Switch” (element library, “Switch” folder). His work has been described above. The index value of the desired image can be viewed in the Nextion Editor project in the image library.
With the transfer of temperature data finished. Go to the humidity.
Fee 3. Humidity output.

As in the case of temperature, first of all we create the signal “Sending data when the humidity changes”. We do this with the help of block B20 - “Number change detector” (library of elements, folder - “Base blocks”). The work of this unit was described earlier. On this signal, the value is sent to the numeric field displaying humidity. This is done using block B21– “Set Parameter” (library of elements -> folder “Nextion HMI Panel” -> Elements folder).
Settings of this unit.
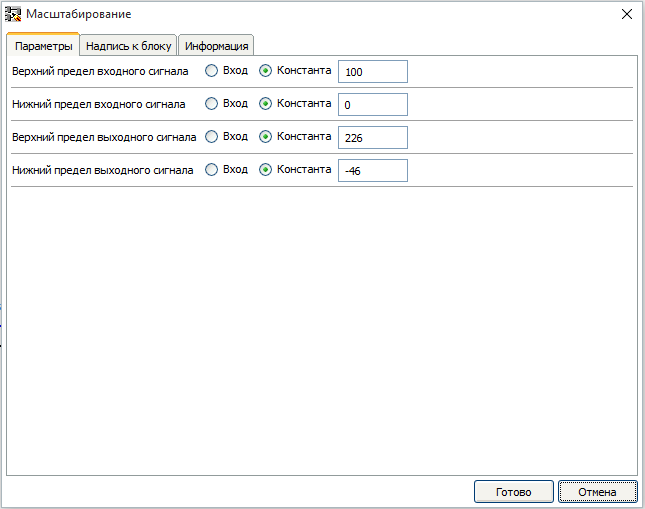
It was empirically determined that for the value of 0% moisture in the drawn hygrometer scale in the panel project, the value of the element “Gayge” drawing the arrow is 314 and for 100% humidity - 226. At the same time, the arrow goes through the value 0. When converted to linear values, we get continuous the range is from -46 (0%) to 226 (100%). In accordance with these data, configure the block B22 - “Scale”.
Block parameters
Since the values for the “Gauge” element cannot be negative, then in order to calculate the arrow deflection angle for such values, in the case of a negative value, the value 360 is added to it. We do this with the help of the block B23- “SUMM (+)” (library of elements, folder "Mathematics"). We determine that the number is less than 0 using block B26 - “Comparator” (library of elements, folder “Comparison”). Its output controls the switch B24 - “Switch” (library of elements, folder “Switch”) and the selected value is sent to the panel using block B25 - “Set parameter” (library of elements -> folder “Panel Nextion HMI” -> Elements folder ).
Settings of this unit.

Next board output graph of temperature and humidity.
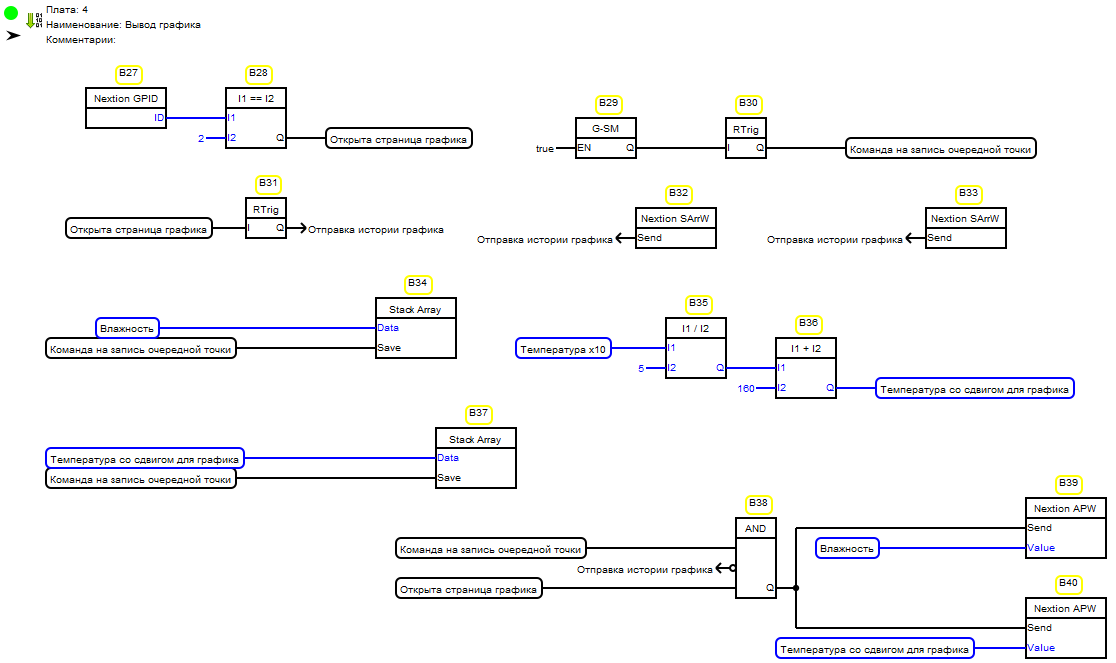
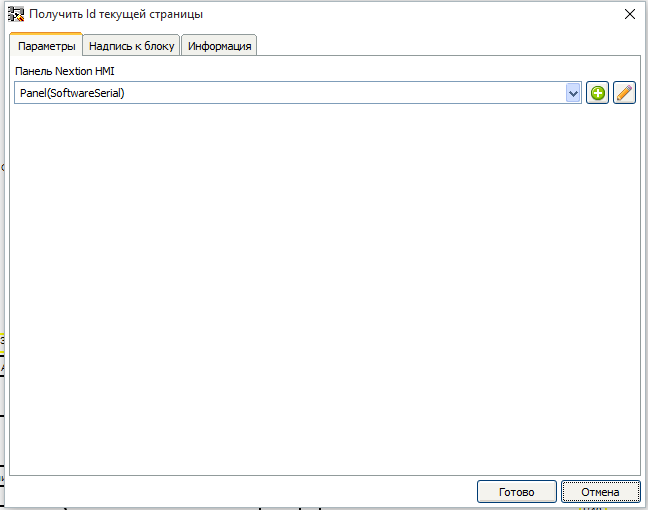
As I wrote at the beginning of the tutorial, the Waveform element does not know how to be a global element and is redrawn empty every time the page on which it is located opens. It is necessary to bypass this restriction. To begin with, we determine the number of the page that is currently loaded on the panel. To do this, use block 27 - “Get the Id of the current page” (element library -> folder “Nextion HMI Panel” -> “Page” folder).In the settings of this block, you only need to select the panel to which we will address with this request.
The page number obtained from this block is compared with the index of the page we need (2) using the B28 block - “Comparator” (library of elements, “Comparison” folder). If the desired page is open, then the logical unit is written to the variable “Opened page of the graph”; if not, then a logical zero.
With the help of block B29 - “Generator” (library of elements, “Timers” folder), a signal is generated to record the next point on the chart. This unit generates pulses with a given pulse duration and pause.
Block settings.
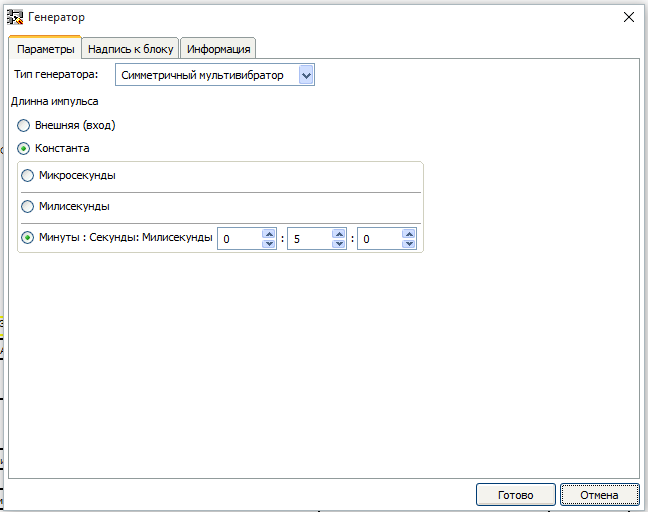
The generator type is “Symmetric multivibrator”, which means that the pulse duration is equal to the pause duration. When setting the pulse duration to 5 seconds, the pause will be the same for 5 seconds. The leading edge of the pulse will come every 10 seconds. This front is highlighted by block B30 - “Rtrig” (library of elements, folder “Triggers”), and is recorded in the variable “Command to record the next point”.
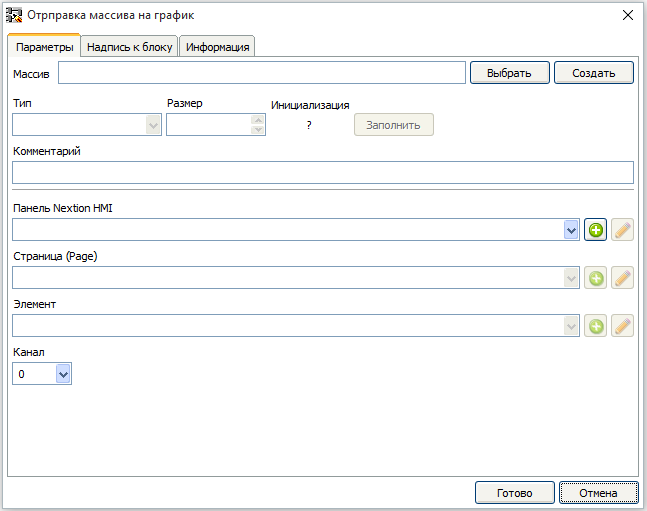
On the leading edge of the “Graph Page” signal that will be highlighted using Block B31 - “Rtrig” (library of elements, “Triggers” folder), the signal “Sending Graph History” will be generated. On this signal, the contents of the arrays in which the values of the points displaying the graph of changes are stored will be sent to the panel on the graph. For temperature, this will be done using block B32 - “Sending an array to a graph” (element library -> folder “Nextion HMI Panel” -> folder “Graph”). The block is configured using the block editor.
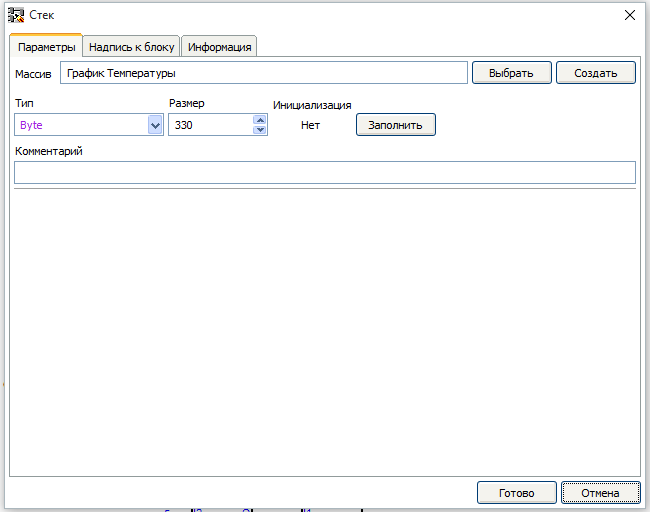
First you need to create an array in which the history of the temperature graph is stored. To do this, click the "Create" button. The array creation window will open.

In this OC, you must enter the array name, type (use Byte, since the Waveform element takes the maximum value of 255). The size is taken equal to the width of the chart (330).
After creation, select the panel, page, item and channel on which the graph will be drawn.
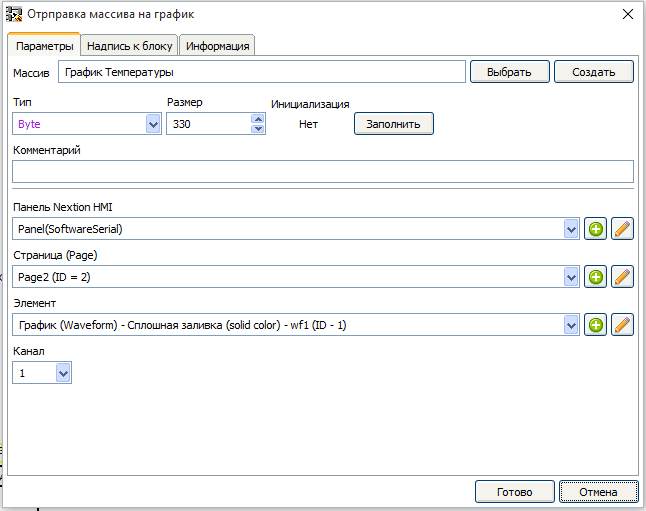
In the same way, we set up a block for sending an array with humidity data to the B33 panel - “Sending an array to the graph” (element library -> Nextion HMI Panel folder -> Graph folder). In its settings we create another array to store this data.

Now you need to prepare the data for the temperature graph. This graph with its axis will have a line at a height of 160 points from the bottom of the graph. In order for the graph to have a better view of the temperature change, we divide the value of the “Temperature x10” variable by 5 (that is, as if multiplying the actual temperature value by 2) using the B35 block and add the offset to it using the B36 block. The result is entered in the variable "Temperature with a shift for the graph."
Using block B37 - “Stack” (element library, folder “arrays”), the pulse from the variable “Command to record the next point” variable is written into the array according to the stack principle (the first element of the array is deleted, the rest are shifted by one, and the value is written to the last). The block is parameterized using the block editor.
In the editor, select the desired array by clicking on the "Select" button.
In the same way, we configure the block B34 - “Stack” (library of elements, folder “arrays”) to write the humidity value into the array, selecting it in the corresponding array.
If the graph page is open, the transfer of arrays to the graph is completed, and the command has come to record the next point, the values of the new points are sent to the corresponding graphs. This is necessary so that during the display of the page the graphics continue to be built. Compliance with these conditions is monitored using the block B38 - “AND” (library of elements, folder “Basic Elements”). This block outputs a unit at its output if at all its inputs there is a logical unit. The next temperature value with a shift is sent to the graph using the B40 block - “Add a point to the graph” (element library -> Nextion HMI Panel folder -> Graph folder).
Block settings.

The unit for sending the next humidity value to the B39 graph is also configured - “Add point to graph” (element library -> Nextion HMI Panel folder -> Graph graph folder).

Finished with the withdrawal of the schedule.
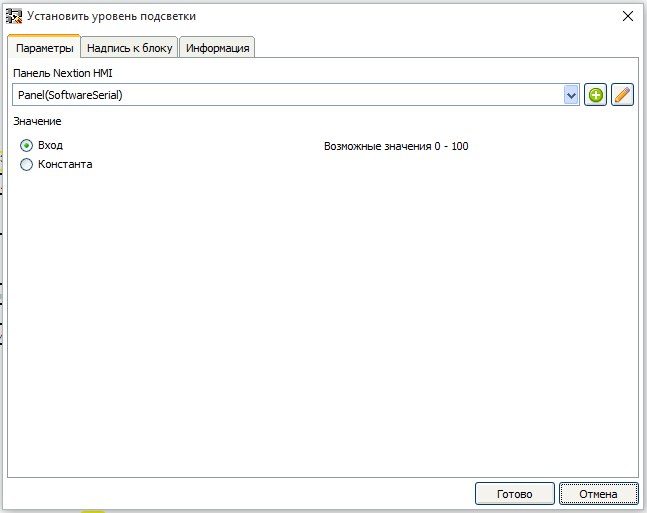
Fee 5. Adjusting the backlight brightness.

The value of the brightness of the backlight set using a variable resistor is read using the “Brightness” analog input block. Since the brightness value of the panel illumination is set in the range of 0 to 100, we scale the read value from the range 0-1023 to the range 0-100 with the help of the block B41 - “Scale”.
Block settings.

Then we determine the fact of the change of this value with the help of block B42 - “Number change detector”. This unit has some non-standard settings.

In order not to change the brightness for each movement of the variable resistor in the block, a dead zone with a value of 5 is set. That is, the block will trigger when the input value changes by more than 5 in either direction. When a block is triggered, a command will be sent to the panel to set a new backlight brightness using the B43 block - “Set the backlight level” (element library -> Nextion HMI Panel folder -> System folder).
Block Settings
Work on the program for the controller is completed.
For those who are interested in the code of the resulting sketch under the spoller.
#include <SoftwareSerial.h> #include "DHT.h" DHT _dht1(4, DHT22); SoftwareSerial Serial100(2, 3); byte _FLPArray142003126[330] = {0, 0, 0, 0, 0, 0, 0, 0, 0, 0, 0, 0, 0, 0, 0, 0, 0, 0, 0, 0, 0, 0, 0, 0, 0, 0, 0, 0, 0, 0, 0, 0, 0, 0, 0, 0, 0, 0, 0, 0, 0, 0, 0, 0, 0, 0, 0, 0, 0, 0, 0, 0, 0, 0, 0, 0, 0, 0, 0, 0, 0, 0, 0, 0, 0, 0, 0, 0, 0, 0, 0, 0, 0, 0, 0, 0, 0, 0, 0, 0, 0, 0, 0, 0, 0, 0, 0, 0, 0, 0, 0, 0, 0, 0, 0, 0, 0, 0, 0, 0, 0, 0, 0, 0, 0, 0, 0, 0, 0, 0, 0, 0, 0, 0, 0, 0, 0, 0, 0, 0, 0, 0, 0, 0, 0, 0, 0, 0, 0, 0, 0, 0, 0, 0, 0, 0, 0, 0, 0, 0, 0, 0, 0, 0, 0, 0, 0, 0, 0, 0, 0, 0, 0, 0, 0, 0, 0, 0, 0, 0, 0, 0, 0, 0, 0, 0, 0, 0, 0, 0, 0, 0, 0, 0, 0, 0, 0, 0, 0, 0, 0, 0, 0, 0, 0, 0, 0, 0, 0, 0, 0, 0, 0, 0, 0, 0, 0, 0, 0, 0, 0, 0, 0, 0, 0, 0, 0, 0, 0, 0, 0, 0, 0, 0, 0, 0, 0, 0, 0, 0, 0, 0, 0, 0, 0, 0, 0, 0, 0, 0, 0, 0, 0, 0, 0, 0, 0, 0, 0, 0, 0, 0, 0, 0, 0, 0, 0, 0, 0, 0, 0, 0, 0, 0, 0, 0, 0, 0, 0, 0, 0, 0, 0, 0, 0, 0, 0, 0, 0, 0, 0, 0, 0, 0, 0, 0, 0, 0, 0, 0, 0, 0, 0, 0, 0, 0, 0, 0, 0, 0, 0, 0, 0, 0, 0, 0, 0, 0, 0, 0, 0, 0, 0, 0, 0, 0, 0, 0, 0, 0, 0, 0, 0, 0, 0, 0, 0, 0, 0, 0, 0, 0, 0, 0, 0, 0, 0, 0, 0, 0 }; byte _FLPArray239384258[330] = {0, 0, 0, 0, 0, 0, 0, 0, 0, 0, 0, 0, 0, 0, 0, 0, 0, 0, 0, 0, 0, 0, 0, 0, 0, 0, 0, 0, 0, 0, 0, 0, 0, 0, 0, 0, 0, 0, 0, 0, 0, 0, 0, 0, 0, 0, 0, 0, 0, 0, 0, 0, 0, 0, 0, 0, 0, 0, 0, 0, 0, 0, 0, 0, 0, 0, 0, 0, 0, 0, 0, 0, 0, 0, 0, 0, 0, 0, 0, 0, 0, 0, 0, 0, 0, 0, 0, 0, 0, 0, 0, 0, 0, 0, 0, 0, 0, 0, 0, 0, 0, 0, 0, 0, 0, 0, 0, 0, 0, 0, 0, 0, 0, 0, 0, 0, 0, 0, 0, 0, 0, 0, 0, 0, 0, 0, 0, 0, 0, 0, 0, 0, 0, 0, 0, 0, 0, 0, 0, 0, 0, 0, 0, 0, 0, 0, 0, 0, 0, 0, 0, 0, 0, 0, 0, 0, 0, 0, 0, 0, 0, 0, 0, 0, 0, 0, 0, 0, 0, 0, 0, 0, 0, 0, 0, 0, 0, 0, 0, 0, 0, 0, 0, 0, 0, 0, 0, 0, 0, 0, 0, 0, 0, 0, 0, 0, 0, 0, 0, 0, 0, 0, 0, 0, 0, 0, 0, 0, 0, 0, 0, 0, 0, 0, 0, 0, 0, 0, 0, 0, 0, 0, 0, 0, 0, 0, 0, 0, 0, 0, 0, 0, 0, 0, 0, 0, 0, 0, 0, 0, 0, 0, 0, 0, 0, 0, 0, 0, 0, 0, 0, 0, 0, 0, 0, 0, 0, 0, 0, 0, 0, 0, 0, 0, 0, 0, 0, 0, 0, 0, 0, 0, 0, 0, 0, 0, 0, 0, 0, 0, 0, 0, 0, 0, 0, 0, 0, 0, 0, 0, 0, 0, 0, 0, 0, 0, 0, 0, 0, 0, 0, 0, 0, 0, 0, 0, 0, 0, 0, 0, 0, 0, 0, 0, 0, 0, 0, 0, 0, 0, 0, 0, 0, 0, 0, 0, 0, 0, 0, 0 }; int _SUETFLPATemp = 0; byte _nextionSaveDataVAL_P0_E2; long _nextionSaveDataPCO_P0_E3; String _nextionSaveDataTXT_P0_E3; byte _nextionSaveDataPICC_P0_E4; int _nextionSaveDataVAL_P1_E2; long _nextionSaveDataVAL_P1_E4; String _nextionCommandTempString; struct _nextionLissenStruct { char code; String result; long number; }; _nextionLissenStruct _nextionTempLissen; int nextionGetPageIdTempVar = 0; int NextionPanel_47525121_PageIdOut = 0; int _hasNumberChangeInTemp = 0; int _gtv1; int _gtv2; int _gtv3 = 290; bool _gtv4 = 0; bool _gtv5 = 0; int _gtv6; unsigned long _dht1Tti = 0UL; float _dht1t = 0.00; float _dht1h = 0.00; bool _changeNumber1_Out = 0; int _changeNumber1_OLV; bool _nextionSetAttr1_isNU = 0; bool _nextionSetAttr1_oldState = 0; bool _nextionSetAttr2_isNU = 0; bool _nextionSetAttr2_oldState = 0; bool _trgrt1 = 0; bool _trgrt1I = 0; bool _trgrt2 = 0; bool _trgrt2I = 0; bool _nextionSetAttr3_isNU = 0; bool _nextionSetAttr3_oldState = 0; long _swi1; bool _nextionSetAttr4_isNU = 0; bool _nextionSetAttr4_oldState = 0; byte _swi2; bool _nextionSetAttr5_isNU = 0; bool _nextionSetAttr5_oldState = 0; bool _changeNumber2_Out = 0; int _changeNumber2_OLV; int _swi3; bool _nextionSetAttr6_isNU = 0; bool _nextionSetAttr6_oldState = 0; bool _trgrt3 = 0; bool _trgrt3I = 0; bool _gen1I = 0; bool _gen1O = 0; unsigned long _gen1P = 0UL; bool _trgrt5 = 0; bool _trgrt5I = 0; bool _nextionAddPointToWave1_OldState = 0; bool _nextionAddPointToWave2_OldState = 0; bool _SFLPAS1; bool _SFLPAS2; bool _nextionSendArraytToWave1_OldState = 0; bool _nextionSendArraytToWave2_OldState = 0; bool _nextionSetLighting1_OldStae = 0; bool _changeNumber3_Out = 0; int _changeNumber3_OLV; void setup() { Serial100.begin(9600); _dht1.begin(); nextionSendCommand("", 100); nextionAck(100); nextionSendCommand("page 0", 100); delay(100); nextionAck(100); } void loop() { nextionGetPageIdTempVar = nextionAskPageNamper(100); if ( ! (nextionGetPageIdTempVar < 0) ) { NextionPanel_47525121_PageIdOut = nextionGetPageIdTempVar; }; if (_isTimer(_dht1Tti, 5000)) { _dht1Tti = millis(); float tempDht4; tempDht4 = _dht1.readTemperature(); if (!(isnan(tempDht4))) { _dht1t = tempDht4; } tempDht4 = _dht1.readHumidity(); if (!(isnan(tempDht4))) { _dht1h = tempDht4; } } _gtv1 = (int((_dht1t) * (10))); _gtv2 = (int(_dht1h)); if ((_gtv1) > (_gtv3)) { if (_trgrt1I) { _trgrt1 = 0; } else { _trgrt1 = 1; _trgrt1I = 1; } } else { _trgrt1 = 0; _trgrt1I = 0; }; if ((_gtv1) > (_gtv3)) { _swi1 = 63488; } else { _swi1 = 2016; } if (!((_gtv1) > (_gtv3))) { if (_trgrt2I) { _trgrt2 = 0; } else { _trgrt2 = 1; _trgrt2I = 1; } } else { _trgrt2 = 0; _trgrt2I = 0; }; if ((_gtv1) > (_gtv3)) { _swi2 = 2; } else { _swi2 = 0; } if (_changeNumber1_Out) { _changeNumber1_Out = 0; } else { _hasNumberChangeInTemp = _gtv1; if (_hasNumberChangeInTemp != _changeNumber1_OLV) { _changeNumber1_OLV = _hasNumberChangeInTemp; _changeNumber1_Out = 1; } } if (_changeNumber1_Out) { if (! _nextionSetAttr1_oldState ) { _nextionSetAttr1_oldState = 1; _nextionSetAttr1_isNU = 1; _nextionSaveDataTXT_P0_E3 = ((( _floatToStringWitRaz((_gtv1) / (10.00), 1))) + (String(" C"))) ; } } else { _nextionSetAttr1_oldState = 0; } if (_nextionSetAttr1_isNU) { _nextionCommandTempString = String("page0.tnt.txt=\"") + _nextionSaveDataTXT_P0_E3 + String("\""); nextionSendCommand(_nextionCommandTempString.c_str(), 100); nextionAck(100); _nextionSetAttr1_isNU = 0; } if (_changeNumber1_Out) { if (! _nextionSetAttr2_oldState ) { _nextionSetAttr2_oldState = 1; _nextionSetAttr2_isNU = 1; _nextionSaveDataVAL_P0_E2 = (map((_gtv1), (-400), (500), (10), (91))) ; } } else { _nextionSetAttr2_oldState = 0; } if (_nextionSetAttr2_isNU) { _nextionCommandTempString = String("page0.tpb.val=") + String(_nextionSaveDataVAL_P0_E2); nextionSendCommand(_nextionCommandTempString.c_str(), 100); nextionAck(100); _nextionSetAttr2_isNU = 0; } if (( (_trgrt1) || (_trgrt2) )) { if (! _nextionSetAttr3_oldState ) { _nextionSetAttr3_oldState = 1; _nextionSetAttr3_isNU = 1; _nextionSaveDataPCO_P0_E3 = _swi1 ; } } else { _nextionSetAttr3_oldState = 0; } if (nextionAskPageNamper(100) == 0) { if (_nextionSetAttr3_isNU) { _nextionCommandTempString = String("page0.tnt.pco=") + String(_nextionSaveDataPCO_P0_E3); nextionSendCommand(_nextionCommandTempString.c_str(), 100); nextionAck(100); _nextionCommandTempString = "ref tnt"; nextionSendCommand(_nextionCommandTempString.c_str(), 100); nextionAck(100); _nextionSetAttr3_isNU = 0; } } else { _nextionSetAttr3_isNU = 1; } if (( (_trgrt1) || (_trgrt2) )) { if (! _nextionSetAttr4_oldState ) { _nextionSetAttr4_oldState = 1; _nextionSetAttr4_isNU = 1; _nextionSaveDataPICC_P0_E4 = _swi2 ; } } else { _nextionSetAttr4_oldState = 0; } if (nextionAskPageNamper(100) == 0) { if (_nextionSetAttr4_isNU) { _nextionCommandTempString = String("page0.tci.picc=") + String(_nextionSaveDataPICC_P0_E4); nextionSendCommand(_nextionCommandTempString.c_str(), 100); nextionAck(100); _nextionCommandTempString = "ref tci"; nextionSendCommand(_nextionCommandTempString.c_str(), 100); nextionAck(100); _nextionSetAttr4_isNU = 0; } } else { _nextionSetAttr4_isNU = 1; } if (((map((_gtv2), (0), (100), (-46), (226)))) < (0)) { _swi3 = ((map((_gtv2), (0), (100), (-46), (226)))) + (360); } else { _swi3 = (map((_gtv2), (0), (100), (-46), (226))); } if (_changeNumber2_Out) { _changeNumber2_Out = 0; } else { _hasNumberChangeInTemp = _gtv2; if (_hasNumberChangeInTemp != _changeNumber2_OLV) { _changeNumber2_OLV = _hasNumberChangeInTemp; _changeNumber2_Out = 1; } } if (_changeNumber2_Out) { if (! _nextionSetAttr5_oldState ) { _nextionSetAttr5_oldState = 1; _nextionSetAttr5_isNU = 1; _nextionSaveDataVAL_P1_E4 = _gtv2 ; } } else { _nextionSetAttr5_oldState = 0; } if (_nextionSetAttr5_isNU) { _nextionCommandTempString = String("page1.humN.val=") + String(_nextionSaveDataVAL_P1_E4); nextionSendCommand(_nextionCommandTempString.c_str(), 100); nextionAck(100); _nextionSetAttr5_isNU = 0; } if (_changeNumber2_Out) { if (! _nextionSetAttr6_oldState ) { _nextionSetAttr6_oldState = 1; _nextionSetAttr6_isNU = 1; _nextionSaveDataVAL_P1_E2 = _swi3 ; } } else { _nextionSetAttr6_oldState = 0; } if (_nextionSetAttr6_isNU) { _nextionCommandTempString = String("page1.humG.val=") + String(_nextionSaveDataVAL_P1_E2); nextionSendCommand(_nextionCommandTempString.c_str(), 100); nextionAck(100); _nextionSetAttr6_isNU = 0; } if (1) { if (! _gen1I) { _gen1I = 1; _gen1O = 1; _gen1P = millis(); } } else { _gen1I = 0 ; _gen1O = 0; } if (_gen1I) { if ( _isTimer ( _gen1P , 5000 )) { _gen1P = millis(); _gen1O = ! _gen1O; } } if (_gen1O) { if (_trgrt5I) { _trgrt5 = 0; } else { _trgrt5 = 1; _trgrt5I = 1; } } else { _trgrt5 = 0; _trgrt5I = 0; }; if (_gtv4) { if (_trgrt3I) { _trgrt3 = 0; } else { _trgrt3 = 1; _trgrt3I = 1; } } else { _trgrt3 = 0; _trgrt3I = 0; }; _gtv4 = (NextionPanel_47525121_PageIdOut) == (2); _gtv5 = _trgrt5; if (_trgrt3) { if ( ! _nextionAddPointToWave1_OldState) { _nextionAddPointToWave1_OldState = 1; if (nextionAskPageNamper(100) == 2) { for (int nextionSATWTemp = 0; nextionSATWTemp < 330; nextionSATWTemp ++) { _nextionCommandTempString = String ("add 1,1,") + String (_FLPArray142003126[nextionSATWTemp]); nextionSendCommand(_nextionCommandTempString.c_str(), 100); } delay (50); } } } else { _nextionAddPointToWave1_OldState = 0; } if (_trgrt3) { if ( ! _nextionAddPointToWave2_OldState) { _nextionAddPointToWave2_OldState = 1; if (nextionAskPageNamper(100) == 2) { for (int nextionSATWTemp = 0; nextionSATWTemp < 330; nextionSATWTemp ++) { _nextionCommandTempString = String ("add 1,0,") + String (_FLPArray239384258[nextionSATWTemp]); nextionSendCommand(_nextionCommandTempString.c_str(), 100); } delay (50); } } } else { _nextionAddPointToWave2_OldState = 0; } if (_gtv5) { if (!_SFLPAS1) { _SFLPAS1 = 1; for (_SUETFLPATemp = 0; _SUETFLPATemp < 329; _SUETFLPATemp = _SUETFLPATemp + 1 ) { _FLPArray239384258[_SUETFLPATemp ] = _FLPArray239384258[_SUETFLPATemp + 1]; } _FLPArray239384258[329] = _gtv2; } } else { _SFLPAS1 = 0; } _gtv6 = ((_gtv1) / (5)) + (160); if (_gtv5) { if (!_SFLPAS2) { _SFLPAS2 = 1; for (_SUETFLPATemp = 0; _SUETFLPATemp < 329; _SUETFLPATemp = _SUETFLPATemp + 1 ) { _FLPArray142003126[_SUETFLPATemp ] = _FLPArray142003126[_SUETFLPATemp + 1]; } _FLPArray142003126[329] = _gtv6; } } else { _SFLPAS2 = 0; } if (( (_gtv5) && (!(_trgrt3)) && (_gtv4) )) { if ( ! _nextionSendArraytToWave1_OldState) { _nextionSendArraytToWave1_OldState = 1; if (nextionAskPageNamper(100) == 2) { _nextionCommandTempString = String ("add 1,0,") + String (_gtv2); nextionSendCommand(_nextionCommandTempString.c_str(), 100); delay (50); } } } else { _nextionSendArraytToWave1_OldState = 0; } if (( (_gtv5) && (!(_trgrt3)) && (_gtv4) )) { if ( ! _nextionSendArraytToWave2_OldState) { _nextionSendArraytToWave2_OldState = 1; if (nextionAskPageNamper(100) == 2) { _nextionCommandTempString = String ("add 1,1,") + String (_gtv6); nextionSendCommand(_nextionCommandTempString.c_str(), 100); delay (50); } } } else { _nextionSendArraytToWave2_OldState = 0; } if (_changeNumber3_Out) { _changeNumber3_Out = 0; } else { _hasNumberChangeInTemp = (map(( (analogRead (0))), (0), (1023), (0), (100))); if (((_hasNumberChangeInTemp > _changeNumber3_OLV) && ((_hasNumberChangeInTemp - _changeNumber3_OLV ) > 5)) || ((_hasNumberChangeInTemp < _changeNumber3_OLV) && ((_changeNumber3_OLV - _hasNumberChangeInTemp ) > 5) )) { _changeNumber3_OLV = _hasNumberChangeInTemp; _changeNumber3_Out = 1; } } if (_changeNumber3_Out) { if (!(_nextionSetLighting1_OldStae)) { _nextionSetLighting1_OldStae = 1; _nextionCommandTempString = String("dim=") + String((map(( (analogRead (0))), (0), (1023), (0), (100)))); nextionSendCommand(_nextionCommandTempString.c_str(), 100); } } else { _nextionSetLighting1_OldStae = 0; } } bool _isTimer(unsigned long startTime, unsigned long period ) { unsigned long currentTime; currentTime = millis(); if (currentTime >= startTime) { return (currentTime >= (startTime + period)); } else { return (currentTime >= (4294967295 - startTime + period)); } } String _floatToStringWitRaz(float value, int raz) { float tv; int ti = int(value); String ts = String(ti); if (raz == 0) { return ts; } ts += "."; float tf = abs(value - ti); for (int i = 1; i <= raz; i++ ) { tv = tf * 10; ti = int(tv); ts += String(ti); tf = (tv - ti); } return ts; } void nextionSendCommand(const char* cmd, byte port ) { while (Serial100.available()) { Serial100.read(); } Serial100.print(cmd); Serial100.write(0xFF); Serial100.write(0xFF); Serial100.write(0xFF); } boolean nextionAck( byte port ) { uint8_t bytes[4] = {0}; Serial100.setTimeout(20); if (sizeof(bytes) != Serial100.readBytes((char *)bytes, sizeof(bytes))) { return 0; } if ((bytes[1] == 0xFF) && (bytes[2] == 0xFF) && (bytes[3] == 0xFF)) { switch (bytes[0]) { case 0x00: return false; break; case 0x01: return true; break; default: return false; } } } struct _nextionLissenStruct nextionListen( byte port ) { char _bite; char _end = 0xff; String cmd; _nextionLissenStruct temp; int countEnd = 0; delay(10); while (Serial100.available() > 0) { if (Serial100.available() > 0) { _bite = Serial100.read(); cmd += _bite; if (_bite == _end) { countEnd++; } if (countEnd == 3) { break; } } } temp.result = ""; temp.code = 'z'; temp.number = 0; switch (cmd[0]) { case 'e': temp.code = 'e'; countEnd = 0; for (uint8_t i = 0; i < cmd.length(); i++) { if (cmd[i] == _end) { countEnd++; } temp.result += String(cmd[i], HEX); if (countEnd == 3) { return temp; } temp.result += " "; } break; case 'f': temp.code = 'f'; temp.result = String(cmd[1], DEC); return temp; break; case 'g': temp.code = 'g'; temp.result = String(cmd[2], DEC) + "," + String(cmd[4], DEC) + "," + String(cmd[5], DEC); return temp; break; case 'h': temp.code = 'h'; temp.result = String(cmd[2], DEC) + "," + String(cmd[4], DEC) + "," + String(cmd[5], DEC); temp.result = "68 " + temp.result; return temp; break; case 'p': temp.code = 'p'; temp.result = cmd.substring(1, cmd.length() - 3); return temp; break; case 'q': temp.code = 'q'; temp.number = (cmd[4] << 24) | (cmd[3] << 16) | (cmd[2] << 8) | (cmd[1]); return temp; break; default: return temp; break; } return temp; } int nextionAskPageNamper(byte port) { int result; _nextionLissenStruct temp; nextionSendCommand("sendme", port); temp = nextionListen(port); if ((temp.code == 'f') && (temp.result != "")) { result = temp.result.toInt(); } else { result = -1; } return result; } A small video with a demonstration.
Archive with the project for the panel and the project for the controller.
In the next lesson we will learn to control the Arduino controller from the panel.
Source: https://habr.com/ru/post/392685/
All Articles