Photo booth do it yourself
 The wedding of two newly released engineers was near. So, these two engineers due to the financial component and mindset decided that they could prepare for the wedding themselves, without resorting to the help of the wedding agency. They sat down, thought and made up the Mind Map of everything that needs to be prepared and made so that the only day in my life will leave impressions for life. So, in the Mind Map among the invitations, décor elements of the banquet hall, gifts for guests, photo of attributes and many more all the item “photo booth” appeared.
Having seen plenty of ideas on the Internet, the bride wanted very much to create, in addition to the photographer, a photo zone with a background and a device that would instantly take a photo and print them out. A Polaroid, photo booth, or printer that prints from Instagram could be used as such a device. Since the main idea was to create a photo zone, and not just the presence of an instant photo printing apparatus, it was decided to stop at the second option. Unlike its rivals, the photo booth allows you to customize templates for printing photos (number of frames in a photo, background, captions, etc.), transmit information from a video finder to a monitor, does not require a photographer, connect to the Internet, allows you to use a high-quality reflex camera, and The cost of the photo depends on the printer and 10 times less than the cost of a photo from a polaroid. However, having learned the price for the order of this miracle, the desire began to subside little by little. The minimum rental price of the photo booth, which was found, is 7000 rubles in two hours (the price is for April 2015, now it is already 9000 rubles and -10% discount when booking earlier than a month). Considering that the photo booth should be available throughout the entire banquet, so that guests could come in and take pictures at any time, the planned ordering time was 4 hours. And this generally results in 17000r. And here, suddenly, the voice of newly minted engineers spoke in the heads of the bride and groom: “Why don't we make this photo booth ourselves !?”
Electronic filling
Immediately the Internet was searched for ready-made solutions for determining the main components of the photo booth and its design. In the process of searching, it turned out that some craftsmen had already tried to assemble such devices with their own hands and even laid out the instructions. List of sites with instructions for assembling photo booths:
- Open air wireless internet-enabled “photo booth”
- How to DIY Your Very Own Photo Booth
- Portable Photobooth (iPad + DSLR)
- DIY Photobooth
The main article, on which it was decided to rely when assembling his creation, is presented on the first link. What exactly is the photo booth? The main components are:
')
- photographic camera;
- photo printer;
- computer with software to control the camera and printer;
- monitor to display the current image from the camera (LiveView);
- button with the inscription: "Click here!" to start the process of photographing.
At first glance, everything is not so difficult, but, as usual, the most interesting lies in the details. The first and most important element is the camera. Not all cameras allow, when connected to a computer, to provide any functions other than copying captured photos from a memory card. And even then only when the “Camera” mode is off, that is, either we photograph or copy to the computer what we photographed. For normal operation of the photo booth, it is necessary to constantly transmit the current image from the camera to the monitor, as well as capture frames and save them to the computer. This functionality is mainly supported only by SLR cameras. In this regard, the existing software for creating photo booths work with a very limited list of cameras. As a result of a search for friends, a Canon 60D camera was found.
The second item in the list is a printer for printing photos. Here, it seems, there should be no problems, as any printer will do, even black and white, if you do not need to print color photos. Therefore, the choice fell on the HP Deskjet Ink Advantage 2520hc MFP available at home. The main parameters, with the exception of color, which in this case is worth paying attention to - of course, print quality and print speed. In photo booths for rent, mostly thermosublimation printers are installed, which give high print speeds with good quality photos. However, trying to print 3 frames on one sheet of photo paper size 10x15 on a simple home MFP, it was decided that this quality and speed (2 min / page) is enough.
A computer is needed to run a program that connects to a camera, renders LiveView on a monitor, forms photos for printing, and sends them to a printer. The instructions for making a photo booth, presented by the link above, use the DSLR Remote Pro program from Breeze Systems. This version of the program works with Canon SLR cameras. The company also produces other versions of programs with similar capabilities, but supporting other cameras:
- NKRemote for Nikon SLR cameras;
- Webcam Photobooth for webcams;
- PSRemote for Canon PowerShot cameras.
The list of supported models can be found on the links above. The process of setting up programs for creating photo booths is also on the website of the creator , so it was not difficult to deal with all this business.
In addition to the mentioned program, there are others, for example, Photoboof . But they were hardly considered because of the much greater availability of the DSLR Remote Pro program.
Well, and still a couple of words about the computer. To reduce space, weight and problems with connecting wires, it was decided to use a laptop, which was also available - Lenovo IdeaPad Z510.
But how do you turn the laptop so that its monitor becomes part of the photobook? The easiest option is to connect another monitor via HDMI / VGA, and the laptop generally fold, so as not to interfere. But monitors not only weigh decently, but also occupy a lot of places. Well, where in a small box monitor with a diagonal of 24 inches!? Here you need a small screen, for example, like a tablet. Well, let it be like a tablet, well, that is, the tablet itself, let it be the screen. To implement this idea was used the following feint ears. A router (an old D-Link DIR-320) was added to the system, which raised the access point without going online. A tablet (Samsung Galaxy Note 10.1) and a laptop connected to this access point. And the tablet, in turn, was connected to the laptop through the application "Remote Desktop" ( Microsoft Remote Desktop ). The speed of such a system left much to be desired, but it performed its role.
The button, or rather the big red button with the words “Press here!” To start shooting, never showed off at the release version of the photo booth. And all due to the fact that overwhelmed the desire to make a remote start. It was necessary to find a keychain with one button, which emulates the Bluetooth manipulator, would transmit a touch signal on the tablet screen (like the left mouse button). A thought flashed through my head that it seemed that my friend had a remote-controlled monopod. Just one button and connects this device via Bluetooth. But it was not there. The button emulated a keyboard and sent a Enter signal, and DSLR Remote Pro does not know these buttons and it turned out to be impossible to teach it to recognize something other than the combinations put. There was little time left, or not at all, so I had to leave the standard mechanism for starting shooting - I just had to poke the tablet anywhere. After that, the screen saver on the tablet screen was replaced by the LiveView mode and the camera took 3 photos with a certain interval, which then got out of the printer.
Wooden filling
Having dealt with the electronic filling of the photo booth, it’s time to think where to fuck up this whole thing, what should a booth look like? Without thinking, it was decided that it was necessary to make a simple box. What is required of him: the height is slightly lower than the human height for the normal location of the camera and a bunch of shelves on which to place all the electronic filling. Next, a drawing was sketched and construction began.
After the material was purchased, the garage was occupied at the nearest construction market, where the active phase of the activity began, which is further represented by a large number of pictures under the spoiler. All the connecting work was carried out using self-tapping screws and a screwdriver.
Photo booth assembly process
Drawer walls are assembled.

Next comes a hole for the lens.

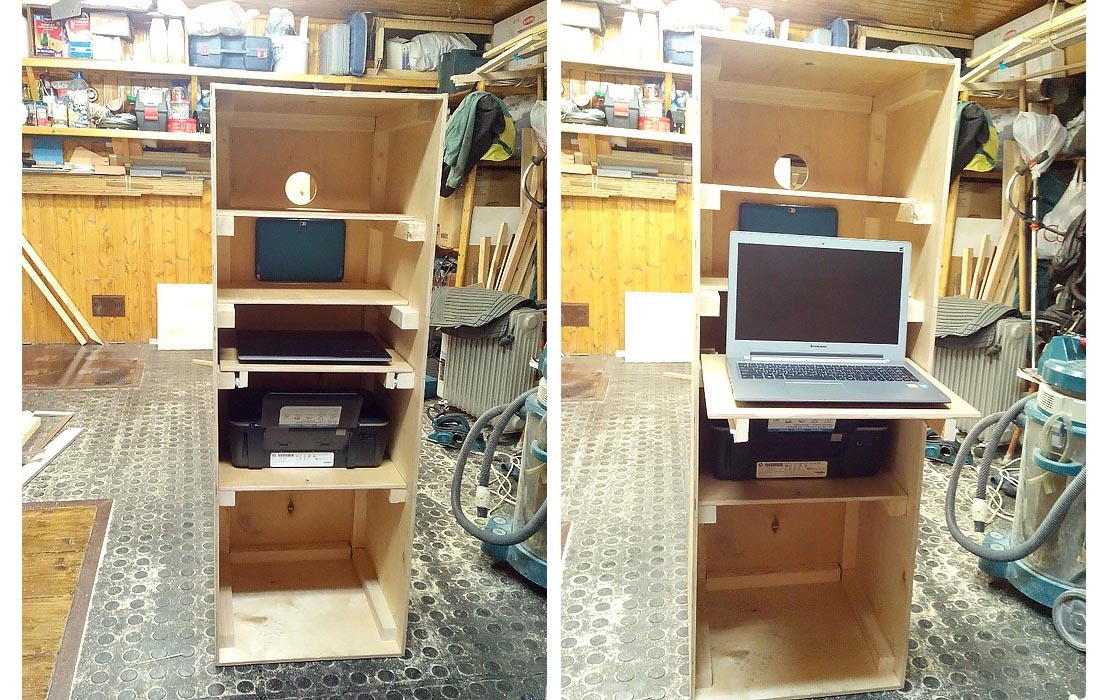
Screwed bars for mounting shelves, cut the shelves themselves and everything is set in its place.

In the process of fitting the laptop, it became clear that it is much more convenient to make a shelf under the guides under it. In the garage just turned out to be a suitable pair.
So, there is a box, there are shelves, what's next? It is necessary, perhaps, to paint the whole thing at least. But it was not there. Suddenly, in my hands turned out to be a roll of dermantine and CC, that this box is easier to turn into furniture than into a beautiful painted booth. Well, great. Having got more foam, double-sided tape and furniture stapler, we went further.

Cutouts are made in foam rubber in the places of the holes. And finally they wrapped up the box in a dermatin coat.

After all, more foam was added to mitigate the life of the tablet and camera, as well as a technological opening for ventilation and supply of wires.

It remains to make the cover and you're done!

Next comes a hole for the lens.
Screwed bars for mounting shelves, cut the shelves themselves and everything is set in its place.
In the process of fitting the laptop, it became clear that it is much more convenient to make a shelf under the guides under it. In the garage just turned out to be a suitable pair.
So, there is a box, there are shelves, what's next? It is necessary, perhaps, to paint the whole thing at least. But it was not there. Suddenly, in my hands turned out to be a roll of dermantine and CC, that this box is easier to turn into furniture than into a beautiful painted booth. Well, great. Having got more foam, double-sided tape and furniture stapler, we went further.
Cutouts are made in foam rubber in the places of the holes. And finally they wrapped up the box in a dermatin coat.
After all, more foam was added to mitigate the life of the tablet and camera, as well as a technological opening for ventilation and supply of wires.
It remains to make the cover and you're done!
That's what happened as a result. A little backlight for the printer and a couple of light bulbs for lighting in the dark. View from the outside (left) and inside view (right).

On the lower floor, in addition to sockets and a router, dumbbells and pancakes are located to give stability.
Design evaluation and possible improvements
And now some numbers and critics. The cost of materials spent on the production of the photozone is given in the table.

As you can see, the price came out not small, but cheaper than renting, given that the photo booth worked for the entire duration of the banquet, that is, about 5 hours.
As for possible improvements, there is a whole list of them. The first is a camera. Firstly, LiveView eats up a lot of battery, so for normal operation you need to power the camera from the network, not from the batteries. For all the time they had to change a couple of times. Gluttony is not the only problem in LiveView mode. This mode loads the system very much, as a result of which the frame refresh rate on the tablet was low. This problem could be solved by adding a webcam. Hooking it to the video finder or simply attaching it next to the camera, display the image on the tablet from it, and not from the camera. Although it is more crutches to solve the problem of poor performance chain notebook-router-tablet.
Again, the problem with the camera is that the program that was used to create the photo booth supports a very limited list of models. Expand this list of course does not work. But if there is no need to use the program from Breeze Software and have the desire and ability to write something of their own, then here are a couple of links to libraries for working with cameras:
As already mentioned, the transfer speed of the desktop laptop on the tablet is quite small. In this case, probably, a tablet laptop, for example, Lenovo Yoga, can show more performance. Then transfer the desktop through the router to the tablet is not required. In this case, the shelf under the laptop can be removed, and to implement the screen will not need an additional device.
To start a photo session, if you do not want to use the touch screen, you can adjust the following remote control:
Conclusion
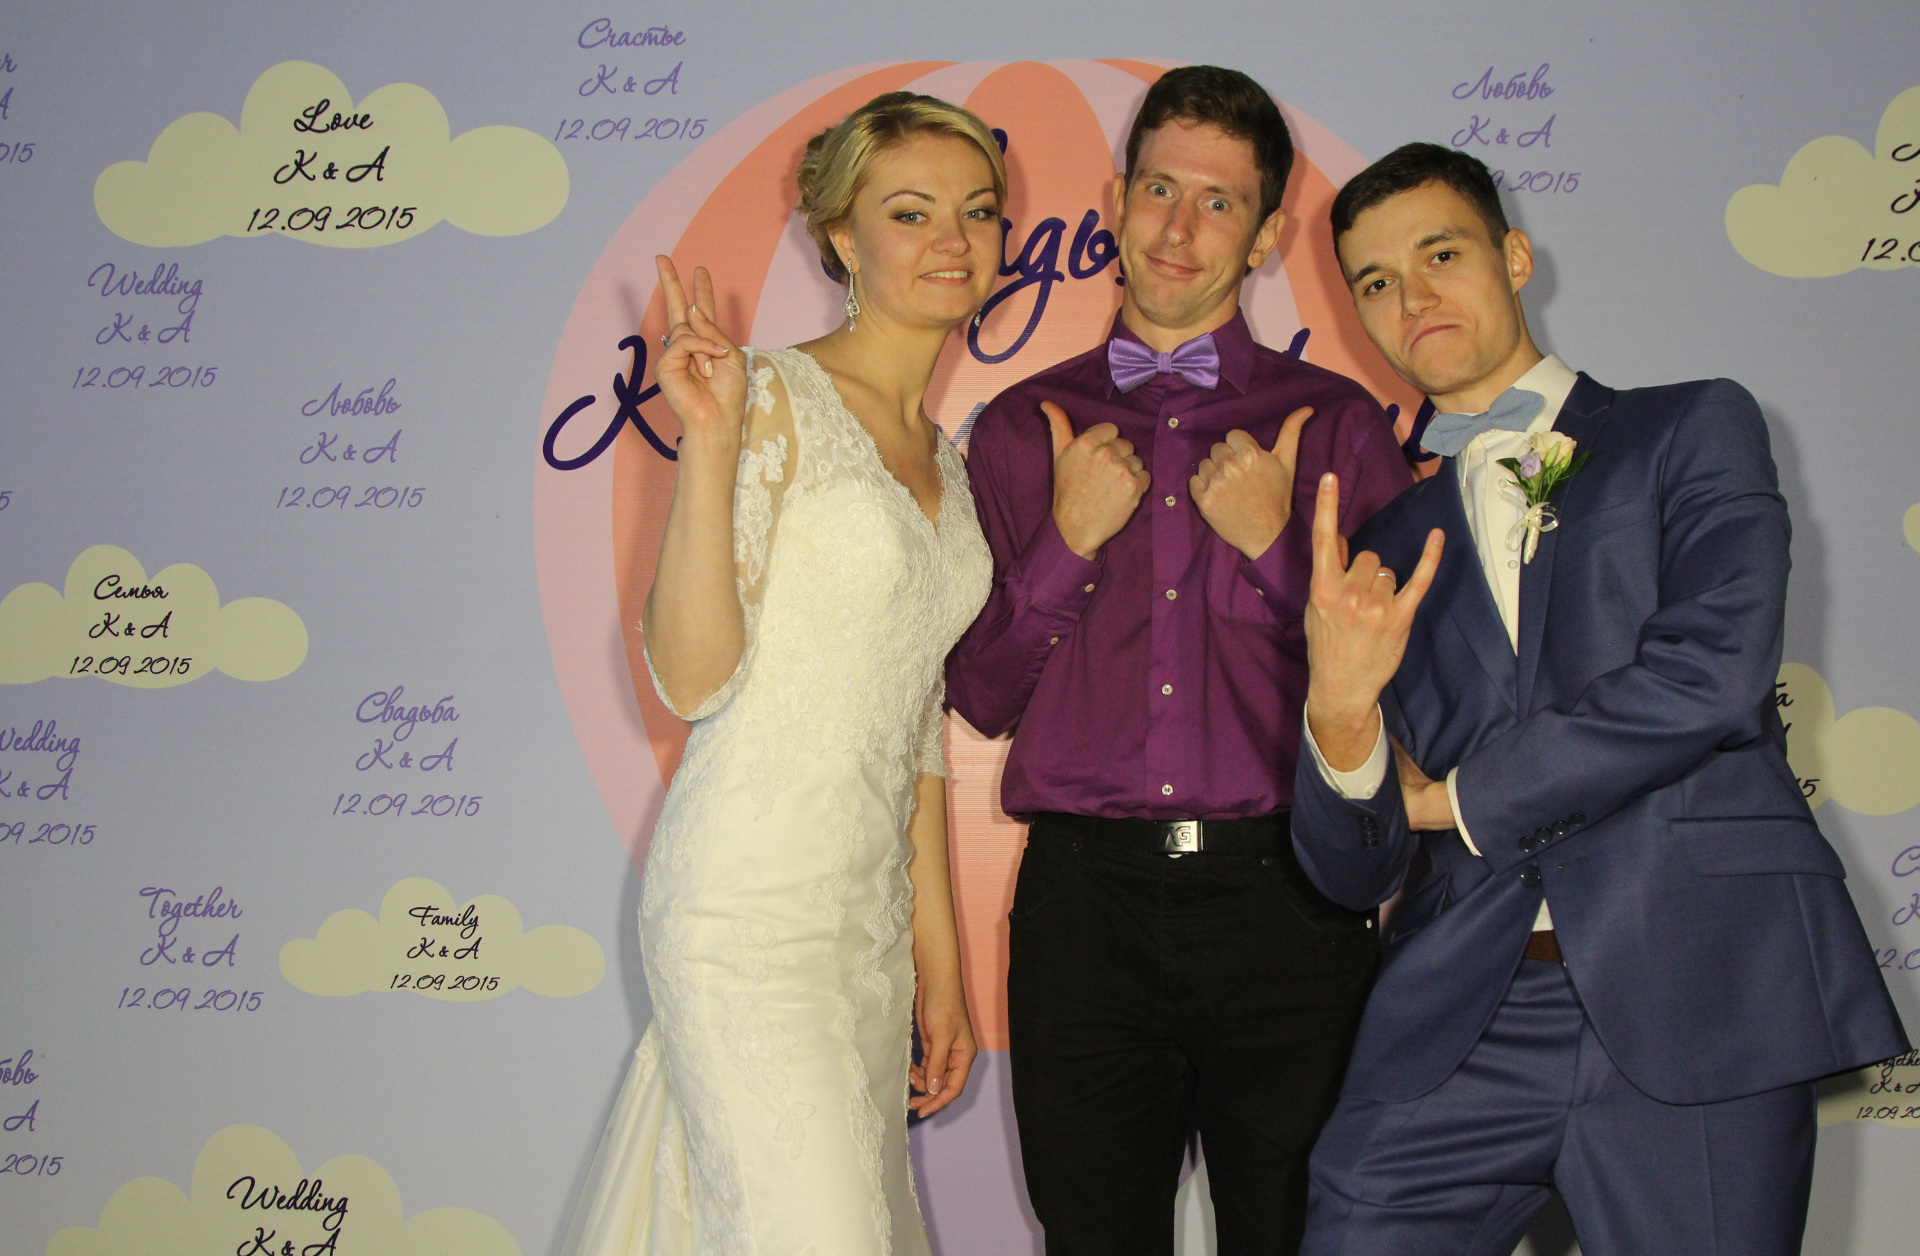
Despite some shortcomings, the assembled structure as a result worked perfectly, the idea was fully implemented. Yes, by the way, the main purpose of the photo booth was to make the guests, after making cool photos, paste them into the album with wishes. All guests gladly completed their task.

The bride, seeing the design of the resulting photo booth, was certainly very, but pleasantly surprised. Guests also liked the toy. All grimaced as they could and left a bunch of positive photos.
The groom, of course, enjoyed the fact that the system worked without failures and all the guests were delighted with this magic box, which means that the time and effort spent on its production were not in vain.
Source: https://habr.com/ru/post/392605/
All Articles