The world through the eyes of a WiFi router
The story of trying to see the world in a completely different light and how it eventually led to the creation of a device that allows you to "see" WiFi. The process will use the popular ESP8266 module. Without Arduino, unfortunately, will not do too.
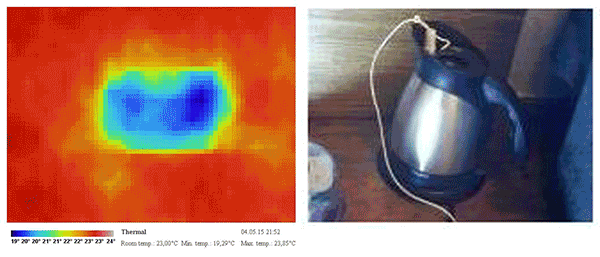
N-years ago, a group of young researchers from Germany described the concept of a thermal imager based on only one sensor. The essence of the operation of the device was as follows: with the help of a design of two servo drives, the IR sensor sequentially guided vertically and horizontally to the desired area, gradually scanning the image. Such an interesting solution made it possible to drastically reduce the price of the device, and get amusing pictures of temperature distribution, like these:
The system of mechanical image scanning — namely, the construction of servo drives is what turned out to be a very interesting thing. Immediately after the construction of such a device, the question arises - why not replace the infrared sensor with something else that would allow using the same principle to visualize for example radio waves?
The human eye, albeit a rather complicated, but very limited tool. The range of visible light represents a very small part of the spectrum of electromagnetic radiation.

Assess the scale of the tragedy - most of the information about the world around us is simply hidden from us. Of course, it would be very great to expand the natural framework and gain the ability to see beyond the limits defined by nature. Therefore, the following experiments were carried out using a mechanical scanning system.
To work out the technology, I made a simple “single-pixel” camera that works in the already visible visible range. As a sensor, I used a solar battery from a Chinese toy car:

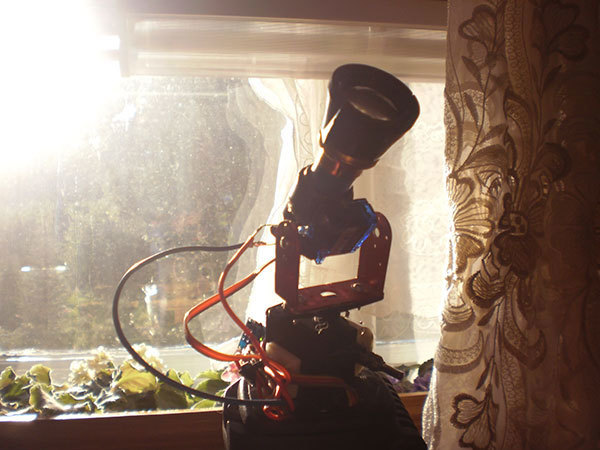
Of course, the area of such a photocell is very large, which means you need to somehow provide a narrow field of view, so we will add a lens from the flashlight to it. We put on servos and connect to the Arduino.

The solar battery is rotated to the desired area of the future image, after which the controller reads a signal that is proportional to the amount of light falling on the battery. Of course, such a camera will eventually produce a black and white image.
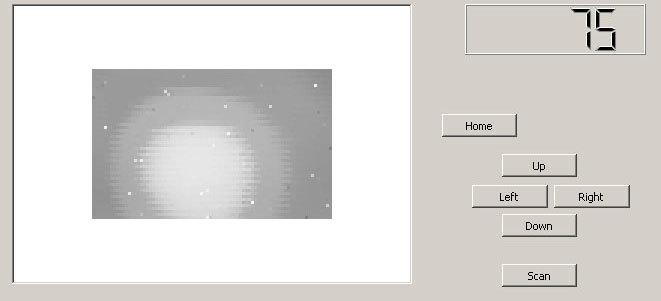
To process the scan results, a program with a simple interface was implemented using QT. (Lessons on how to implement communication Arduino and Qt can be easily obtained on youtube ). The program consists of a pair of buttons for manual control of servos and a QGraphicsScene field, where squares-pixels are drawn, the color of which depends on the signal size at a specific point. The use is simple - first, the drives are manually guided to the left upper point of the future image, after which the area is automatically scanned during which the picture is built. Here is what came out of all this:
What is shown on this visualization? Of course, this is the most obvious object to shoot in case your camera is a solar panel - this is the sun.
')
However, the signal from the battery is too weak to get adequate images in indoor lighting, because it was replaced with a photoresistor, and the lens from the flashlight gave way to half of the broken theatrical binoculars.
Wiring diagram
This creation turned out to be more successful, and the opportunity to take more or less recognizable photos has already appeared:
Chandelier
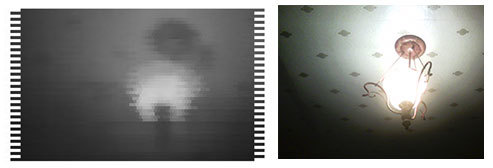
Car on the road
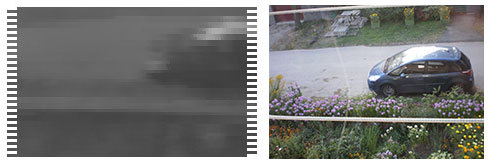
View from the window
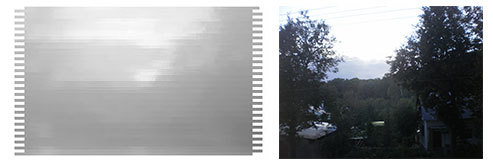
And even clouds in the sky

Satisfied with this result, I decided that it was time to finally make a full-fledged radiovizor, replacing the photoresistor with a directional antenna. The most suitable range for this is the microwave, since the directional antenna does not take up much space, and even today there are many devices in our life that radiate carefully in this range.
First, I decided to use a horn antenna, which is in car radar detectors (they usually operate in the range of 10.525 GHz or 24.15 GHz). Attempts to isolate an analog signal proportional to the magnitude of the detected radiation from the circuit of such a detector were unsuccessful, possibly due to the lack of my knowledge, and perhaps because there is no such thing at all, since it works on the principle of comparison. (Hello to Chinese brothers who gathered this miracle). Of course, I wanted to pull out the antenna itself and build something of my own, but I did not break a good device for this.
The second thing that occurred to me was to build a field detector according to one of the schemes that are abundantly found on amateur radio portals and attach a homemade directional antenna to it, for example, the very popular and fairly simple to manufacture Kharchenko biquadrats. But as it turned out, the most important element - the microwave detector diode is very difficult to find, easy to lose and in general it costs a lot, so I had to search for the necessary part for a long time.
After some time, I managed to get a germanium detector diode from Soviet times and put together the following scheme:

The resulting device worked confidently, but at a very small distance, about 5-10 cm from a mobile phone, acting as a radiation source. This, of course, was not enough for the task.
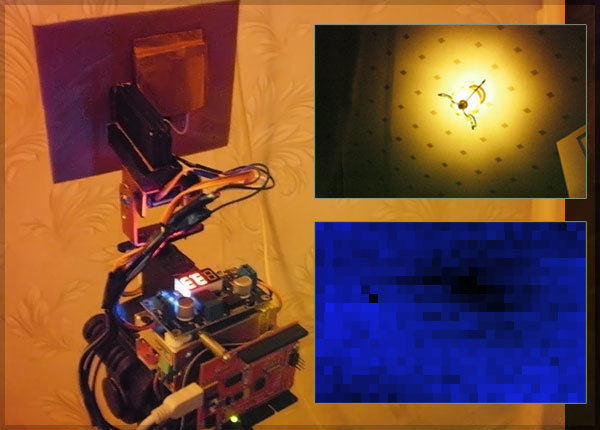
After all these ordeals, in the end I got an ESP8266 module that can display the RSSI (Indicator of the received WiFi signal level) of the access points found. To do this, use the AT + CWLAP command in the standard firmware of the module. I decided to use this function along with the self-made WiFi direction bi-square antenna mentioned earlier. Thus this miracle of technology appeared:
connection diagram

The ESP8266 itself is mounted on the back of the antenna and is well shielded with copper sheets. Luminous tsiferki show the voltage at the output of a pulsed DC-DC converter, which lowers 12V from the power supply to 3.3V required for the module to operate (it is very voracious, therefore, it is unstable to power it from the Arduino).
Arduino as before controls the servos and also sends AT commands ESP8266 using the SoftwareSerial library. One of the difficult moments - instead of the standard libraries, SoftwareSerial and Servo had to switch to their counterparts, since the original ones conflict with simultaneous use.
Of course, you can hear the accusations that the Arduino here is a superfluous element at all, since ESP8266 itself can cope with such functionality. But historically, in the course of creating the device, I initially focused on the Arduino as the central link of the final device, and ESP8266 plays the role of a kind of sensor.
The program on QT, written for the "solar camera" has undergone significant refinement.
final version of the program
In the course of scanning the area for each access point found, an array of signal values is created, which allows you to see how different WiFi routers “shine” and even estimate their approximate location when scanning is completed. The stronger the signal at a particular point, the brighter blue the corresponding pixel will have.
Well, finally, putting the device in different parts of my home, I got the following images. Fortunately, there are quite a lot of wifi networks in my house, and with such a directional antenna you can catch even quite remote ones.
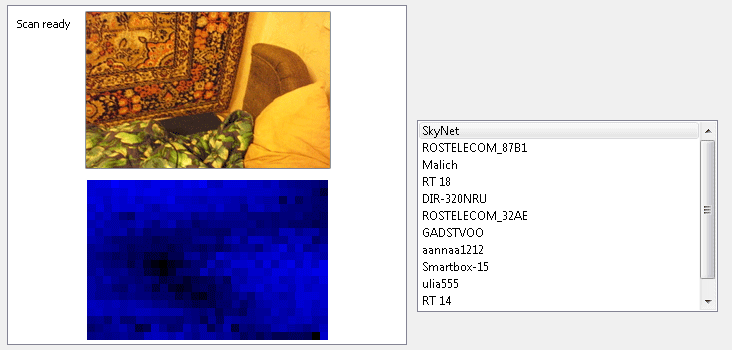
Sofa and part of the carpet. If you pay attention, a very high-quality image in comparison with the others is obtained at the “SkyNet” point - this is my home router. He is closest to the place of filming, which apparently plays an important role in the process.
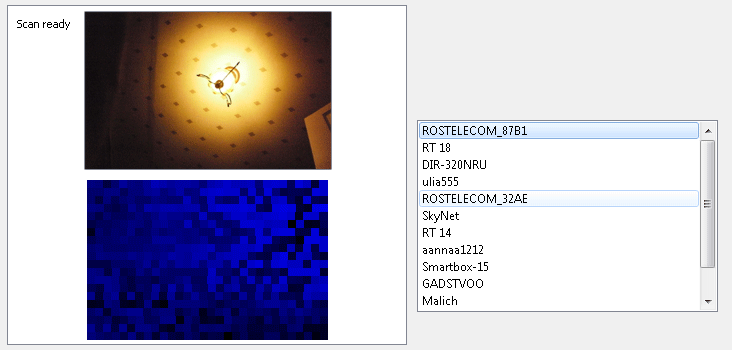
Chandelier again. Signals of some networks are not reflected from the ceiling, or from the chandelier. Most likely on these grounds you can try to determine the physical location of the transmitter.
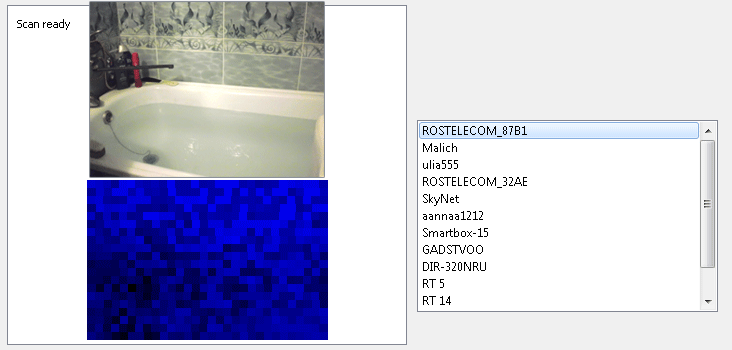
Bath filled with water. As everyone knows, radio waves under water are not transmitted well.
It is worth noting that photos in the visible range only roughly correspond to the scanned area. It is also necessary to take into account that when operating, the antenna somehow describes the hemisphere, and this also affects the result. The resolution is in principle limited only by the course of the antenna and the time it takes to circle the entire area. At the same time data acquisition for each pixel requires 4-5 seconds. I would like to get less blurry images, but for this you need an antenna with a narrower radiation pattern.
Source codes, including the sketch for Arduino
Source: https://habr.com/ru/post/392555/
All Articles