Simple experiences with the child at home
An example of a very unsuccessful experience, an explanation in the section “about safety”
My previous post had a lot of comments on experiments with children. Then I promised to write a separate post about simple fascinating experiences. Now I keep this promise. This article will be introductory, in it I will tell only about the most popular and well-known experiments that are easy to perform at home with the child.
The article is based on a list from the previous post , which I expanded with explanations and added a little. Of course, the explanations are not complete, the list is even more so. This is just a seed to interest.
1. Go to the science museum with him.
As noted in the comment branch , almost in every major city there is at least one science museum, in addition, there are a huge number of magnificent decent science centers in various cities of Europe, the USA, Israel, etc. For each such institution is easily the official site, as well as reviews, reviews and photos from visitors.
')
I agree with the commentators that museums, wanting to please children, tend to create as “spectacular” exhibits as possible, often to the detriment of the educational part. Additionally, the situation is aggravated by the fact that some guides are volunteers with a liberal arts education. Explaining to the child how that one or another physical device works, they vigorously and happily share their fantasies and inventions. In general, it is worthwhile to worry about this question in advance, and it is best to conduct a tour yourself (if your knowledge allows it).
2. Assemble an ordinary flashlight
Depending on the age, knowledge and skills of the child, as well as your free time, different options are possible. If the child is more mature, you can equip yourself with a soldering iron, and carry out the lighting in a homemade cardboard house, as the user GeckoPelt did .

If the child is younger, it is better to use a ready-made kit for laboratory work.

Or make a similar set yourself. For example, I did the following for my five year old son:

In the yellow heat-shrinking shribrik - ionistor. For 5-10 seconds, it charges from standard charging with a USB connector. To the other end, the son connects a buzer with a built-in generator, a laser pointer, or any 5 mm LED to choose from. While this set is enough for him.
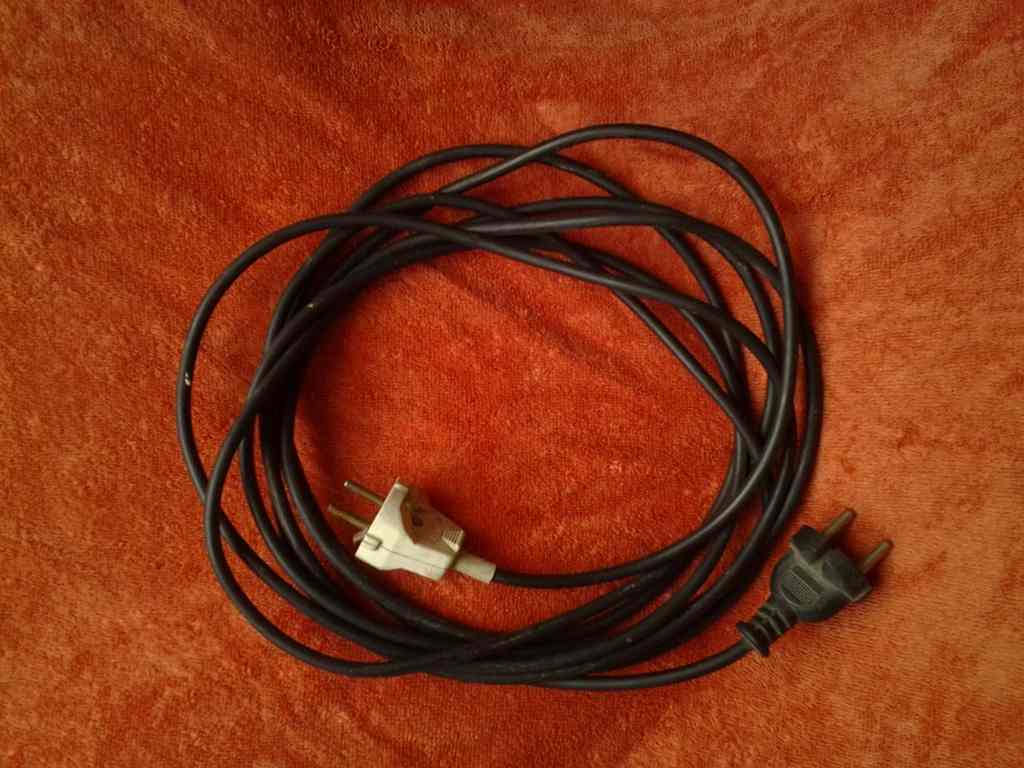
About safety
Most acquaintances who see this set, anxiously ask me: “Isn't it dangerous that charging is plugged in and the children touch it?”. Probably, all the children are different, but after my son, at the age of two, used a self-tapping screw to dig a plug out of the socket, I realized that it is better to teach a child to handle the plug and socket carefully than to put gags and locks.
I find much more dangerous sockets falling out of the boxes, or sockets with damaged covers, but I experienced the greatest horror when we moved into one rented apartment. Its owner, in an original way, eliminated a line break from one of the rooms:
My children (2 and 5 years old) are very curious and know perfectly well that there is a plug on one side of the wire, and the device on the other, and if this is not the case, then it’s worth finding out. Fortunately for my family, I knew that too, and first noticed an unusual “gizmo”. The design was immediately removed and the wiring redone. NEVER, NEVER allow anything like this in your apartment! It is very dangerous and can actually be fatal . Surprisingly, the owner of the apartment did not understand the reason for my disturbances.

There are still electronic designers, such as “OST” and its clones. In general, I treat such designers well, but before acquiring it, you need to consider a few points:
- A small child is not yet able to perceive the blocks as conductors and abstract assemblies from them into an electrical circuit, that is, this set is not for kids at all.
- Without control of adults, children immediately discover that they can start a propeller, and that’s the only thing they do. I can not say that this is a bad job, but the study of the set usually ends there.
- Under the supervision of a strict adult, the child diligently repeats the scheme after the scheme from the book without the slightest understanding of what he is doing. Sometimes children try to do something on their own and a short circuit will occur. The battery heats up and sits down, the stern adult is very unhappy, the child understands that he “made a mistake” and then only collects it according to the scheme.
In other words, if you gave a child a similar set, then feel free to play and have fun with him, explaining and inventing your own schemes!
3. Make the ping-pong ball soar in the air stream from the hairdryer
Everything is simple:
- We take a ping-pong ball and a hairdryer without attachments.
- Turn on the hair dryer and turn it so that the air flow is vertically upwards.
- Place the ball in the flow axis at a distance of about 10 cm from the nozzle of the dryer.
- According to Bernoulli's law, the ball will tend to be in the center of the stream. As a result, he will levitate in the jet.
Instead of a tennis ball, you can use an inflatable ball.
4. Make a microscope from a drop on the glass.

The drop has a spherical shape and, in fact, is a collecting lens. It is convenient to study the microcosm with a drop on the edge of the pipette, or droplets on the surface of the glass. The smaller the drop, the smaller objects it allows to observe. If you want to show the child the pixels on the smartphone screen, then note that modern smartphones have a high dpi. To see a pixel, a drop must be very small. For this purpose, I use a spray gun. The drops are so small that they evaporate in a few seconds.
I also recommend to read the post from beliakov : "Macro photography with improvised means: just add water"
5. Assemble unipolar motor
The unipolar engine is the simplest type of electric motor among existing ones. In the home version widespread two options. The first - with a rotating screw and a magnet, the second - with a stationary magnet and a rotating frame. Both options are noted in this comment from SilverHorse .
6. Make a compass from a magnetized needle on the water
This link is a video from my lab colleague. In addition to the compass, the video also explains very clearly how to repeat Oersted's experience.
7. Create your kaleidoscope

I took a photo from this site . You can also find a detailed description of the assembly process. I personally confirm that as a mirror you can use ordinary aluminum tape.
8. Show the night sky and the Milky Way (outside the city)

Let me remind you that the city illumination practically does not give an opportunity to admire our galaxy, and it is not possible in every village. But if you and your son had such an opportunity, for example, somewhere along the way between cities - do not take the time to stop and admire the greatness of the Milky Way.
9. Show Saturn and the Moon through a telescope.
It seems to me that the post from lozga will be exhaustive: “IT person on vacation: what about the telescope?”
10. Demonstrate how to build an image with a lens (a conventional magnifying glass).
It is no secret that a collecting lens allows you to project actual inverted images onto the screen. I still remember that for me it was a real discovery that with the correct placement of a magnifying glass between the candle and the wall, an inverted image of the candle appears on the wall. Now I don’t light candles for children, but I project the screens of their mobile phones on the wall. Thus, a primitive projector is obtained. Fresnel lens can also be used as a collective lens.

Such a lens has a large area and a small focal length, thanks to which it captures more light and the picture is brighter. If desired, the lens and the phone can be inserted into the shoe box, then the device is already more like a projector, there is also no parasitic illumination from the screen of the phone.

Photos from this site . There you can find instructions and other examples.
If the child is older and you are full of strength and energy, then you can even make a real projector with a significant aperture and resolution. The search query “do-it-yourself projector Fresnel lens” to help you.

In this section, you can add and burning a magnifying glass, thanks FlameStorm , that recalled. If the child is small, we say that the lens collects the light from the sun at one point, if it is older, that we get the construction of the image of the sky with clouds and the sun, where it burns out the image of the sun. You knew that, right?
11. Assemble the camera obscura.

This is a very worthwhile experiment with the “Wow effect” and the qualitative methodical component. The camera obscura is a dark room, on the wall of which, through a hole, an image of the street is projected. In fact, this is the progenitor of cameras!
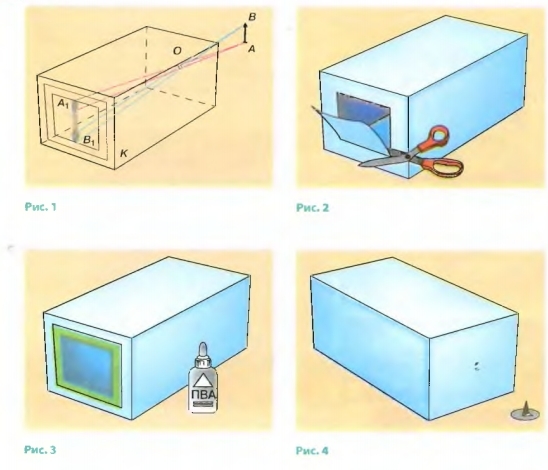
There are a lot of pinhole camera designs. From the simplest ones, as in the photo, to more thoughtful models with variable focal length, with sets of holes of different diameters and protection from glare of the eyes. The most diligent parents can collect with children a full-fledged film camera, as in this article . Well, if it so happens that the lens on your camera is removed, then it would be a crime not to take a few photos (pinhole).

12. Electrify the balloon and stick it to the wall.
I think this experiment is well known to all. Electrostatics allows you to create a large number of colorful experiments, in addition, many interesting experiments were developed in my “Laboratory of Physics Teaching Methods” at my university. I will not even try to fit something in this post, but leave all the material for a separate article.
13. Buy an ultraviolet flashlight and turn off the light in the room.

I repeat, almost all the bright "poisonous" colors luminesce. Such paints cover most of the children's toys. It looks very impressive. You can still shine in the pencil case, as well as draw something with a bright marker.
Instead of a flashlight, you can buy a UV lamp, or borrow a lamp for nails from your wife:

Do not conduct experiments with a quartz UV lamp! It emits a hard ultraviolet, incredibly harmful to the eyes, in contrast to the LED flashlight.
14. Buy a plasma lamp and light a fluorescent lamp in the hands of a child
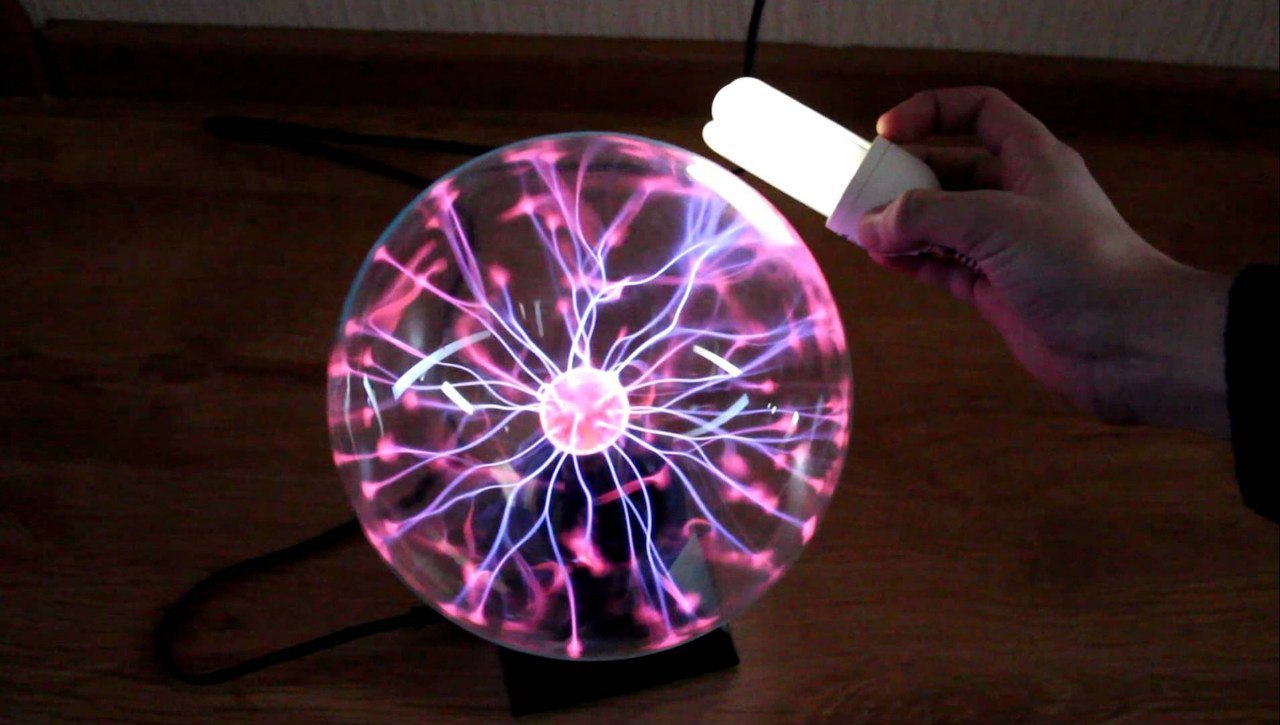
inside this lamp is a Tesla transformer, which emits a powerful alternating electric field, which, in turn, leads to gas discharges in the lamps.
The lamp is very popular with young children. In no case do not leave them alone with the device, they can beat the lamp or the lamp. Just as tormozedison correctly noted, do not bring electronics to the lamps, which you are not ready to part with.
15. Buy soap bubbles

J. B. C. Chardin. Bubble. OK. 1739
This proposal caused a whole wave of discussion in the comments. I agree that you can buy bubbles and make them yourself. There is a huge variety of fun with soap bubbles, ranging from simple physical experiments (J. Perelman, “Entertaining Physics.” Book 1. Chapter 5), to educational demonstrations for students of physical faculties (J. Geguzin, “Living Crystal” and “Soap bubbles ”). My children themselves, guessed that with the help of liquid soap, you can get soap bubbles, now they do not leave the bathroom for hours.
A separate layer go show with giant bubbles. There are not many physical contents in them, but children like them very much. You can take your child to a show in the summer, or buy a set yourself. If you want to try to make a liquid for bubbles with your own hands, I recommend the link that Meklon brought.
16. Experiments with the expansion of gases during heating
The goal of all these experiments is to show that if the gas is heated, the pressure in it increases and it begins to expand. I try not to hold these demonstrations until I explain the basics of the ILC to children.
The most famous simple and vivid experience is the egg in the bottle. When I spent a week of entertaining physics in a private school in Montenegro, the children liked this experiment so much that, at half-time, they themselves decided to draw a small instruction:

I confess that the instruction is with one mistake, but I did not interfere in the creative process.
For interested readers a mystery. As from a medical glove, and a tin can of coffee, make a simple thermometer that can be used to determine if it is warm, cold, or hot.
17. Balloon

Explain to your child the principle of the Montgolfier and work with it a Chinese lantern.
18. Helium balloon
Buy a helium balloon and tell your child about Charlera and aeronautics.
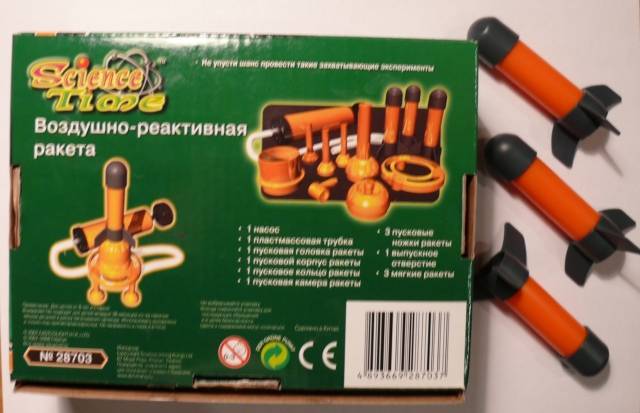
19. Reactive force

The simplest thing is to launch a balloon along the thread, as in the photo. A higher level is to make a rocket from a plastic bottle on water and compressed air. Ile buy a similar rocket:
20. Recommendation from jar_ohty
Add to the list “Make a telescope of two loops, holding one in the left hand near the eye, the other - the right one”. For me at the age of six it was such a discovery! Which I, moreover, myself did.
21. Recommendation from alecv
From simple experiments yet:
· On a sunny day, take a mirror and get a sunny spot on the ceiling. Then take a basin where 3 cm of water is poured and lower the same mirror with one edge (get a water prism). The edges of the bunny will be painted in a rainbow.
· Pour water and half a cup of milk into a large container, such as an aquarium. Show the propagation of a ray of light from a laser pointer and its reflection.
Conclusion
Before you conduct the experiment, I strongly recommend to understand the physics of the process and think about how it will be better to bring it to your child. In addition, it is worth looking for how these experiments are performed by others, because the same experience has a huge number of variations in performance. In parallel, you will find a huge number of new interesting ideas. I invite you to share in the comments fascinating experiments, useful Internet resources and books, as well as discuss ready-made kits.
In the next posts, I would like to share the methodological developments of the “Laboratory of Physics Teaching Methods”, where I was lucky to work at one time, and also tell where to get and how to experiment with liquid nitrogen and dry ice at home.
Source: https://habr.com/ru/post/391831/
All Articles