Installing the Android tablet NEXUS 7 2013 instead of the radio in the Mazda MX-5 - part 1/2
Hello reading! In this article I will try to describe the whole way of installing the tablet on an android as a radio in the mazda mx5 car. Starting from the purchase of components and ending with the software part - in general, a complete complete set with a bunch of photos, videos and text. I did this work and tried to describe everything so that everyone could repeat it!
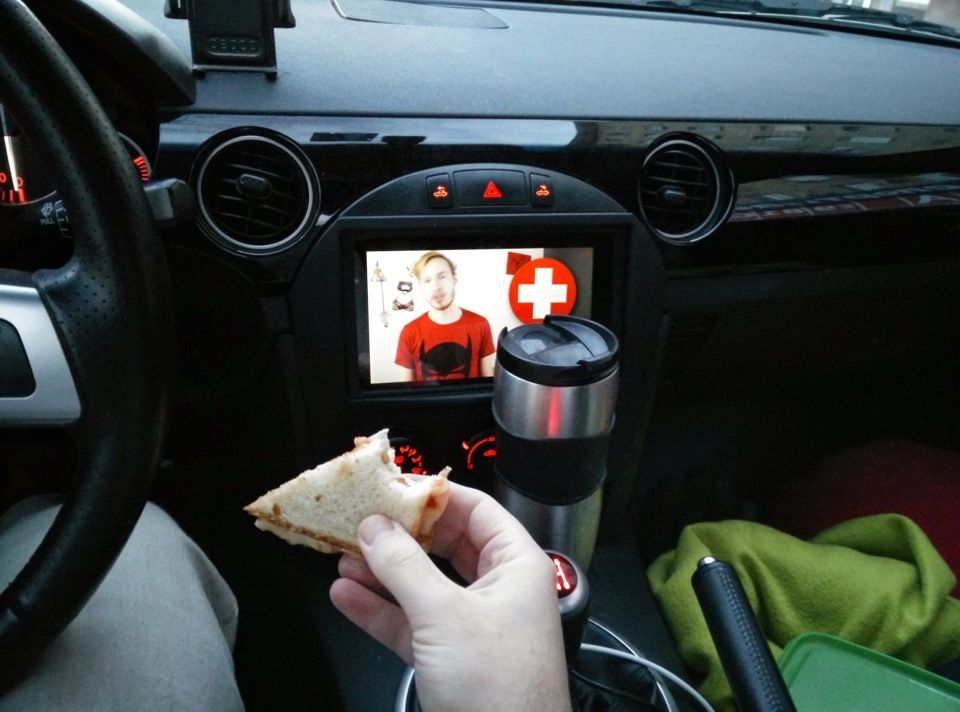
And you can have breakfast in traffic jams with YouTube
')
In this fascinating article we will touch on the order of electronics from abroad, setting up unusual devices and auto compatibility with the tablet and setting up an android with scripts and a modified interface for living in a car.
Selection of components
The basis of the project is of course the tablet. I chose the Nexus 7 because it is a rather reliable, functional and at the same time inexpensive tablet from a good brand. Next, you need to immediately determine where we will purchase the set for creating a multimedia system. As you understand, there are a lot of options, but I stopped my choice on buying a tablet in Moscow, and accessories in Moscow and on ebay 50/50. In principle, it is possible to find everything just in Moscow, but some things on ebay are cheaper by a factor of 2–3, and some in Moscow are very hard to find.
Well, let's go on a specific list. In this way, I connected the nexus to the machine:
Whoa whoa! It looks ugly, but now we all simplify it)
The video below shows all the components, their connection as well as installation and connection in the car!
Or you can read further in text form with pictures.
If you watched the video - you know in principle everything you need, you can scroll to the list of components with links and prices.
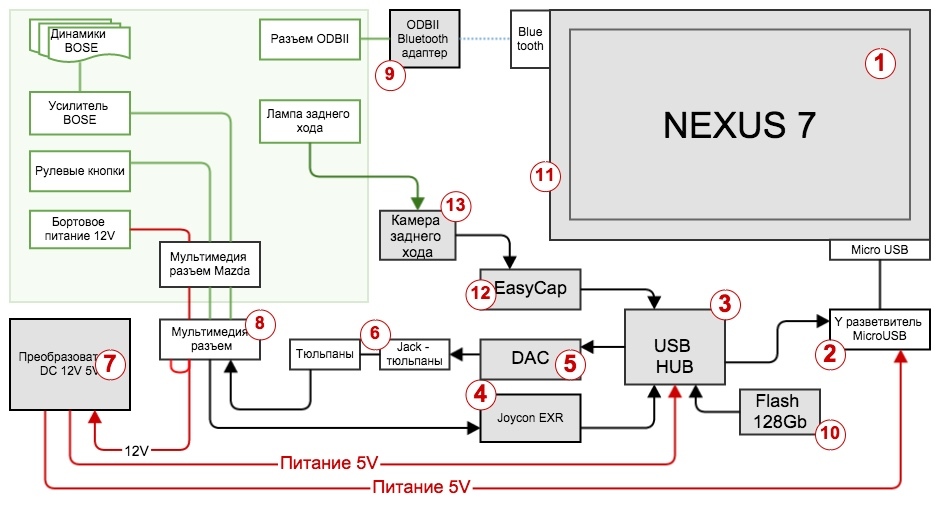
So, proceeding from the scheme above - the lines for power supply are marked in red, the devices are marked in gray, and the white ones are just wires and connectors. The green part - this is what is already in the car without us.
In this diagram:
1. The nexus itself. It has a microusb connector for charging and connecting a USB hub as well as Bluetooth for wireless devices and sim for 4G internet

2. Splitter microusb to USB (data) + microusb (power). It is necessary so that the tablet can simultaneously charge from 5V power supply and use a USB OTG connector for connecting external devices. Please note that a special cable is needed, which indicates DATA + POWER and not every tablet can work with it correctly!
3. USB Hub for at least 4 ports with external power. External power is a must. Preferably one should be 5V (this is almost always the case)

4. Joycon EXR Module, with which we will make the buttons on the steering wheel

5. External sound card on USB with jack 3.5mm output. You can do without it, but the sound quality and lack of noise makes this thing useful.

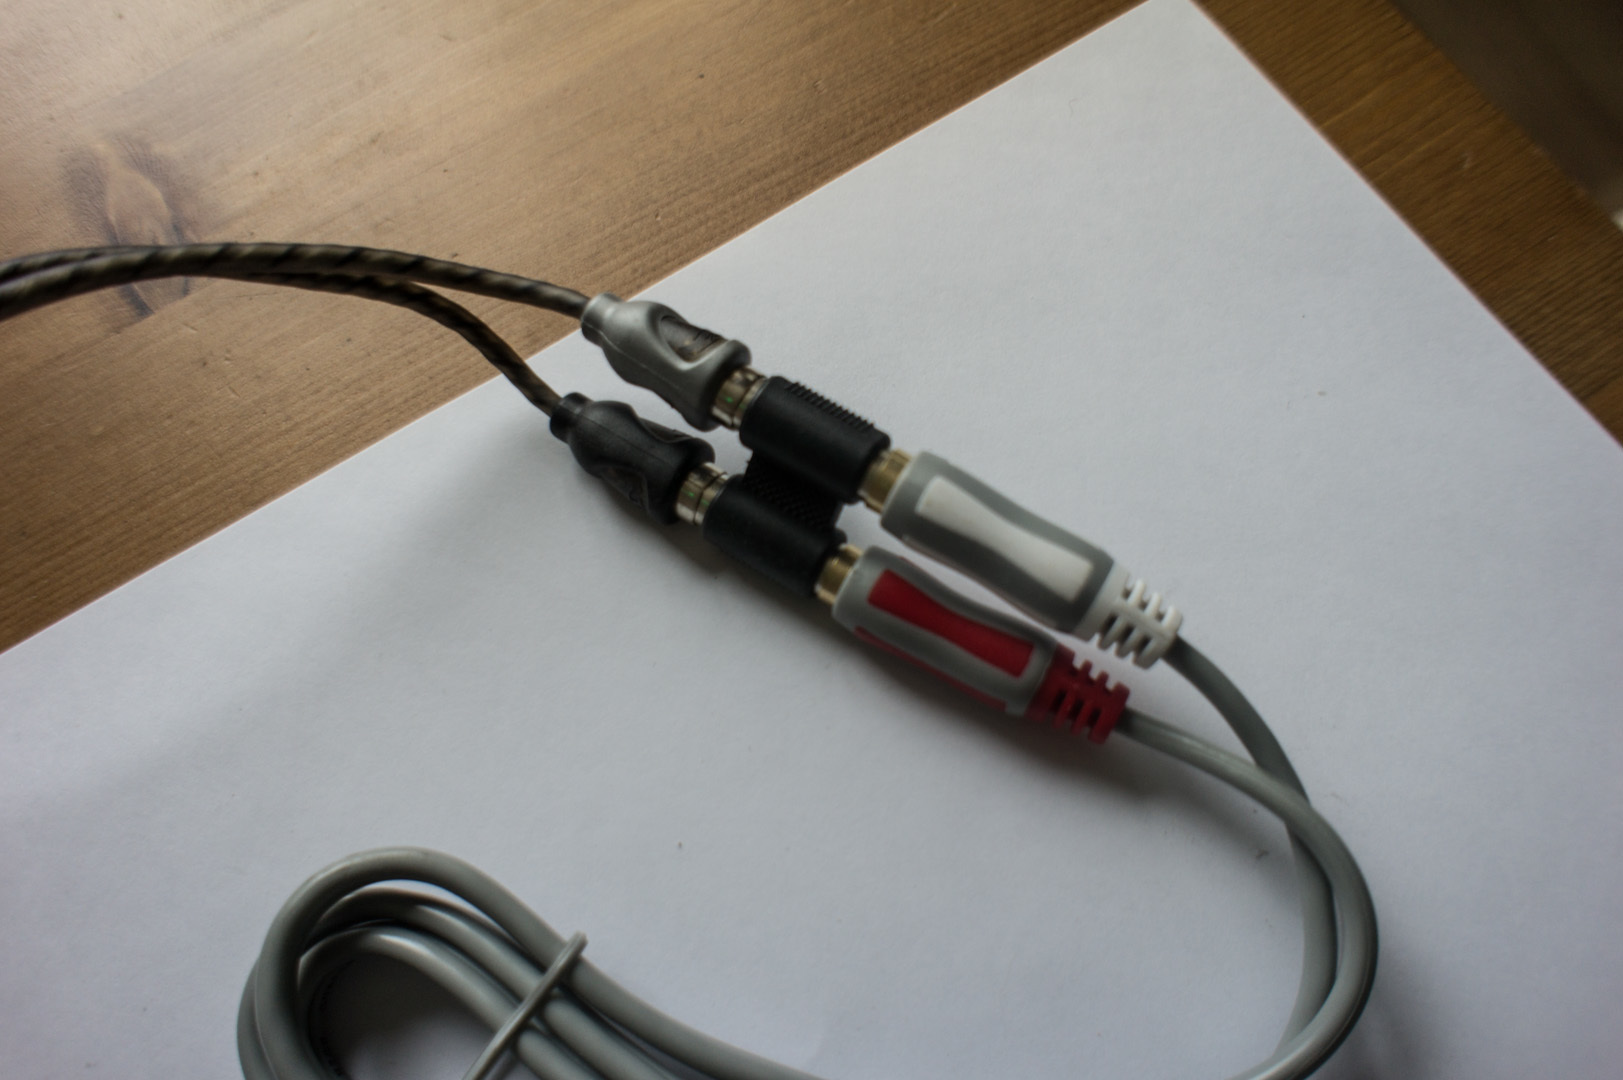
6. Jack - tulips for switching from one wire to two pairs (the wires are located in the car) + Tulips with bare wires at the other end
7. Onboard power converter 12V to 5V required for charging the tablet. In the converter, the power output is already carefully designed in the form of USB sockets. Power pick up again with the chips radio

8. Multimedia plug from Mazda itself. It is convenient to work with him, while not invading the wiring of the car and in general the system is replaced back with a regular player in 10 minutes!
9. Optional ODBII Bluetooth adapter for receiving information from the onboard computer of the car. Android has a special software that can work with it.

10. Just a 128GB flash drive
11. 2DIN frame for tablet installation

12. EasyCap video capture device for receiving a signal from the rear view camera
13. Reversing camera connected to the reversing light

All components assembled

Take into account the important point - the focus with the tablet will pass only if you have an audio amplifier in the car. Very often, low-cost audio systems as well as most conventional external tape recorders contain a built-in amplifier. Thus, removing the radio and the amplifier from the car, we will leave only the speakers with wires - of course, the tablet is not able to provide them with the necessary power. In this case, you definitely need to buy an external audio amplifier! Its price and configuration will depend on the specific car, but in some simple version you will only need a two-channel amplifier (stereo) to which you connect your speakers.
Go through the prices and places of purchase
Again, based on the scheme
! During the preparation of the article, prices were no longer relevant, and some links could become non-working. I will try to fix it soon
1. Nexus 7 2013 32gb lte is the maximum version of the nexus tablet at the time of this writing. It is worth 12-13 thousand rubles in Moscow. You can save by taking the version without LTE - it will be 3 thousand cheaper. Or take b / y (I did so) for 9-10 thousand rubles.
2. USB-Y-OTG wire - 160 rubles from ebay with delivery. Pay attention to the angular microusb connector - this is very important, there is no place for a direct connector! www.ebay.com/itm/Micro-USB-Host-OTG-Cable-With-USB-Power-For-Samsung-Galaxy-Note-i9220-Brand-new-/261559225174 ?
3. USB HUB - anyone with external power supply is suitable, for example, www.oldi.ru/catalog/element/0209249 - 300 rubles
4. Joycon exr - to make the buttons on the steering wheel. In Russia it is not possible to buy it, on ebay completely - www.ebay.com/itm/CarPC-JoyCon-Exr-Steering-wheel-controls-USB-interface-/221286412466?pt=Keyboard_Mice_Bundles&hash=item3385b2b0b2 - with delivery 2100 rubles
5. External sound card Hifimediy Saber. I repeat - this is not a mandatory component. www.ebay.com/itm/131196141440?_trksid=p2060778.m2749.l2649&ssPageName=STRK%3AMEBIDX%3AIT - 2100 rubles with delivery
6. Any wires - we need these:
a. Jack 3.5mm - 2xRCA - www.oldi.ru/catalog/element/0209397 170 rub. If you do not buy a sound card - look for a cable from which the JACK connector will be at a 90 degree angle!
b. 2xRCA - wires for connecting to the radio connector. It is unlikely that you will find the option directly with bare wires, but you can gut such for example www.oldi.ru/catalog/element/0242152 - 130 rub
c. You may need an adapter for RCA - www.oldi.ru/catalog/element/0153396 - 50 rubles per pair
7. Power converter. You can use the usual USB charging from the cigarette lighter, but I recommend to take something more serious and not have any problems later. For example www.chipdip.ru/product/sd-25a-5 - Mean Well SD-25A-5. This is a serious converter with 5V 5A output and output voltage regulation. This is a useful feature because for a quality tablet charge I had to twist the output voltage from 5 to 5.7 V - 1600 rubles
8. Not sure that in Moscow you can buy it. Even on ebay did not see - only Amazon - www.amazon.com/gp/product/B0030N2XJU/ref=oh_aui_detailpage_o02_s00?ie=UTF8&psc=1 - costs 300 rubles
9. Wireless ODBII scanner. Surprisingly - before wired cost from 3000 rubles, and now you can buy wireless for 300 rubles - www.ebay.com/itm/Mini-VGate-Scan-ELM327-Bluetooth-OBD2-V1-5-OBDII-Auto-Torque-Scanner- L5RG- / 201125806332? Hash = item2ed40840fc & item = 201125806332 & pt = Motors_Automotive_Tools & vxp = mtr
10. I bought it simply because I got my hand for cheap - www.dx.com/p/kingston-digital-128gb-usb-3-0-datatraveler-mini-emerald-dtm30-128gb-852337126#.VDU8Myl_t4h - 2400 rubles
11. 2DIN transition frame - www.ebay.com/itm/NEW-METRA-99-7519B-SINGLE-DOUBLE-DIN-INSTALLATION-DASH-KIT-FOR-2010-MAZDA-MIATA-/181474044303?pt=US_Car_Audio_Video_Dashboard_Installation_Kits4 - 2000 rubles with delivery. In general, you can find cheaper - rubles for 700. In Moscow, you can buy for 1500 if you look
12. EasyCap costs about 700-1000 rubles in Moscow, on ebay - 300 rubles with delivery www.ebay.com/itm/141320692656?_trksid=p2060778.m2749.l2649&ssPageName=STRK%3AMEBIDX%3AIT
13. Camera in Moscow 1000-1500 rubles a lot where you can buy, I chose on ebay such a fairly expensive one - www.ebay.com/itm/161333210368?_trksid=p2060778.m2749.l2649&ssPageName=STRK%3AMEBIDX%3AIT - 800 rubles per second delivery
Total we get: about 25 thousand rubles for the full stuffing.
Budget option: nexus 7 2012 3g (6000 rubles), without an external sound card, without a 128GB flash drive, without a back-up camera, the rest is left = 11 thousand rubles. As you can see there is where to save - you want to choose the most stuffing or just a working basic system. Many things can be discarded at the beginning by purchasing them later if desired. The only thing on which I do not recommend saving is the tablet - the 2013 model’s screen is brighter and works faster. And the power converter - 1600 seems a lot, but in fact this is the price of two Chinese cigarette lighter adapters.
Having finished with the purchase, we begin to build. Most of the work on the connection and configuration can be done right at home.
Due to the fact that we have thought of everything in advance, now you do not have to frantically run around the shops, buying up unexpectedly very necessary parts or soldering everything right and left. Everything is connected nicely and neatly with us, just like a designer for adults.
The connection between the tulips and the connector of the car is neatly soldered (well, or crimped with a special connector)
We need these four wires:

Everything, from this moment we have conditionally working music in the car. Imagine how simple it is)
Now power starting from the microusb connector in the tablet
• Corner microusb
• Data + power microusb + usb cable
• USB - Microusb cable
• 12V - 5V converter with USB at the end
• Auto connector wiring
For power, we take the wires on which there is power when you turn the key to the ACC position
Carefully solder and isolate well (there 15A aha, snot from wires are not recommended)
In these power wires, it is wonderful that they are de-energized when the key is removed from the ignition, which gives two important advantages. Firstly, it is safe - our whole hand-made system is not energized when we leave the car. In this case, the disconnection is made at the level of the brains of the car, which means it is reliable and does not depend on our curvature. Secondly, we get two very important events in the life of the tablet “power supply” - “power supply cessation” - based on these events we will create a simple script that will turn off the screen and stop playing music when you take out the key and start everything back when we insert key and start the car. Well, just like all adult tape recorders!
Further, if we want to connect the buttons on the steering wheel directly to the tablet (what a progress has reached!), We need to plug into our free USB connector on the Y cable that is sticking out of the tablet, plug CarPC JoyCon EXR. It is powered by USB and it does not need a separate power supply. But you need to connect the following wires to it, which we take again from the auto connector. About his setup will be in the next part (in general, there is nothing very complicated).
Bluetooth ODBII adapter, we connect directly to the car, because my house (most likely as yours) is not equipped with such connectors))
Now when we tried to connect everything - you need to fix the tablet in a 2din frame. This can be done in many ways, I chose this. The most important thing is that the tablet does not hang out in the frame and does not bend by pressing a finger, otherwise you will get terrible impressions of working with it.
Installation in the car, the connection of all components
So we brought all our good to your favorite car. First you need to remove the full-time multimedia system. By the way, if you have your favorite disks in it - do not forget to remove) And then minus 6 disks in the collection ... although who needs them now, we have a super-tablet-mafon!
Removing the system is not very difficult. Remove the side plugs and unscrew the screw on the sides. Carefully, but persistently pull the frame towards you. Disconnect the wiring. Pull on taking it out. Rearrange the climate unit in a new frame. Connect the chip wiring (how simple it is, if done in advance). Put the frame in place. If everything is done correctly at all stages before that - by turning on the car, make sure that.
• Tablet is charging
• The sound of the player on the tablet is heard on the speakers
That's all, congratulations, this is a basic version, but nevertheless you have a working adnroid tablet instead of a radio tape recorder! You can listen to Muzaku, lay routes with traffic jams, watch a kintso, play toys and surf the internet from this wonderful device. It is always charged and ready to go.
In the second and final part:
- Connect to the tablet and configure all the buttons on the steering wheel
- Connect the bluetooth ODBII adapter and remove-display information from the car's computer
- Installation of special firmware for the car
- Setting through Tasker "smart cars" (this is like a smart home, only cars)
- Installation of rear view camera (maybe)
And you can have breakfast in traffic jams with YouTube
')
In this fascinating article we will touch on the order of electronics from abroad, setting up unusual devices and auto compatibility with the tablet and setting up an android with scripts and a modified interface for living in a car.
Selection of components
The basis of the project is of course the tablet. I chose the Nexus 7 because it is a rather reliable, functional and at the same time inexpensive tablet from a good brand. Next, you need to immediately determine where we will purchase the set for creating a multimedia system. As you understand, there are a lot of options, but I stopped my choice on buying a tablet in Moscow, and accessories in Moscow and on ebay 50/50. In principle, it is possible to find everything just in Moscow, but some things on ebay are cheaper by a factor of 2–3, and some in Moscow are very hard to find.
Well, let's go on a specific list. In this way, I connected the nexus to the machine:
Whoa whoa! It looks ugly, but now we all simplify it)
The video below shows all the components, their connection as well as installation and connection in the car!
Or you can read further in text form with pictures.
If you watched the video - you know in principle everything you need, you can scroll to the list of components with links and prices.
So, proceeding from the scheme above - the lines for power supply are marked in red, the devices are marked in gray, and the white ones are just wires and connectors. The green part - this is what is already in the car without us.
In this diagram:
1. The nexus itself. It has a microusb connector for charging and connecting a USB hub as well as Bluetooth for wireless devices and sim for 4G internet
2. Splitter microusb to USB (data) + microusb (power). It is necessary so that the tablet can simultaneously charge from 5V power supply and use a USB OTG connector for connecting external devices. Please note that a special cable is needed, which indicates DATA + POWER and not every tablet can work with it correctly!
3. USB Hub for at least 4 ports with external power. External power is a must. Preferably one should be 5V (this is almost always the case)
4. Joycon EXR Module, with which we will make the buttons on the steering wheel
5. External sound card on USB with jack 3.5mm output. You can do without it, but the sound quality and lack of noise makes this thing useful.
6. Jack - tulips for switching from one wire to two pairs (the wires are located in the car) + Tulips with bare wires at the other end
7. Onboard power converter 12V to 5V required for charging the tablet. In the converter, the power output is already carefully designed in the form of USB sockets. Power pick up again with the chips radio
8. Multimedia plug from Mazda itself. It is convenient to work with him, while not invading the wiring of the car and in general the system is replaced back with a regular player in 10 minutes!
9. Optional ODBII Bluetooth adapter for receiving information from the onboard computer of the car. Android has a special software that can work with it.
10. Just a 128GB flash drive
11. 2DIN frame for tablet installation
12. EasyCap video capture device for receiving a signal from the rear view camera
13. Reversing camera connected to the reversing light
All components assembled
Take into account the important point - the focus with the tablet will pass only if you have an audio amplifier in the car. Very often, low-cost audio systems as well as most conventional external tape recorders contain a built-in amplifier. Thus, removing the radio and the amplifier from the car, we will leave only the speakers with wires - of course, the tablet is not able to provide them with the necessary power. In this case, you definitely need to buy an external audio amplifier! Its price and configuration will depend on the specific car, but in some simple version you will only need a two-channel amplifier (stereo) to which you connect your speakers.
Go through the prices and places of purchase
Again, based on the scheme
! During the preparation of the article, prices were no longer relevant, and some links could become non-working. I will try to fix it soon
1. Nexus 7 2013 32gb lte is the maximum version of the nexus tablet at the time of this writing. It is worth 12-13 thousand rubles in Moscow. You can save by taking the version without LTE - it will be 3 thousand cheaper. Or take b / y (I did so) for 9-10 thousand rubles.
2. USB-Y-OTG wire - 160 rubles from ebay with delivery. Pay attention to the angular microusb connector - this is very important, there is no place for a direct connector! www.ebay.com/itm/Micro-USB-Host-OTG-Cable-With-USB-Power-For-Samsung-Galaxy-Note-i9220-Brand-new-/261559225174 ?
3. USB HUB - anyone with external power supply is suitable, for example, www.oldi.ru/catalog/element/0209249 - 300 rubles
4. Joycon exr - to make the buttons on the steering wheel. In Russia it is not possible to buy it, on ebay completely - www.ebay.com/itm/CarPC-JoyCon-Exr-Steering-wheel-controls-USB-interface-/221286412466?pt=Keyboard_Mice_Bundles&hash=item3385b2b0b2 - with delivery 2100 rubles
5. External sound card Hifimediy Saber. I repeat - this is not a mandatory component. www.ebay.com/itm/131196141440?_trksid=p2060778.m2749.l2649&ssPageName=STRK%3AMEBIDX%3AIT - 2100 rubles with delivery
6. Any wires - we need these:
a. Jack 3.5mm - 2xRCA - www.oldi.ru/catalog/element/0209397 170 rub. If you do not buy a sound card - look for a cable from which the JACK connector will be at a 90 degree angle!
b. 2xRCA - wires for connecting to the radio connector. It is unlikely that you will find the option directly with bare wires, but you can gut such for example www.oldi.ru/catalog/element/0242152 - 130 rub
c. You may need an adapter for RCA - www.oldi.ru/catalog/element/0153396 - 50 rubles per pair
7. Power converter. You can use the usual USB charging from the cigarette lighter, but I recommend to take something more serious and not have any problems later. For example www.chipdip.ru/product/sd-25a-5 - Mean Well SD-25A-5. This is a serious converter with 5V 5A output and output voltage regulation. This is a useful feature because for a quality tablet charge I had to twist the output voltage from 5 to 5.7 V - 1600 rubles
8. Not sure that in Moscow you can buy it. Even on ebay did not see - only Amazon - www.amazon.com/gp/product/B0030N2XJU/ref=oh_aui_detailpage_o02_s00?ie=UTF8&psc=1 - costs 300 rubles
9. Wireless ODBII scanner. Surprisingly - before wired cost from 3000 rubles, and now you can buy wireless for 300 rubles - www.ebay.com/itm/Mini-VGate-Scan-ELM327-Bluetooth-OBD2-V1-5-OBDII-Auto-Torque-Scanner- L5RG- / 201125806332? Hash = item2ed40840fc & item = 201125806332 & pt = Motors_Automotive_Tools & vxp = mtr
10. I bought it simply because I got my hand for cheap - www.dx.com/p/kingston-digital-128gb-usb-3-0-datatraveler-mini-emerald-dtm30-128gb-852337126#.VDU8Myl_t4h - 2400 rubles
11. 2DIN transition frame - www.ebay.com/itm/NEW-METRA-99-7519B-SINGLE-DOUBLE-DIN-INSTALLATION-DASH-KIT-FOR-2010-MAZDA-MIATA-/181474044303?pt=US_Car_Audio_Video_Dashboard_Installation_Kits4 - 2000 rubles with delivery. In general, you can find cheaper - rubles for 700. In Moscow, you can buy for 1500 if you look
12. EasyCap costs about 700-1000 rubles in Moscow, on ebay - 300 rubles with delivery www.ebay.com/itm/141320692656?_trksid=p2060778.m2749.l2649&ssPageName=STRK%3AMEBIDX%3AIT
13. Camera in Moscow 1000-1500 rubles a lot where you can buy, I chose on ebay such a fairly expensive one - www.ebay.com/itm/161333210368?_trksid=p2060778.m2749.l2649&ssPageName=STRK%3AMEBIDX%3AIT - 800 rubles per second delivery
Total we get: about 25 thousand rubles for the full stuffing.
Budget option: nexus 7 2012 3g (6000 rubles), without an external sound card, without a 128GB flash drive, without a back-up camera, the rest is left = 11 thousand rubles. As you can see there is where to save - you want to choose the most stuffing or just a working basic system. Many things can be discarded at the beginning by purchasing them later if desired. The only thing on which I do not recommend saving is the tablet - the 2013 model’s screen is brighter and works faster. And the power converter - 1600 seems a lot, but in fact this is the price of two Chinese cigarette lighter adapters.
Having finished with the purchase, we begin to build. Most of the work on the connection and configuration can be done right at home.
Due to the fact that we have thought of everything in advance, now you do not have to frantically run around the shops, buying up unexpectedly very necessary parts or soldering everything right and left. Everything is connected nicely and neatly with us, just like a designer for adults.
The connection between the tulips and the connector of the car is neatly soldered (well, or crimped with a special connector)
We need these four wires:
Everything, from this moment we have conditionally working music in the car. Imagine how simple it is)
Now power starting from the microusb connector in the tablet
• Corner microusb
• Data + power microusb + usb cable
• USB - Microusb cable
• 12V - 5V converter with USB at the end
• Auto connector wiring
For power, we take the wires on which there is power when you turn the key to the ACC position
Carefully solder and isolate well (there 15A aha, snot from wires are not recommended)
In these power wires, it is wonderful that they are de-energized when the key is removed from the ignition, which gives two important advantages. Firstly, it is safe - our whole hand-made system is not energized when we leave the car. In this case, the disconnection is made at the level of the brains of the car, which means it is reliable and does not depend on our curvature. Secondly, we get two very important events in the life of the tablet “power supply” - “power supply cessation” - based on these events we will create a simple script that will turn off the screen and stop playing music when you take out the key and start everything back when we insert key and start the car. Well, just like all adult tape recorders!
Further, if we want to connect the buttons on the steering wheel directly to the tablet (what a progress has reached!), We need to plug into our free USB connector on the Y cable that is sticking out of the tablet, plug CarPC JoyCon EXR. It is powered by USB and it does not need a separate power supply. But you need to connect the following wires to it, which we take again from the auto connector. About his setup will be in the next part (in general, there is nothing very complicated).
Bluetooth ODBII adapter, we connect directly to the car, because my house (most likely as yours) is not equipped with such connectors))
Now when we tried to connect everything - you need to fix the tablet in a 2din frame. This can be done in many ways, I chose this. The most important thing is that the tablet does not hang out in the frame and does not bend by pressing a finger, otherwise you will get terrible impressions of working with it.
Installation in the car, the connection of all components
So we brought all our good to your favorite car. First you need to remove the full-time multimedia system. By the way, if you have your favorite disks in it - do not forget to remove) And then minus 6 disks in the collection ... although who needs them now, we have a super-tablet-mafon!
Removing the system is not very difficult. Remove the side plugs and unscrew the screw on the sides. Carefully, but persistently pull the frame towards you. Disconnect the wiring. Pull on taking it out. Rearrange the climate unit in a new frame. Connect the chip wiring (how simple it is, if done in advance). Put the frame in place. If everything is done correctly at all stages before that - by turning on the car, make sure that.
• Tablet is charging
• The sound of the player on the tablet is heard on the speakers
That's all, congratulations, this is a basic version, but nevertheless you have a working adnroid tablet instead of a radio tape recorder! You can listen to Muzaku, lay routes with traffic jams, watch a kintso, play toys and surf the internet from this wonderful device. It is always charged and ready to go.
In the second and final part:
- Connect to the tablet and configure all the buttons on the steering wheel
- Connect the bluetooth ODBII adapter and remove-display information from the car's computer
- Installation of special firmware for the car
- Setting through Tasker "smart cars" (this is like a smart home, only cars)
- Installation of rear view camera (maybe)
Source: https://habr.com/ru/post/391429/
All Articles