Not stupid office
 I would never dare to write an article about the next implementation of a smart home with the connection of sensors for water leakage in the bathroom and tracking systems for cat tricks in the apartment. Thank God, the cat is under the control of the dog, the water does not seem to flow either. But still we are more at work, in various offices, where it is not always possible to create an optimal working environment. The article is devoted to the system of environmental monitoring of the working space in the office and the activities that we had after a month of (surprisingly) stable work. Of course, we send all the data to the clouds, we look at them from our smartphones, there is no usefulness in this, but there is no reason to boast to our friends and relatives, and even in the office it became more comfortable. Everything is implemented on ESP8266, and how - you are welcome under the cat)
Where are we monitoring?
I will not say that we work right in unbearable conditions. Offices in the company are wonderful, in rooms of three people, a lot of flowers. The building itself is surrounded by forest. In general, the panorama of the office where the monitoring system is deployed is attached.

')
What are we monitoring?
Nothing original. We remove office temperature, humidity, pressure and CO2 levels. Of course, a light sensor has been added to the system. The level of illumination of workplaces is even subject to control and should in our case be at the level of 300-400 Lk. Perhaps this is the most important parameter for comfortable work. And the most dynamic during the day.

Temperature and humidity are obtained from the DHT22 sensor. Description of the sensor.

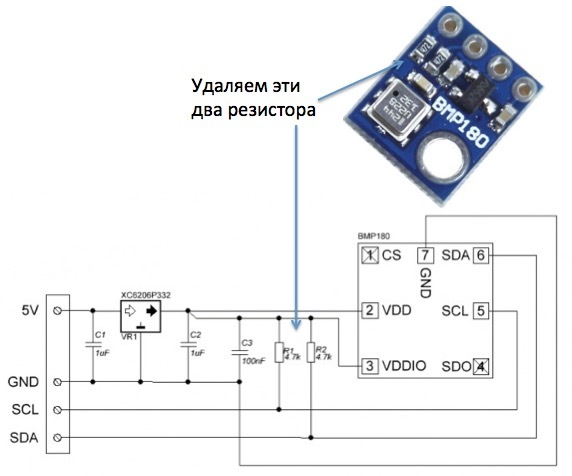
We take pressure from the BMP180 sensor. Description of the sensor.

The CO2 sensor is monitored by an optical sensor MH-Z14. Description of the sensor.

Well, the TSL2561 sensor in the form of a label for the GROVE series Arduino monitors the quality of lighting. Description here .

And, finally, the ESP8266 controller in the form of shawls for NodeMcu rapid prototyping (after the firmware name), which in my case is stitched from the standard Arduino IDE, rules all this.

We collect the boxed version
So, all the sensors are laid out on the table - it's time to assemble the device. However, for the beginning we will analyze some subtleties. Schematic diagram sketched for clarity.

Here, all sensors are powered from +3.3 V, which we take from the NodeMcu board, since there are already three of them on the board. But the carbon dioxide sensor will have to be powered separately, it requires 4-6 volts of power, and the manufacturer strongly recommends that you pay special attention to this. Since I plan to power the device from a separate power supply for + 5V - there will be no problems. We supply power to pin 1 of the MH-Z14 sensor (or 15, since they are duplicated). When turned on, the sensor gives a couple of minutes any garbage to the port when transmitting via the TX / RX line, so I take the useful signal from this sensor from the PWM output on the 6th leg. In general, I liked this sensor. It is quite stable, it has digital and analog output, but it can only work with microcontrollers with three-volt logic, therefore, it won't work to launch it, for example, on UNO without
Without a soldering iron has not done ...
As can be seen from the diagram, I use two sensors on the i2c line. This is a pressure sensor and light sensor. As you know , on the serial bus you can "hang" up to 127 all sorts of sensors and devices. In the implementation of the protocol, SDA / SCL lines should be tightened to power, but only once. And if we hang N sensors, each of which has braces, you can land a line. Probably nothing would have happened from the two sensors - but I am always consistent in design. There should not be a tooth - sorry ... Therefore, we are getting rid of the pull-up resistors in one of the sensors. It was more convenient to pull the resistors out of the pressure sensor. The picture shows.
After all these dopilov - we assemble our boxed version. In a paper box)

What is surprising - earned immediately. Not good for it, but still.
We assimilate data
So, the ideology is as follows. We collect data from the sensors and, for example, every 10 minutes, we drop them into the cloud storage via office Wi-Fi. We build beautiful graphs and analyze the results from Thingspeak.com. The service is free, fairly stable and easy to understand. Much has been written about him. We register the channel, get the API-key, and reset the data from any sensors using the POST method.
Program code
// , #include <Wire.h> #include <ESP8266WiFi.h> // , float index_comfort=0; // //+++++++++++++++++++++++++++++++++++++++++++++++++++ // , // #include "DHT.h" #define DHTTYPE DHT22 // - Grove DHT22 #define DHTPIN 14 // 14 ESP ( D5) . // float humidity_room = 0.0; // // humidity_room = dht.readHumidity(); float temp_room = 0.0; // // temp_room = dht.readTemperature(); // . // DHT dht(DHTPIN, DHTTYPE); //++++++++++++++++++++++++++++++++++++++++++++++++++++ // #include <Digital_Light_TSL2561.h> // float light_room=0.0; // light_room=TSL2561.readVisibleLux(); //+++++++++++++++++++++++++++++++++++++++++++++++++++++++ // C02 int CO2; // int pin_CO2 = 13; // 13, 7 // 2 //+++++++++++++++++++++++++++++++++++++++++++++++++++++++ // . #include <Adafruit_BMP085.h> Adafruit_BMP085 bmp; float pressure =0.0; // // pressure=bmp.readPressure(); // ! // 1013.25 millibar = 101325 = 760 .. ? ... // , //+++++++++++++++++++++++++++++++++++++++++++++++++++++++ // - // thingspeak.com , , .., #define myPeriodic 300; // const char* server = "184.106.153.149"; // thingspeak.com String apiKey ="1K******************GM"; // const char* MY_SSID = "P********x"; // Wi-Fi const char* MY_PWD = ""; // , , "" int sent = 0; // () . ? , ... //++++++++++++++++++++++++++++++++++++++++++++++++++++++++++ // , void setup() { Serial.begin(9600); // Serial.println("Go! Go! Go!"); Wire.begin(); dht.begin(); // TSL2561.init(); // pinMode(pin_CO2, INPUT); // CO2 // if (!bmp.begin()) { Serial.println("Promlem with sensor bmp180!"); while (1) {} } // wi-Fi connectWifi(); } //++++++++++++++++++++++++++++++++++++++++++++++++++++++ // void connectWifi() { Serial.print("Connecting to "+*MY_SSID); WiFi.begin(MY_SSID, MY_PWD); while (WiFi.status() != WL_CONNECTED) { delay(1000); Serial.print("."); } Serial.println(""); Serial.println("Connected"); Serial.println(""); Serial.print("SSID: "); Serial.println(WiFi.SSID()); // IPAddress ip = WiFi.localIP(); Serial.print("IP Address: "); Serial.println(ip); // long rssi = WiFi.RSSI(); Serial.print("signal strength (RSSI):"); Serial.print(rssi); Serial.println(" dBm"); }//end connect //++++++++++++++++++++++++++++++++++++++++++++++++++++ // void send_info(float temp_in, float temp_out, float humidity_in, int CO2_in, float light_in, float pressure_all ) { WiFiClient client; if (client.connect(server, 80)) { // use ip 184.106.153.149 or api.thingspeak.com Serial.println("WiFi Client connected "); // String postStr = apiKey; // postStr += "&field1="; postStr += String(temp_in); // postStr += "&field2="; postStr += String(temp_out); // postStr += "&field3="; postStr += String(humidity_in); // postStr += "&field4="; postStr += String(CO2_in); // 2 postStr += "&field5="; postStr += String(light_in); // postStr += "&field6="; postStr += String(pressure_all); // postStr += "\r\n\r\n"; // client.print("POST /update HTTP/1.1\n"); client.print("Host: api.thingspeak.com\n"); client.print("Connection: close\n"); client.print("X-THINGSPEAKAPIKEY: " + apiKey + "\n"); client.print("Content-Type: application/x-www-form-urlencoded\n"); client.print("Content-Length: "); client.print(postStr.length()); client.print("\n\n"); client.print(postStr); delay(1000); }//end if sent++; // client.stop(); Serial.println("transmition closed "); }//end send //+++++++++++++++++++++++++++++++++++++++++++++++++++++ // , ? void loop() { delay(5000); // dht.begin(); humidity_room = dht.readHumidity(); delay(500); // temp_room = dht.readTemperature(); delay(500); // light_room=TSL2561.readVisibleLux(); delay(500); // CO2 while(digitalRead(pin_CO2)==HIGH){;} float duration_h = pulseIn(pin_CO2,HIGH)/1000; CO2= int(5000*(duration_h-2)/(duration_h+(1004-duration_h)-4)); // delay(500); // bmp.begin(); pressure=bmp.readPressure(); pressure=int((pressure/101325)*760); delay(500); // if (temp_room<18) { index_comfort=(2*light_room/300)+(400/CO2)+humidity_room/40; } if (temp_room>25) { index_comfort=(2*light_room/300)+(400/CO2)+humidity_room/40; } index_comfort=1+(2*(light_room/300)+(400/CO2)+humidity_room/40); if (index_comfort>5){ index_comfort=5; } // send_info(temp_room, index_comfort, humidity_room, CO2, light_room, pressure); //. int count = myPeriodic; while(count--) delay(1000); // , . ... // , // // i2c , // . . // . . // , . , . // , DHT22, . // --, ... // 15 2016 . } If everything works correctly, it will be something like this)
In order for this to work, you will need libraries to work with selected sensors and a library to work with ESP8266 over Wi-Fi. You also need to add a NodeMcu card to the Arduino IDE board list, and in order for the computer to see it, you need a USB-SERIAL CH340 driver, which is easy to find and download on the network without any problems.
Library for ESP8266 Download
Library to work with a humidity sensor. Download
Library for working with light sensor. Download
Library to work with pressure sensor. Download
CO2 sensor in libraries does not need. The readings are calculated by the duration of the pulse output from the PWM and calculated by the formula from the sensor description . By the way, the measurement range is not 2000 ppm, but 5000, about which, by the way, the user Hellsy22 also writes in a recent article about a similar carbon dioxide sensor.
Organizational Conclusions
1. Works
2. The craft is worthy of a box out of paper to move into a decent case.
Here it is. It will be like a traffic light to show the level of comfort in the office.
3. In the office in the evening is not enough light - added a couple of ceiling lights. Got better. 350 Lk.
4. The cleaning lady really works. It comes early in the morning, turns on the light, wet cleaning gives a splash of moisture in the office for half an hour. Not thick, but still ...
5. After two hours of work (three people breathe strainingly) in the office, the CO2 level is off the scale. Five minutes airing corrects the situation to normal (500 ppm). We combine (if desired) airing with industrial gymnastics)))
6. Very dry. Heating in the winter, of course, is the direct cause. It is not possible to reach a comfortable 40-50% humidity. However, flowers in the office really give plus 10 percent to moisture compared to a similar room without flowers. Do not forget to water them, of course). By the way, watering flowers takes 10-12 liters of water. The office has 13 pots of flowers. We water twice a week.
7. Utility in this in all, frankly speaking, is not enough. However, for example, for school classes or polyclinics such systems would probably be more useful.
Have a nice day, everyone!
Source: https://habr.com/ru/post/391399/
All Articles