As a smart home did not let the cat freeze
All materials about smart home
Smart home, in the minds of most people, is still a kind of toy that turns on the light when entering the toilet and allows you to automate the inclusion of outlets on a schedule. Those who have already got their home, try to automate routine processes as much as possible, since the house really requires a lot of attention. I was confronted with the fact that my cat, regardless of any frosts, goes hunting, and just walk. He always returns to the same place - the porch, and can sit there for hours until someone looks out the window and goes to open the door. And the frosts this year were up to -28 degrees. Today I want to talk about how smart home allowed to save the cat from freezing.
To begin, let me show you how things were before. The cat comes and always waits on the porch opening the door. Sometimes it can wait an hour or more until someone looks out the window.
I decided to use the automation of the smart home and here, by the way, I read about the Z-Wave technology. About how smart home did not let the cat freeze, read under the cut.
')
The first idea was to teach the cat to press the bell button, simply by setting a separate button for it. But the cat-animal is capricious and it is not at all necessary that he will press the button. Yes, and it would be at variance with the idea of automating processes.
The second idea that I began to implement was to somehow detect the appearance of a cat on the porch and an alert that it was time to open the doors.
We need to make a small digression and say why I prefer the Z-Wave technology. Since the house is ready, the laying of additional wires for the motion sensor is difficult, which means you need to choose a wireless method of transmitting the signal. Z-Wave technology has already been tested and sensors are being mass produced, which means that children's diseases have already been cured. The protocol itself operates at a frequency of 869.2 MHz (in Russia) and has data protection during transmission. Sensors can be configured to update information at a certain frequency, which will have a positive effect on battery life (do not forget that the sensor is wireless). Finally, the Z-Wave controllers themselves are widespread, a bunch of plug-ins are written under them, and finding answers to questions will not be difficult even on Russian-language forums. So, I decided to try Z-Wave.
First meeting
To solve my problem, I selected three devices:
1. Fibaro Home Center Lite Controller
2. Aeotec 4 in 1 multisensor
3. Universal Sensor Fibaro Universal Sensor
And although I did not expect to use the latter in this project, it was useful, which I will tell later.
The idea was as follows:
1. The motion sensor detects the appearance of a pet on the porch and transmits a signal to the controller.
2. A controller with available methods notifies residents that it is time to open the door.
3. The door opens and the cat is saved from inevitable freezing!
I'll start in order
The controller itself is a bit like a compact router, with the only exception that it has only one Ethernet port.

Description of the connection and the first setting of the smart home controller
On the front panel are a series of indicators that alert you to conditions. Among the unusual: receiving \ transmitting a signal and adding new devices.

And on the reverse side everything is simple: power and Ethernet port. It should be noted that the power adapter is equipped with a very bright indicator light, so when installing in the bedroom, it is better to glue this LED at least with tape.

Initial setup is reduced to entering network settings and creating users and passwords. A properly configured device immediately contacts the server and checks for the presence of fresh firmware. It is curious that the latest firmware is not installed immediately, but downloaded sequentially, so you can stop at the most stable version.
In principle, it is already possible to begin connecting sensors and configuring devices, but if you want to work with the controller remotely, then two options appear:
1. Port forwarding on a home router. (80 and 22)
2. Registration on the server home.fibaro.com
The latter option will allow you to use the proprietary application on your smartphone and eliminates the problems if you have a "gray" IP address.
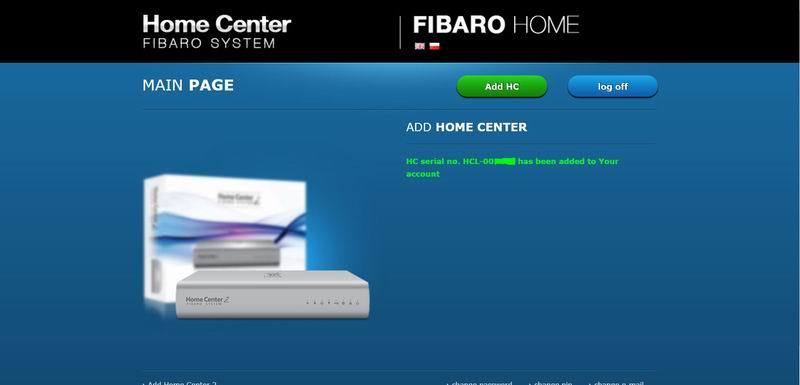
Registration is carried out in two steps. The first step is to create a user profile, which specifies the username and password. Registration is completed with confirmation of the click on the link that came to your email. The second step is to add a controller. This requires a serial number and login / password from the controller. After the done operations, you can connect remotely to the controller, both from smartphones and from any computer on the Internet.
And on the reverse side everything is simple: power and Ethernet port. It should be noted that the power adapter is equipped with a very bright indicator light, so when installing in the bedroom, it is better to glue this LED at least with tape.
Initial setup is reduced to entering network settings and creating users and passwords. A properly configured device immediately contacts the server and checks for the presence of fresh firmware. It is curious that the latest firmware is not installed immediately, but downloaded sequentially, so you can stop at the most stable version.
In principle, it is already possible to begin connecting sensors and configuring devices, but if you want to work with the controller remotely, then two options appear:
1. Port forwarding on a home router. (80 and 22)
2. Registration on the server home.fibaro.com
The latter option will allow you to use the proprietary application on your smartphone and eliminates the problems if you have a "gray" IP address.
Registration is carried out in two steps. The first step is to create a user profile, which specifies the username and password. Registration is completed with confirmation of the click on the link that came to your email. The second step is to add a controller. This requires a serial number and login / password from the controller. After the done operations, you can connect remotely to the controller, both from smartphones and from any computer on the Internet.
Getting the sensor connected
To register a sensor on the controller, you need to do the simplest procedure of two steps.
1. Select the item "Devices" - "Add remove devices"
2. Press the button on the external sensor 3 times. (Pressing once wakes up the sensor and initiates data transfer, double-clicking most often triggers registration. But if double-clicking is recognized as a single, then the triple will be recognized correctly).
It takes 10-60 seconds to register a sensor. When the sensor is registered, we begin to create our scene.
Scene creation, reaction to events
A scene is a task that will be performed under certain conditions. You can create scenes from logical blocks or with the help of a simple constructor. I decided to resort to logical blocks, because it is very clear. Before that, I downloaded the official application of fibaro on my smartphone and entered the account data, which I registered a little earlier on home.fibaro.com. Now the smartphone has seen all the sensors and events occurring on the controller.
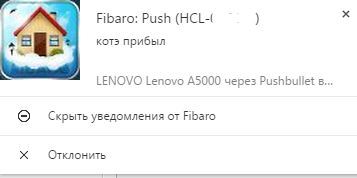
Notifications can be sent in the form of SMS (if SMS is sent to the distribution center), push notifications to a smartphone or e-mail messages. I was interested in the second option, since it is the fastest.
So, create a scene that will make the controller send a notification to me on a smartphone. For reliability, I connected two smartphones and sent a notification to both at once.

From this moment, the debugging and long-term adjustment of the sensitivity of the motion sensor starts, since it has a very wide angle of coverage. I had to reduce the sensitivity and maximally turn out the sensor, since it worked even on birds flying low. The sensor itself was temporarily fixed to the window grill.

It is very convenient that the controller allows you to adjust the operating time of this condition so that at night the smartphone does not wake up with false alarms. But still, there were up to 50% incorrect alerts. If you look at the photo above, you can see the surveillance camera, with which the first video was made. Since the porch and the steps fall into the frame, it was decided to use the DVR in this operation.
Universal sensor and video recorder
The DVR also has its own settings and even has its own emergency exits. Therefore, it was decided to use its capabilities to determine movement in a certain zone and notify the controller. For this, a universal sensor came in handy. It allows you to connect a pair of binary sensors (on, off) or up to 4 temperature sensors.

The sensor itself is very compact and requires a constant voltage of 9 to 30 V. I have surveillance cameras powered by 12 V, so this did not become a problem.
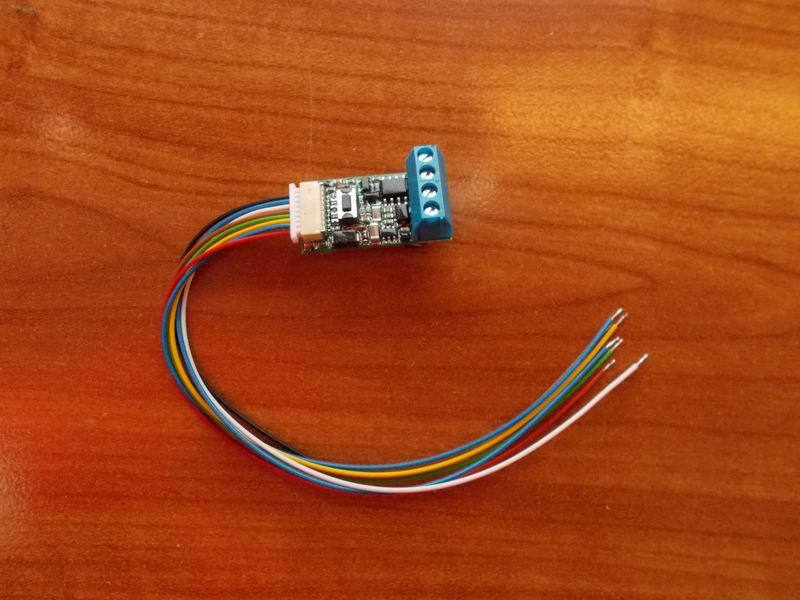
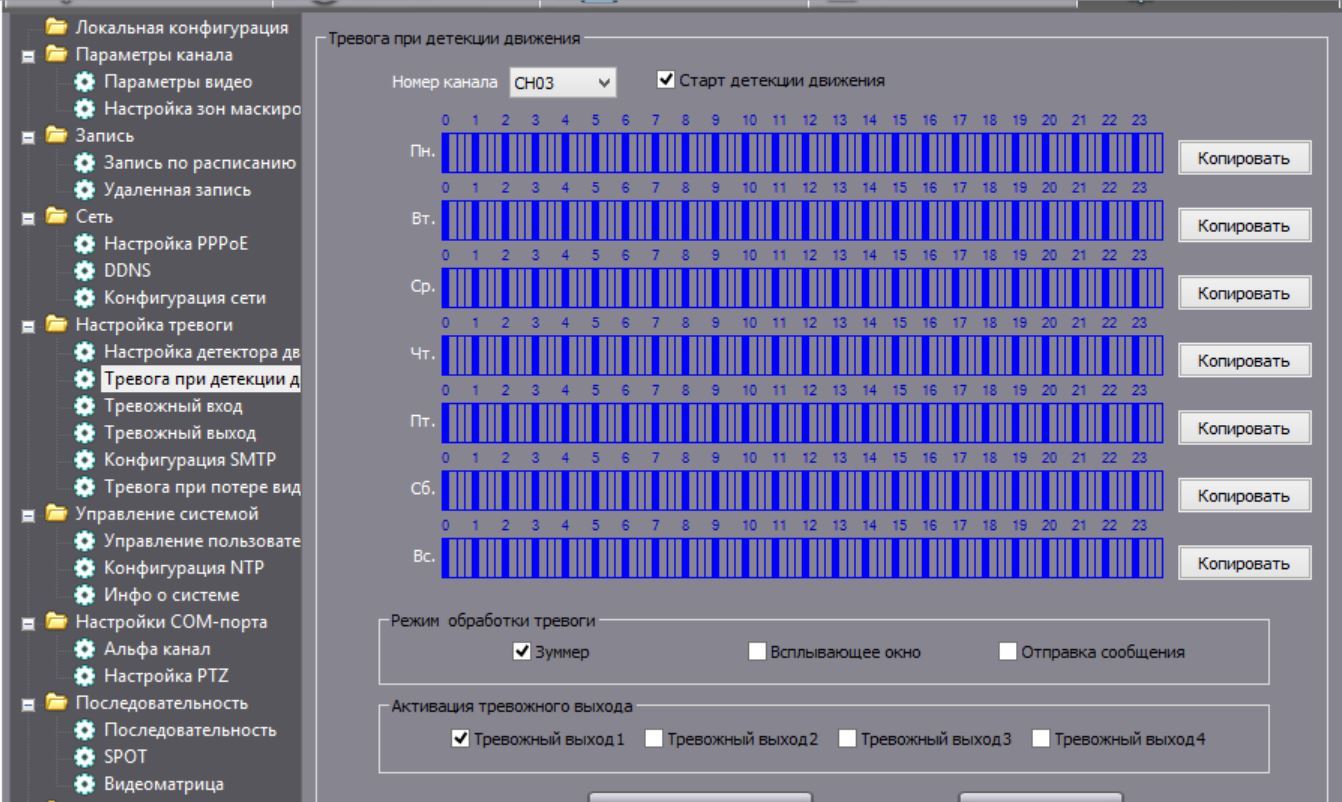
Since the sensor can detect only the closure of contacts, I used the built-in relay in the DVR. It closes when motion is detected in the specified zone.

The picture below shows that in case of motion detection, the first relay closes. The response time of this relay is also set if you do not want to receive alerts at night. (in the picture the relay operates around the clock)
The universal sensor was connected to the controller in the same way as the motion sensor, and the block diagram underwent minimal changes - the response of one sensor was replaced with the operation of another. As a result, the following chain came out:
1. The cat appears on the porch
2. The DVR captures movement in this area and closes the relay.
3. The universal sensor sees a short on its outputs and sends a signal to the controller.
4. The controller processes the signal according to the specified scene and sends a push notification to the smartphone.
5. Incoming notification prompts hosts to open the door.
And it looks like this.
Conclusion
The nontrivial problem was solved in 3 days with sensitivity detuning and without the need for laying new wires. Z-Wave wireless communication technology has been fully justified. The functionality and flexibility of setting the system pleasantly pleased. The task ahead is to transfer the current functionality of the smart home, which is assigned to the Arduino suite, which I wrote about earlier . If you, dear readers, will be interested in a review of certain functions, or maybe any sensors of a smart home, then please respond in the comments, and I will try to test them and write a review.
PS I decided to add how the appearance of a cat on the threshold looks from the computer:
Source: https://habr.com/ru/post/391343/
All Articles