How do games help teach children programming?
It seems that modern children are just born with gadgets. For them to understand the technology becomes a matter of a few minutes. But it turns out they still have something to surprise! Programming allows children to discover a completely different world for them - the world of technology.
In the beginning, I want to share with you an excerpt from the book “ Gamification in Business ” by Gabe Zickermann and Jocelyn Linder:
It is not surprising that it is more difficult to captivate modern children. For the older generation, it is difficult to imagine how the virtual world can be more interesting than playing in the courtyard. But anyway, the task of adults is how to continue to amaze children and discover for them the amazing world around, including the world of science and technology.
')
One way to show the child the opposite side of technology is to show it to him from the point of view of the creator, not the consumer.
Scratch is one of the most successful programming languages for kids. It makes the "entrance" in programming technology very simple and straightforward. The more complex the project becomes, the more versatile knowledge is required.
Let's try together to create a game in Scratch and take the first steps in programming.
To create your game you need this online editor . We recommend to join / register on the Scratch website so that the game is saved automatically.
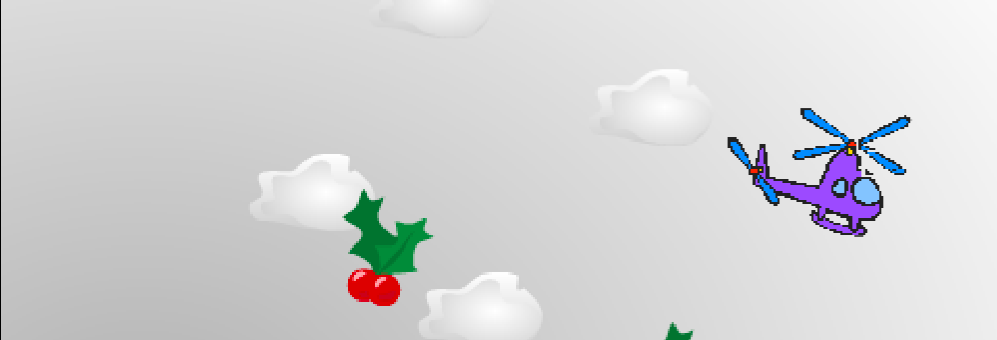
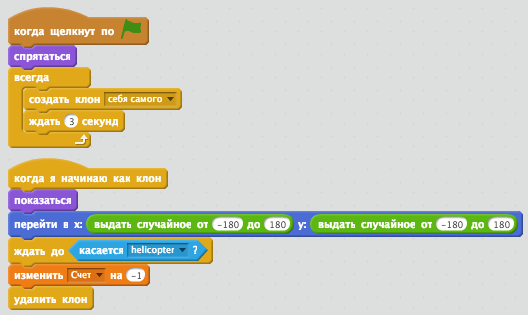
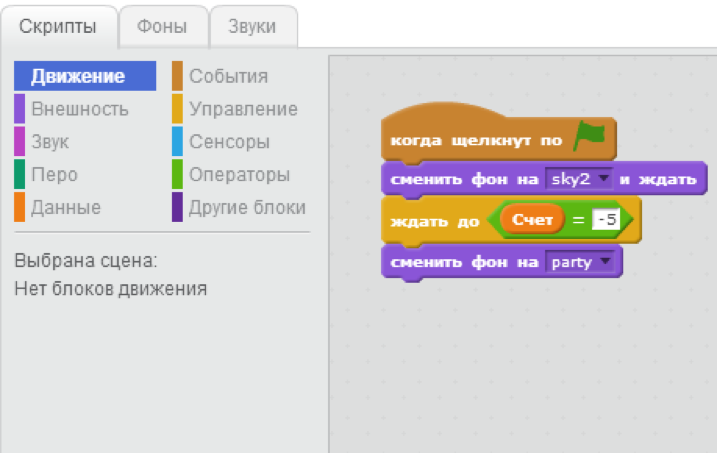
The essence of the game: a helicopter flies through the sky, where clouds fly in a chaotic order. When colliding with a cloud, the helicopter says “Ouch” and it adds 1 penalty point. As soon as he collides with the clouds 10 times, the game will end and the user will be asked to try playing again. There is another element useful - berries. They will also appear in different parts of the screen and touching them will remove one penalty point. If you score minus 5 penalty points, then win and the background will change to congratulatory!
Please check out the Scratch interface.

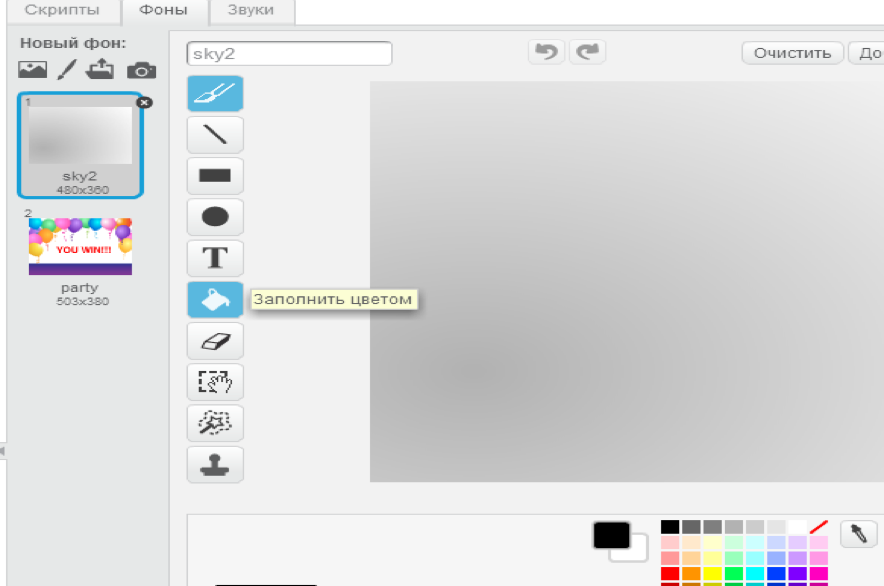
There will be only two: main and congratulatory. The main background at the initial stage will be bright, so you just need to fill it with gray paint. In the lower left of the screen, select the scene, go to the Backgrounds tab, select the Fill item, select a color from the palette, and fill the background.
The second background we take from the gallery. Above the picture of the first background choose the first button Select background from library . Theme - “Music and dancing”, the picture - “Party”.
Select the Insert Text element - the letter “T” immediately above the fill, click anywhere and write “You Win!”. Scratch perceives only English, so do not try exactly here to write in Russian letters. After the input is completed, click once with the left mouse button next to the text and a frame will appear around it with the help of which it can be stretched and moved.

All sprites are selected from the gallery. Under the scene you will find the text “New Object” and a button with a picture. to add a new sprite from the library.
Section Transport → “Helicopter” (helicopter) → select and click OK at the bottom.
The Items section → “Button2” (button) → highlight and click OK at the bottom.
Section Items → “Holly” (berry) → select and click OK at the bottom.
Section Items → "Cloud" Cloud → select and click on the bottom OK.
Thus, all sprites should be under the scene in the same row, as in the picture above.
Click on each sprite and go to the Suits tab. You need to leave only one suit, so the second one is simply deleted by a cross from above or right-click on the suit and select the item to be deleted in the appeared menu.
To write the text "Restart", use the algorithm specified for writing the text on the background.
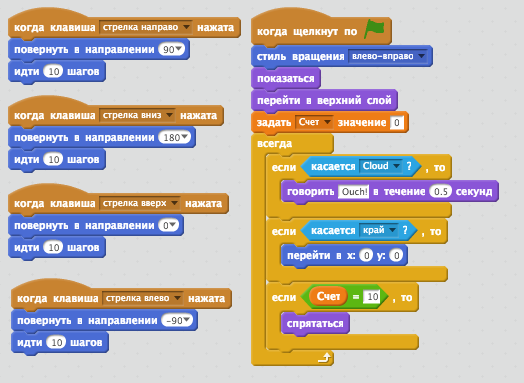
Under the scene, select the helicopter sprite and go to the Scripts tab (it is next to the costumes). On the right you will have an empty work area where you will need to drag items from the palette. Here, each block has its own color, so be guided by it and look for elements by color. You can assemble chains in any part of the working area and this will not affect the work of the program.
We will control the helicopter with arrows on the keyboard, so for each arrow there is a code.
To make an orange element “Account”, go to the category Data - Create a variable , type the word “Account” on the keyboard and press OK - the blocks of orange color will automatically appear to work with the variable.
Under the scene, select the sprite clouds.

Under the scene, select the sprite button.

Under the scene, select the sprite berries.
Select the background on the bottom left.
On the top of the work pane, select File and click Save Now . You can save online, and you can - right to your computer. Under the word File there is a white field. Here you can write any name for your project.

As it was indicated in the code, the game will be launched only when you click on the green flag. You can stop it with a red button next to the flag.
In the beginning, I want to share with you an excerpt from the book “ Gamification in Business ” by Gabe Zickermann and Jocelyn Linder:
For the filming of the TV show Aviators, Remy, a 12-year-old boy, was led to a professional aviation simulator almost from the street. After giving the boy minimal instructions, he was asked to land the Boeing 737 at Los Angeles Airport (on a computer, of course), relying only on the observed flight conditions, without autopilot prompts. It was a task that only experienced pilots can handle in the real world. Without any preparation, Remi safely landed the aircraft in a matter of minutes and led him to the telescope at one of the busiest airports in the world.
“They [teenagers] very quickly understand what's what, because they have computers and video games and such situations are a usual thing for them,” says the owner of the simulator.
Modern children grew up in games, in reality, which significantly changed their consciousness and our world. Practical media research revealed that 70% of parents allow their children, even babies, to use these devices (tablets and smartphones). Moreover, the study also showed that in 2010, 38% of children aged less than eight years used a smartphone or tablet computer, including 10% were children under one year old. Approve the choice of parents or not, but you have no choice but to come to terms with the facts: they educate employees and consumers of the future
It is not surprising that it is more difficult to captivate modern children. For the older generation, it is difficult to imagine how the virtual world can be more interesting than playing in the courtyard. But anyway, the task of adults is how to continue to amaze children and discover for them the amazing world around, including the world of science and technology.
')
One way to show the child the opposite side of technology is to show it to him from the point of view of the creator, not the consumer.
Scratch is one of the most successful programming languages for kids. It makes the "entrance" in programming technology very simple and straightforward. The more complex the project becomes, the more versatile knowledge is required.
Let's try together to create a game in Scratch and take the first steps in programming.
Instructions for creating the game "Helicopter" on Scratch
To create your game you need this online editor . We recommend to join / register on the Scratch website so that the game is saved automatically.
The essence of the game: a helicopter flies through the sky, where clouds fly in a chaotic order. When colliding with a cloud, the helicopter says “Ouch” and it adds 1 penalty point. As soon as he collides with the clouds 10 times, the game will end and the user will be asked to try playing again. There is another element useful - berries. They will also appear in different parts of the screen and touching them will remove one penalty point. If you score minus 5 penalty points, then win and the background will change to congratulatory!
Preparatory step
Please check out the Scratch interface.
Step One: Background
There will be only two: main and congratulatory. The main background at the initial stage will be bright, so you just need to fill it with gray paint. In the lower left of the screen, select the scene, go to the Backgrounds tab, select the Fill item, select a color from the palette, and fill the background.
The second background we take from the gallery. Above the picture of the first background choose the first button Select background from library
. Theme - “Music and dancing”, the picture - “Party”.Select the Insert Text element - the letter “T” immediately above the fill, click anywhere and write “You Win!”. Scratch perceives only English, so do not try exactly here to write in Russian letters. After the input is completed, click once with the left mouse button next to the text and a frame will appear around it with the help of which it can be stretched and moved.
Step Two: Sprites
All sprites are selected from the gallery. Under the scene you will find the text “New Object” and a button with a picture.
to add a new sprite from the library.Section Transport → “Helicopter” (helicopter) → select and click OK at the bottom.
The Items section → “Button2” (button) → highlight and click OK at the bottom.
Section Items → “Holly” (berry) → select and click OK at the bottom.
Section Items → "Cloud" Cloud → select and click on the bottom OK.
Thus, all sprites should be under the scene in the same row, as in the picture above.
Step Three: Adjusting Sprites
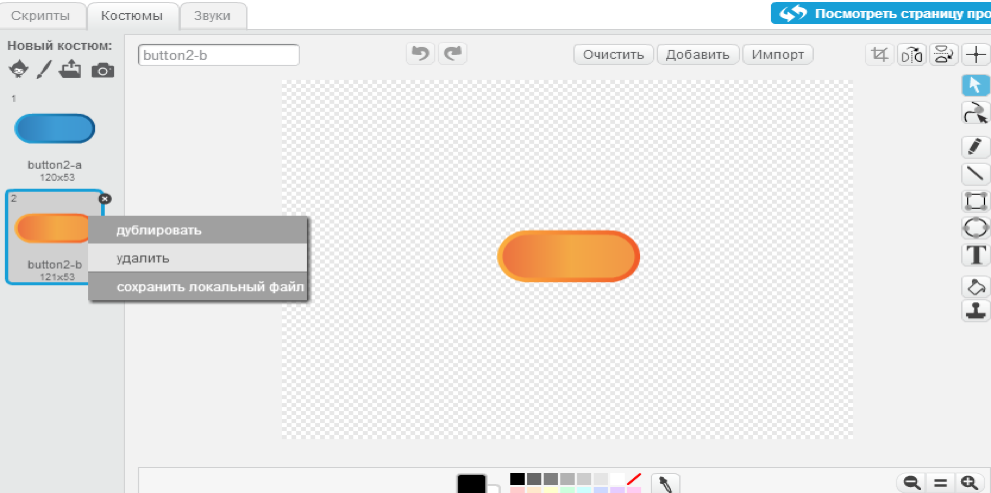
Click on each sprite and go to the Suits tab. You need to leave only one suit, so the second one is simply deleted by a cross from above or right-click on the suit and select the item to be deleted in the appeared menu.
To write the text "Restart", use the algorithm specified for writing the text on the background.
Step Four: Code for the helicopter sprite
Under the scene, select the helicopter sprite and go to the Scripts tab (it is next to the costumes). On the right you will have an empty work area where you will need to drag items from the palette. Here, each block has its own color, so be guided by it and look for elements by color. You can assemble chains in any part of the working area and this will not affect the work of the program.
We will control the helicopter with arrows on the keyboard, so for each arrow there is a code.
To make an orange element “Account”, go to the category Data - Create a variable , type the word “Account” on the keyboard and press OK - the blocks of orange color will automatically appear to work with the variable.
Step Five: code for the cloud
Under the scene, select the sprite clouds.
Step Six: the code for the button
Under the scene, select the sprite button.
Step Seven: code for berries
Under the scene, select the sprite berries.
Step Eight: Code for Background
Select the background on the bottom left.
Step Nine: Save the Game
On the top of the work pane, select File and click Save Now . You can save online, and you can - right to your computer. Under the word File there is a white field. Here you can write any name for your project.
Step Ten: Launch the game
As it was indicated in the code, the game will be launched only when you click on the green flag. You can stop it with a red button next to the flag.
Source: https://habr.com/ru/post/390949/
All Articles