Using mbed code in your own project on STM32 - overclocking experience of the Chinese LCD
Sometimes someone else's code is very helpful in connecting to the peripheral iron microcontroller. Unfortunately, it is more difficult to adapt someone else's code to your project than to rewrite it yourself, especially when it comes to mega frameworks like arduino or mbed. Wishing to connect a Chinese LCD based on ILI9341 to the STM32L476G DISCOVERY board, the author set out to use the driver written for mbed in the demo project from ST without changing a single line in its code. As a result, we managed to accelerate the screen at the same time to unprecedented update speeds of 27 fps.
')
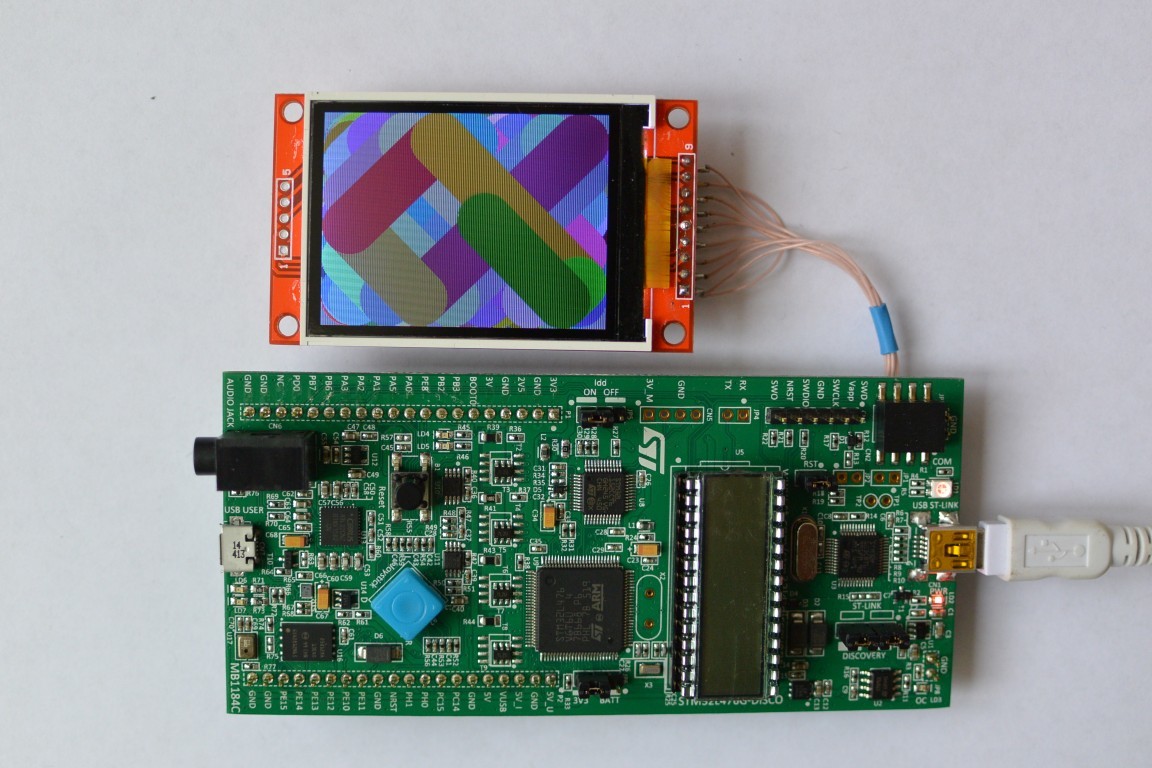
ST Microelectronics produces very interesting microcontrollers, both in terms of capabilities and price, and also produces boards for rapid development. About one of them will be discussed - STM32L476G DISCOVERY . The computational capabilities of this board are quite pleasing - a 32-bit ARM with a maximum clock frequency of 80MHz can perform floating-point operations. At the same time, he is able to reduce power consumption to a minimum and work on batteries, waiting for the opportunity to do something useful. To this device, I decided to connect a cheap Chinese color LCD with a resolution of 320 by 240, working on the SPI interface. How to use it with mbed is described in detail here . Mbed is an online programming environment where you can compile your firmware without having a compiler on your computer at all, and then download and flash it by simply copying it to your mbed-compatible card, which when connected to USB looks like a removable disk. All this is great, but there are a few problems. Firstly, not all motherboards are mbed-compatible. Secondly, there are many existing projects that are not compatible with mbed at all, including the software supplied by ST. And finally, not all developers are compatible with mbed, some (for example, the author of these lines) find in this wonderful tool more disadvantages than advantages. What are these drawbacks, we will discuss below until it suffices to mention that after connecting the display driver to the demo project from ST and a few simple optimizations, it began to work faster about 10 times.
It is time to download and examine the source code of the display driver . Working with ports in mbed is organized through calls to methods of classes that represent I / O ports. For example, the DigitalOut class implements access to the output port. Assigning a zero or one to an instance of this object initiates writing the corresponding bit to the output port. Initialization of the DigitalOut class is performed by the PinName enumerated type, the only purpose of which is to identify the processor stem. One of the main drawbacks of implementing DigitalOut and other classes that implement I / O is that the port is initialized in the class instance constructor. This is great for flashing an LED if an instance of the DigitalOut class is created on the stack in the main function. But let us imagine that we have a lot of various iron, the initialization of which is scattered across several modules. If we make instances of our I / O classes static variables, we lose all control over the initialization, since it will occur before the main function and in an arbitrary order. ST libraries (they are called HAL - hardware abstraction level) use a different, more flexible, paradigm. Each I / O port has its own context and a set of functions that work with it, but they can be called exactly when it is needed. Port contexts are usually created as static variables, but no automatic uncontrolled initialization takes place (ST libraries are written in C). It is also worth mentioning the extremely handy utility CubeMX , which can generate all the necessary initialization code for the set of ports you need and even allows you to subsequently make changes to this set of ports without affecting your own code. Its only drawback - the inability to use with existing projects, you must start the project by using this utility.
The mbed library to initialize microcontroller resources uses the same HAL functions from the ST library, but it does this in a strikingly mindless way. To make sure of this, just look at the SPI port initialization code (which we need to work with the display) in the spi_api.c file. The spi_init function first looks for a suitable SPI port for the legs it will use, and then calls the init_spi function, which actually initializes the port. In this case, for all 3 possible SPI ports, one static context structure is used.
In essence, this is a classic example of using global variables instead of local ones. Even taking into account the fact that we have one computational core, the global context is not protected from simultaneous use of code in different places, there are still interruptions, as well as preemptive multitasking.
So I don't want to write all the code on mbed. I much like the examples from ST, which come as part of CubeMX . I did not find the finished driver for my LCD for ST libraries, I didn’t have a desire to write it myself. There remains an alternative way to have fun - connect a driver written for mbed, and so that it does not need to change anything. All you need is to implement the mbed libraries in an alternative way. In fact, the task is simpler than it seems, because of all the mbed libraries, the LCD driver uses only the output port and SPI. In addition, it needs delay generation functions and file and stream classes. With the latter, everything is simple - we do not need them and are replaced by plugs that do nothing. The delay generation functions are easy to write; they are in the wait_api.h file. Implementing I / O classes requires a bit more creativity. We are going to fix the lack of mbed libraries and not to initialize the hardware in the constructor. The constructor will receive a link to the context of the port, located somewhere else, its initialization code will be completely independent of our interface classes. There is only one way to pass this information to the constructor, without changing the driver code, through PinName, which instead of simply listing the legs will now store the pointer to the port, the leg number, and also an optional pointer to the resource (like SPI) to which this leg is connected.
The implementation of the output port is fairly trivial. To improve performance, we will try to use HAL functions less, and work as far as possible directly with port registers, as well as write inline code, which will allow the compiler to avoid function calls.
The code for implementing the SPI port is not much more complicated; you can see it here . Since we have separated the port initialization from the interface code, we ignore configuration change requests. Digit word just remember. If the user wants to transfer a 16-bit word, and the port is configured as 8-bit, then it is enough for us to simply swap the bytes and transfer them one by one - the port buffer still fits up to 4 bytes. All files needed to compile the driver are compiled in the compat directory. Now you can connect the original driver files to the project and compile them. We will also need code that initializes the ports, creates an instance of the driver, and draws something meaningful on the screen.
If LCD is used to display something dynamic, then there is a natural desire to make communication with it faster. The first thing that comes to mind is to increase the SPI clock frequency, which the driver sets at 10MHz, but we ignore its wishes and can set any of them. It turned out that the screen works fine and at a frequency of 40 MHz - this is the maximum frequency that our processor is capable of with a clock frequency of 80 MHz. To evaluate the performance, a simple code was written, which in a cycle outputs a bitmap of 100x100 pixels. The result was then extrapolated to the full screen (the bitmap that occupies the entire screen simply does not fit in the memory). The result - 11fps is quite far from the theoretical limit of 32fps, which is obtained if you transmit 16 bits for each pixel without stopping. The reason becomes clear if you look into the source code of the driver . If he needs to transfer a sequence of bytes, he simply transfers them one by one, at best packing in 16 bit words. The reason for this inefficient design lies in the mbed API. The SPI class has a method for transmitting an array of data, but it can only be used asynchronously, calling the notification function upon completion, and in the context of an interrupt handler. It is not surprising that very few people use this method. I have supplemented my implementation of the SPI class with a function that transmits a buffer and waits for the transfer to complete. After I added this function call to the bitmap transfer code, the performance increased to 27fps, which is already very close to the theoretical limit.
Lies here . IAR was used for compilation IAR Embedded Workbench for ARM 7.50.2. The demo firmware code from ST is taken as a basis. The description of the pins to which the LCD is connected can be found in the file lcd.h.
')
Introduction to the problem
ST Microelectronics produces very interesting microcontrollers, both in terms of capabilities and price, and also produces boards for rapid development. About one of them will be discussed - STM32L476G DISCOVERY . The computational capabilities of this board are quite pleasing - a 32-bit ARM with a maximum clock frequency of 80MHz can perform floating-point operations. At the same time, he is able to reduce power consumption to a minimum and work on batteries, waiting for the opportunity to do something useful. To this device, I decided to connect a cheap Chinese color LCD with a resolution of 320 by 240, working on the SPI interface. How to use it with mbed is described in detail here . Mbed is an online programming environment where you can compile your firmware without having a compiler on your computer at all, and then download and flash it by simply copying it to your mbed-compatible card, which when connected to USB looks like a removable disk. All this is great, but there are a few problems. Firstly, not all motherboards are mbed-compatible. Secondly, there are many existing projects that are not compatible with mbed at all, including the software supplied by ST. And finally, not all developers are compatible with mbed, some (for example, the author of these lines) find in this wonderful tool more disadvantages than advantages. What are these drawbacks, we will discuss below until it suffices to mention that after connecting the display driver to the demo project from ST and a few simple optimizations, it began to work faster about 10 times.
We study the driver code
It is time to download and examine the source code of the display driver . Working with ports in mbed is organized through calls to methods of classes that represent I / O ports. For example, the DigitalOut class implements access to the output port. Assigning a zero or one to an instance of this object initiates writing the corresponding bit to the output port. Initialization of the DigitalOut class is performed by the PinName enumerated type, the only purpose of which is to identify the processor stem. One of the main drawbacks of implementing DigitalOut and other classes that implement I / O is that the port is initialized in the class instance constructor. This is great for flashing an LED if an instance of the DigitalOut class is created on the stack in the main function. But let us imagine that we have a lot of various iron, the initialization of which is scattered across several modules. If we make instances of our I / O classes static variables, we lose all control over the initialization, since it will occur before the main function and in an arbitrary order. ST libraries (they are called HAL - hardware abstraction level) use a different, more flexible, paradigm. Each I / O port has its own context and a set of functions that work with it, but they can be called exactly when it is needed. Port contexts are usually created as static variables, but no automatic uncontrolled initialization takes place (ST libraries are written in C). It is also worth mentioning the extremely handy utility CubeMX , which can generate all the necessary initialization code for the set of ports you need and even allows you to subsequently make changes to this set of ports without affecting your own code. Its only drawback - the inability to use with existing projects, you must start the project by using this utility.
The mbed library to initialize microcontroller resources uses the same HAL functions from the ST library, but it does this in a strikingly mindless way. To make sure of this, just look at the SPI port initialization code (which we need to work with the display) in the spi_api.c file. The spi_init function first looks for a suitable SPI port for the legs it will use, and then calls the init_spi function, which actually initializes the port. In this case, for all 3 possible SPI ports, one static context structure is used.
static SPI_HandleTypeDef SpiHandle; In essence, this is a classic example of using global variables instead of local ones. Even taking into account the fact that we have one computational core, the global context is not protected from simultaneous use of code in different places, there are still interruptions, as well as preemptive multitasking.
We connect the library to your project
So I don't want to write all the code on mbed. I much like the examples from ST, which come as part of CubeMX . I did not find the finished driver for my LCD for ST libraries, I didn’t have a desire to write it myself. There remains an alternative way to have fun - connect a driver written for mbed, and so that it does not need to change anything. All you need is to implement the mbed libraries in an alternative way. In fact, the task is simpler than it seems, because of all the mbed libraries, the LCD driver uses only the output port and SPI. In addition, it needs delay generation functions and file and stream classes. With the latter, everything is simple - we do not need them and are replaced by plugs that do nothing. The delay generation functions are easy to write; they are in the wait_api.h file. Implementing I / O classes requires a bit more creativity. We are going to fix the lack of mbed libraries and not to initialize the hardware in the constructor. The constructor will receive a link to the context of the port, located somewhere else, its initialization code will be completely independent of our interface classes. There is only one way to pass this information to the constructor, without changing the driver code, through PinName, which instead of simply listing the legs will now store the pointer to the port, the leg number, and also an optional pointer to the resource (like SPI) to which this leg is connected.
class PinName { public: PinName() : m_port(0), m_pin(0), m_obj(0) {} PinName(GPIO_TypeDef* port, unsigned pin, void* obj = 0) : m_port(port), m_pin(pin), m_obj(obj) { assert_param(m_port != 0); } GPIO_TypeDef* m_port; unsigned m_pin; void* m_obj; static PinName not_connected; }; The implementation of the output port is fairly trivial. To improve performance, we will try to use HAL functions less, and work as far as possible directly with port registers, as well as write inline code, which will allow the compiler to avoid function calls.
class DigitalOut { public: DigitalOut(GPIO_TypeDef* port, unsigned pin) : m_port(port), m_pin(pin) { assert_param(m_port != 0); } DigitalOut(PinName const& N) : m_port(N.m_port), m_pin(N.m_pin) { assert_param(m_port != 0); } void operator =(int bit) { if (bit) m_port->BSRR = m_pin; else m_port->BRR = m_pin; } private: GPIO_TypeDef* m_port; unsigned m_pin; }; The code for implementing the SPI port is not much more complicated; you can see it here . Since we have separated the port initialization from the interface code, we ignore configuration change requests. Digit word just remember. If the user wants to transfer a 16-bit word, and the port is configured as 8-bit, then it is enough for us to simply swap the bytes and transfer them one by one - the port buffer still fits up to 4 bytes. All files needed to compile the driver are compiled in the compat directory. Now you can connect the original driver files to the project and compile them. We will also need code that initializes the ports, creates an instance of the driver, and draws something meaningful on the screen.
Overclocking
If LCD is used to display something dynamic, then there is a natural desire to make communication with it faster. The first thing that comes to mind is to increase the SPI clock frequency, which the driver sets at 10MHz, but we ignore its wishes and can set any of them. It turned out that the screen works fine and at a frequency of 40 MHz - this is the maximum frequency that our processor is capable of with a clock frequency of 80 MHz. To evaluate the performance, a simple code was written, which in a cycle outputs a bitmap of 100x100 pixels. The result was then extrapolated to the full screen (the bitmap that occupies the entire screen simply does not fit in the memory). The result - 11fps is quite far from the theoretical limit of 32fps, which is obtained if you transmit 16 bits for each pixel without stopping. The reason becomes clear if you look into the source code of the driver . If he needs to transfer a sequence of bytes, he simply transfers them one by one, at best packing in 16 bit words. The reason for this inefficient design lies in the mbed API. The SPI class has a method for transmitting an array of data, but it can only be used asynchronously, calling the notification function upon completion, and in the context of an interrupt handler. It is not surprising that very few people use this method. I have supplemented my implementation of the SPI class with a function that transmits a buffer and waits for the transfer to complete. After I added this function call to the bitmap transfer code, the performance increased to 27fps, which is already very close to the theoretical limit.
Source
Lies here . IAR was used for compilation IAR Embedded Workbench for ARM 7.50.2. The demo firmware code from ST is taken as a basis. The description of the pins to which the LCD is connected can be found in the file lcd.h.
Source: https://habr.com/ru/post/390909/
All Articles