Ventilation system based on the "raspberry" and "CO2 Detector"
The fashion for smart homes has swept the entire Internet, every now wants to make a light bulb that can turn off via the Internet or click the fan in the toilet. My experience was quite simple: I wanted to make a system that can automatically ventilate a room, no more, no less.
After thinking about the principle of the system, I came to some conclusions, which I decided to implement. As planned, the entire functionality of the system is divided into three components: the “brains” that control everything, the opening system of the vents / or turning on the fan and the sensor itself that monitors the quality of the air in the room. I’ll tell you about the air quality sensor, plus I’ll touch on the topic of integrating it with the brains of a smart home.
The quality of the "freshness" of air, I decided to control the concentration of carbon dioxide. Future plans include launching sensors for ammonia, propane / butane (gas leaks), dust concentrations in the air, etc.
It was decided to place the ventilation system in some living room where a person spends as much time as possible. Probably, such a room is a bedroom, and it is there that the automatic ventilation system will be very useful during the night's sleep.
')

It's no secret that the concentration of carbon dioxide in the air strongly affects not only the productivity of the human brain, human performance, but also the ability to have a good rest. The higher the CO2 concentration, the worse.

The carbon dioxide detector of the company Dadzhet was used as the instrument for measuring the concentration of carbon dioxide.
This device can receive power from the USB port of a computer or laptop. On the front panel - LCD indicator, which displays information about the concentration of carbon dioxide and ambient temperature. There are also 3 LEDs that give the user a clear idea of the content. Everything is quite simple - turn on the device. And it works.
I was attracted by the fact that there is software that works with this device. The software is both under Windows, and under Linux. The source code for Linux is on github and it seems to be written by our compatriot. And if you have the source code, you can come up with something, modify it, “sharpen” the program for yourself.
As practice has shown and googling, the device is seen by a computer as a HID device. Therefore, the program for Windows has a dll called HIDApi. To work with Linux, you need the HIDApi library of the same name. I have made a revision of the linux software source and written a simple squeak.
It is clear that using a computer with Linux to read data from a sensor and then transfer data somewhere to a smart home controller is blasphemy. Therefore, it was decided to use Raspbery pi with pure Debian installed. In the future we plan to do everything on the Arduino and transmit via wireless channels.
The scheme of my software and hardware complex is as follows:

An intelligent reader and an avid geek might think that it is not very sporting to use HUB in this scheme. That's right, you can directly connect the CO2 monitor and enjoy life. Using this scheme, I solve several problems at once:
● most often the brains of a smart home are not where the sensor is;
● The use of raspberry pi makes it possible to connect additional sensors;
● placing the sensor separately, we get two ways of indication, the first one on the sensor screen, the second one on the phone or via a web page, since the data is transmitted to the controller.
A MicasaVerde device is used as a smart home controller, the device can collect data from sensors and make decisions according to a given program, which in its terminology is called “scenes”.
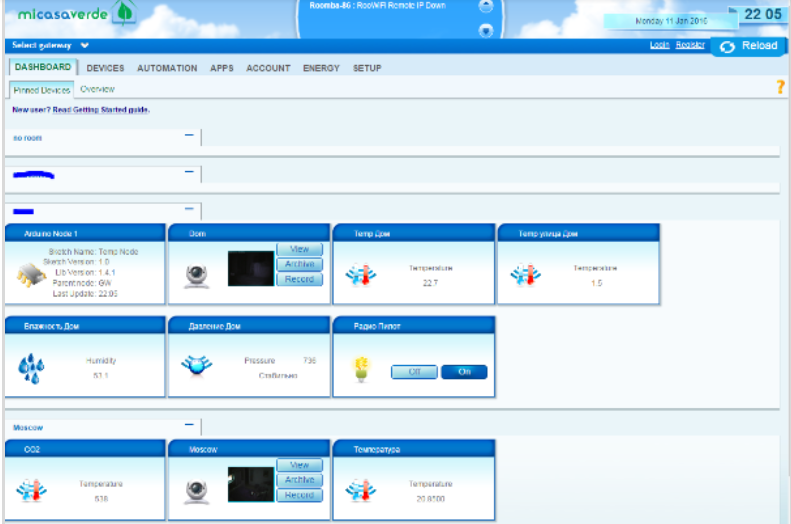
In the device, you can create virtual sensors and update their information using http requests, which I did using raspberry pi.
Request example:
ip_address : 3480 / data_request? id = variableset & DeviceNum = 6 & serviceId = urn: micasaverde-com: serviceId: DoorLock1 & Variable = Status & Value = 1
That is, the “Malinka” reads data from a carbon dioxide detector, and then sends the http data with a request to Vera. The scheme is simple, but working.
So there is a “raspberry”, no matter what version, the main thing is that it has a network interface.
Next, you need to install support for hid devices. This library is taken with git, so git must be installed on the “raspberry”:
apt-get install libcurl4-gnutls-dev libexpat1-dev gettext libz-dev libssl-dev
Next, download and install the library itself.
mkdir hidapi
cd hidapi /
git init
git clone github.com/signal11/hidapi.git
Additional libraries
sudo apt-get install libudev-dev libusb-1.0-0-dev libfox-1.6-dev autotools-dev autoconf automake libtool
Install
cd hidapi /
./bootstrap
./configure
make
sudo make install
After that, download the source code of the program CO2 monitor
mkdir co2monitor
cd co2monitor
git init
git clone github.com/dmage/co2mon.git
Next, I slightly modified the program code, in the original version it reads two parameters (temperature and co2) and sends it to the console in an infinite loop. This option did not suit me, the goal was to run once and get the value once, so I changed two lines in the main.c. file.
Looking for lines
printf ("CntR \ t% s \ n", buf);
fflush (stdout);
And change to
printf (“% s \ n", buf);
fflush (stdout);
exit (1);
The first line is responsible for the output value, after the change only the digit will be displayed, and after the output the program will close, the exit (1) line is responsible.
Compile
cmake ...
make
Next, a simple script was written that runs the program, assigns the values of the output of the program compiled above to a variable, and then transfers this value using curl to MicasaVerde. After that, add the udev rule so that the system can access the sensor without root.
SUBSYSTEM == "usb", ATTR {idVendor} == "04d9", ATTR {idProduct} == "a052", MODE = "0666"
And we will add a survey script and transmission to cron, for every minute.
crontab -e
And add the line
* * * * * /home/pi/co2sender.sh

Script result
Of course, you also have to configure the MicasaVerde files so that there are adequate records everywhere. But it works, quickly and simply.
As a result, we have a system based on the " CO2 Detector ", which operates normally, analyzes and reports on changes in the concentration of carbon dioxide. In this case, the “raspberry” reads the data from the sensor once a minute and transmits it to the smart home controller, which can turn on the ventilation system if necessary.
After thinking about the principle of the system, I came to some conclusions, which I decided to implement. As planned, the entire functionality of the system is divided into three components: the “brains” that control everything, the opening system of the vents / or turning on the fan and the sensor itself that monitors the quality of the air in the room. I’ll tell you about the air quality sensor, plus I’ll touch on the topic of integrating it with the brains of a smart home.
Device Overview
The quality of the "freshness" of air, I decided to control the concentration of carbon dioxide. Future plans include launching sensors for ammonia, propane / butane (gas leaks), dust concentrations in the air, etc.
It was decided to place the ventilation system in some living room where a person spends as much time as possible. Probably, such a room is a bedroom, and it is there that the automatic ventilation system will be very useful during the night's sleep.
')
It's no secret that the concentration of carbon dioxide in the air strongly affects not only the productivity of the human brain, human performance, but also the ability to have a good rest. The higher the CO2 concentration, the worse.
The carbon dioxide detector of the company Dadzhet was used as the instrument for measuring the concentration of carbon dioxide.
This device can receive power from the USB port of a computer or laptop. On the front panel - LCD indicator, which displays information about the concentration of carbon dioxide and ambient temperature. There are also 3 LEDs that give the user a clear idea of the content. Everything is quite simple - turn on the device. And it works.
I was attracted by the fact that there is software that works with this device. The software is both under Windows, and under Linux. The source code for Linux is on github and it seems to be written by our compatriot. And if you have the source code, you can come up with something, modify it, “sharpen” the program for yourself.
Workflow overview
As practice has shown and googling, the device is seen by a computer as a HID device. Therefore, the program for Windows has a dll called HIDApi. To work with Linux, you need the HIDApi library of the same name. I have made a revision of the linux software source and written a simple squeak.
It is clear that using a computer with Linux to read data from a sensor and then transfer data somewhere to a smart home controller is blasphemy. Therefore, it was decided to use Raspbery pi with pure Debian installed. In the future we plan to do everything on the Arduino and transmit via wireless channels.
The scheme of my software and hardware complex is as follows:
An intelligent reader and an avid geek might think that it is not very sporting to use HUB in this scheme. That's right, you can directly connect the CO2 monitor and enjoy life. Using this scheme, I solve several problems at once:
● most often the brains of a smart home are not where the sensor is;
● The use of raspberry pi makes it possible to connect additional sensors;
● placing the sensor separately, we get two ways of indication, the first one on the sensor screen, the second one on the phone or via a web page, since the data is transmitted to the controller.
A MicasaVerde device is used as a smart home controller, the device can collect data from sensors and make decisions according to a given program, which in its terminology is called “scenes”.
In the device, you can create virtual sensors and update their information using http requests, which I did using raspberry pi.
Request example:
ip_address : 3480 / data_request? id = variableset & DeviceNum = 6 & serviceId = urn: micasaverde-com: serviceId: DoorLock1 & Variable = Status & Value = 1
That is, the “Malinka” reads data from a carbon dioxide detector, and then sends the http data with a request to Vera. The scheme is simple, but working.
Completion of software
So there is a “raspberry”, no matter what version, the main thing is that it has a network interface.
Next, you need to install support for hid devices. This library is taken with git, so git must be installed on the “raspberry”:
apt-get install libcurl4-gnutls-dev libexpat1-dev gettext libz-dev libssl-dev
Next, download and install the library itself.
mkdir hidapi
cd hidapi /
git init
git clone github.com/signal11/hidapi.git
Additional libraries
sudo apt-get install libudev-dev libusb-1.0-0-dev libfox-1.6-dev autotools-dev autoconf automake libtool
Install
cd hidapi /
./bootstrap
./configure
make
sudo make install
After that, download the source code of the program CO2 monitor
mkdir co2monitor
cd co2monitor
git init
git clone github.com/dmage/co2mon.git
Next, I slightly modified the program code, in the original version it reads two parameters (temperature and co2) and sends it to the console in an infinite loop. This option did not suit me, the goal was to run once and get the value once, so I changed two lines in the main.c. file.
Looking for lines
printf ("CntR \ t% s \ n", buf);
fflush (stdout);
And change to
printf (“% s \ n", buf);
fflush (stdout);
exit (1);
The first line is responsible for the output value, after the change only the digit will be displayed, and after the output the program will close, the exit (1) line is responsible.
Compile
cmake ...
make
Next, a simple script was written that runs the program, assigns the values of the output of the program compiled above to a variable, and then transfers this value using curl to MicasaVerde. After that, add the udev rule so that the system can access the sensor without root.
SUBSYSTEM == "usb", ATTR {idVendor} == "04d9", ATTR {idProduct} == "a052", MODE = "0666"
And we will add a survey script and transmission to cron, for every minute.
crontab -e
And add the line
* * * * * /home/pi/co2sender.sh
Script result
Of course, you also have to configure the MicasaVerde files so that there are adequate records everywhere. But it works, quickly and simply.
Conclusion
As a result, we have a system based on the " CO2 Detector ", which operates normally, analyzes and reports on changes in the concentration of carbon dioxide. In this case, the “raspberry” reads the data from the sensor once a minute and transmits it to the smart home controller, which can turn on the ventilation system if necessary.
Source: https://habr.com/ru/post/390859/
All Articles