Practical use of ROS on the Raspberry Pi - part 3
Good afternoon, dear readers of Habr!
I continue a series of articles on the practical use of ROS on the Raspberry Pi ( first article , second article ).
In this article we will use the teleop_twist_keyboard package from the ros-teleop stack to control the robot by pressing the keys on the keyboard. In addition to this package, the ros-teleop stack also includes several packages for various control methods, for example, using a joystick. Who is ready to start studying teleop_twist_keyboard, please under the cat.
In the meantime, I want to tell you about one trick, which allows you to work remotely on a Raspberry Pi via SSH simultaneously in several terminals. To do this, you need to install the tmux utility on the RPi.
After that, run the utility:
')
At the bottom of the terminal window should appear a green bar with the window number - 0.
tmux is a very convenient terminal window manager that allows you to create any number of windows in a single terminal window, placing them in several different ways (a separate terminal window (window), window pane) and conveniently switch between them.
Press Ctrl + B and C on the keyboard. Another window with the number 1 should open. Also try the combination Ctrl + B and%. The current terminal window will be divided in the middle by a vertical green bar into two windows (pane). If you press Ctrl + B ,: and enter “split window”, the window will be split horizontally into two identical windows. To remove a panel (pane), use the Ctrl + B, X combination and then press Y. To switch to another panel in the same window, use the Ctrl + B, O combination. To switch between the terminal windows by the window number, use the Ctrl + combination B, <window number>.
Now we add the launch of the program to the ~ / .bashrc file to start automatically when the new terminal is opened. Add the following lines to the file:
Now let's get acquainted with the teleop_twist_keyboard package.
Run the script teleop_twist_keyboard.py from the teleop_twist_keyboard package as a normal ROS node:
We get the following output:
Let's list all currently active topics:
The topic / cmd_vel should appear in the list. The teleop_twist_keyboard node publishes messages to this topic each time a key is pressed on the keyboard.
Let us show the output of messages published in the topic / cmd_vel:
Run rqt_graph to represent the computational graph ROS graphically. The scheme of the computational graph shows all the active nodes and topics that connect them.
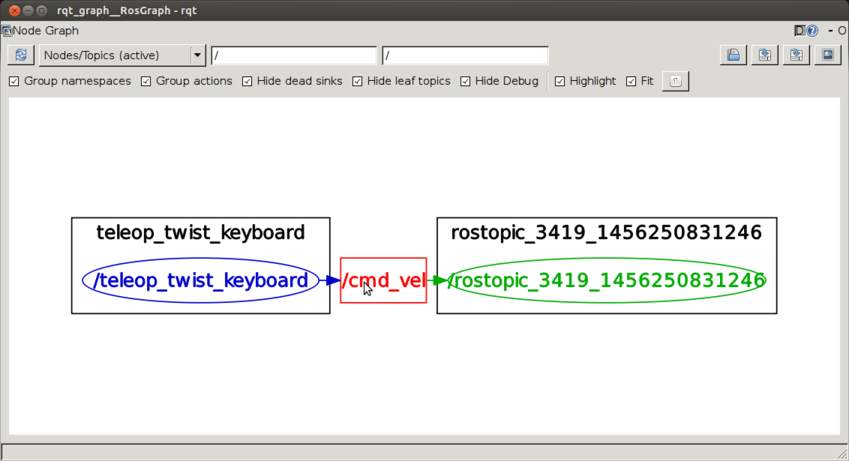
Here we see that the teleop_twist_keyboard node publishes messages to the topic / cmd_vel, and the rostopic node subscribes to this topic (the rostopic echo command).
Let's find out what type of messages are published on the topic / cmd_vel:
The command will print the line:
This means that the messages are of type Twist from the standard geometry_msgs ROS package.
We can also get information about the message structure with the rosmsg command:
The field 'linear' is responsible for the linear velocity, 'angular' - for the angular velocity.
Press the 'i' key, the output will be like this (associated with moving forward):
Press the 'k' key, the output will be (stop):
Press the 'u' key, the output will be (turn left):
And finally, when pressing the 'o' key, we get the following conclusion (we turn right):
The 'j' and 'l' keys are responsible for turning left and right in place (without moving forward).
I have already written a rosserial sketch for controlling the robot through keystrokes. We simply subscribe to the topic / cmd_vel and, depending on the received value of each of the speeds, give the necessary command to the motion controller (move forward, stop, turn left or right). The sketch can be downloaded from here .
Let's look at the sketch code in more detail.
At the beginning of the file, in addition to the standard ros.h header file, we include two additional files with the message types geometry_msgs / Twist.h and geometry_msgs / Vector3.h:
We declare the ros :: NodeHandle node handler:
The messageCb method is of primary importance:
In this method, we process the message we receive from the cmd_vel topic. In the variable forward_vel we keep the linear speed, in the variable angular - the angular. Linear speed allows us to track the stop command (value 0). The angular velocity determines the direction of rotation (if more than 0, then we turn left, less than 0 - to the right, if 0 - we move forward).
Create a subscriber for the topic / cmd_vel:
with reference to the message processing method (messageCb) and the type of message received - geometry_msgs :: Twist.
At the end of the script, follow the standard sketch methods for rosserial_arduino:
Run the rosserial_arduino server:
and upload the sketch to the Arduino board.
Switch to the terminal where the teleop_twist_keyboard node is running, try pressing the 'u', 'i', 'o' and 'k' keys and check the output of the rosserial server in the terminal.
Thus, using the teleop_twist_keyboard package, we can now perform simple remote control of the robot by transmitting motion commands: move forward, stop, turn left or right. In the future, we will learn to control the robot with a joystick, which is much more convenient, using a different package in ROS. But more about that in the next article.
I continue a series of articles on the practical use of ROS on the Raspberry Pi ( first article , second article ).
In this article we will use the teleop_twist_keyboard package from the ros-teleop stack to control the robot by pressing the keys on the keyboard. In addition to this package, the ros-teleop stack also includes several packages for various control methods, for example, using a joystick. Who is ready to start studying teleop_twist_keyboard, please under the cat.
Multi Terminal with tmux
In the meantime, I want to tell you about one trick, which allows you to work remotely on a Raspberry Pi via SSH simultaneously in several terminals. To do this, you need to install the tmux utility on the RPi.
$ sudo apt-get install tmux After that, run the utility:
')
$ tmux At the bottom of the terminal window should appear a green bar with the window number - 0.
tmux is a very convenient terminal window manager that allows you to create any number of windows in a single terminal window, placing them in several different ways (a separate terminal window (window), window pane) and conveniently switch between them.
Press Ctrl + B and C on the keyboard. Another window with the number 1 should open. Also try the combination Ctrl + B and%. The current terminal window will be divided in the middle by a vertical green bar into two windows (pane). If you press Ctrl + B ,: and enter “split window”, the window will be split horizontally into two identical windows. To remove a panel (pane), use the Ctrl + B, X combination and then press Y. To switch to another panel in the same window, use the Ctrl + B, O combination. To switch between the terminal windows by the window number, use the Ctrl + combination B, <window number>.
Now we add the launch of the program to the ~ / .bashrc file to start automatically when the new terminal is opened. Add the following lines to the file:
[[ $TERM != "screen" ]] && exec tmux Work with the teleop_twist_keyboard package
Now let's get acquainted with the teleop_twist_keyboard package.
Run the script teleop_twist_keyboard.py from the teleop_twist_keyboard package as a normal ROS node:
$ roscore $ rosrun teleop_twist_keyboard teleop_twist_keyboard.py We get the following output:
Reading from the keyboard and Publishing to Twist! --------------------------- Moving around: uio jkl m , . q/z : increase/decrease max speeds by 10% w/x : increase/decrease only linear speed by 10% e/c : increase/decrease only angular speed by 10% anything else : stop CTRL-C to quit Let's list all currently active topics:
$ rostopic list The topic / cmd_vel should appear in the list. The teleop_twist_keyboard node publishes messages to this topic each time a key is pressed on the keyboard.
Let us show the output of messages published in the topic / cmd_vel:
$ rostopic echo cmd_vel Run rqt_graph to represent the computational graph ROS graphically. The scheme of the computational graph shows all the active nodes and topics that connect them.
$ rosrun rqt_graph rqt_graph Here we see that the teleop_twist_keyboard node publishes messages to the topic / cmd_vel, and the rostopic node subscribes to this topic (the rostopic echo command).
Let's find out what type of messages are published on the topic / cmd_vel:
$ rostopic type /cmd_vel The command will print the line:
geometry_msgs/Twist This means that the messages are of type Twist from the standard geometry_msgs ROS package.
We can also get information about the message structure with the rosmsg command:
$ rosmsg show geometry_msgs/Twist geometry_msgs/Vector3 linear float64 x float64 y float64 z geometry_msgs/Vector3 angular float64 x float64 y float64 z The field 'linear' is responsible for the linear velocity, 'angular' - for the angular velocity.
Press the 'i' key, the output will be like this (associated with moving forward):
linear: x: 0.5 y: 0.0 z: 0.0 angular: x: 0.0 y: 0.0 z: 0.0 --- Press the 'k' key, the output will be (stop):
linear: x: 0.0 y: 0.0 z: 0.0 angular: x: 0.0 y: 0.0 z: 0.0 --- Press the 'u' key, the output will be (turn left):
linear: x: 0.5 y: 0.0 z: 0.0 angular: x: 0.0 y: 0.0 z: 1.0 --- And finally, when pressing the 'o' key, we get the following conclusion (we turn right):
linear: x: 0.5 y: 0.0 z: 0.0 angular: x: 0.0 y: 0.0 z: -1.0 --- The 'j' and 'l' keys are responsible for turning left and right in place (without moving forward).
Controlling the robot from the keyboard with teleop_twist_keyboard
I have already written a rosserial sketch for controlling the robot through keystrokes. We simply subscribe to the topic / cmd_vel and, depending on the received value of each of the speeds, give the necessary command to the motion controller (move forward, stop, turn left or right). The sketch can be downloaded from here .
Let's look at the sketch code in more detail.
At the beginning of the file, in addition to the standard ros.h header file, we include two additional files with the message types geometry_msgs / Twist.h and geometry_msgs / Vector3.h:
#include <geometry_msgs/Twist.h> #include <geometry_msgs/Vector3.h> We declare the ros :: NodeHandle node handler:
ros::NodeHandle nh; The messageCb method is of primary importance:
void messageCb(const geometry_msgs::Twist& message) { geometry_msgs::Vector3 linear = message.linear; float forward_vel = float(linear.x); if(forward_vel == 0) { stop(); return; } geometry_msgs::Vector3 angular = message.angular; float ang_vel = float(angular.z); if(ang_vel > 0) { turnLeft(); } else if(ang_vel < 0) { turnRight(); } else { goForward(); } } In this method, we process the message we receive from the cmd_vel topic. In the variable forward_vel we keep the linear speed, in the variable angular - the angular. Linear speed allows us to track the stop command (value 0). The angular velocity determines the direction of rotation (if more than 0, then we turn left, less than 0 - to the right, if 0 - we move forward).
Create a subscriber for the topic / cmd_vel:
ros::Subscriber<geometry_msgs::Twist> sub("/cmd_vel", &messageCb); with reference to the message processing method (messageCb) and the type of message received - geometry_msgs :: Twist.
At the end of the script, follow the standard sketch methods for rosserial_arduino:
nh.initNode(); nh.subscribe(sub); Serial.begin(57600); Run the rosserial_arduino server:
$ rosrun rosserial_python serial_node _port:=/dev/ttyACM0 and upload the sketch to the Arduino board.
Switch to the terminal where the teleop_twist_keyboard node is running, try pressing the 'u', 'i', 'o' and 'k' keys and check the output of the rosserial server in the terminal.
Thus, using the teleop_twist_keyboard package, we can now perform simple remote control of the robot by transmitting motion commands: move forward, stop, turn left or right. In the future, we will learn to control the robot with a joystick, which is much more convenient, using a different package in ROS. But more about that in the next article.
Source: https://habr.com/ru/post/390851/
All Articles