Another way to determine the quality of air on the Arduino - with the transfer of data to the network
My name is Eugene, and I am a web developer. There are already dozens of posts about various meteorological stations on Arduino, but I wanted to write that in 2016 you can quickly, easily and without knowledge of electrical engineering assemble a useful sensor that claims to be IoT, which can easily work with your infrastructure written on anything.
If you are wondering why measure CO2 at all, then you can find useful links at the end of the post.
So, our goal is to make a temperature, humidity and CO2 sensor with data displayed on the display and sent to a web server. What we need for this:
1. Arduino. I took the Wemos D1, Arduino compatible board based on the ESP-8266EX microcontroller. Wemos is compatible with the Arduino IDE, it has its own Wi-Fi, and it costs $ 6.3.
')
2. CO2 sensor. Earlier, I tried the usual MQ-135, but even after burning, calibrating and taking into account corrections for temperature and humidity, the errors were quite noticeable - about 300 ppm. So to guarantee accurate measurements, I took the MH-Z19 - the most expensive component of the circuit, $ 27.
3. Temperature and humidity sensor. Used the standard and favorite of all DHT11 for $ 1.44. In the comments suggest that it is better to take the DHT22, but for the scheme and cost it does not matter:
4. I2C compatible display. I took the cheapest hd44780 for $ 3.06.
5. To make it look not so terrible, and to be moved, it is just as good to have a body. In order not to bother with sawing, I took the case for $ 8 with holes and fasteners for usb and display. Attention - there must be holes in the case for airing, otherwise it will measure only its own special atmosphere.
6. Debug USB cable and about 10 wires. The price will not take into account.
The total cost is $ 44, if you take on aliexpress. Similar devices without the ability to transfer something to the network now stand with the Chinese in the region of $ 100. An analogue from Tion, which in quantity make their posts on hyktimes with advertising of breathers, while in development (I have no relation to them, which is a pity).
Ordered, waited a month - proceed to the assembly! There is nothing easier.
1. Connect the temperature and humidity sensor. Land to earth, dust to dust, plus five volts per arduino, digital output to digital output (I used D5).
2. Connect the CO2 sensor. It has a rich choice of interfaces - PWM, analog and digital output. The only element of soldering is to attach the legs to the required outlets. Checked personally - all work. I stopped on receiving digital data - precisely, beautifully, concisely, and it is also possible to send commands for calibration, which I, however, did not need. Again - ground to ground, plus the other five volts, TX and RX outputs to digital pins - in my case, to D6 and D7.
3. Connect the display. And again - the ground to ground, plus the last remaining output of five volts, SDA on the display to SDA on arduino, SCL also to SCL.
And ... Everything! You can twist the resulting good into the body, if you certainly did not manage to make any mistake when connecting. Please note that the CO2 sensor does not have air intakes (or, as it is more correct to call it, white such things). As a bonus, deviations in measurement are significantly reduced when assembling in a case.
Great, we just have to write software. In the links below there is a repository on the githaba, which you can simply upload and use. The only subtle point is that your display may have a different address. Use the mini-program from the links to scan i2c addresses and change it to the one you need if it does not work right away. Disconnect other devices before scanning, otherwise you may get a lot of garbage.
Yes, Wemos D1 is Arduino compatible, and you just need to add an appropriate board to the Arduino IDE. We connect with a standard short cable via micro USB and upload the firmware. If you did everything correctly, the device will first try to connect to Wi-Fi (the network and password are taken from the settings file), then it will take some time to “warm up” the sensors, and finally show the data on the display. If data cannot be sent over the network, it will report this. If the CO2 level is acceptable, then after loading the backlight will turn off, and turn on only if it is time for you to open the window.
It looks like this to me (cautiously, traffic):
Unassembled
Assembled, with the backlight turned off
It's time to air out!
Now about working with the network. Without further ado, I collect the data in JSON and send it to the server with the usual POST request, where a simple PHP script puts it in the MySQL database. Then you can see how your living conditions changed throughout the day using PHP and Google Charts - the entire server part is also in the links.
As a result, at a ridiculous price, with zero knowledge in electrical engineering and with minimal time, we can get about such nice graphics:
Caution traffic
I will not say that it directly breaks the veil from the simple truth, that “fewer people - more oxygen”, and that it is necessary to ventilate from time to time, and they talked about it many times - including the damage to plastic windows. But this example makes it clear how simple, fast, reliable and beautiful you can make almost any sensor that supplies data for some more complex system.
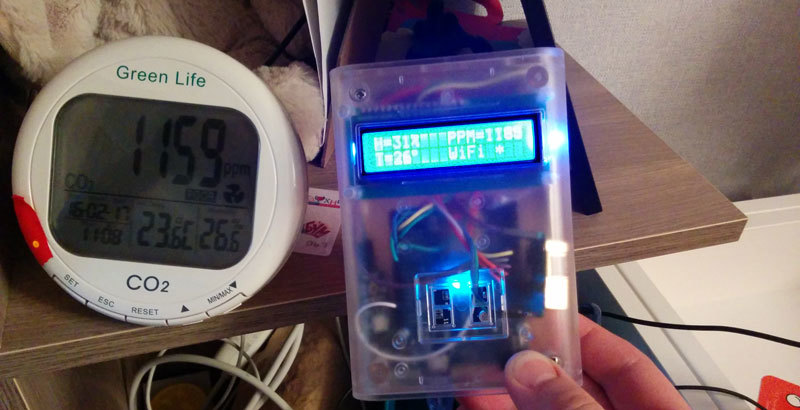
Yes, I compared the readings with the Chinese Green Life sensor like this — the readings are almost identical, only mine responds a bit faster to the changing situation:
Of course, much could be done better. Offhand, I see the following disadvantages:
And then I want to take a break from everyday work and play laser tag with friends. One problem - the game costs from 500 rubles per hour per person. This is in the absence of consumables. And to buy a kit for the game will be worth some very transcendental money - from about 8,000. So, in order to play laser tag, you must first collect it. I plan to do something like Skirmos - where some money will be worth only the barrel itself, which should be pretty durable. Interesting? Follow the publication! What are you doing on the Arduino?
If you are wondering why measure CO2 at all, then you can find useful links at the end of the post.
So, our goal is to make a temperature, humidity and CO2 sensor with data displayed on the display and sent to a web server. What we need for this:
Components
1. Arduino. I took the Wemos D1, Arduino compatible board based on the ESP-8266EX microcontroller. Wemos is compatible with the Arduino IDE, it has its own Wi-Fi, and it costs $ 6.3.
')
what it looks like
2. CO2 sensor. Earlier, I tried the usual MQ-135, but even after burning, calibrating and taking into account corrections for temperature and humidity, the errors were quite noticeable - about 300 ppm. So to guarantee accurate measurements, I took the MH-Z19 - the most expensive component of the circuit, $ 27.
what it looks like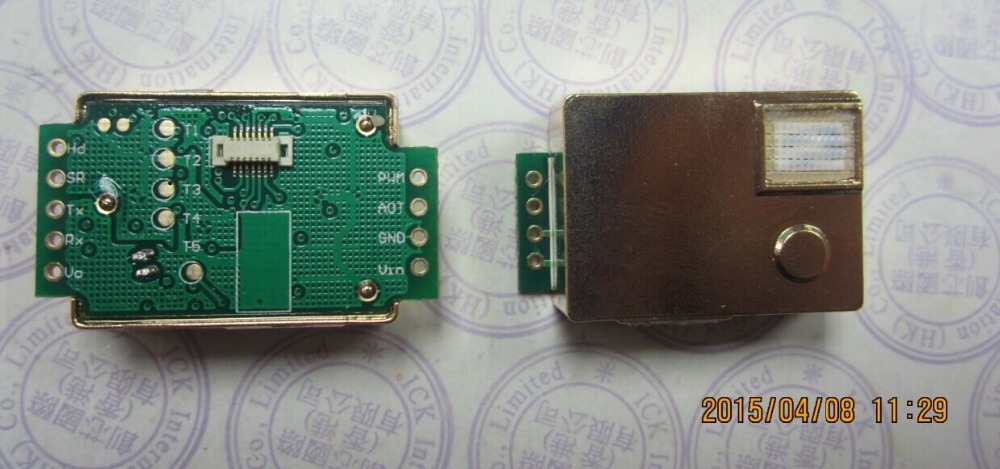
3. Temperature and humidity sensor. Used the standard and favorite of all DHT11 for $ 1.44. In the comments suggest that it is better to take the DHT22, but for the scheme and cost it does not matter:
what it looks like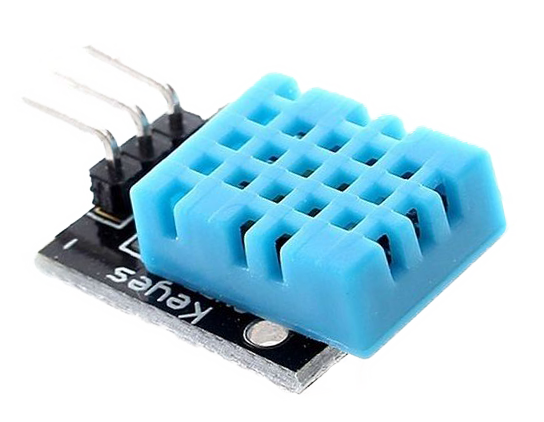
4. I2C compatible display. I took the cheapest hd44780 for $ 3.06.
what it looks like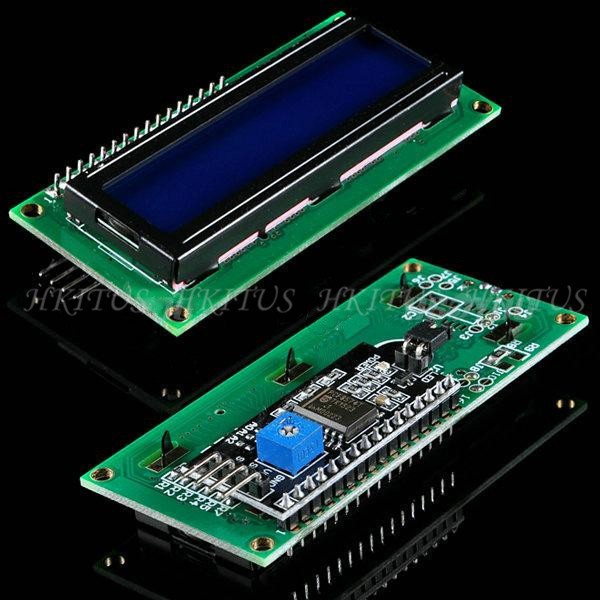
5. To make it look not so terrible, and to be moved, it is just as good to have a body. In order not to bother with sawing, I took the case for $ 8 with holes and fasteners for usb and display. Attention - there must be holes in the case for airing, otherwise it will measure only its own special atmosphere.
what it looks like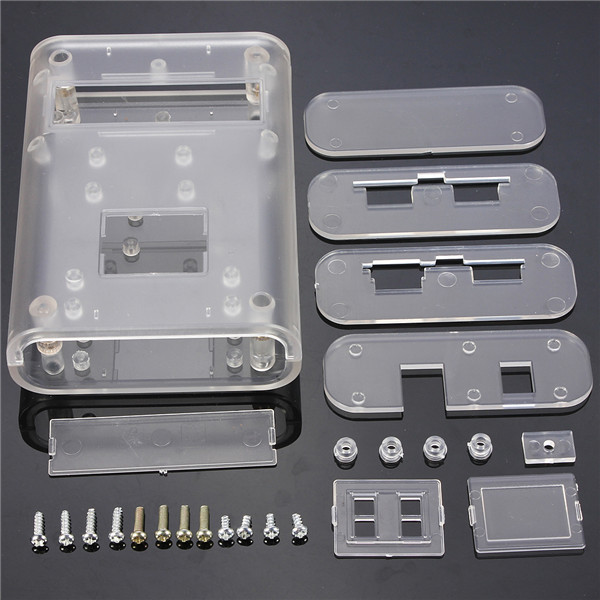
6. Debug USB cable and about 10 wires. The price will not take into account.
The total cost is $ 44, if you take on aliexpress. Similar devices without the ability to transfer something to the network now stand with the Chinese in the region of $ 100. An analogue from Tion, which in quantity make their posts on hyktimes with advertising of breathers, while in development (I have no relation to them, which is a pity).
Ordered, waited a month - proceed to the assembly! There is nothing easier.
Assembly
1. Connect the temperature and humidity sensor. Land to earth, dust to dust, plus five volts per arduino, digital output to digital output (I used D5).
2. Connect the CO2 sensor. It has a rich choice of interfaces - PWM, analog and digital output. The only element of soldering is to attach the legs to the required outlets. Checked personally - all work. I stopped on receiving digital data - precisely, beautifully, concisely, and it is also possible to send commands for calibration, which I, however, did not need. Again - ground to ground, plus the other five volts, TX and RX outputs to digital pins - in my case, to D6 and D7.
3. Connect the display. And again - the ground to ground, plus the last remaining output of five volts, SDA on the display to SDA on arduino, SCL also to SCL.
And ... Everything! You can twist the resulting good into the body, if you certainly did not manage to make any mistake when connecting. Please note that the CO2 sensor does not have air intakes (or, as it is more correct to call it, white such things). As a bonus, deviations in measurement are significantly reduced when assembling in a case.
Firmware
Great, we just have to write software. In the links below there is a repository on the githaba, which you can simply upload and use. The only subtle point is that your display may have a different address. Use the mini-program from the links to scan i2c addresses and change it to the one you need if it does not work right away. Disconnect other devices before scanning, otherwise you may get a lot of garbage.
Yes, Wemos D1 is Arduino compatible, and you just need to add an appropriate board to the Arduino IDE. We connect with a standard short cable via micro USB and upload the firmware. If you did everything correctly, the device will first try to connect to Wi-Fi (the network and password are taken from the settings file), then it will take some time to “warm up” the sensors, and finally show the data on the display. If data cannot be sent over the network, it will report this. If the CO2 level is acceptable, then after loading the backlight will turn off, and turn on only if it is time for you to open the window.
Result
It looks like this to me (cautiously, traffic):
Unassembled
Assembled, with the backlight turned off
It's time to air out!
But what about the network?
Now about working with the network. Without further ado, I collect the data in JSON and send it to the server with the usual POST request, where a simple PHP script puts it in the MySQL database. Then you can see how your living conditions changed throughout the day using PHP and Google Charts - the entire server part is also in the links.
As a result, at a ridiculous price, with zero knowledge in electrical engineering and with minimal time, we can get about such nice graphics:
Caution traffic
I will not say that it directly breaks the veil from the simple truth, that “fewer people - more oxygen”, and that it is necessary to ventilate from time to time, and they talked about it many times - including the damage to plastic windows. But this example makes it clear how simple, fast, reliable and beautiful you can make almost any sensor that supplies data for some more complex system.
Yes, I compared the readings with the Chinese Green Life sensor like this — the readings are almost identical, only mine responds a bit faster to the changing situation:
what it looks like
In the picture the contrast of the display is raised - everything is seen perfectly on it, but the phone has twisted from its light:
findings
Of course, much could be done better. Offhand, I see the following disadvantages:
- Display off has a very low contrast. It is better to take another, go broke another 10 cents.
- When the backlight is on, the screen flickers a bit. Not critical, but apparently he doesn’t like it, that three five-volt devices are powered from the arduin at once. It would probably be right to make a separate meal.
- Of course, all this can be beautifully soldered, and not just leave the box, something like connecting.
- The temperature and humidity sensor sometimes returns huge left values. I just cut them off, but generally unpleasant. Perhaps, the general washing or poor-quality connection affects.
- Of course, it would be possible to accumulate statistics and periodically send it (and accumulate in case of errors) - nobody needs to know their air quality to within 5 seconds.
- In order not to drive in the data of the Wi-Fi point during compilation, it would be possible to ensure that if the connection fails, the device would switch to the Wi-Fi mode of the point (yes, Wemos can do it), by hooking to which you can reconfigure it - including entering a new network name and password.
- Wemos D1 is good for everyone, but sometimes it takes off for me (every 2-3 days) for unknown reasons, and it only reboots after a few hours. It seems like not my software curve, just the board is not very stable. You can deal with this by connecting the device to some arduino nano, which restarts it if necessary, or simply put a piece of hardware with a timer, which will restart the device once every half hour (since it has a RESET input).
- When pulling out and returning power, the CO2 sensor goes crazy, which is treated by a reboot. I decided this in a simple way - with the accumulation of a certain number of continuous errors, the device restarts itself, after which everything returns to normal. Probably one could solve this in a more correct way at the iron level.
- Temperature is measured with an accuracy of two degrees, humidity - with an accuracy of ten percent. For domestic purposes it is enough, but for some other use you will need a sensor more precisely.
- If you need to send one small data packet, then the library for working with JSON is killing the sparrows from a cannon. It is much easier to collect JSON handles, or even transfer parameters using GET / POST, which I did at the beginning. But with a huge amount of RAM on Wemos - why not, so beautiful. But when porting code to a low-power arduin, you will most likely have to rewrite it.
- In the current implementation there is no backlight brightness control - it can only be turned on and off. You can remove the jumper and put resistance instead or enter it on arduino - then you can control the brightness of the backlight.
- You can also manage or retrieve information using the application. The easiest way, no matter how funny - add bot telegrams - there is already a library for arduino communication via telegrams.
What's next
And then I want to take a break from everyday work and play laser tag with friends. One problem - the game costs from 500 rubles per hour per person. This is in the absence of consumables. And to buy a kit for the game will be worth some very transcendental money - from about 8,000. So, in order to play laser tag, you must first collect it. I plan to do something like Skirmos - where some money will be worth only the barrel itself, which should be pretty durable. Interesting? Follow the publication! What are you doing on the Arduino?
Links
Main
- Code for Arduino
- Server part
- Look at the air in my office here.
- Take me to work (yes, I'm looking for her) here
Useful
- If you know nothing about CO2 - geektimes.ru/company/tion/blog/269134
- About wemos d1
- Sensor Specs MH-Z19
- Good article , about the same thing, but without a network, with a display from the phone, with work on PWM and on Arduino nano
- Scanning devices on i2c
- Future analog sensor from Tion (not related to it)
- ESP8266 Iron Restart Solution
- Another good article about ESP, Lua and CO2
- And here the MAMI students are engaged in all good electronica. By the way, they need teachers. Soon I will be there to lecture.
Used libraries
Source: https://habr.com/ru/post/390327/
All Articles